
As any 5th Gen 4Runner owner knows, it lags behind the times with interior features, technology, and creature comforts. This is my second 10’+ 4Runner, and it’s always fun to get a new project off the ground, especially with this platform in particular. However, every time I jump into one, I’m immediately reminded of the 4Runner’s age.
I purchased a 2021 RAV4 Hybrid a couple of years ago to serve as our daily driver. While an equally popular seller as the 4Runner, the interior features are light-years ahead.
Toyota has made some minor improvements over the years in terms of interior technology. It wasn’t until 2020 that Android Auto and Apple CarPlay became standard in the 5th Gen.
Compared to the factory Entune infotainment system, it breathed new life into the antiquated interface and was more in line with what you’d expect for such an expensive SUV. In fact, we’ve even posted 11 Must-Have Interior, Performance, and Tech Features for the 6th Gen 4Runner. Hopefully, Toyota read that one!

Despite Toyota now including Apple CarPlay and Android Auto standard in all newer model years, the screen size is still fairly underwhelming. In the automotive industry, we’re seeing manufacturers move away from physical buttons in favor of touchscreen and verbal command options.
Love them or hate them, even the newer 4Runner center dash displays are still surrounded by buttons and large knobs. If these were removed, it could make room for a larger center display. Here’s to hoping Toyota’s highly anticipated 6th Gen redesign takes cues from its competitors.
So, what options are there if you have a 5th Gen 4Runner and want to upgrade your center dash? We’ve covered the T8, T9, and T10 head units, but I was surprised not to find any information on the Dasaita Vivid11 head unit, specifically designed for the 5th Gen.
Compared to other models on the market, it features an OEM look with its display built into a replicated dash surround. It also features modern technology, including wireless Apple CarPlay and Android Auto.
I was intrigued, looking to make an upgrade, and after watching a few YouTube videos on the product, decided to take the plunge.
Find Android Head Units Online:
- Dasaita Vivid11 Toyota 4Runner Car Stereo: Check Price
- CarTrimHome T10V3 Knobless 12.3″ Head Unit (larger unit without knobs): Check Price
Table Of Contents
Key Features

Plug-and-Play Harnesses
I’ve had plenty of cars over the years, and with most of them, I’ve upgraded the head units. Between adding a CD player to my 1992 Chevy Lumina and even trying out this new feature (at the time) called Bluetooth, I’m no stranger to ripping apart the dash and building out a wire harness.
Most aftermarket head units are single- or double-din and can fit most makes and models. Therefore, I believe that if a head unit is designed for a specific make and model, the manufacturer should make it plug-and-play compatible.
That’s what Dasaita has done with the Vivid11 head unit. It comes with all plug-and-play harnesses that connect the back of the head unit to the factory 4Runner harnesses. It also includes a module that retains your factory steering wheel controls—no need for wire shrink, butt connectors, color-matching wires, or soldering connections. As you’ll see below, the installation felt almost too easy.
Wireless Apple CarPlay
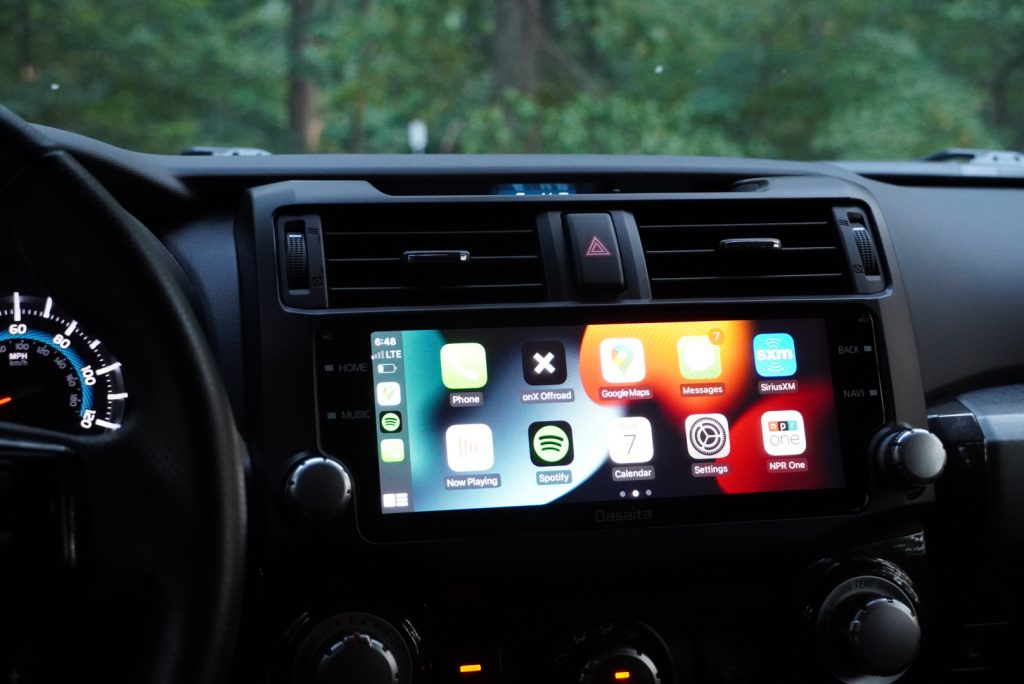
Another huge draw for me was having Apple CarPlay. You’re either an Apple or an Android person, and both have their pros and cons. For me, the Apple CarPlay user interface is clean, almost identical to the phone layout, and dummy-proof. I enjoy having everything integrated into one platform.
Staring into your lap at your phone going 70mph down the highway is obviously unsafe. Having my phone integrated into the head unit makes things much safer. To boot, the head unit comes standard with wireless Apple CarPlay and Android Auto functionality.
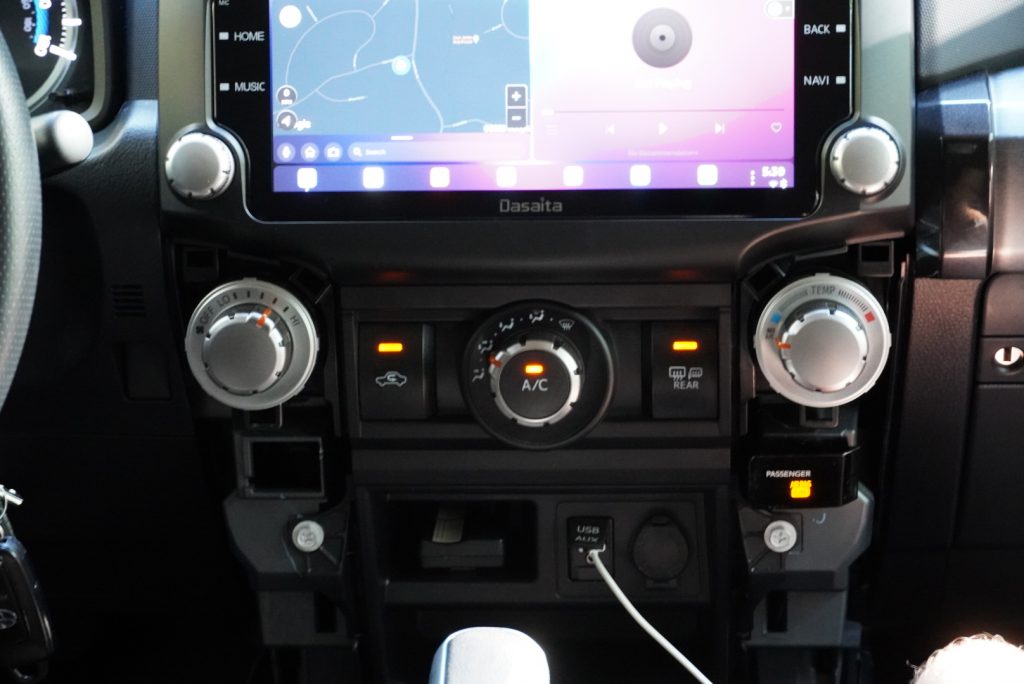
Large Display
The Dasaita Vivid11 head unit display measures 10.25″ diagonally, which is significantly larger than the 6.1″ OEM screen size in my 2019 TRD OR. Not only is the screen larger, but it’s also much clearer. Maps are bigger, and you have more landscape with the CarPlay split-screen mode (three widgets showing GPS of choice and recently used apps).
OEM Look
The dash surround included with the Dasaita Vivid11 head unit is similar in look and feel to the OEM one. Some options on the market offer larger, generic displays akin to tablets, such as the Alpine Halo9. However, they don’t integrate well into the interior, and some can even block factory controls, switches, and air vents.
The Vivid11 comes with seamlessly integrated touchscreen buttons and illuminates with the 14+ interior blue lighting by default. That color can be adjusted to whatever you want. You can even match it to the orange interior lighting on models 10-13.
Installation
From start to finish, you can expect the installation to take 1-2 hours to complete, including the installation of the head unit and its power-up. When it comes to customizing the interface, that can take hours, if not weeks! Since the head unit is built on the Android platform, you can download a plethora of apps outside of Apple CarPlay to make the experience that much better.
Tools Needed:
- Plastic pry tool
- 10mm socket and wrench (w/ socket extension)
- 8mm socket and wrench (w/ socket extension)
- Standard size Phillips head screwdriver
- Smaller size Phillips head screwdriver (something like you’d use to repair glasses)
- Smaller size flathead screwdriver
- Towel or blanket to lay both head units on
Step 1. Disassemble OEM Dash Elements
If you’ve never removed parts from your interior or dash before, you’ll be surprised by how much plastic can be removed just by giving it a good tug.
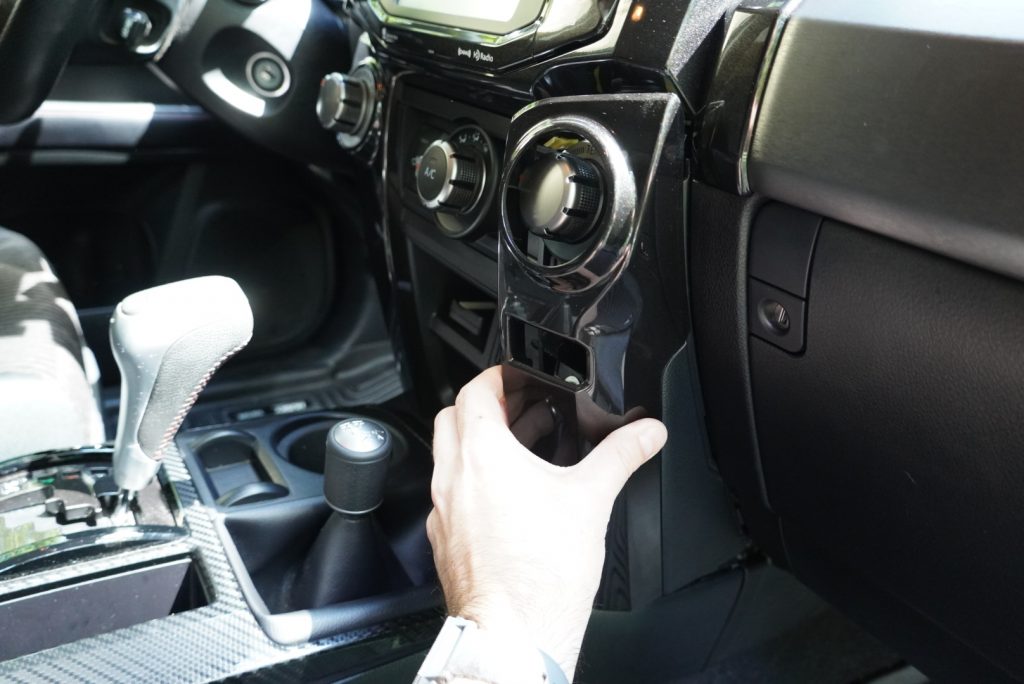
Start by removing the plastic surrounds the climate control knobs, pulling from the inside out. An optional step here is to remove the center console plastic surround. However, I always found this to be an unnecessary step.
Slowly pull the climate control knob surrounds from the inside out, with your hand on the bottom, to avoid scratching any pieces during this step. Set both pieces aside.

Next, remove the climate control knobs by pulling the unit gently. I held down both of the outer knobs and pressed down; you’ll hear and feel the module unclip itself.
As you pull out the climate control module, unplug the harness from the rear and depress the clip that holds the wiring in place. Set this piece aside where it won’t be in the way of your installation.

Using your 10mm socket and wrench, remove the four mounting bolts holding the head unit in place. Set all bolts aside, as these will be reused when replacing the head unit.
Step 2. Remove Factory Head Unit

With the plastic dash elements and mounting bolts removed, it’s time to remove the factory head unit.
As described above, gently tug the head unit from the underside while keeping one hand on top. It should now be free from the plastic clips that were keeping it in place.

Gently lay the head unit down on one hand and begin unplugging all wiring harnesses connected to the back of it.
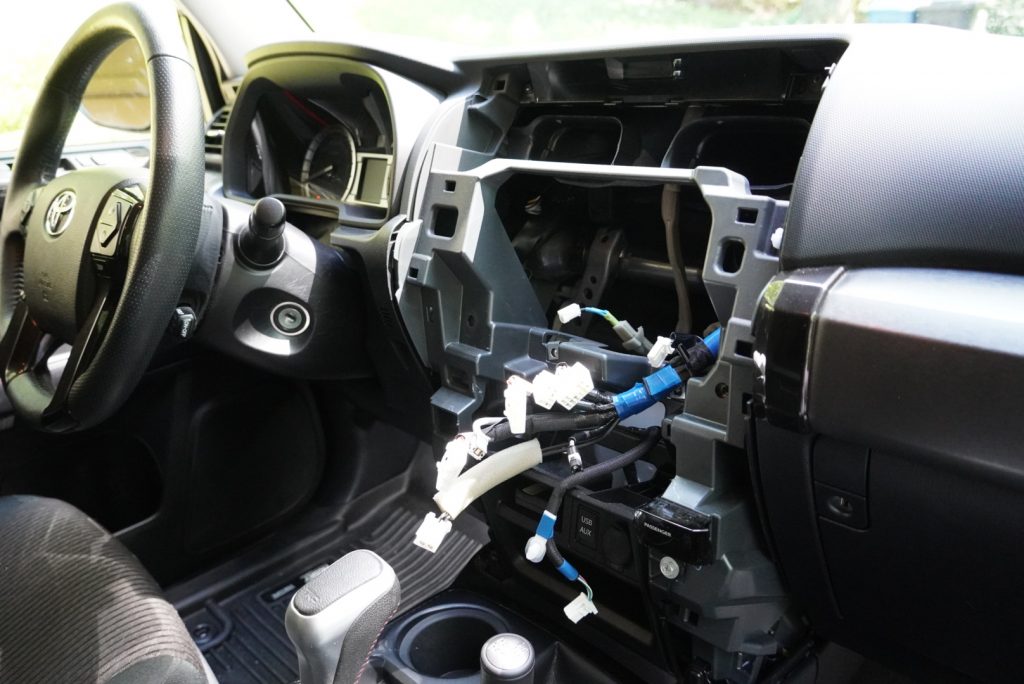
With the wire harnesses unplugged, you can bring the head unit inside to start preparing the Dasaita head unit.
Step 3. Remove Factory Head Unit Elements

Before installing your new Dasaita head unit back into the 4Runner, you’ll need to swap out some parts from the factory one. Start by removing the steel brackets on each side of the head unit.

Using your 8mm socket and wrench, remove the four bolts that secure the bracket to the right side of the head unit. Set them aside, as you’ll need some (but not all) for the Dasaita head unit.

On the left side of the head unit, remove the four bracket bolts as well. You may need to move around the hazard light wiring. Using a socket extension or just a long sleeve helps.

As you remove the left-side bracket, disconnect the hazard light harness from both the back of the head unit and the mounting bracket. Slide your smaller flathead screwdriver beneath the clip, and it should pop off. Pinch the plastic clip holding the wiring into place, and the wiring harness should free itself from the bracket. Set this aside as it will be reused on the new head unit.
At this point, the lower element of your factory head unit can be removed and will not be used on the new one. If you left the harness on, as I did, set it aside, as it will be reused.

Now, remove the four yellowish clips on the back of the factory head unit and transfer them to the new one. To avoid breaking the clip, I found it best to start one side with my plastic pry tool, hold my finger underneath, and then move the other side. They should pop right out (and maybe fly across the room).

Next, remove the top flat plastic plate from the factory head unit using a Philips-head screwdriver. Again, this will be reused, but set it aside for now.

Remove the two black brackets that house the white clips using your Philips-head screwdriver. Set them aside with the four screws, as these will be reused on the Dasaita head unit, but not yet.

Now, pop out the hazard light from the back of the head unit and move it towards the front. Set this aside as it will be reused.

Now it’s time to remove the factory AC/heating vents. This can be tricky at first, but not impossible. First, use your smaller Philips-head screwdriver to remove the two screws that hold the vent open/close frame in place.
Next, remove the vents. Essentially, there are four clips on each side of each vent. Be patient and avoid pulling too hard. Using your smaller flat head screwdriver, simultaneously loosen and gently pull each corner of the vent. As you repeat this process on each side, the vent will eventually become loose.
On the upper side, you’ll notice a larger retaining clip that also needs to be pressed open; I found the plastic pry tool to work better here. Remove both vents and put them aside.
Step 4. Swap Factory Pieces To the Dasaita Unit

Now that you’ve stripped down all the essential elements from your factory head unit, it’s time to start reassembling the remaining components on the Dasaita. I decided to leave the protective film on the front screen until it was installed back in the 4Runner.
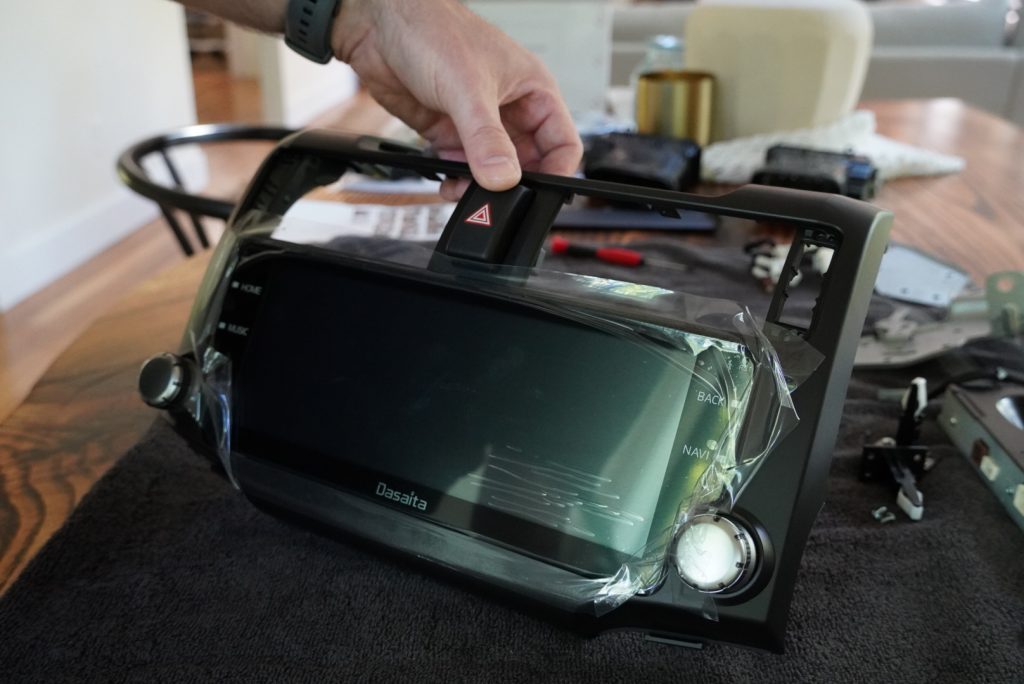
Snap the factory hazard button into place from the front side of the head unit. It should just click into place.

Snap the appropriate AC/heating vent into place. You’ll know immediately if you’re putting the wrong vent into the wrong spot, so don’t force it!

Place the appropriate vent open/close frame back on the front and screw the plate in. These tiny screws can be a pain to keep on your smaller Philips head screwdriver; I used the tiniest amount of grease on the end to keep the screw on the driver after the screw fell off ten or so times!
With the vents now in place, install the two black brackets that hold the white clips back into position (not pictured).

Now, mount the head unit brackets you removed from the factory unit on the Dasaita unit. While you saved all eight bolts from the factory head unit, you’ll only need to use two on each side of the Dasaita unit.

What threw me off was that the bracket sits on top of the two screws, which are seated on each side of the head unit. Don’t worry, it will mount up just fine.
Start by mounting the right side of the head unit, reusing the two bolts you set aside with your 8mm socket wrench.
Repeat this process on the left side and add your hazard harness back to the assembly.
Step 5. Wire It Up

As I mentioned above, everything is plug-and-play. To say you need to “wire up your head unit” should be more accurately phrased as “plug everything in.”
I won’t go into painstaking detail here explaining which components need to be placed where, as each harness is unique and has only one designated location. Just don’t force things in, as you can easily bend or break the pins. If it doesn’t fit easily, it’s in the wrong spot.
One thing worth mentioning is that to retain your factory backup camera, you must correctly connect the red, yellow, and white AV cables. All of them are labeled, and it’s pretty straightforward. I only call that out because it was something I forgot to do in my haste to check out the new head unit! Make these connections before you bring the rat’s nest of wires out to the 4Runner.
Additionally, Dasaita includes a harness that can be used to connect any additional sound system upgrades you may have made to your 4Runner, like a subwoofer or even a DVR player.
Step 6. Connect Harnesses & Mount Head Unit

The complex parts are done, and it’s now time to mount your new Dasaita head unit. Having a second set of hands to hold the head unit while you make all the connections will make things much easier.
Make all your connections by again matching port for port. Two smaller factory plugs/harnesses aren’t used if you opt for the standard setup. If you’ve decided to wire in a front-facing camera, you can do so, and Dasaita includes the necessary plugs/harnesses for that.
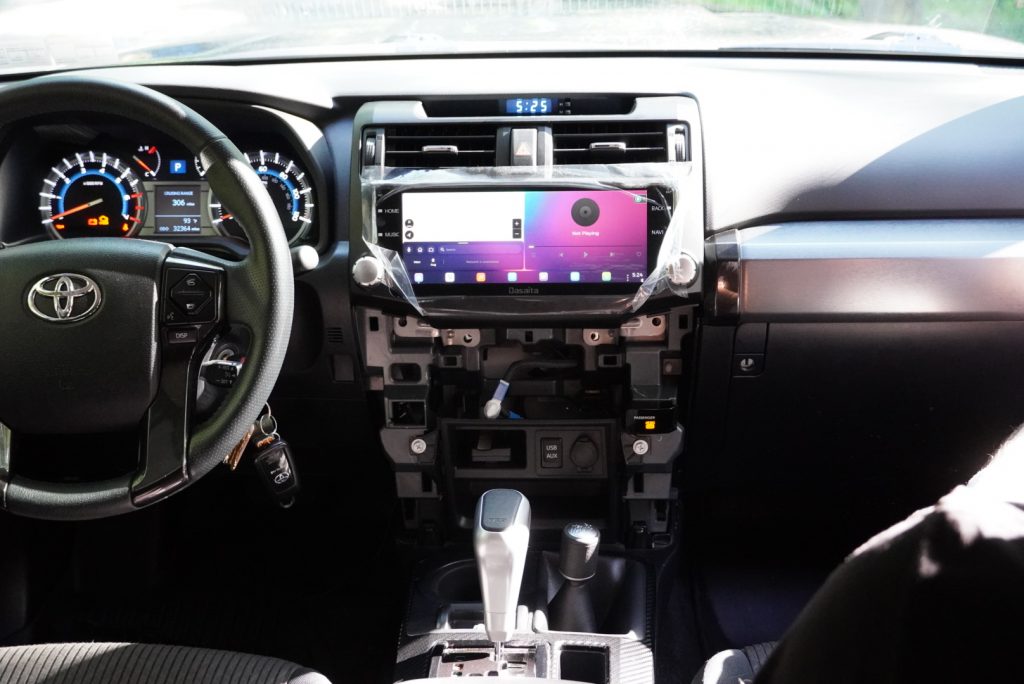
Gently set the head unit in place (or have that second set of hands hold it in place) and turn on the car. You should have power to the unit immediately. I cycled through the radio to ensure I was getting audio, then turned off the vehicle to complete the installation.

Mount the head unit in its final resting spot and bolt in the four mounting bracket bolts using your 10mm socket wrench. The holes may not be perfectly aligned with the bracket holes, but the steel has some flexibility, and everything should mount up just fine.
Reconnect your climate control module to the dash, making the necessary connections.
Snap all the plastic interior panels into place, and that’s it – your new Dasaita head unit installation is now complete!
Initial Impressions

It’s fair to say that the images speak for themselves. The Dasaita Vivid11 head unit represents a tremendous leap forward from the factory one, and so far, it has exceeded my expectations in every way.
Pros
- The display is massive – As I mentioned before, the factory head unit screen pales in comparison to the Dasaita screen. The display is wider and taller, and the resolution is super clean.
- Wireless Apple CarPlay operates flawlessly. The ZLink app is used to establish your initial CarPlay connection to the head unit. The connection is made through WiFi Direct to the head unit. Once you’re connected, you can set the phone to auto-connect each time the car starts up. You can also plug it into the factory USB port for a direct connection. Through ZLink, you can customize the steering wheel controls to perform certain functions, such as switching the previous/following track buttons from up/down to left/right.
- Integrated backup camera – The factory backup camera is connected to the head unit, and you have the option to turn on turn-assist lines. For those with TSS, I believe you still maintain the safety features.
- Steering wheel controls work flawlessly. I had to install an aftermarket unit to maintain the steering wheel controls on my previous 4Runner, and the wiring was a pain. I anticipated that the steering wheel controls would not work as seamlessly here. Much to my surprise, they did.
Cons
- Backup camera resolution is slightly distorted. The resolution is a bit distorted. In fairness, you’re taking an image designed to fit a 6.1″ screen and stretching it out to a 10.25″ one. I’d like to see Dasaita make a software patch that allows users to resize the camera display to its original size. However, the image is definitely still usable.
- Dash surround isn’t a perfect color match – Dasaita offers the dash surround in both silver and matte black. From photos I’ve seen of the silver surround, it looks to be a much closer match than the matte black option. For those with the speckled black glossy interior parts, it’s just not an exact match. I’d consider having the Dasaita surround repainted at a local body shop. From the looks of it, the Dasaita display is not glued in and can be removed for this.
- Control knobs – As I mentioned previously, more manufacturers are moving away from actual knobs and towards 100% touchscreen functionality. I personally don’t mind the control knobs. In fact, they match the OEM control knobs found on the factory head unit and climate controls. This one is just a matter of personal preference.
Final Thoughts
All in all, I’m pretty happy with the Dasaita Vivid11. There are endless possibilities with this head unit that go well beyond the standard Apple CarPlay features. You can hotspot to it and stream Netflix, Hulu, HBO Max, YouTube, etc.
You can even get your Google Mail on the native UI and tons of other apps through the Google Play store – all of which sound incredibly dangerous if you’re using them while driving!
Be safe, keep the car in park, and have fun customizing your new Dasaita Vivid11 head unit.
For anyone looking to order this head unit, the latest 5th gen 4Runner head unit by Dasaita, or anything on their site for that matter, use code RG8 at checkout to receive 8% off.
I am having just the worst time figuring out why my steering wheel controls don’t work after install. Everything else works perfectly, but I can’t get them to respond to any Canbus key I try to use to set them. 2018 TRD Offroad Premium. Any suggestions?
I downloaded the latest version of the VIVID and now my controls work. They did not work prior.
It is nice to upgrade a primitive touch screen, but physical knobs and buttons are not bad!
Just to clarify, the adaptor at Discount Car Stereo allows you to use your factory gps antenna and comes in 4”, 1’, 6’. 4” is a little tight. The factory GPS is mounted right above the middle vents/center clock on a metal plate. The factory GPS antenna is the same part number used on models 2014 – 2023. I have no affiliation to this company. Toyota part number, 8686035090, MSRP is $475.15. Just doesn’t make sense try to find a good location to mount the $15 head unit gps antenna when Toyota engineers already did.
Very nice write up. Check out Enfig, they make a mic that replaces the 5th gen mic in the overhead console. You have to feed the cable down the a-pillar. Discount Car Stereo dot com makes an adaptor so you can use your factory GPS. The 4” is a little tight. I’m getting ready to try the Vivid11.
Dude, just picked one up and stoked to get it installed. Thanks for the recommendation!
Bro… your recommendation worked out great! I referenced you in the post. Thanks for the recommendation!
https://trail4runner.com/2023/05/18/enfig-aftermarket-radio-microphone-for-5th-gen-4runner/
I switched to Dasaita PX6 Vivid11 Android11 on March 10 2022 and switched back to the OEM unit on March 6 2023 for my 4Runner TRD Pro 2017 when the WiFi & BT stopped working (I suppose a hardware failure). It was a year of mixed feeling that kept on the hook, mainly because of the apple CarPlay. I am kind of happy that the Dasaita unit failed and made me to go back to the factory unit! I really missed it. The Dasaita experience is not original and one should do some compromise before pulling the trigger. Here are some:
1-not all the steering wheel buttons work, and the key mapping does not work.
2-volume control is outrageous. the immediate step after 0 can be still loud! the audio output circuitry missing signal attenuation.
3-the equalizer is just not usable.
4-except the CarPlay, the native User Interface (UI) and the apps like Radio is poor. You dont want to look at it, if CarPlay is off.
5-poor Technical Support if anything goes wrong. You should send an email and wait one day for someone in China to reply.
6-poor build quality. My unit did not last even 1 year. Warranty is a joke: When Dasaita realized that the unit has to be replaced under warranty and it is not fixable by software upgrade, they just stopped replying my email.
7-poor microphone quality, I was not able to talk easily, the other party hardly understood.
8-Unltra wide display looks a bit awkward.
9-the backup camera picture (2:3 ratio) stretches too much on the ultrawide Dasaita display.
10-you lose the digital little compass on the dash.
Is the carplay woth it? it is a personal preference. Personally, I do not think so.
@RYAN, nice work. I too am hesitant to bite the bullet to replace the factory unit. I am not a fan of the interface but I grew an affection toward the way it reads text messages and the voice recognition/steering controls. I replaced my factory knobs and plastic trim around the radio and console so replacing the radio also would undue that work for me. So matching knobs and plastic trim would be challenging too. I am very happy this worked out for you. But I will keep my eye out on the future model versions. Thanks.
Thanks bud!
Will Maestro work with these Dasaita head units to bring in OBD data and display on the head unit?
The Dasaita head unit comes with a connection to the ODB data and the steering wheel controls. I’m not sure how precise the MPH is compared to the dash, but it does work. The only thing that won’t display on the Dasaita are the TPMS’s. Dasaita makes their own that connect automatically to the radio.
Hi Ryan, Can you elaborate on this? My unit works well but I can’t get it to read the TPMS. What do I need to buy to make it work?
Will SiriusXM radio still work?
This unit cannot play XM radio. You do not connect the satellite antenna up. There is not satellite radio. Most brand name head units have an external device you can connect to the head unit for satellite radio. The Dasaita 4Runner units do not have this feature. You’ll read you can use an app but then you are not connecting via satellites but thru WiFi or 4G or your phone. Hope this helps.
I run Howard on the Sirius app through CarPlay so I can’t comment on whether the native satellite will work or not.
This vs a T10V3?also website doesn’t list compatibility beyond 2018?
This is not the T10-v3… that review is forthcoming! I have a T10-v3 to install and at first look, the screen is bigger, no knobs, and the dash surround is color-matched to the speckled MGM trim vs. the Dasaitia that’s just matte black.
As for the compatibility beyond 2018, I think that’s just a translation issue. I have a 2019 TRD OR and it worked plug-and-play without any issues. If you have a 2021+ model, I would suggest reaching out to them directly because @Ryan L mentioned the 2021+ models have some functional differences (in general, not specific to the head unit).
Has anyone considered the Alpine ILX-F511? With this Radio, the DASAITA VIVID11 . . How is the GPS working?
That looks similar to the Alpine Halo9 that Frank R. reviewed a few years back. I had the Halo9 and while the interface was nice, you couldn’t adjust the screen brightness which was rough on the eyes night-driving. Additionally, it sat like a tablet on top of the dash and slightly blocked the air vents. Not the end of the world because it was a beautiful screen… but the T8, T9, T10, Dasaitia, etc. models all adapted a large screen into the dash surround.
As for the GPS, I use Google Maps through Apple CarPlay… flawless.
Have you had any issues with radio reception with this new android 11 version? I’ve been holding off on the dasaita since the vivid 11 isn’t available on Amazon, but may go through dasaita site after your write up. How is the brightness at night? Other reviews say the screen doesn’t dim with the headlights turned on and manually dimming the unit doesnt turn the brightness down enough.
I’m not sure I agree with the other reviewers on the brightness. Outside of CarPlay, you adjust the brightness through the typical UI settings and it’s noticeable to me. As I mentioned in another comment, I had the Halo9 in my old 4Runner and it was almost blinding how bright it was. So for me, this works just fine but I’ll update this comment next time I’m driving at night.
Any issues with radio signal? That’s the only thing really keeping me from pulling the trigger on this unit. A lot of reviews on previous versions said the signal is pretty bad. If the vivid11 was available on Amazon I’d have already made the purchase knowing I could easily return it if it had issues.
None as of yet and I live in a very remote area. The only thing that I’ve gotten feedback on was the microphone quality. I just haven’t messed with it yet.
I’ve been watching these style of headunits for a while now and just haven’t pulled the trigger yet but really thinking about with this 11 unit. I read some of the early models had issues with functionality. Sounds like they have this figured out now so might have to give it a try myself.
Yeah man honestly, I’m a fan. I’m always skeptical about aftermarket products that aren’t mainstream like Alpine, Sony, Panasonic, etc. but I’ve been pleasantly surprised with this one. I haven’t experienced any glitches or anything. Occasionally the ZLink app that performs the wireless Apple CarPlay functionality takes an additional 10-20 seconds but most times, it links up shortly after start-up. Give it a shot. What I may do down the road is uninstall the head unit, remove the dash surround from the screen (which seems possible), and have it sprayed at a body shop color-matching the other dash surround pieces. That’s a lot of work to stay committed to a head unit, if that tells you how satisfied I am with it.