
There are a couple of good options for engine bay lighting on the 5th Gen 4Runner. You have the KC Cyclone underhood light kit, the KC Cyclone kit from Aiden James Customs, the Yodateq LED light strip kit, OPT Offroad, and many others. There are tons of universal options as well. The large range of prices, companies, number of lights, and kinds of lights can be overwhelming.
You can’t go wrong with a reputable company such as KC. However, if you are on a budget and need affordable engine bay lighting, I have just the solution. Not only will it help give you peace of mind knowing that you have lighting at all times in your engine bay, but it costs only $20 and some simple electrical knowledge.
Find It Online:
- DIY Weatherproof Under Hood Light Kit: Check Price
Table Of Contents
Why I Chose The DIY Route

I wasn’t looking for something overpowering or insanely bright. I just wanted enough to see what is going on under the hood.
Picking something relatively small that had a decent light spread was a good start. Easy installation was another desire. This light strip features 3M molding tape on the back for easy placement wherever you like. It is also IP67 water-resistant rated. That was a must-have considering it would otherwise be destroyed quickly in most off-roading or wet environments.
I wanted to run the light through a guarded switch under the hood so I could have the option to have the hood open with no light. The wiring for this light is extremely straightforward, so being able to throw a switch in and modify the wiring was awesome. With the light having a draw of about .42 Amps, a small fuse will be a sufficient safety device for this setup.
Coming from Amazon, I always read the reviews, check the ratings, and make sure I see nothing fishy. The light from GraceYou checked out, and I’m sure some others would as well.
Last but not least, it was very cheap compared to other options on the market. For $20, it’s pretty hard to beat. If you want to compare this against out-of-the-box options, check them out:
- KC Cyclone Kit from AJC ($140): Check Price
- OPT Off-Road under-hood light kit ($65): Check Price
- KC Cyclone kit from Amazon ($90): Check Price
Why Engine Bay Lighting Is Useful

I did a cross-country drive over a year ago from Tampa to San Diego. During that trip, I realized if I was stuck on the side of the road or on some off-road trail for any reason at say, 3 am, that would suck. It’s better to need it and have it than to need it and not have it.
If you are doing maintenance in a darker (but safe) location, engine bay lighting can be a helpful tool as well. My past garage lighting situations haven’t been the best, and the hood blocks even more of that limited light. With this light installed, you can take off that sweaty headlamp and set down that flashlight.
If you are running a lot of lights and have a plethora of fuses or relays running under your hood, having a dedicated light source is extremely helpful for simple work, such as replacing a fuse.
The list could go on – anytime you want or need light, it’s yours.
Installation
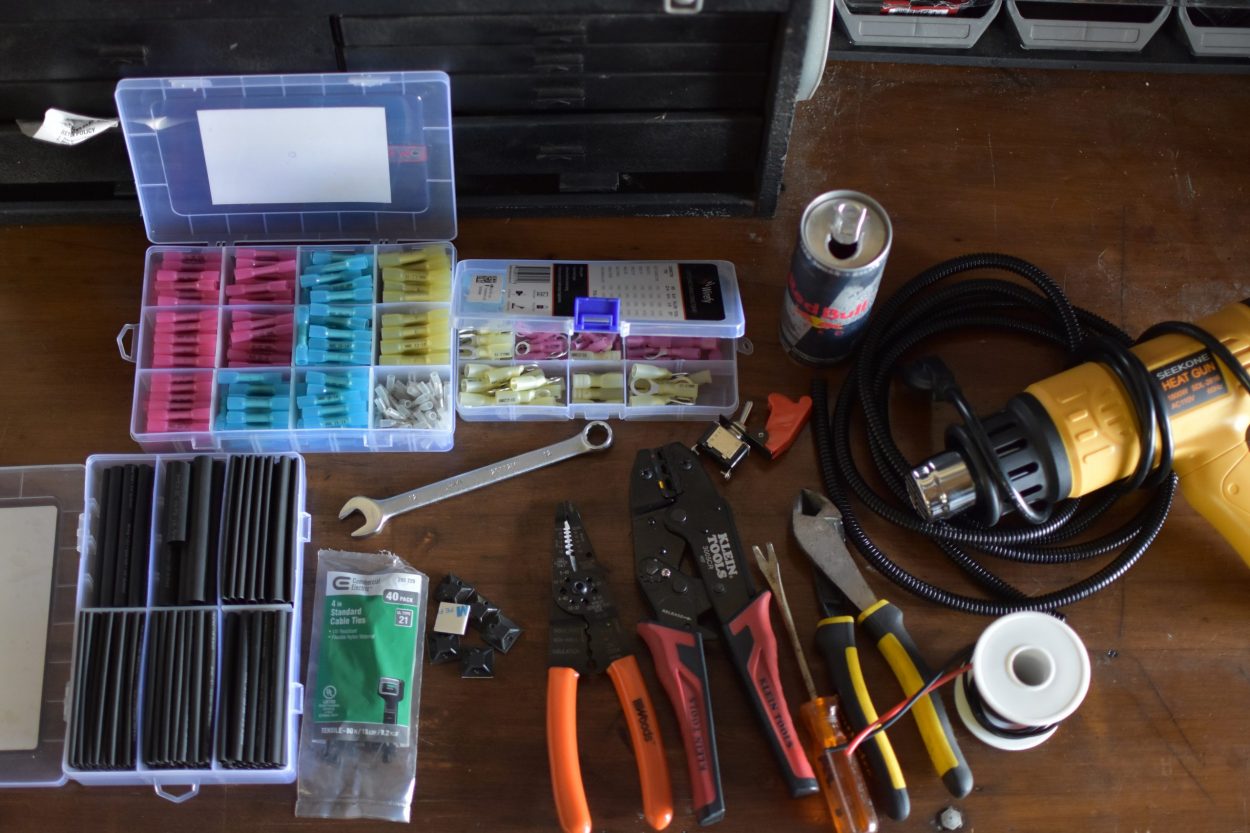
Everything you need to do this install, as I did, is listed below. What is actually required isn’t much, but I needed to extend the wire harness a bit longer. If you are in the market for heat shrink tubing, butt connectors, or termina, grab the links below. You get so much more for your money compared to buying them from Autozone or Home Depot.
Supplies:
- Lighting kit
- Heat shrink terminals
- Heat shrink butt connectors
- Heat shrink tubing
- Zip ties (preferably smaller-sized)
- 20-Gauge spare wire (you don’t need much if you decide to extend the wiring)
Tools:
- Klein crimping pliers (great investment)
- Wire strippers
- Diagonal cutters
- Heat gun
- 12mm combo wrench
- Something to pry or pull out the plastic plugs that retain the hood insulation
I also used a guarded switch I found on Amazon so I could turn the light on when I wanted, rather than have it come on when the hood opens with the pin switch that’s included in the kit. Usually, grabbing switches from stores is really expensive, so I opted to go with Nilight on Amazon.
Extra things to tidy up wiring:
I also made a bracket out of spare aluminum that I had lying around. I got creative and found a location, due to my Overland Equipped mount already being full for my power setup. This part is optional; I just got the urge to make something and found a reasonable location for myself.
If you need to, construct a wiring diagram to make your installation easier. I do this for almost any electrical wiring project that I do. It helps remind me where I need to put what, and stay organized. The last thing you want to do is redo your wiring or chase an electrical issue.
Step 1. Disconnect Battery

Anytime I do anything electrical, I disconnect the battery. This is for the safety of yourself and your awesome rig; it’s also just a good habit.
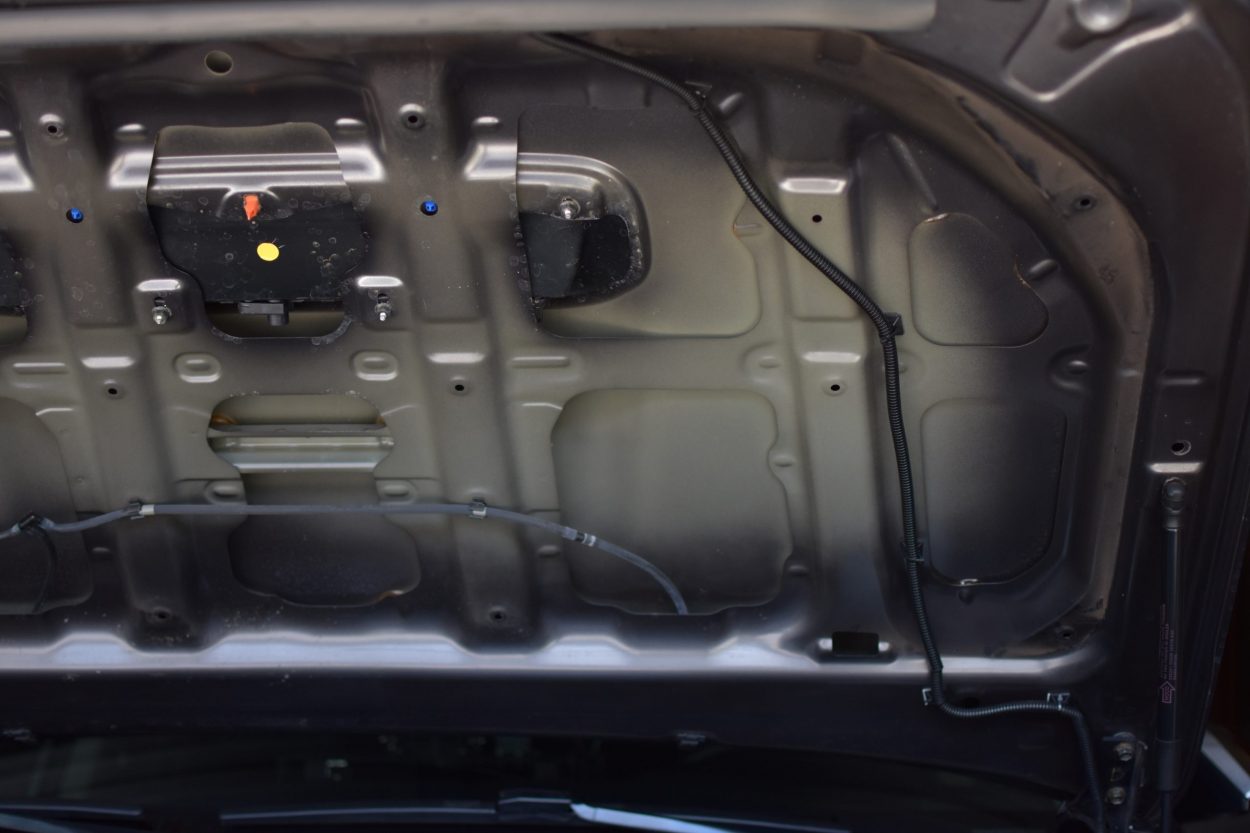
Step 2. Location & Prep

Select the location where you want the lighting to be positioned. I chose to put it in the forward center hood area, where the interior of the hood angles downward toward the engine bay. Prep the surface with a surface cleaner, Isopropyl, or an adhesion promoter.
Go ahead and place the light now. I found it easier to work with the wiring once the light was where I wanted it.
Step 3. Prep The Wire
Determine where you want the wires to run, and know how long you want them to be. Keep in mind where you install your switch as well; this could save you some wire.
I ran the wires behind the hood insulation, down to the hinge, and alongside the engine bay up to the battery area. The wire run provided includes an inline fuse holder and fuse. Remember not to cut out your circuit protection if you decide to extend your wiring.
Step 4. Place Your Switch

Once you have an idea of where all your wires will be organized, find a convenient place to install your switch. For this install, I made a bracket that extended off the forward battery hold-down bolt. This allowed me to tighten the nut back down to the custom aluminum bracket. The switch and wiring were able to clear just enough in that area without making contact with anything else.
I won’t get into custom brackets here or how I crafted it, but I basically found an area where I wanted the switch and designed the piece of aluminum to fit. It’s far from perfect, but it works. You could always use the pin switch included with the kit.
Step 5. Connect The Positive Wire

From your initial wire run from the hood to the engine bay, connect your positive wire to one end of the switch and craft a short wire run from the switch to the positive on your battery terminal. That way, the switch is in line with your positive wire for the light directly from the battery.
Step 6. Connect The Ground Wire
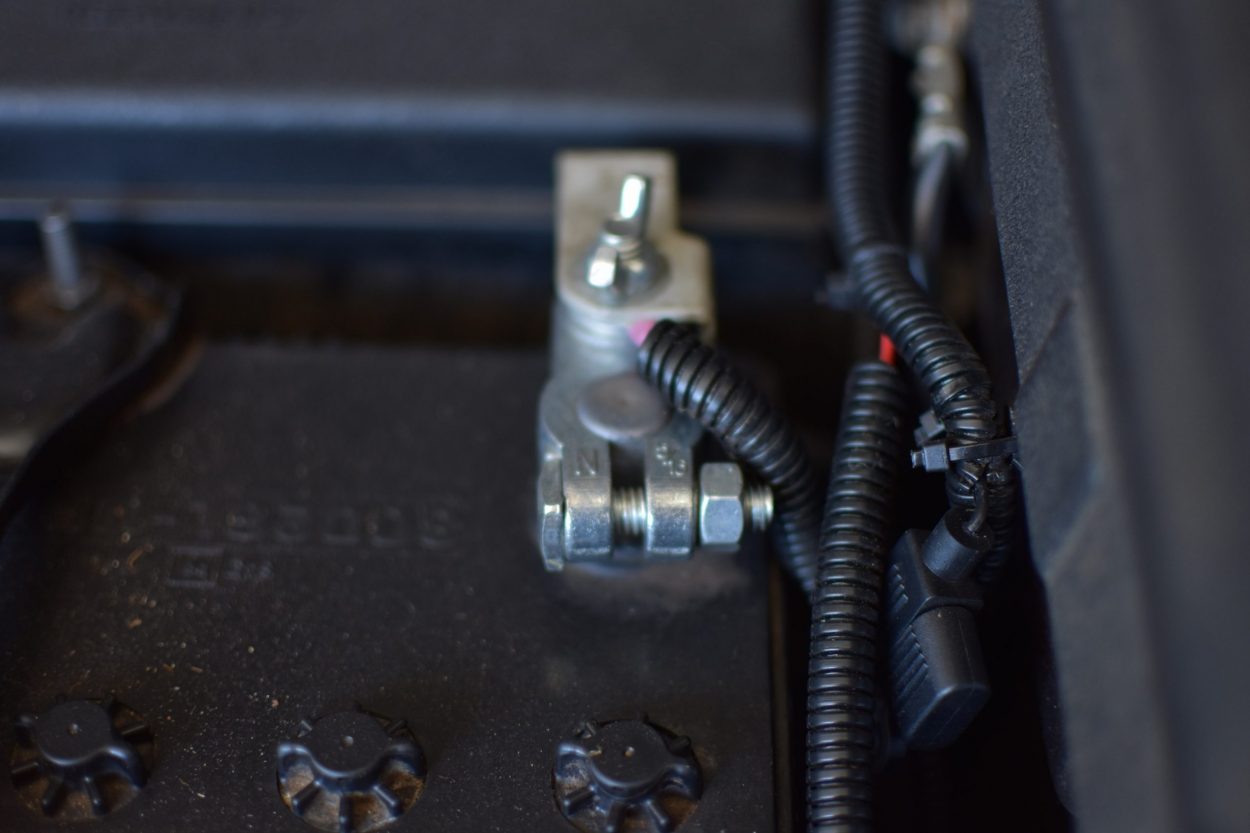
Run your ground to either the negative terminal on your battery or a grounded bolt that connects to the body. I decided to run the wire to the negative terminal for ease of installation.
Step 7. Connect The Battery & Test
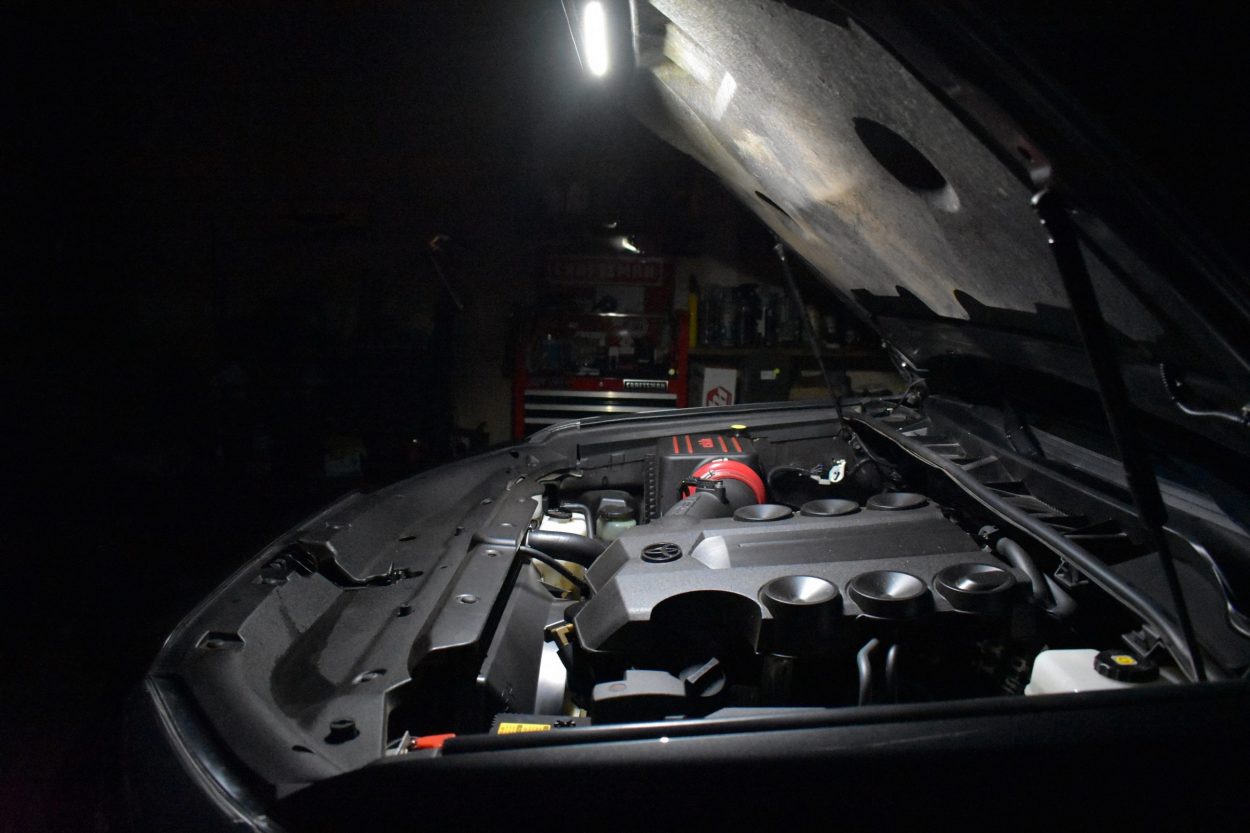
Reconnect the positive and negative terminals on your battery and throw the switch. Hopefully, you see the light!
Final Thoughts

I added my own wire protection and organization, but it’s not required. I do recommend it, as you will probably save yourself time in the long run with potential issues.
Overall, this is a very easy install and helpful for your future endeavors. You could even wire a couple of these lights in parallel and have more light if you wanted. This application doesn’t just end at your engine bay, either, since it’s universal and can be mounted anywhere.
I’ve had it installed for some time now, and used it mainly for maintenance due to my garage lighting situation. It also serves as a little peace of mind if I get stuck anywhere dark. The light is just bright enough and doesn’t produce a glare on objects. Being able to have it on a guarded switch is nice as well, so I have the option to turn it on and off as I please.
For the price, ease of installation, and overall effectiveness of the light strip, it really makes you think about whether you need to spend $140 on engine bay lighting. In my opinion, save that money and put it towards another mod!
The fuse on the negative side of this light is very bad practice, any wiring damage has the entire positive and much of the negative wiring to cause a fault. Would recommend anyone using this kit to modify it to correctly protect the circuit.
Great article Lane! I ordered the Nilight 90012E waterproof toggle switch instead, which comes with a boot that seals the switch from water/dirt/dust. I’m glad to be able to see my engine again and for a bargain!
I’m glad to see that the article was able to help you! Agreed, it’s great addition to have!
Great writeup. Re-reading this post for some inspiration on underhood lights for our 2016 TEP. That switch looks like you’re about to launch some nuclear missiles. I like it.
Much appreciated, glad it helps! It’s satisfying to flip the guard over.
Thanks for a great article. I have the Yodateq underhood light and installed the pin switch in place of one of the plastic push clips near the battery. Took a while to get the height just right so that the light would shut off when the hood was closed, but the lighting is great. If I had seen this option, I probably would have chosen this because it is so cheap, but the Yodateq is an exceptionally well thought out kit, was easy to install, and is very bright.
Thanks! If it works for you then that’s all that matters. Yodateq kit really isn’t that much more in the grand scheme of things, so you couldn’t go wrong. lots of options and lots of prices, it can be hard to make a final decision sometimes, even with the smaller things. I hope this article helps people make the choice that suits their needs.