
Maybe it’s just me, but Toyota seems to have a very odd approach when it comes to features included with certain 4Runner trim levels. My first 5th Gen 4Runner was a 2010 Trail. It came with a number of things that made sense, but still lacked certain features it should have had.
With my 2019 TRD Off-Road, I would have assumed this trim level was a step up, so to speak, and it would include more creature comforts. However, that was not the case, and it even included less! For example, the 2010 model came equipped with the HomeLink garage door opener, power and heated front seats, a cargo sliding tray, and an auto-dimming rearview mirror.
Nine years later, and my more recent build comes with none of that. So, I’ve accepted that I’ll need to make some interior modifications in addition to the exterior build plan. Hey, at least the 2019 and 2010 models both have E-lockers, so I can’t complain.
We all know that the 4Runner is renowned for its reliability, durability, and overall badassness. It’s also known for not having a modern interior and some key creature comforts. I recently upgraded my head unit to a more modern model with a wider screen and wireless Apple CarPlay capability.
What wasn’t on the list was adding a driver-side grab handle, mainly because I didn’t know anyone was making them. But as it goes in this world, you immediately justify the need once you see it.
Find it Online:
- Driver-Side Grab Handle A-Pillar (2014 – 2022) – Check Price
Table Of Contents
Who Is KTJO?

Katie, the owner of KTJO 4×4, and her team are a family-run business that focuses on providing one-of-a-kind custom exterior and interior products for 4Runners, Tundras, and Tacomas. KTJO 4×4 was a company I had heard about on some of the other forums, but not one that popped up regularly on any of my social media feeds.
In fact, KTJO 4×4’s Instagram page has a limited presence. That’s somewhat surprising to me, given that some of the products they offer are quite unique and not available anywhere else. They’re currently working on a HUD (heads-up display) for the 5th Gen 4Runner that integrates into a replacement speaker panel on the dashboard. I’m fairly certain they designed it themselves, as they did with the driver-side A-pillar grab handle.
Installation

Installation of the KTJO 4×4 driver-side grab handle is pretty straightforward. All in all, you’re looking at 10-15 minutes from start to finish with minimal effort and tools required.
Tools Needed:
- 10mm socket wrench
- Philips head screwdrivers
Kit Includes:
- (1) Replacement A-pillar (grey or beige)
- (1) Driver’s side handle (grey or beige)
- (2) Grip handle hole covers (grey or beige)
- (1) Trim removal tool
- (1) Rivet nut gun
- (1) Bag of all the hardware needed for installation
Step 1. Disconnect Negative Battery Terminal

Using your 10mm socket wrench, remove the negative terminal from the battery of your 4Runner. Why? Since you’ll be removing the driver-side A-pillar, every precaution should be taken to prevent inadvertently deploying the A-pillar airbag. Take the time to perform this step!
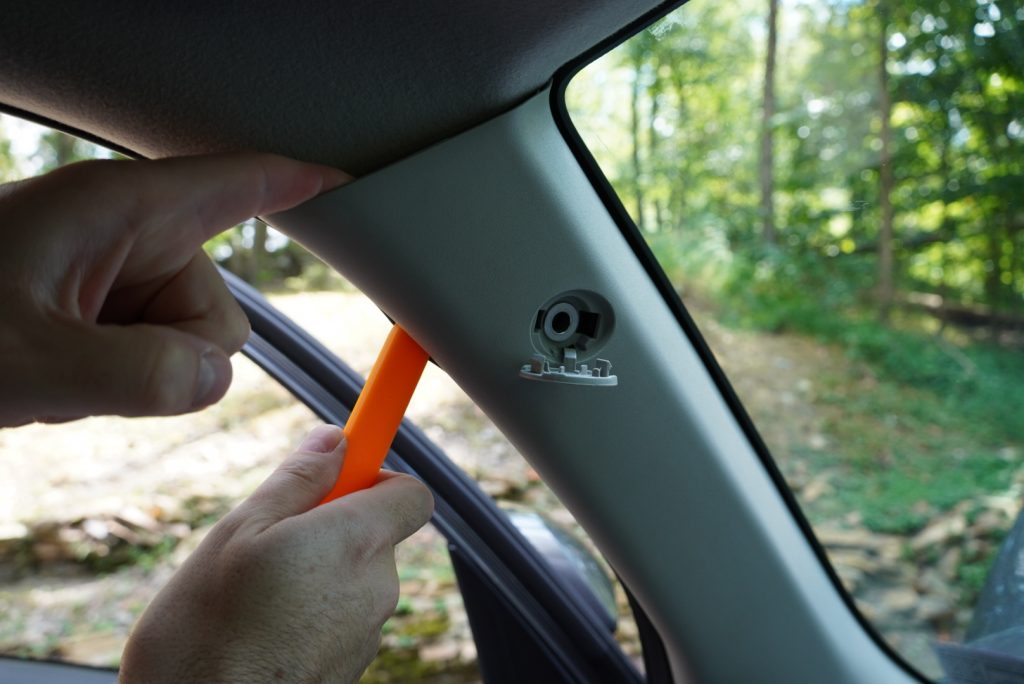
Step 2. Remove SRS Curtain Airbag Cover

KTJO 4×4 includes a plastic trim removal tool with the grab handle kit. Pry the “SRS Curtain Airbag” bolt cover off to expose the bolt underneath.
Step 3. Remove A-Pillar 10mm Bolt

Once the SRS Curtain Airbag bolt cover is removed (and left hanging), remove the bolt underneath using your 10mm socket wrench.
Be careful swinging the socket wrench handle around your windshield; you don’t want this simple modification to include a replacement windshield.
Step 4. Remove OEM A-Pillar
With the 10mm bolt removed, you can now pry off the OEM A-pillar. The pillar has a few clips underneath that hold it in place. Take your time prying behind the panel with your plastic pry tool, pulling it up and away from the windshield.
Step 5. Install Rivet Nut to Accept Bolt

KTJO 4×4 also includes a rivet nut gun specifically for one bolt and one step in the process. I was shocked it was included, but it’s probably one of those tools we’re all less likely to have in the garage. I personally didn’t have one, but I do now!
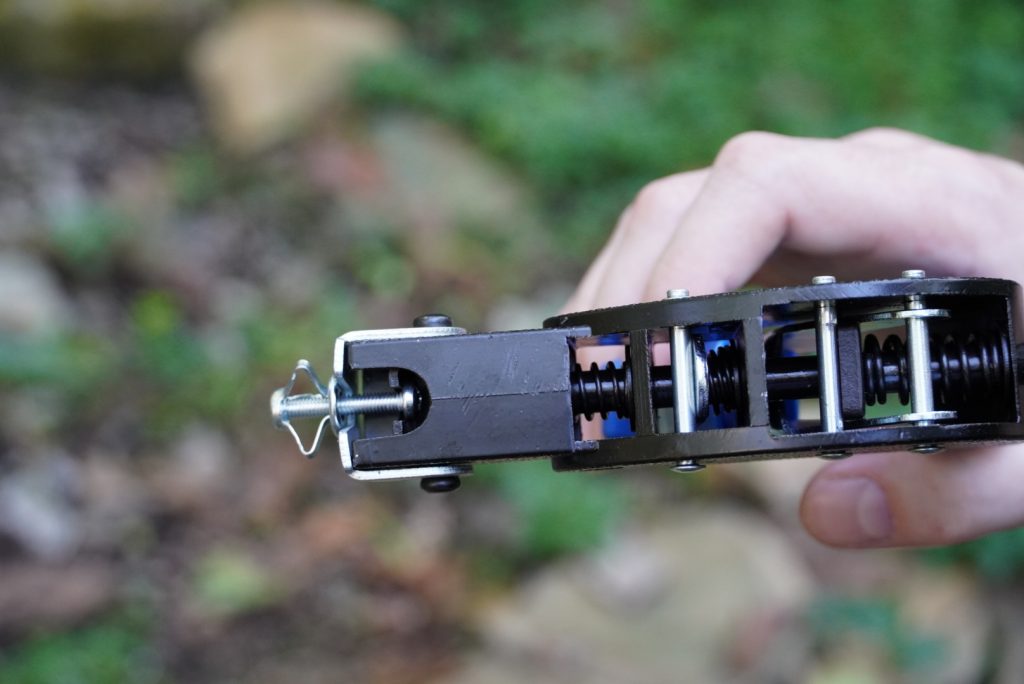
So you understand what this Jack nut does “behind the scenes”, the rivet nut gun pulls on the screw head and “crushes” the sleeve behind the A-pillar so you have a solid mounting point.

As you remove the OEM A-pillar, you’ll notice that there are some unused bolt holes on the frame. Toyota left the uppermost handle mounting point on the truck for stability in the new front pillar.
Unfortunately, there is no nut welded onto the back, unlike on the top mount, so there’s nothing for a new screw/bolt to thread into. This is where the Jack nut needs to be “crushed” into place.

Remove the temporary screw from the Jack nut. With the new Jack nut in place, you now have two mounting points for the new grab handle.
Step 6. Install New A-Pillar

Installing the new A-pillar is fairly straightforward. Just as you removed the OEM pillar, you’ll slide the new one back into place.
Starting from the bottom of the panel, slide it forward as close to the windshield as possible and start working your way up. If you’re forcing the panel onto the clip connection points, you’re doing it wrong. This panel should pop back in just as easily as removing the OEM panel.
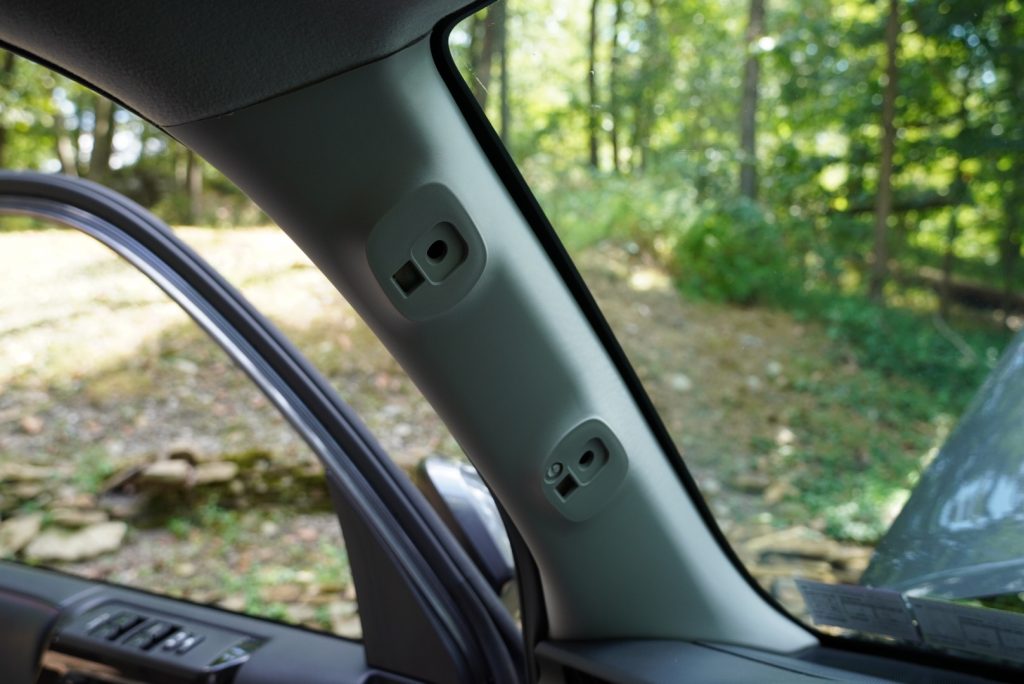
Step 7. Add Grab Handle, Bolt Sleeves & New Hardware

Set the new grab handle in place to prepare for the bolt sleeves included in the pack.

The smaller of the two bolt sleeves will sit in the uppermost spot of the grab handle.

As such, the longer of the two bolt sleeves will sit in the lowermost point of the grab handle.
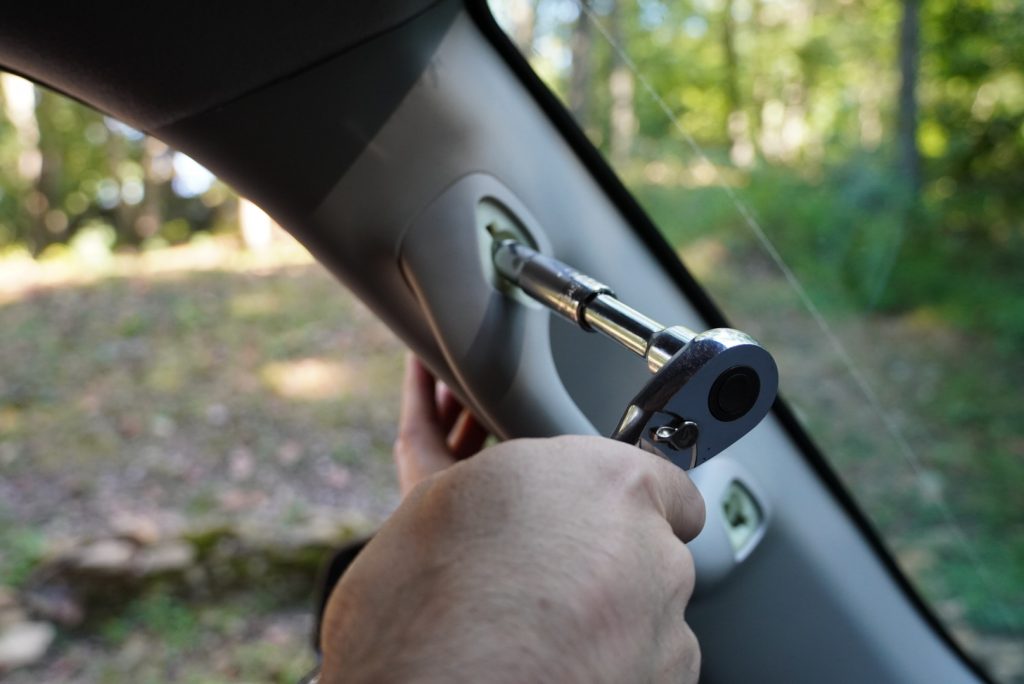
Using the provided hardware, hand thread the 10mm bolt into the uppermost mounting point on the handle and tighten it down with your wrench.

Next, using the longer Philips head screw and screwdriver, tighten the bottom screw into place.
Step 8. Add Handle Covers

Lastly, pop in the corresponding bolt covers, and you’re all done!
Final Thoughts
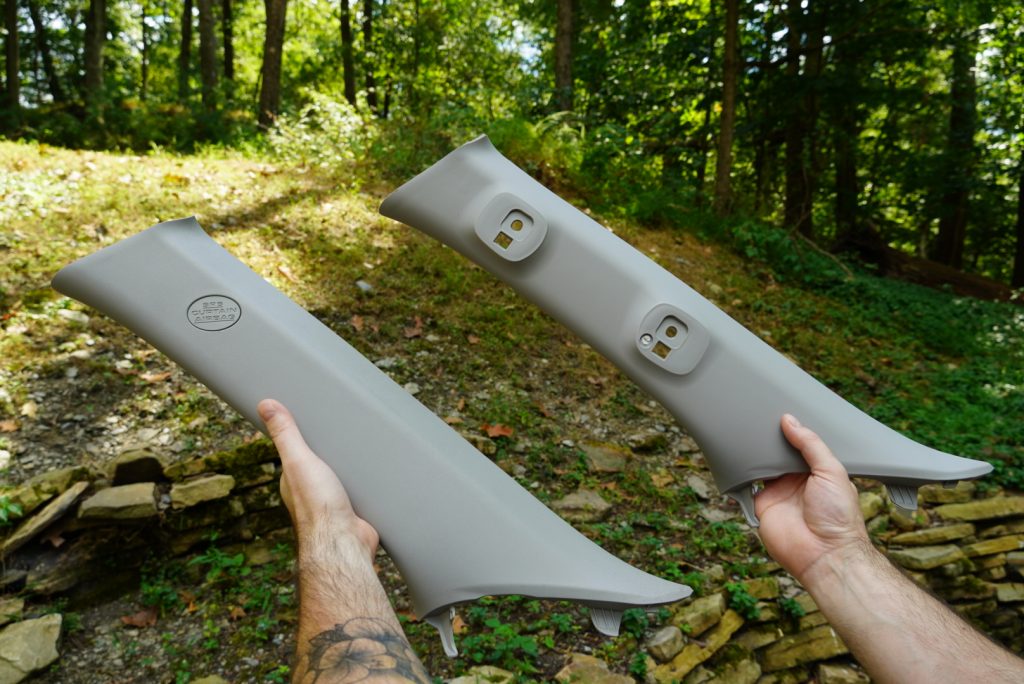
I have to say, I’m pretty impressed with this kit. Between the provided hardware, the provided rivet nut tool, and the 100% color match to the OEM A-pillar (pictured side by side above), this was a nice little upgrade.

Of course, I’ve gone out of my way to intentionally use the grab handle to get in and out of the 4Runner. Since this is my second 5th Gen build, next up on the docket is a 3″ lift all the way around. So, this added grab handle will get much more use!
As an aside, am I alone in thinking that if Toyota offers a grab handle on the passenger side, it should also be on the driver’s side? Is the expectation that drivers have the steering wheel to grab onto whilst hoisting themselves into the truck? Interested in your thoughts in the comments below.
Update – 11/30/2022

As a few of you had commented, some installations of the KTJO4x4 A-pillar panel resulted in a slight bevel on the fascia with a discolored gray line. This was due to a small tab molded into the back of the A-pillar panel they designed.
While they work on a new design, Katie graciously sent me a replacement panel to test out. The KTJO4x4 team shaved down said tab, and it worked like a charm.


As you can see, there is no more gray line, and the fitment was better. My understanding is that KTJO4x4 is updating its design, which may or may not incorporate this tab in the future.
If you’ve purchased a kit from KTJO4x4 and haven’t installed it yet, I highly recommend shaving down the tab, similar to the images above. The handle itself holds the panel in tightly, and the tab is not a push clip; rather, it serves as a guide for proper placement.
Do not buy from this company. I never received the product, they stole my money. They never responded to my multiple emails inquiring about status of order. No phone number to reach them at which is unheard of in a company. This is a scam company!!
I have no issue getting in using the steering wheel, but I seem to have an issue getting out.
This is a very interesting upgrade, I specially searched for this solution because I wish my driver’s side had this. However, the biggest issue I see here is anything going wrong with this rivnut (anything!) and the impossibility of removing it.
Are you (or the company) able to demonstrate a simple way of removing a problematic rivnut?
I need this for rear passenger side would be great where can find it
I’ve got all the mentioned issues:
upper tab caused white mark, bowing when 10mm was tight.less than stellar finish at the base of the handle.over-tightened jack nut didn’t clamp well.lower spacer several mm too long.Fixes:
cut off tabused a file to remove flashingThe jack nut is not like a rivnut where you have to summon the hand strength of Thor to set. With the screw head snug in the setting tool, squeeze all the way through one squeeze of the trigger, release, and finish setting with another ~1/3 of an EASY squeeze. Once you hit resistance, it’s set. Overtightening will easily damage the jacknut.gonna try a hacksaw on this one…
I had one in my 4th Gen and liked it, but I usually used the steering wheel. For me, it was easier. Also, I tend to avoid doing any aftermarket work that interferes with my airbags. Insurance companies look down on that type of thing. So, this aftermarket part is something I would not buy.
I find that using the steering wheel for entry with my 5th Gen is easier and more ergonomic. On the passenger side, it makes sense that a handle is on the pillar there because they don’t have a steering wheel. Just because the passenger side has one doesn’t mean the driver’s side needs one. YMMV.
I like this mod, but I’m curious whether the presence of the handle would in any way impact the function of the air bag? Especially seeing as the handle is right in front of it.
This was my question as well. Great post though OP! This was one of my gripes too with my 2018 4Runner that my 2006 4Runner had.
Does this fits a 2021 4runner ?
Does this fit the 2010-2013 5th gens?
According to their website, the early 5th Gen (2010-2013) does not have a place to mount the rivnut for the lower mounting bolt and it will not work.
Yessir.
I am sure one can drill a hole to accommodate the rivnut.
Hey Ryan, thanks for this Grab Handle write up. I bought one for my Taco from Katie which was great. And now one for my 4Runner but it’s hit some damage. I emailed & Instagram’d KTJO4x4 and hopefully they respond. Also seems the long sleeve is a little too long and I can’t seem to tighten down all the way. Not to mention I’ve stripped the Philips head. (Why a Philips head 🤷🏼♂️)
I had the same issue with the lower sleeve being too long and not able to tighten the handle all the way to the A pillar – I could pull the handle away from the pillar slightly even when tightened. I cut off a few mm from the sleeve and it tightened right up to the A pillar. The cheap Philips head screw is easily stripped/rounded out if not careful.
Great write up – thanks
LOVE THIS ! Was so used to the one in my previous Tacoma. Only issue I had was even though I though I crushed the jack nut sufficiently, it spun while I was trying to tighten the phillips screw. I ended up applying a little back pressure on screw/washer with a small flat tip screwdriver while tightening the phillips screw. It keep the jack nut in place until I was able to fully tighten it. See attached photo.
This was my issue as well. Back pressure did not let me fully tighten the screw down. Had to walk away. Will give it a go again today. Have also contacted KTJO.
Just installed this recently, overall its a decent kit – however the finished product needs some refinement. When I tightened the 10mm bolt on the top hole of the grab handle, it left a stretch mark after I had tightened it just above the top side of the grab handle where the plastic tab that fits into the teal square is behind the A-Pillar, if you zoom in on the install pictures used on this article you’ll see the exact same “mark” that appeared on mine. Also, be very careful not to over tighten the bottom bolt to the rivet nut, it will go tight then loose if your not careful and then you’ll have to extract the rivet nut and replace it. The plastic covers for the grab handles are also very poor fitting, mine were very loose fitting and I had to get creative to get it to clip on tighter to sit flush with the handle. Also, the edges on my grab handle had a lot of imperfections, searching around on some forums I found others who have installed this kit had the same imperfections. Overall, not a bad kit considering there aren’t any more options out there, I don’t mind the imperfections because my 4Runner is my family hauler and the interior plastics get scratched from daily use anyways but if you’re expecting OEM fit and finish you may be a bit disappointed. So far the grab handle is solid so no complaints there just needs some attention to quality control
Hey Simon – I’ll be honest, that’s something I should have called out in my install. Between taking pictures and jotting down notes, I had missed that until recently. As for the QC on your grab handle, reach out to the company. My first handle arrived with some marred edges and they immediately sent out a replacement handle… like it arrived two days later “immediately”.
I’m in Canada so I’m a bit skeptical that they will respond in the same manner as they did for you, I will try anyways though. Honestly the imperfections don’t really bother me, my 4Runner is my daily and has its fair share of scratches and blemishes in the interior from my family/work life, I just thought I’d mention that for the owners that have showroom pristine interiors that would purchase this. Overall its a good product, if they ever revised their design or came out with a new design I would definitely buy it again
I bought the ‘clearance’ version of the grab handle with noted imperfections. I figure the $70US savings (especially being in Canada) would hopefully outweigh the slight imperfections. I cleaned up the imperfections a bit (edge of the grab handle) so they weren’t as noticeable.Also had to shorten the bottom longer sleeve by a few mm in order to tighten the bottom screw so handle fit tight to the A pillar. Overall happy with the product.
I have been looking for a handle since I bought my 2016 and put a lift on it 2 yrs ago! Now I’m adding this to my list of “must buys”. Thanks for the detailed instructions!
Thanks for the info. My 2002 4Runner SR5 came with a driver side grab handle! I thought it odd that my 2016 TEP did not. I would welcome a professional opinion wether or not this interferes in any way with the SRS.
If you build it, people will buy it, I guess. I have never once thought this was an item I needed.
…and now you do. Lol. I didn’t write it in the post, but it does give the front cabin a more aggressive look. Jeep’s have grab handles all over and it gives off a rugged look.
Does this interfere with the side curtain airbag though?
Not that I know of. My understanding is that the ones they make for the 4Runner and Tacoma still allow the SRS airbag to deploy and function like the passenger side. If you look at some of the pictures with the cover removed, the airbag sits on the outside of the grab handle vs behind it.
Thanks for the write up! This is one of those duh upgrades!
FYI I just purchased this upgrade and the tab is still in place. Will be trimming it down per the pics above. Thanks again for the excellent write up!
Right?! And for the price and effort it takes to install… why not?
Can paracord be used as grab handles instead of what comes with product?
I don’t see why not. I think the right side uses two 10mm bolts where this side uses one 10mm bolt and a long philips head screw on the bottom. So you would just use the KTJO hardware is my assumption.
Does the rivnut sit inside that hole before pulling the trigger?alignment pretty easy?
Yessir. Admittedly the KTJO install on the website has a better shot of which hole the rivnut goes into because they did the install on a white 4Runner. But it goes into the hole that would be very obvious when you remove the pillar cover. “Crush” it into place and you’re good to go. Alignment is spot on and the longer of the two sleeves helps seat the screw in.