
Hiding your gear or other 4Runner-kept items can help free up cargo space, reduce clutter, and hopefully keep prying eyes and break-ins to a minimum. In an effort to hide and store my recovery gear, I turned to this site and found a great post on a Simple Sleeping Platform Build.
Now, had I waited a few years, these additional write-ups would have been available for me to consider:
As a car camper, a low-profile cargo build fit both my budget and needs perfectly. I followed the build thread from Sgt Keebler. I could hide my recovery gear, still maintain a practical and uncluttered cargo area, and flatten out the back when the 2nd row seats are folded down for sleeping—checking all the boxes and more.
It took just a quick trip to realize that this setup required me to pull almost everything out of the cargo area when I wanted to access my recovery straps for a friend who got stuck on the way to a campsite. Not ideal. I needed something more accessible, yet still hidden, for my recovery gear. The low-profile drawer thread would have solved this, but I didn’t want to go through a rebuild.
When I was looking to make more sleeping room, I accidentally discovered that the underside of the larger bench seat is hollow. The bottom plastic liner and seat cushion compress a fair amount. Pull the plastic liner off, and there is plenty of empty space to work with. I found my new spot to store (and hide) my recovery gear!
Table Of Contents
Installation Overview
This simple DIY setup will cover the process of removing the bench, figuring out the usable space for storing your gear, and a few extra steps to make sure everything is secured and quiet. I initially thought of creating a clean and custom design MOLLE panel with a company like Send-Cut-Send, but I ultimately decided to keep this inexpensive and more utilitarian in practice.
Note: 4Runners with a 3rd row seat have a different 2nd-row seat configuration. Access to the underside of the seat is not possible since it keeps the bench and seat-back as one unit.
Tools and Supplies
- 14-mm socket
- Phillips head screwdriver
- Flathead screwdriver (or plastic removal pry tool)
- Scissors
- Zip-ties
Find It Online:
- MOLLE panel (18.5″ x 10″)
- Various Length Velcro Straps
- Black Fabric (I selected a canvas material from a local fabric store)
Step 1. Remove the Larger Bench Seat
There are only two (2) bolts holding your bench seat in place. Pull off the two (2) plastic covers with your hands, or use a flathead screwdriver to apply some leverage. They should pop off.
Once removed, there is a single 14-mm bolt in each location. Remove each bolt and set them aside as they’ll be needed to reinstall the seat.
Step 2. Remove the Plastic Bottom Cover

Once the bench seat is pulled from your 4Runner, unscrew the two (2) rubber feet and two (2) Phillips screws around the latching point. Pulling against the plastic cover at the seam where it meets the fabric, working your way around the edge. Lift the latch area up slightly to slip out the plastic cover. The plastic liner is tough, so don’t worry about cracking or breaking it. I chose not to keep it and set it aside, but you could modify it with an opening to maintain an OEM look.
There are fabric clips holding the seat cushion fabric in place; twist and separate any remaining portions that did not come apart when removing the plastic cover. This will allow you to completely separate the frame cushion, making the next step very easy.
Step 3. Place Your Selected Fabric Between the Seat Cushion and Seat Frame

Roughly eyeball the amount of fabric needed and cut out a bit extra; the turns in the frame take up more fabric than you might think.
Place the seat frame back onto the bottom of the cushion, working the frame back into its original position, adjusting the fabric as you go. Trim the edges of the fabric, and tuck the remaining amount between the cushion and the seat cover itself. This will ensure that the fabric stays in place. Snap all of the seat cushion fabric clips back onto the frame.
Step 4. Find the Best Position for the MOLLE Panel

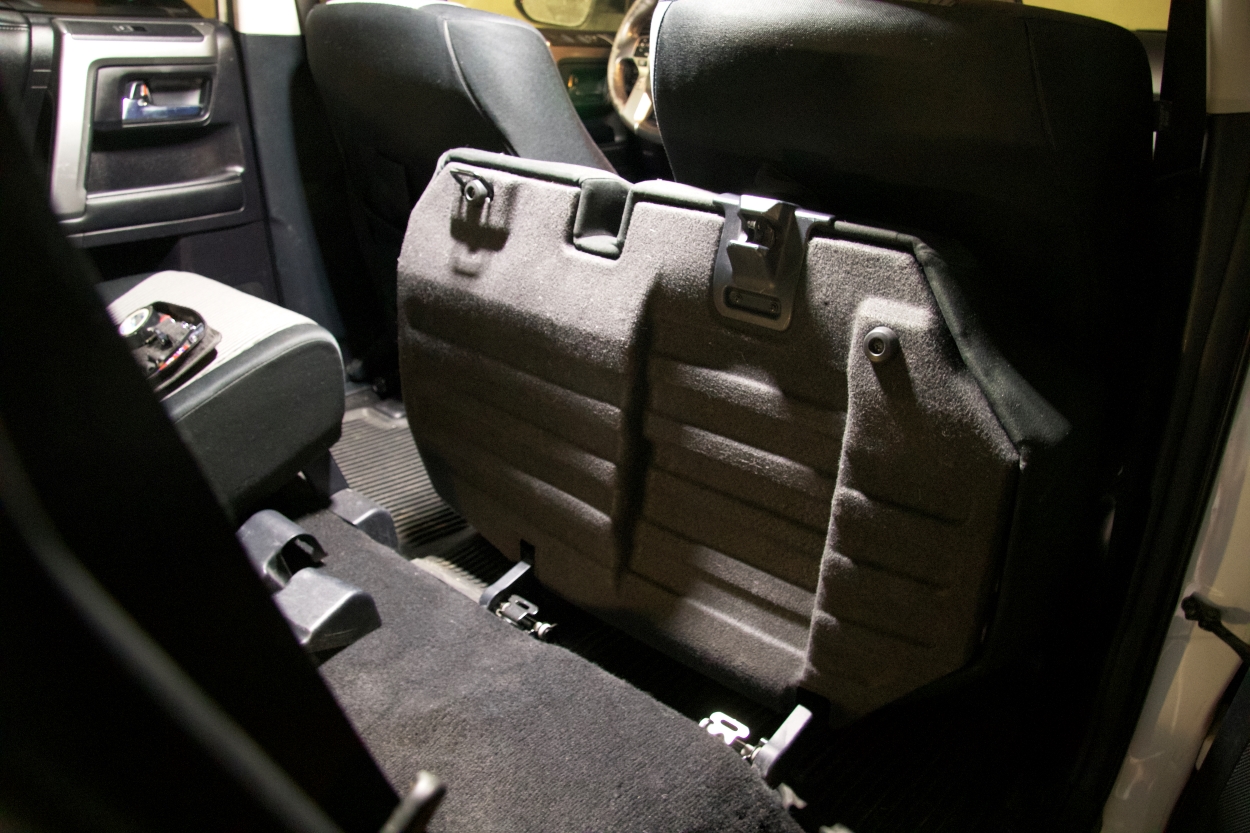
The dimensions of the area where the MOLLE panel will attach to your seat frame are approximately 19″ x 11″. I found an 18.5″ x 10″ panel on Amazon that kept this build fairly inexpensive. Placing the panel as close to the seat legs provided the most usable space for my gear when the seat is in its normal position. The closer to the latch you place it, the less room you will have for gear to stick out from the panel.
Step 5. Attach the MOLLE Panel to the Seat Frame

Use zip-ties to attach as much of the panel to the wire frame as possible. When the seat is in its normal position, everything attached to the panel is hanging upside down. Because I opted for a cheaper plastic panel, I didn’t want it to warp or break over time. Clip the zip ties so your friends don’t give you a hard time.
Step 6. Organize Your Gear on the MOLLE Panel (Considering Spacing Requirements)

The plastic cover in the earlier photos is a great indicator of how far out your gear can sit from the panel without interfering with the seat’s normal position when folded down.
(From left to right)
I used the pocket area of the frame to keep my strap ends in place and the next area to hold the snatch strap nicely. Make sure to pull it to the left as far as possible; otherwise, the headrest will stop the seat back from folding completely flat.
To the right of the snatch strap, the headrest is a limiting factor to consider, and I opted to put my tow hitch pin and shackles here. The small area to the right fits my 2″ receiver and shackle perfectly.
Final Thoughts

The hidden MOLLE panel under the second row seat solved my goals of storing my recovery gear out of sight and keeping the cargo area clutter-free. There is more you can do to aesthetically improve the design, including painting the frame, creating a custom-sized MOLLE panel to fit the seat frame better, and trimming the OEM plastic cover to keep the look. However, for a simple and clean install, this was a perfect balance between getting it done and making it look clean.
Do you have ideas on how to improve this DIY further? Let me know! I’m interested to see where and how the community will refine and improve it.
Curious whether that’s doable on a 4th gen! Thoughts?
Just gotta take the seat out and check for yourself. I also have never been in a 4th gen, so I couldn’t tell you, but I would figure Toyota wouldn’t completely redesign the back seats that much, right?
I’m sad. I finally got to installing this and when I went to drop the seat down so that everything was flat, the head rest hits something. (As in, I tilted the head rest down, pushed the button and when I tried to flatten the back out, nope!) I tried arranging things differently, it will still hit something. You can’t make it flat, even with the front seat moved up. I wish this would have worked, especially after all the work I put into it.
Let me add to my comment. It works, looks great and helps with storage. But I love the fact that I can make that back seat completely flat and with this you can’t do that. If you don’t care about that, you’re good!
Hi Sergio! I’m glad you’re finding use but I’m bummed it’s not quite working as it is for me. You can also send me some photos on Instragram and I can try and see if I have any pointers.
There is that small section over the panel where the headrest (when folded down) needs to be relatively clear of stuff to allow for the seat to fold down completely. I’ve ended up putting my shackles and winch remote in this location and it’s been working just fine. If you have bulkier items in this location, pushing them towards the front of the seat (bottom part of the panel when the seat is up) may give you more space. That critical point of touching is right about where the hitch pin is shown in my photos. Can’t really put anything there.
One thing I’ve noticed in the years of car camping; if the passenger seat is rolled back too far, it keeps the bench seat from opening up completely. Before and after I worked through this modification, I was finding that to be a common reason for not being able to put down the back seat fully.
Would you be willing to make a video about this? How did you add the fabric to the underneath?
Hi Jacob, I’ll definitely think about a video.
To add the fabric between the bottom of the cushion and frame, is pretty easy! Once you’ve unclipped the seat cover from the seat frame, you can simply pull the frame away from the cushion. The cover is what keeps everythign together for these seats. I would recommend paying attention to how they’re connected to make putting them back easier towards the end.
Once the new fabric is roughly where you want it (laid over the the cushion), you want to make sure the frame is squished back into the cushion tighly as possible, because you will then need to reattach the seat cover clips to the frame.
This is great! I’m curious, does it effect the padding or how it feels to sit on the seat by doing this? Thank you in advance.
Hi Sergio, this all sits on the side of the steel cage that is away from the seat. So you don’t notice it at all.
Excellent idea and great job of thinking outside the box. Out of curiosity, how have the zip ties held up with the weight, especially the hitch?
Hi Hugo, thanks for the comment! The zip ties hold the molle panel to the seats frame. I was a bit in excess I’m sure, but I probably used 10 in total.
For holding items to the molle panel, I used the velcro straps threaded through the molle panel. For the bitch mount I ended up using 2, one on top and bottom.
It’s been under the seat for over a year at this point any had no issues breaking loose.
Excellent project, thank you for the detailed installation instructions and clear photos.
That’s an awesome idea! I’m going to look into it. About how much space do you have to fit something? From bottom of the seat, like 4”?
Hey Jeff, thank you!
the space ranges at the bottom, where the metal frame is it’s probably 4-6”. As you get closer to the top, where it meets the back rest, maybe 1”.
This is one of the most creative and brilliant mods I have ever seen for the 5th Gen. Bravo, sir! I’ll be getting to work on this immediately. Talk about a missed opportunity to offer it that way from the factory!
Crazy thought, but would there be enough room to install power gear, such as radio bases, or maybe an Inverter or DC charger like a Redarc under there? Knowing you have to get a bit fancy with wiring since you need to allow for the seat flipping up.
Hi Mike, I’d think it’s possible. Without knowing much about the equipment size, I’d say you’d just have to try it out to see if it all fits.
I personally wouldn’t want all that stuff next to my head while sleeping on a trip. If I wasn’t a car camper, then why not?
figuring out the wiring to it all might be another step to figure out. You’d have to run it up the legs of the seats, and those are somewhat exposed to being stepped on it.
Dillon, awesome idea! Especially for all the smaller items that tend to “move” around the truck after a couple days on trail whether you moved it or it moved itself during a wash board ride. Did you just decide one day to start removing panels in the oddest locations to find space?
Thank you.
That’s essentially what I did. Just asking myself “what’s under this, behind that?” I had seen photos of the stuff under Tacoma and Tundra seats and that’s what pushed me to look at this area a bit further.
Innovative, inexpensive, and so practical! Is there room under the single 2nd row seat to do something similar?
thank you so much!
There might be a little, I haven’t looked too much into yet. The reason I haven’t is that the head rest area, that pinches to the seat bottom when folded flat, takes up the majority of the space. It might not be a bad place for a single small item, like a couple of soft shackles?
Brilliant! Really well done with the photos and detailed descriptions. Will be passing this on to other 4-Runner aficionados. Great job!
Dillon, I love that camping is such a big part of your life—one more thing to appreciate about you. Space issues take precedence in the ‘less is more’ approach with a fine line between having what you need and constantly having to shuffle gear and parts around as the situation requires.
What’s your dream camping rig?
Hi Jake! That is always a serious battle, especially when sleeping inside. All of your storage space goes away when it’s time to sleep!
Dream rig? I’d have to say an Earth Roamer.
I was curious why this idea wasn’t utilized before.
I agree, I was surprised to find all of this space when I took the cover off.
This is neat and great idea! I never thought about it. Toyota definitely should have tried to utilize this space like they do with the Tacoma. Hopefully for the next generation!
Where did you get your Mole rack?
Hi Wendy, I bought it from Amazon. Here is the link:
MOLLE PANEL
This is a killer idea. Great spot for jumper cables and a first aid kit. Thanks for sharing
Very ingenious young Jedi! Is butt comfort compromised at all when someone is using the seat?
Thank you, appreciate it!
Everything is mounted on the underside of the metal frame, no actual contact with the cushion. The one spot where I stuffed the snatch strap ends doesn’t appear to compress that much.
I’ve had some version of this under the seat for the last year and a half. No one has mentioned anything even when they know it’s there.
Just curious what its like when you actually have to fold the backrest into the seat inorder for it all to lay flat…does your newly attached gear make way for the back to to fold in? or do you have to remove all your gear just to fold it in? please explain. thanks!
Hi Josh, the way I have it arranged in the photo there are no clearance issues and everything folds down without issue. That was a big requirement as I car camp a lot.
In my 4Runner, the headrest rubs against the plastic shield. Maybe it’s because my front passengers push the seat too far back?
Any ideas for this?
If the seat is too far back, it does make it so the bench seat does not fold all the way up. If you’re car camping, sliding the seat forward at night does the trick.
“Do It Yourself Dillon” – Hah, this is fantastic, thanks for sharing Dillon!
Great idea and implementation.
For my camp trips, I remove the bottom seat altogether. I have a couple of bins that fit in that space. I use a cot inside with the seat back folded down and a 1/4” plywood top to support the cot legs. Removing the seat bottom provides a lot of usable space thats easy to access from the opened door