
STEEL-IT Preparation and Application Instructions – A Complete Step by Step Guide and Overview
There have been quite a few posts showing us how to paint bare metal. Some of those include Cory’s post on using Rust-Oleum bed coating and another one by Adam with TrailTacoma.com covering Rust-Oleum high-performance enamel (just regular ol’ spray paint).
I too have painted bare metal armor using bed coating, flat black Rust-Oleum, hammered Rust-Oleum, and of course, I have had steel powder coated. Although those products work and definitely get the job done, there is another option to consider.
The problem with some of the Rust-Oleum products is that they simply don’t hold up that well through some of the harsh conditions we put our trucks through. The common oil-based enamel paints we have used in the past are prone to chipping after minor scrapes on rocks let alone the big hits. Blistering, bubbling, and paint runs are also common, however, a lot of this comes down to preparation. Regardless, the point is oil-based enamel paints have their downsides. Powder Coating on the other hand is by far the best of the best, but it’s pricey and comes with extensive lead times.
Today, we are prepping and painting the new C4 Fabrication Skid Plates and we’re using STEEL-IT to do it. Stick around to see how it turns out.
STEEL-IT – Complete Overview & Review
Introducing STEEL-IT

STEEL-IT is a stainless steel coating, it’s a 316L stainless steel flake made of a polyurethane base and comes in either aerosol spray, quarts, gallons, or whatever else you may need for your application. The STEEL-IT Polyurethane coating system features a unique stainless steel leafing pigment, and when properly applied, provides optimum all-weather performance, abrasion resistance, and corrosion resistance properties for general maintenance applications.
Read more on the aerosol can here.
Features:
- Engineered Industrial Paint Coating with Stainless Steel for Superior Protection
- Protects Against the Destruction and High-Cost of Corrosion
- Use on Food Processing Equipment Where USDA Approval for Incidental Food Contact is Required
- Incredible Aesthetic Appeal and Durable Finish
Overview

For commercial applications, you want to sandblast before application, but for most of us DIY garage type, a DA (orbital sander) will get the job done.
If blasting is not an option, using #32 – #36 grit sandpaper will achieve similar results on steel. The surface, once properly prepared, should feel like the striking area on a matchbox. After sanding, blow any remaining grit material off using an air hose and/or solvent and clean the surface with acetone, alcohol, xylene, or denatured alcohol (more on this later).
The goal is to get your armor (skid plate, rock slider, bumpers) to a nice, raw, smooth finish so you have something for the coating to really bite onto.
Once they’re blasted/sanded and cleaned, you can wipe down the parts with a lint-free (microfiber) towel and make sure there’s nothing on the steel; wax, grease, finger oils, hand oils, etc. The cleaner the surface is before laying down your first coat of STEEL-IT, the more likely you are to prevent fish eyes, blistering, bubbling, or any other imperfections.
We will walk you through the step-by-step application process below.
Tools and Materials:
- C4 Fabrication Skid Plates
- STEEL-IT Black
- STEEL-IT Silver
- Makita DA
- Makita Drill Driver
- Saw Horses
- Red Scotch Brite pads
- Wire End-Brush Attachments
- Shop Gloves for Acetone Wash
- Respirator w/ 3M vapor cartridge
- Denatured Alcohol
- Acetone Wash
- Shop Rags/Towels
- Masking Tape
Step-by-step application guide directly from STEEL-IT
Preparation
Directly from STEEL-IT:
We recommend cleaning the surface with acetone or alcohol after grit-blasting or DA sanding, and then finally clear the bare metal with an air hose before coating. We do not recommend using wax & grease cleaner or any product like that because they can leave a residue that affects adhesion. Acetone and alcohol both dry without leaving a residue. To establish the proper profile by blasting/power-sanding, remove debris by wiping down with acetone or alcohol (allow that to dry) and then coat with STEEL-IT.
As with all paint, primer, or application coatings in general; the prep is the most important part. Have you heard the saying “it’s all in the prep”? If not, now you have. Most of the hard work is in the preparation of the painting/coating process.
Step 1. Sand Main Surface Area w/ DA

We started prepping the skid plates by sanding the flat surface areas with a dual-action sander (DA for short). This is the fastest, most effective way to remove all oils, rust, weld splashes, paint pen markers, sharpie marks, etc. All of this must come off to ensure the STEEL-IT sticks to the metal properly.
Use the DA on all flat surface areas of the skid plate. These skid plates are very intricate so you won’t be able to reach every nook and cranny with the DA. For the spots we couldn’t reach with the sander, we used a wire brush attachment for our Makita.
Step 2. Coarse Wire Cup
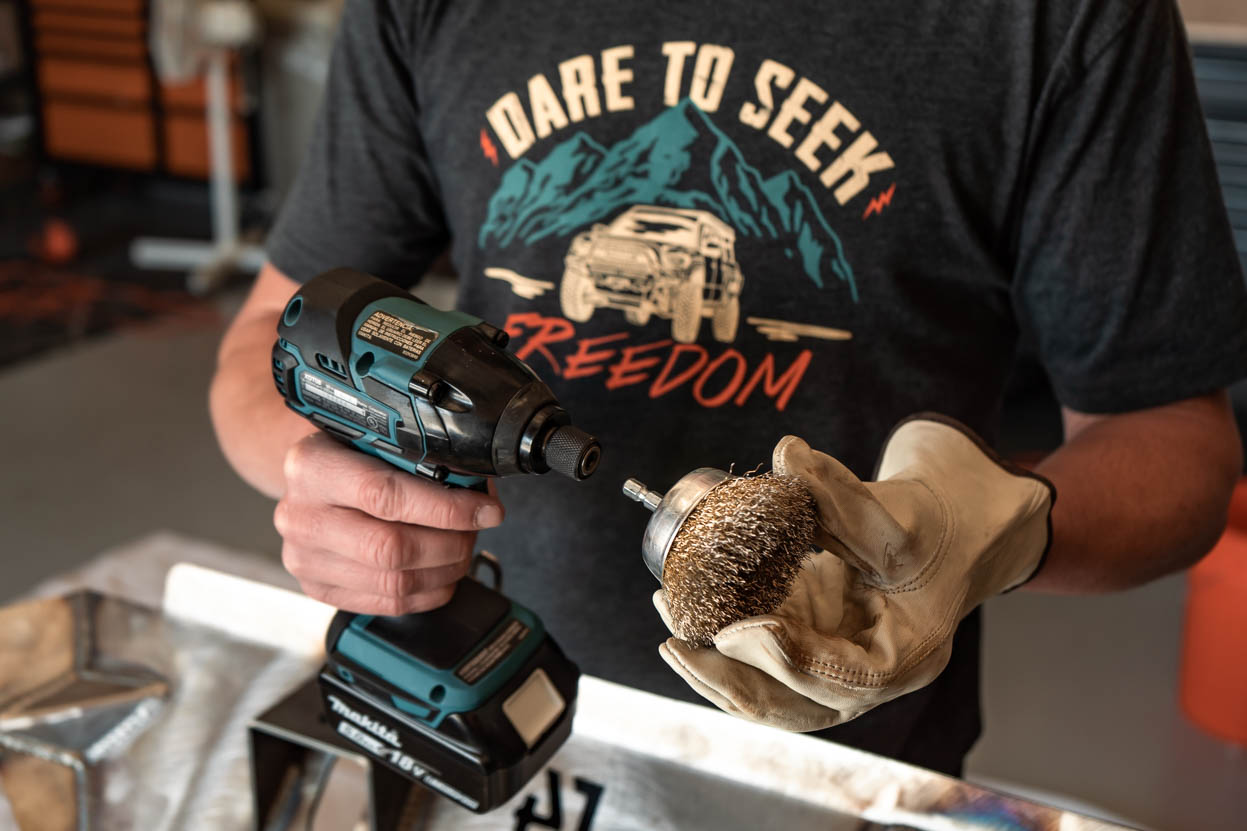
For all those hard-to-reach spots, these wire cup, wheel, and brush attachments are a lifesaver. They work extremely well when it comes to cleaning up the welds, weld splashes, or if you notice any signs of rust/dirt formation which is common if the plates sit for long periods of time. You will have a much easier time using these bits as opposed to a Scotch Brite pad or any other handheld cleaning brush.
The kit we are using here comes with a couple of different attachments. Two coarse attachments (one big and one small wire cup), two fine attachments (one big and one small brush), and two very small yet very coarse wire brush attachments (one slightly smaller than the other).
Kit contents:
- 4″, 3″ and 2″ Wire wheel with mounted 1/4″ Hex Shank
- 1″ Wire Brush with mounted 1/4″ Hex Shank
- 2 1/2″ wire cups with mounted 1/4″ Hex Shank
- 1 3/4″ wire cups with mounted 1/4″ Hex Shank
Start with the coarse wire cups (pictured above) and work your way down to the fine bristle attachments.
WARNING: Use gloves when handling these wire brush attachments. They are incredibly sharp and will draw blood quickly if you mishandle them.
Step 3. Fine Wire Cup

Once you have gone over the majority of the hard-to-reach areas with the coarse cup, you can proceed to use the fine cup attachment. The fine wire cup attachment allows you to reach even more challenging areas than the coarse bristles.
Step 4. Coarse/Fine Wire Brush

Clean up all the additional hard-to-reach spots with the smaller drill attachments. This step is crucial especially for the front skid plate from C4 Fabrication. The front skid plate has a lot of corners and hard-to-reach places, all of which need to be cleaned properly.
Once you are finished sanding and cleaning, the bulk of the work is done. We are preparing multiple skid plates; front, engine, t-case, differential, and cross member skid. The prep took us an entire day (on and off). You can easily spend an hour on one skid plate with the drill attachments depending on how clean you want them.
Before and After Comparison

Here you can see a before-and-after look after cleaning one area of the steel skid plates. Night and day – and we’re not even done yet.
Step 5. Prep Access Plates

Remove all of your access plates from the skid plates in order to clean in between any bolt-on areas.
Step 6. Bolt Threads

Once you have removed all the access plates, you want to cover any exposed bolt threads with some masking tape before applying the STEEL-IT. We rolled up some masking tape until the outside diameter of the tape matched the inside diameter of the bolt threads. Once you have found the correct diameter of your tape roll oh, you can simply thread the tape roll into the bolt threads. They should thread right in.
Step 7. Blow Off Dust

Repeat Step Throughout The Process. You want to consistently blow off any metal dust shavings, towel threads that get caught on weld splatter, and any other debris. You should consistently blow off your skid plates. Once you sand and brush the entire skid plate, blow it off before going to the next step. You can either use compressed air or in our case, an electric blower. This will make the next step much easier and more effective. We did this in-between steps of sanding with the DA and cleaning edges with the wire brush attachments.
Step 8. Scotch Pad

Before we started washing, we wanted to make sure the skid plates were clean enough to eat off. We decided to go across the skid plates one more time with red scotch pads to the hard-to-access edges of the skid plates. Since cleaning the edges of the skid plates can be somewhat awkward with the DA wire cups, hand sanding is best here.
Step 9. Clean Metal w/ Acetone

Once you are certain you have removed any surface grime and grease on the skid plates, you can now start washing off any remaining residue.
Using a lint-free towel, wipe the skid plates hard with acetone. Take your time, this step is an important step. We use shop towels – and lots of them in order to take off ANY and EVERY spec of dust.
Step 10. Clean w/ Denatured Alcohol

After you clean the entire skid plate with acetone, you’re most likely going to have streaks left behind. One solution we found for this was to go back over the surface with denatured alcohol. Even though we just cleaned the entire skid plate with acetone, we were amazed at how much dirt we picked up afterward with the denatured alcohol. The alcohol will take out all the streaks and provide you with a nice spotless clean surface to work with. STEEL-IT does not call for this step but the type-a OCD was getting the best of me seeing streaks all over the plates.
Did we go overboard? Maybe.
Was it worth it? Absolutely. The end result is stunning before paint.
Application
You want to apply the STEEL-IT in a well-ventilated area with a respirator mask. If you are coating a set of skid plates or a set of rock sliders, you’re going to be surrounded by these fumes for hours. A high-quality 3M respirator mask will keep you from getting light-headed and tasting paint fumes in your nasal passageway for days.
Step 1. Shake Can Vigorously

The first step before the application is to shake the paint can just as you would any paint can. However STEEL IT recommends you shake very vigorously for at least 2 minutes straight with a power shaker (5 or minutes by hand), more so than you would shake a can of Rust-Oleum.
STEEL-IT also recommends spraying the can for 2-3 seconds before (and after) applying it to the paint surface. This allows you to clear any debris that may be in the spray tip of the can.
Step 2. Apply 2-3 Thick Coats

Time to paint.
Hold the can far enough away to provide a nice even coat (12-16″).
Be careful not to hold the can too close as the paint won’t dry evenly and may be prone to streaks, drips, and runs. The entire skid plate should have a nice thick coat on it, but be careful not to overdo it since you’ll be doing more than one coat.
Step 3. Let sit for 4 hours

Before applying the next coat, STEEL-IT recommends you wait 4-24 hours. This allows the paint to completely dry ensuring the next coat will be just as even as the first. We applied a total of 3 coats onto our C4 Fabrication Skid Plates over a few days time. We found this to be plenty thick.
After you apply all of your coats, you need to let the STEEL-IT completely cure for 5-10 days before installing anything onto your truck.
In Between Coats

In between each coating, we blew the skid plates off with our shop blower. Since you have to let them sit for so long between coats (6-24 hours), it’s a good idea to blow any dust off that may have accumulated overnight.

Warning: Do not touch the skid plates after you have let a coating of STEEL-IT cure as this will leave grease and oils from your hands onto the surface. Any grease and oil transfers from your hands onto the skid plates will cause the next STEEL-IT coating to come out uneven and/or splotchy. This is incredibly important.
Final Thoughts

This stuff is impressive. I don’t think I will ever go back to Rust-Oleum or general flat black rattle cans from Home Depot.
The STEEL-IT lays on thick and even, is easy to control, and most importantly, the final outcome is amazing. This stuff looks very nice on steel.
One of the big selling points of this stuff is that you can weld on it, and although we have not tested it, I watched a few videos on YouTube of it being done. Many off-road trucks, trophy trucks, buggy’s and even race car builds use STEEL-IT on their frame and chassis in order to make quick repairs.
How Does it Look?

So is it a true powder coat alternative? Not really.
STEEL-IT isn’t going to be as strong as a true powder coating process. I don’t think there will ever be a true “powder coat in a can” but if there is anything close, it’s definitely STEEL-IT. At an average temperature of 400°F, true powder coating (fine powder that is electrostatically applied and baked) is going to offer the strongest material bond possible. It’s hard to compete with this process from a DIY perspective at home but with a ton of prep and painting with STEEL-IT, you will get an absolutely stunning look all while having something that will hold up very well on the trails.
Powder Coating lead times killing you? STEEL-IT is the way to go.
The lead times out there right now are insane. Some powder coat shops are backed up for 3-6 months. In that case, STEEL-IT is an awesome solution. You can grab this stuff on Amazon, and have your armor ready to go in under 10 days from the final application.
All in all, we are pretty stoked with how the skid plates turned out and will absolutely order another case STEEL-IT to have on hand for any new armor that comes in.
I’ve used that steel in the gallon two part system with their prime on food grade application.the stuff will not chip or peel.
Great information joy & hope and peace all is so nice advice for us , thanks for sharing it give us the first opportunity to visit this website along with you .
i think you should write a article about Conventional Powder Coating .
Our WEB : https://bhept.com/product/conventional-powder-coating/
Is there a cost comparison between this and a local powder coater? This could have its place for small pieces but large skid plates, I would assume a powder coater would be cheaper and faster. Thanks for the write up though. I just came across this stuff. Excited to get it to use.
Looks great but how well does it hold up? I got my Grumper powder coated professionally by a company that has been powder coating for over 30 years. It looked great and has held up great except in 6 months it went front being black to being grey.
How many cans did you use?
When coating the skid plate, did you coat one side and let it cure before flipping it to coat the other side? I’m wondering if you had to do some additional prep work on the bare steel if you flipped it prior coating the other side.
Thoughts on this for a C4 Lo-Pro bumper? Powdercoat/LineX prices around here are insane and i’m looking to DIY and do not want to use trasholeum.
A lot of guys actually coat their chassis for custom builds with this stuff. I don’t think it would be a bad idea to apply STEEL-IT to a lo pro. I think we’re going to apply STEEL-IT to our C4 Fabrication Hybrid front bumper, rock sliders, and rear bumper for the 2nd Gen Tacoma. I say go for it.
Here’s another tip. Degrease the metal before sanding/blasting as well as after. Sanding over oil or grease can drive it down into the scratches making it harder to remove later.
Yeah, for sure. A good wipe down prior to sanding wouldn’t hurt, thanks!!
Nice write up. I was thinking of getting bare metal sliders because I wanted to paint them red. Was there any information on painting on top of the steel it? It seems like a multilayer approach might not be a bad idea for a surface that has the tendency to get scuffed. Also, have you damaged the coating yet? What is your plan to repair the coating if it does get damaged on the trail?
I have not seen anyone paint using an oil-based paint over STEEL-IT, that’s a good question. I am sure it would work but could prove to be a challenging task upon touch-up. No damages yet as we have not installed them. Repairs and touch up are two big highlights of STEEL-IT and probably one of the biggest selling points of STEEL-IT. You don’t need to take it down to bare metal again to coat it. You can wipe any debris out of the scratch or scuff, and lay a coating down. It’s not going to remove any damage or deformations but it will cover deep cuts preventing future rust from attacking your bare metal.