
TRD Pro (2019+) Roof Rack Swap and Installation Guide – Parts List and Overview For the 5th Gen 4Runner
Back in 2019, Toyota paid tribute to the FJ Cruiser by incorporating its roof rack onto the TRD Pro 4Runner. The basket style roof rack is definitely a departure from the rails and crossbars roof rack from past 4Runnners.
There is some discussion on how this rack looks; some people don’t like it and some do. I fall under the latter category, and when I came across one in my area, I jumped on the opportunity.
A used TRD Pro Roof Rack can usually be found for sale on Facebook Marketplace/Groups, Offer Up, Vilmont Market, etc. You can also buy a new Pro Rack (PT278-89190) from the dealership, however, this will be the more expensive option.
Buying a Used Roof Rack

When buying a used TRD Pro Roof Rack, I highly recommend getting a hardware kit (PT278-35130-HW) since the foam and fiber washers will most likely need to be replaced. My recommendation is from the FJ roof rack. It is the same hardware as the TRD Pro Hardware Kit (PT278-89190-HW) at a fraction of the cost (~$20 vs. ~$102), plus it comes with extra screws and washers. Also make sure you are getting 4 roof Brackets (63185-42020), if not you’ll have to order them from the dealer.

What You’ll Need For Installation

Source the Parts:
- TRD Pro Roof Rack Kit (PT278-89190): Check Price
- Roof Rack Hardware Kit (PT278-35130-HW): Check Price
- Roof Rack Bracket (63185-42020): Check Price
Buy the Rack Kit:
- OEM TOYOTA roof rack: Check Price
- OEM Style roof rack: Check Price
Tools & Materials:
- Torx Bit Set
- T40 Torx Driver
- T25 Torx Driver
- Socket Set
- 3-12″ extensions
- Wrench Set
- Torque wrench (Needs to torque to 18.0 Nm +/- 3 Nm or 13 lbf-ft)
- Impact Driver (optional)
- Trim removal tool(s)
- Large Towel
- Shop Towels
- Multi-Purpose Cleaner
- Isopropyl Alcohol (not pictured)
Step 1. Remove Stock Roof Rack & Clean Roof

Start by removing the 4 roof rail plastic caps. Once the caps have been removed, use a 12mm socket to remove the 8 screws holding the roof rails to the roof. Remove the roof rails and clean the area where the rail base previously contacted the roof.
Step 2. Install Brackets
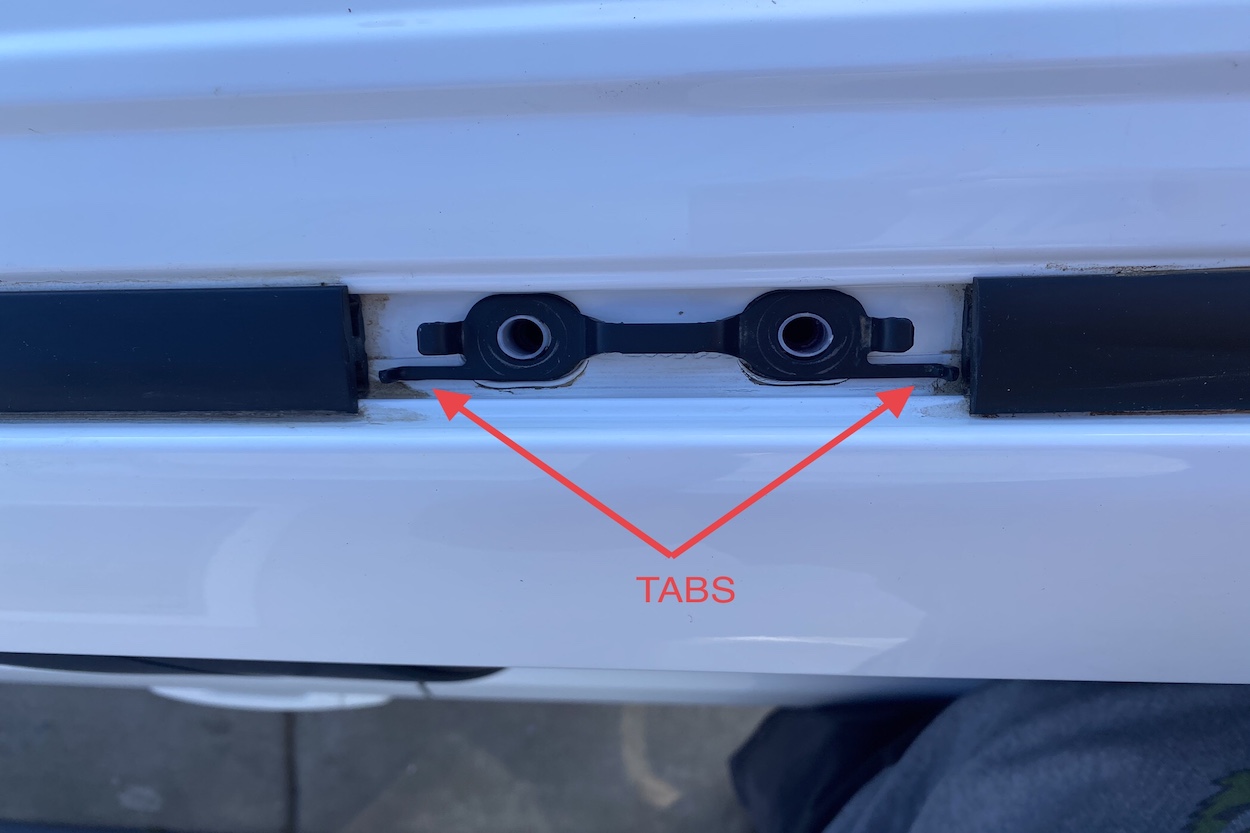
Install 4 brackets (63185-42020) at each of the roof mounting points. The brackets should be positioned so that the tabs are facing towards the doors.
Step 3. Prep Roof Rack Install

Before lifting the roof rack on top of the roof of the 4Runner, I recommend taking 3 of the crossbars off to reduce weight. Keep one crossbar attached towards the front of the roof rack to maintain rigidity when the roof rack is lifted over the vehicle.
Step 5. Apply Foam Washers
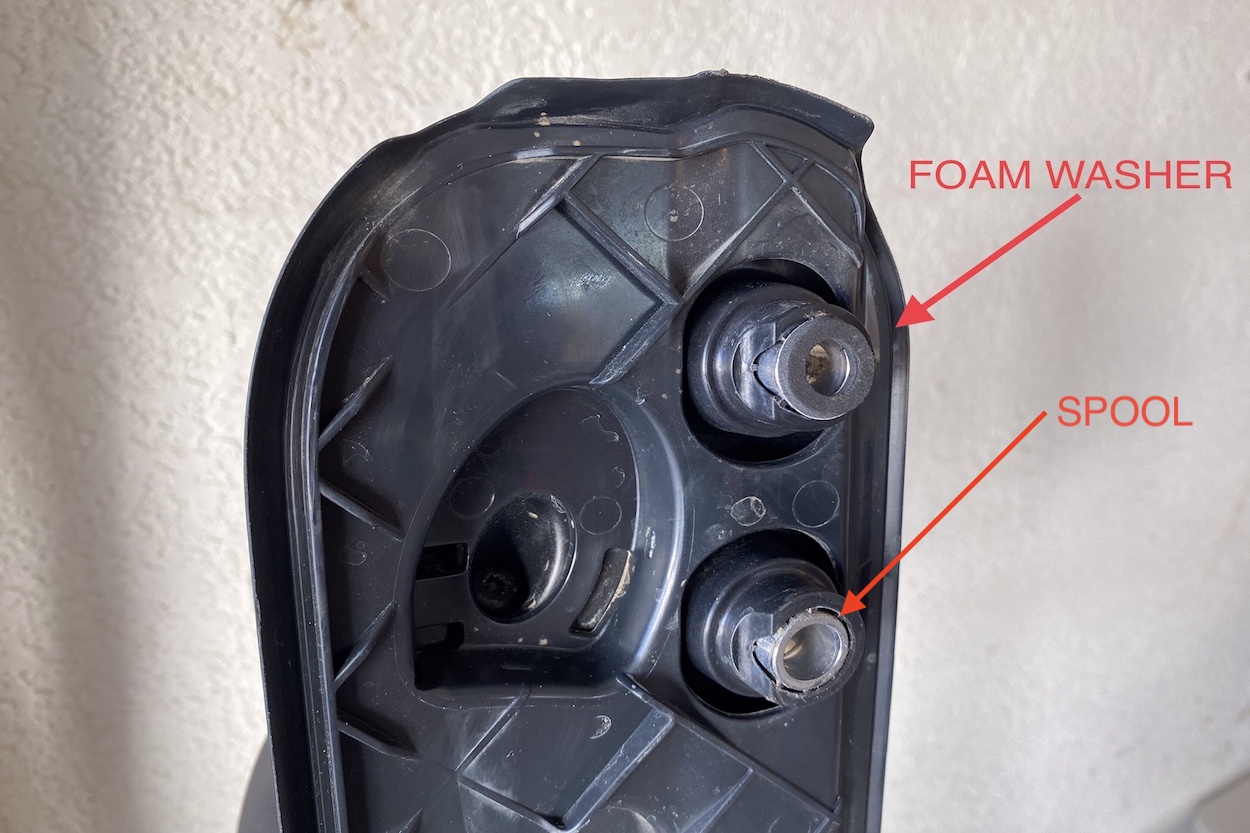
Clean the spools (metallic bushing) with some isopropyl alcohol.
Peel off the adhesive backing on the foam washers and adhere the foam washers onto the bottom surface of the spools. You’ll have to do this for each of the 8 spools. Take the time to do this right since the foam washer will act as a water barrier once it is sandwiched between the spools and brackets.
Step 6. Position Roof Rack On Top Of 4Runner

With the help of a friend, lift the rack over the vehicle. This can be done by a single person but I recommend putting a towel down on the other side to prevent damaging the roof. Another option is to separate the left and right half of the rack by completely removing 2 M5 screws from the connector.

Next, loosen the 2 thumb screws located on the crossbar (see photo on the left above).

Loosen the 4 M5 (T25) screws on the connector. Then, position the rack so that the holes align between the roof rack and the roof. Make sure that the foam washers are not blocking the hole openings.
Step 7. Install Roof Rack
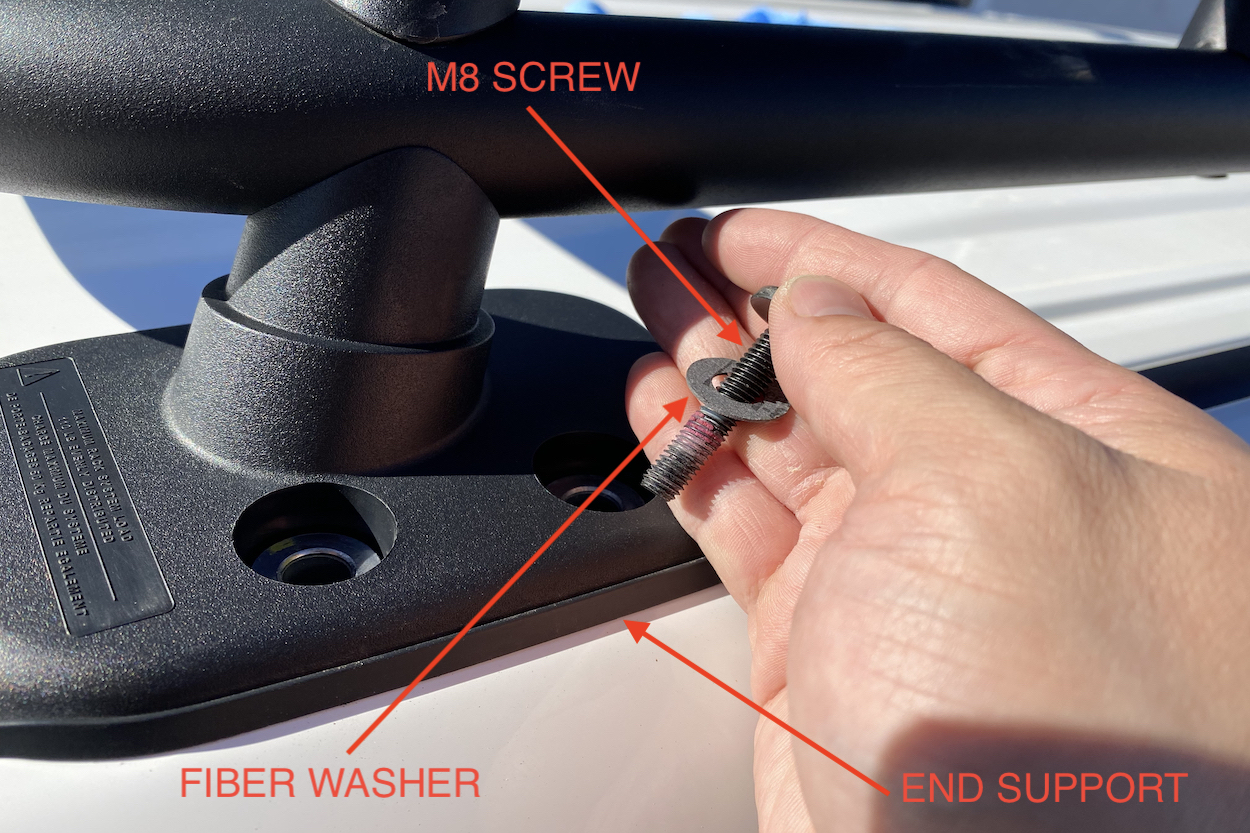
Install the M8 (T40) screws and fiber washers by hand in all 8 locations (front and rear end support). This is only to start the thread, do not fully tighten at this point.
Note: Do not forget the fiber washers; they seal the gaps between the spools and screws to prevent water from getting in.

Make sure the front and rear end support sits on the roof and follows the roof’s contour.

Begin tightening the 4 rear end support screws first then move onto the 4 front end support screws. Check and verify that all end supports are properly seated onto the roof.

Torque the screws to 13 lb-ft (18.0 Nm +/- 3Nm). Starting again with the 4 rear end support screws first. Alternate between the screws when torquing to draw down the supports evenly.
Tighten the 4 M5 (T25) screws on the connector, torque to 35 lb-in (4 Nm) or just hand tight.
Step 8. Install Crossbars

Note the crossbars are orientation specific. All crossbars will have to be installed with the arrow facing “FORWARD” and the thumbwheel knobs facing up.
Double-check and make sure the lower clamps are on the correct side (LH vs. RH). If the clamps are on the wrong side, they will not be able to be installed. Separate the lower clamps along with the thumbwheel knobs to their respected side and place them on top of the roof, they will have to be separated in order for the crossbars to fit over the rails.
Step 9. Reposition Crossbars To Finish Up!

The last step is to remove the lower clamps from the crossbars and then position the crossbars between the vertical rail sections.
After that, you’ll need to loosen the inner thumbwheel knobs to adjust the width of the crossbars as they are positioned in place. Lastly, attach the lower clamps with the thumbwheel knobs on both sides, and then center the crossbars and tighten the inner thumbwheel knobs.
Final Thoughts
The install on the TRD Pro Rack is pretty straightforward and it took me about an hour and a half to do.
When installing this rack, one of the main concerns I had was a leaking roof. I contemplated reusing the old hardware, but after looking it over, I decided for peace of mind. Replacing all the hardware was the way to go, and given the low cost of the kit, it was a no-brainer. I can happily say after multiple Costco car washes I have zero leaks!
I’ve used this rack a few times for hauling, camping, and climbing gear and it has worked out great for me and definitely freed up the much-needed trunk space!
The TRD Pro Roof Rack is a good looking rack in my opinion and if one comes across you at a great price, I would highly recommend picking it up!
Updates
After having the rack installed for a while I’ve decided to mount my Pelican Storm case to the top for some extra weatherproof storage. I’ve seen some rail bolt combo similar to how roof top tents are mounted but didn’t like the look plus taking it on and off seemed like a pain. I wanted something more stream lined and can be removed with relative ease.
Here is what I’ve came up with:

1/4-20 Rivet Nuts installed in crossbars.

Thumb screws to hold the Pelican case to the crossbars.

All set for more gear storage!
1) is there a recommended wind deflector to place on the front up bars of the TRD roof rack to divert wind? 2) Can I purchase 1-2 additional/individual stock cross bars, in addition to the 4 that come with the rack?
could someone share instructions to delete the TRD PRO rack?
I want to be sure that it fits my 2016 4runner SR5
because on the Toyota website it tells me that it may not be compatible
There is literally nothing different from 2010-2024. I’m baffled people drive these and are so clueless.
What size are the thumb screws?
anyone know if we can just buy the bars only from somewhere? I just need to replace the 3 oenology bars as they faded and cracking.
Have them repowdercoated. My company can handle it for you if you have no one nearby. TTP Coatings 409-943-4054 ask for Joe
Does the hardware kit come with a brand new roof rack from Toyota?
Nope, nor the mounts
Thanks for this post Jensen! I picked up the FJ Hardware Kit (PT278-35130-HW) and it worked great. Appreciate your time in posting.
Can i buy lower clamps of the crossbars & thumbwheel knobs separately. Has i have lost one of mine. If i can buy can you share the link
Did you ever find one? I’m looking for a lower clamp to the crossbar as well!
I just bought used trd pro roofrack and doesn’t come with the joint piece ,will you guys help me to find the product item number ? Toyota parts in dealer doesn’t know.
Just ordered this brand new TRD Pro roof rack from Toyota. Can someone please tell me if EVERYTHING is included in the new OEM kit ?
I keep seeing mention of these 4 little rubber-backed brackets and people have to buy them but it’s not been made clear if that only applies to used racks… or if the new OEM Toyota kit includes them. Please clarify. Thanks !
So I’m in the midst of installing on my ’22 Limited and I can tell you that the TRD Pro roof rack from Toyota does in fact come with a hardware kit, but you still need to order the 4 brackets. So if you buy OEM Toyota Kit, you get: the roof rack, 4 crossbars, and hardware kit with T25 and T40 and fiber washers. You just need to add the 4 brackets to your order!
Don’t order the hardware kit separately or they’ll hit you with a 30% restock fee.
I did have a cracked crossbar clamp that I’ll need to get replaced, but otherwise, this couldn’t have been easier and I did it myself with a blanket in a couple hours.
honestly most racks I’ve help install have been take offs… you are going to be the 1st one with a new in box from Toyota. Please let us know what’s all included!
What pelican case is that?
its a Pelican Storm iM3100
I bought a used TRD roof rack and noted that I’m missing one of the plastic pads that sits in between the rear roof rack mount and the roof of the 4Runner (specifically the right rear side). I went to the local Toyota dealer and they claim they don’t stock the part and that it doesn’t show up in their “system” (i.e. no part number)… which I find really hard to believe, but. Does anyone know what the part number might be or where a person can source a replacement pad or pads?
Plastic pad? are you referring to the donut shape pads? if so I would just get a new set of PT278-35130-HW.
Great post! I am looking at a used rack in great condition except that a bolt hole in one of the end supports was damaged during take off. Do you know if it is possible to purchase a single new end support?
sorry that I do not know… That’s something you’ll have to inquire Toyota about. The only part number I’ve been able to find are for the whole rack.
I like the Trail/Mountain badge on your 4runner! I have a similar one but yet to find someone with the same one.
nice badge! you are the only other rig I’ve seen as well!
How tall is the top of the rail from the roof?
about 7.5″
Hello,
Thank you for your post.
I personally really like the TRD Pro roof rack and would like to install one on my 2017 SR5 Premium. Why is it that the dealership claims the rack won’t fit? According to all the forums, I have read, they say it will fit and that all of the 5th gen 4runners are the same as far as the roof rack is concerned. What are your thoughts?
Definitely fits!! I installed mine in a 16 Premium and it works great! I found mine on FB marketplace.
it’ll fit the dealer is just going off of what their systems tells them. I bet you’ll get the same response if you ask them if a 2019 TRD Pro rack will fit on a 2017 TRD Pro. For reference I have a 2018 TRD OR and it fits.
Hi I can find this roof rack.any suggestions thank you
you can get it thru Toyota or check your local Toyota 4Runner group someone is always selling one.
Any chance this will fit a 2010 4Runner?
I don’t see why it wouldn’t the roof should be the same.
What are the inside dimensions of the rack ?
I like the rack.I would like to put 2 to 3 good size cooler on top.
Hi, Jensen. Just wanted to say thanks for posting these thorough instructions. I work at a body shop & our local Toyota dealership sent a brand new 4Runner over to us to have the roof rack reinstalled after a poorly done first attempt at the area distribution center that resulted in a leak down the driver side B-pillar. With your instructions & insights the job was a breeze for us. 100% agree with your recommendation to go with all new hardware.
Thanks again.
glad this helped!
How is the wind noise with the trd pro roof rack?
quieter than my tires, but really I don’t notice it at all.
will this roof rack fit a 2014 4runner?
Yes it’ll fit.
Nice setup with the Pelican Case. Would you be able to provide the parts used to get it mounted? Also, a bit of a step by step, did you drill the crossbar to install the rivet nut?
So I got all my hardware thru McMaster and I can’t seem to find the exact invoice with all the part#s unfortunately. But I can tell you the rive nuts are 1/4-20 and its the cad plated steel ones. The cross bar was drilled to install the rivet nut also built a jig for that too since there are vertical webbings within the cross bar and getting is somewhat on the centerline was critical. Hope this helps.
What size is this pelican case? I am thinking about installing a low profile pelican gun case on top of my 2020 t4r trd pro for extra storage. This one looks great!
Hi I used a pelican im3100.
What is the overall height of the vehicle with the pro rack? I am concerned it may not fit in the garage. Thank you
77 inches……..I only know because it won’t fit in my garage……..after Toyota US told me it was 72.5 inches!!!
Since all lifts are slightly different I think the best way to answer your question is that the pro rack adds about 4.25” above the shark fin antenna.
Jensen, thanks for the instructions. I do not remember my brand new OEM Toyota mounting brackets having a rubber gasket underneath. I think they were bare metal. Also, are your support pads made of plastic or rubber?
The brackets should have a very thin rubber gasket bonded to it… the support pads are some sort of reinforced polymer (plastic) and on the bottom there’s a hard rubber like seal that’s attached.
Wondering how how your install is holding up to leaks. I did the rack install per your instructions but I am really paranoid about leaks and feel uncomfortable not using a sealant. Just hoping that the bracket and washer setup works.
Hello! I was paranoid (checked it almost daily) at the beginning, but I hope this will help putting your mind at ease. I’ve had mine for about 5 months now and its been parked outside every time it rained down here in SoCal (its not much i know) and I’ve ran it thru Costco carwash more than i like to admit and so far ZERO leaks. I think as long as you use brand new washers and bracket (or if its in good shape) you should have nothing to worry about.
Really nice set up with the pelican case! How has it held up? Also can you do a write up of how you drilled holes and modifies your cross bar for the storage attachment? Thanks!
Hello! It’s held up pretty well no issues with leaks or the mounts coming loose. I’ll make sure I take some pictures the next time I’m mounting something to the cross bar.
The hardware kit you linked…..does it come with the adhesive foam washers? Sorry if that is a dumb question, but Toyota does not mention what comes in the kit. If the used TRD pro rack I am buying has the mounting brackets, does the kit you linked have everything else?
I was also going between Gobi and TRD Pro. When I bought my 4runner, the guy behind me was there to pick his wife’s up, and he was selling his TRD pro rack for $300. Seemed like a no brainer to me.
Hi yes the HW kit comes with the foam and fiber washers. $300!? That’s such a good deal!
The Pelican Case mounting is really smart! Do you think the nuts are strong enough to mount a high lift jack? Thanks 🙏
I think the hole size on the hi-lifts are 1/2”? If I remember correctly the 1/ 2” bolt rivnut is too big for the cross bars. There are two vertical webs going down the length of the cross bar and that limits the size you rivnut you can use. That being said I think the 1/4” rivnuts should be able to hold a hi-lift jack considering the loads the rivnut experiences are mostly lateral so pull out isn’t that big of a concern. But you might want to find a step bolt that’ll better match the mounting holes. I’ve also seen people drill thru the crossbar and put a bolt/nut to secure it.
Thanks so much!
My Dealer brought in PT278-0C200-CB. The were 34-3/4″ long. I find that listed as 4Runner and Tundra. Too short for the Sequoia
Bummer. I wonder what would happen if the dealer had to warranty one of those bars…
I spaced out the 3 bars that came with. It looks better but I’d still like 1 or 2 more
Is this PT278-35180-AA? It will be worth it to get the ends. I have an extra cross bar from my 2018 TRD Sport. I’ll see if it is the same. then hopefully i just need to put in some rivet nuts. thanks
I just got a Sequoia TRD Pro and the roof rack looks like identical parts. I’d like to add more cross bars. Any help with where to buy them? My dealer is stumped.
PSo when I was doing my rivnut install to mount my pelican box to the rack I came across the FJ adjustable crossbars (Part number PT278-35180-AA) which I think might be the same ones. However I don’t know if the crossbar width is the same between the 4Runnner and Sequoia… Can you take one of yours apart and take a linear measurement of the aluminum bar?
The bars are 38-11/32″ or 973mm wide measuring across the bow of the top surface. There is a nut insert in the top near each end.I don’t see a part number on the ends, just an L and R.
Thanks
I have 34.75” on my end. So I don’t think the FJ ones will work for you… might have to wait on Toyota to make spares available…
My local dealer finally got a crossbar kit that fit. It looks better but I still want the look of the 4Runner TRD Pro rack so I’m ordering 2 more bars. 6 Bars will give me the same spacing as the 4Runner. I’ll post a picture when it’s done. Thanks for your help
Do you have a part number on the crossbars? I have been trying to get an extra bar or two for my Sequoia too but Toyota has not been able to help.
Thanks for the write up. I see its listed as 2019+. Did they change where the holes are after 19? Will this (in theory) work on all 5th gen 4runners to replace the factory rack?
Thanks! The 2019+ is referencing the new/current TRD Pro roof rack. Prior to 2019 TRD Pros all had the traditional rack but with a different color scheme for the caps and rails. So this rack should fit all 5th gen 4Runners.
Excellent write-up. Thank you. I’m of the same opinion and recently installed one. I used the new FJ hardware kit but did not use the brackets. My understanding was that the brackets are for use when you are deleting a rack – so the rubber trim has something to snap onto, but now I’m thinking I should have used them. Do you know for sure if they are necessary? Everything seems to be fine and the spools seem to be very tight against the roof (installed new foam washers as well). Thanks!
Thank you! From what I was able to find Toyota instructs that the brackets be
left in. Considering the underside of the brackets have a rubber gasket i think it acts as the main seal in the rain channel. When I’ve taken the rack off in the past I’ve noticed that the foam washers were basically fully compressed, so if you’ve installed the rack without the brackets I would say that your rack is probably sitting about the thickness of the bracket lower (.070”) and the foam washer is now your main seal. I would check your support pad and see if it sits well to the contour of the roof if that’s good and you live in a dry climate the foam washer should be ok. Hope this helps with your question!
I installed the brackets today and they were definitely necessary. Not only do they clearly act as the main water seal but they enable you to apply the proper torque to the bolts. I noticed the front foam washers were barely compressed and the rears were completely destroyed, so in both cases probably not doing their job. I’m really glad I found your blog!
That’s great! Glad to help!
I went ahead and ordered the brackets. Otherwise I’d just obsess about it and drive myself nuts. lol. If I ended up with a leaky roof later I’d kick myself. Also had to source some new self adhesive foam washers – I was able to find some that will work. Thanks again!
no problem glad I could help! Haha I think we’ve all been there.
Thanks. I’ll do that yeah. I noticed that when I installed it – that the old foam washers were completely compressed and the spool basically cut into them.
In the endless debate on RTT or no RTT, I’ve elected to keep my pro roof rack, and honestly it works fine for me. I got a $60 roof bag on Amazon and keep all non-essentials up there when I’m on the trail. Putting more weight on a bigger roof rack just feels like too much weight to me (at least with the current Pro Fox suspension).
Hi Robert, Are you saying that you did install an RTT on your pro roof rack? If so how heavy is it? Easy installation? Wondering about this myself so any advice would be great for my and my pro rack
No RTT on pro roof rack. Not only can it not support that kind of weight according to the manufacturer, your’s truck’s height and look would border on the absurd. Do not try.
So I ended up calling Toyota directly, had to call my dealership and talk with the parts department, and they confirmed that the rack is sturdy enough for an RTT. It can hold 300lbs dynamic, and 600lbs static. As far as looks, it doesn’t really bother me.
If this is true, and you go this route, I demand you to do a write-up on this website!!
I went back n forth between RTT or a traditional ground tent for a while and ended up deciding to go with a ground tent. Mainly for mobility no need to pack up when I leave camp and not raising the CG is a plus.