
High-End Overland Drawer System with Offset Drawers and Slide Table from TruckVault Security – Step by Step Install
When it comes to storage in the back of the 4Runner, you have plenty of options. There are a wide variety of storage boxes and overland gear bags out there that we all typically run. Whether you run high-end aluminum storage boxes or bespoke wax duffle bags, gear organization is key when heading out.
Many of us require lots of storage options for the gear we carry. Some of us require lots of everyday carry gear and others require lots of recovery gear. Maybe you are a photographer and you need boxes full of camera bodies, lenses, drones and tripods. Perhaps you hunt often and need a secure legal place to store your 30-06 rifles plus boxes of ammunition. For my needs, I require lots of recovery gear, every day carry tools, trail tools, and camping gear.
Today, we’re going to take our past storage solutions to the next level and install a TruckVault Drawer System. This is one of the most high-end drawer systems you will find with a focus on security and almost unlimited options on how it can be built.
This post is going to focus more on the step-by-step install portion of the drawer system and we will follow up with a full review and overview. At the end of this post, however, we will include our initial thoughts and feedback.
Whatever your travel style, many of us can benefit from a drawer system. Let’s jump in and see what one of the nicest drawer systems on the market looks like.
Who is TruckVault?

TruckVault makes a wide range of drawer systems primarily for law enforcement, military and tactical applications. They offer custom-built drawer systems for just about every truck, SUV, sedan and van on the road. With TruckVault, you don’t have to choose between a couple of different models (like most pre-built drawer systems on the market). You can literally build your own drawer system with the help of their step-by-step drawer system configurator.
TruckVault is the most recognized name brand for vehicle equipment storage solutions in the sports, law enforcement and public safety markets. You will not find a better in-vehicle storage solution than one manufactured by TruckVault. —TruckVault
TruckVault built its first drawer system around 1995 and has been going strong ever since. They are among the leader in the hunting, fishing, law enforcement, military and more recently have grown into the overland and offroad industry and it’s no surprise as to why.
Impressive Build Quality & Security
The build quality of their products is impressive, to say the least. The security is far superior to any other application on the market and the options for customization make this product a true standout among industry competitors. This is one of the first companies that I’ve seen which allows you to literally build your own drawer system through an impressive online drawer configurator with a video at some steps of the buying process. You can customize everything down to the carpet color.
From the website buying experience until the moment the product arrives, TruckVault provides a robust customer experience. Very impressive company to work with so far.
Go Fully Custom
To top it off, TruckVault will build you a custom drawer even if it’s not on their website. You can call their team, explain your build platform and they will get to work. Comparatively speaking, you rarely find that in off-road fabrication shops these days, let alone, drawer system manufacturers on the market. To find a company that will work with you on something that’s truly unique to your build is pretty impressive. Most companies are moving to mainstream mass-produced parts, and I get it… time, energy, costs – it all adds up.
Yeah, TruckVault is probably the highest-end drawer system company out there… but expect to pay for it. Their systems are not cheap.
Product Overview & Options

Although we didn’t go with a fully custom set up, what we ended up with is going to work very well for our needs.
We ordered our specific drawer system somewhat fully loaded. We started with black standard height (lowest profile options) offset drawers and added their pull out table. For the color, we decided on the grey carpet with black composite drawers.
For security, they have multiple lock options and we went with the Kaba Simplex lock. We then added multiple horizontal and vertical dividers in order to organize and section out our gear.
Then we chose to add their technology platform which is a fancy way of saying two AC 110v outlets, 12vdc ports, and two USB ports built into the actual drawer itself.
Finally, we added in-drawer lights, L-track tie-down systems on the top of the drawer, and some 1/4″ rubber truck mats to prevent gear from sliding around on top.
Again, we will go into a full detailed review and overview of how all of this stuff works in a follow-up post.
Installation Guide

We are going to install our drawer system on a 2014 Trail Edition Premium, however, the installation will be the same on a 2010 to 2016 model Trail Edition as well as 2017+ TRD Off-Road models. This is a two-man job as you will need another person to help you lift the drawer system up into the 4Runner. From start (unboxing and reading instructions) to finish, the install took around two hours. The install is so simple we completed the job with a couple of tool rolls I had in the 4Runner.
Tools and Materials
- Two People
- Basic Shop Tools
- Sockets
- Open-End Wrenches
- Sound Deadening Material (optional)
- Trim Removal Tool
- Drill Driver
- Square Bit
- Phillips Bit
Package contents
- Baseplate (1)
- 5/16 Plus Nut (x2)
- 5/16 by 1 1/4″ Fender Qasher (x1)
- 5/16 – 18 x 1 1/2″ Hex Bolt (x1)
- 3/8 – 16 Plus Nut Flare Tool – Red (x1)
- 5/16 – 18 x 40mm Joint Connector (x2)
- Drawer System (1)
- Turnbuckle 3/8 x 10 1/2″ (x4)
- (4) Wood Screw #8 x 2″ Square Head (x4)
- (4) Drywall Screw #8 x 2″ Flat Head (x4)
- (1) Locking Steel-Core Security Strap (x1)
- Extra Accessories
Inspection – Unpackage Box

Start by unboxing the TruckVault package and account for all your parts and pieces before you begin the install. All of your accessories will come packed inside the drawer system. Unlock the drawers and count all your parts/pieces before moving forward with the install.
Step 1. Remove Cargo Tray

Remove the factory sliding tray and the carpet from the cargo area.
You may want to add a sound deadening material to the bare metal while you are here. We already have sound deadening on our doors and rear hatch and that has been enough sound deadening and weight for our build so far.
To remove the cargo tray, start by uncovering the bolt locations. Using your plastic pry tools, you can pop these caps off and see all the bolts. Remove them all.
Step 2. Remove Cargo Tray Slide Brace

There are quite a few pieces that are holding your cargo tray in place. Remove all of the crossbars and channels needed to get to the carpet.
You may want to save all of these for later as you can re-sell your slide tray for anywhere from $300 to $400. Many, who are doing cargo tray conversion swaps, are looking for these trays so they are in demand.
Step 3. Remove Factory D-Rings

Using a plastic trim tool, pull up the cap covering the D-ring bolt.
Proceed to remove this bolt and set the D-ring and bolt to the side. You will be reusing the D-ring to mount the TruckVault with a turnbuckle.
Step 4. Remove Cargo Tray Storage Section

After you remove the D-rings, you can remove the entire cargo tray storage section.
Step 5. Remove Remaining Tray Braces

With the storage section out of the way, you can now unbolt and remove any additional pieces that were holding the cargo tray in place.
Step 6. Remove Factory Carpet

Now you should just have carpet remaining.
In order to remove the carpet, you will need to pry up the cargo area kick panel in the rear of the 4Runner. Once the kick panel tabs have been lifted up, you should be able to pull the carpet right out.
Step 7. TruckVault Special Tool & Rivet Nut

This is the TruckVault special tool that you will use to install their provided rivet nut (rivnut). The special tool is basically a bolt, washer, and flare nut.
This part of the process is to fit their platform in place securely on the sheet metal floor.
Step 8. Measure & Install TruckVault Rivet Nut

The process is pretty simple to install. Insert the rivnut into the provided openings on the 4Runner floorboard a 22″ apart from the center.
Step 9. Prep Special Tool

Slide the red nut onto a 9/16 open-end wrench and then thread the bolt into the rivnut.
Finally, torque down the bolt as tight as possible forcing the rivnut to expand against the sheet metal. You should now have a bolt hole location for the TruckVault platform.
Step 10. Set TruckVault Platform Into Place

With the rivnuts successfully installed, you can now set the TruckVault platform into the cargo area.
Step 11. Line Up Rivnut Locations & Tighten Tray Down

Before fully setting the platform into the cargo area, slide the two provided Allen bolts into the holes on the platform. This will allow you to line up the platform over the rivnut locations and proceed to thread them down.
Step 12. Install Drawers

Before installing the drawer system on the platform, clean your area off, and make sure the platform is nice and secure. With the help of a friend, lift up the drawer system and carefully place it directly on top of the platform and gently slide it back into place.
Step 13. Backside of Drawer

Before pushing the drawer system too far back, check and make sure you’re not interfering with the back seats.
Here is what makes TruckVault really special…
Because we have a Trail Premium 4Runner with a cargo slide-out tray, their bottom platform section does not reach the back seats which creates a gap between the platform and seats. We called up TruckVault and they are currently making us an exact fit piece to fill that gap at no extra cost.
That’s rad! Working with them has been really simple: call, text, email, etc. They just make it work.
Step 14. Turnbuckles

You have four turnbuckles that will tighten the drawer system to the provided D-rings and mounting points in the 4Runner.
Non-Cargo Tray Models: For the 4Runner models without the cargo tray, you can attach the turnbuckles to the floorboard D-Rings.
Caro Tray Models: For the 4Runner with the cargo tray, TruckVault is working on an extended platform that will cover the gap picture here. We will update the post as soon as we get the new piece.
Step 15. Secure Drawer System

Tie down the back of the TruckVault to sheet metal.
Extend to turnbuckles about 10 turns or midway open. Hook the turnbuckles to the tie-down points on the sheet metal in the 4Runner and on then to the D-rings on the back of the TruckVault.
Step 16. Rear Turnbuckles

Tighten the turnbuckle snuggly by hand.
Hold the body of the turnbuckle with a 5/8 wrench and tighten the jam nut on the turnbuckle with a 9/16 wrench. This prevents the turnbuckle from loosening over time.
Step 17. Front Turnbuckles

Repeat that process.
Tie down the front of the TruckVault. Extend to turnbuckles about 10 turns or midway open then hook the turnbuckles to the tie-down points on the side of the 4Runner.
Step 18. Side Gussets
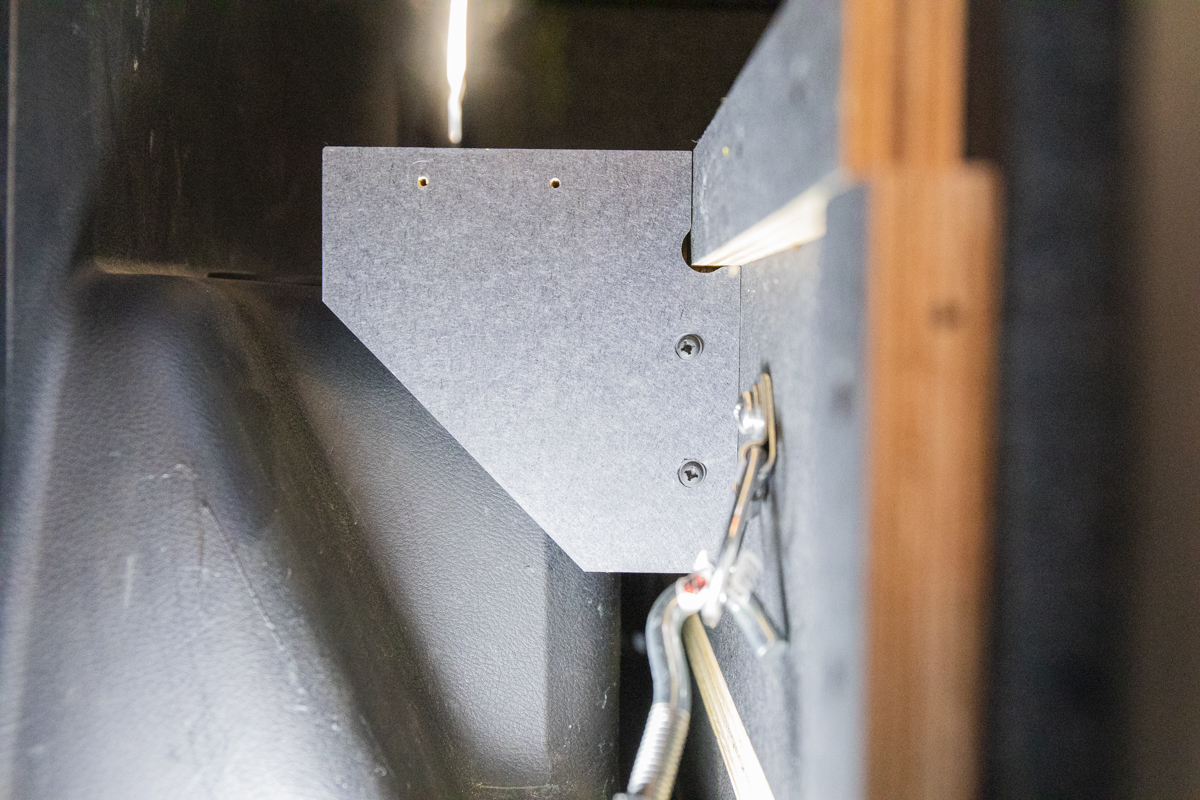
Attach the gussets to the ledgers (the outside shelf) on the TruckVault using a drill and a Phillips bit. The gussets are pre-drilled so installation is pretty simple here. You really can’t get it wrong. The whole drawer is beyond plug and play.
If you want to take your install a step further, you can secure the TruckVault to the vehicle with the locking tie-down straps. Pass one end of the lockable ratchet straps through one of the back D-rings of the TruckVault and through a seat latch, child-restraint bracket or a bracket that is secured to the floor of the vehicle. Then feed one end of the strap to the cam buckle on the tie-down strap. Pull it tight. Be sure the can is locked.
Step 19. Side Gussets and Wings

Set wings in place adjusting the position of drawer box to center if necessary. Remove lids to lock down the vault.
Step 20. Faceplates

Attach the faceplate to the ledgers with the four-round head wood screws through the pre-drilled holes. The faceplates are pre-drilled through the carpet to accept the washer head wood screws.
Congrats, your TruckVault Drawer System has been successfully installed!
Dividers

TruckVault provides vertical dividers and horizontal dividers if you order them.
In order to install the dividers, you have to first pre-install plastic channels with two screw locations. Once you figure out where you want to run your dividers, measure your mark, install the plastic channels first and then proceed to slide your dividers into place.
We are testing out a few different configurations of dividers so we have not permanently mounted any horizontal or vertical dividers at this time.
Accessory Light

The TruckVault accessory light is pretty simple to install.
Simply level off the area where you want it installed and screw the detachable backing bracket into place. Then, slide the light back onto the detachable bracket.
Kaba Simplex Locks

TruckVault provides a step-by-step guide on how to set up and change your Kaba Simplex lock combination. You can also check out this helpful guide on their website. This lock is one of the primary highlights of TruckVault. Their drawers are designed to be incredibly secure and the Kaba Simplex lock does just that.
Final Thoughts

We touched on it earlier but this is really a custom-built drawer system for exactly what I wanted. No compromises were made in the building of this drawer system. We got exactly what we desired because TruckVault literally lets you pick every detail in the build process. From the secure drawers and pull-out table to the integrated power system, this is everything (and more!) we would ever need in a drawer system.
We have only been out a couple of times running this drawer but it has already proven to be quite the useful trail accessory. Being a Type-A overly organized personality, to begin with, the TruckVault drawer system really sets my mind at ease when I see how organized and clean everything is.
The build quality is impressive, to say the least. The table slides out like butter and locks into place making a gratifying clicking sound. The drawers are even more impressive, providing a smooth rolling sound when pulling out and pushing back in. The Kaba Simplex locks have a stout locking hammer that gives you a real sense of security when you hear it slide and lock into place. Every time I use the drawer system, I tend to squint my eyes and nod in pure fulfillment as if I just finished eating a tomahawk ribeye. It’s really that enjoyable.
No DIY drawer system will ever compete with this level of perfection.
Any downsides?

I would have to say only one downside and that would be the price point. The cost of this drawer system is definitely not for everyone. Sure, there are plenty of DIY drawer systems out there, but I would be hard-pressed to see a similar build quality unless you are a seasoned woodworker.
My dad honestly might come close due to the fact that he owned a custom cabinet shop for two decades, but even after showing him, he was really impressed with the general millwork throughout. It’s hard to impress that guy too.
I thought at first the 5/8 inch MDO (medium density overlay) would be a concern over time, but after reading some of their long-term reviews, that thought quickly went away.
I have had an Extreme Series All-Weather TruckVault in the back of my Ford Ranger for 3 years. The truck bed is not covered and except for some dirt and debris, it still looks new. Through rain and snow, I have never had any moisture get inside the vault. I keep it loaded with camping gear year round and never have to worry about break-ins. This is a great product and I highly recommed it. —Some guy on Facebook
Time will tell after a few years and really getting to know the product in person. After a couple of trips out I have faith that the TruckVault is going to hold up extremely well.
I’m excited to get out there and start camping and off-roading a little more with this impressive system.
I have a 3rd Gen 2001 4 Runner, and love the tool box for the 5th Gen 4 Runner. Wondering if that will fit the 3rd Generation of 4Runner? Any help would be appreciated and if the tool box would fit for the 2001 4Runner.
Did you ever get an answer, regarding 3rd Gen compatibility?
Great review. I’m curious to hear why did you not go with the standard table extension? It’s half the height as the heavy duty and can hold up to 50lbs which seems like enough. Interested to hear your thoughts.
just out of curiosity, what did you do with the sliding tray/parts? Are they are for sale?
What height drawer did you guys go with in this setup. Is it the standard, utility, or magnum height? Just wonder because your looks to be the right height to still be able to fit a fridge freezer combo in top of.
Great review. Just got a quote myself. Are the face plates and wings included on all orders or did you pay extra for those? The diagram I was sent only shows the box dimensions. Thanks
Included. You can also call them if you want. They have a pretty helpful team of people that explain everything to you. Really good people over there.
TruckVault is top notch, and definitely worth the money if you can swing it. I have a similar drawer setup from them in my 2018 Ford Explorer interceptor and even with constant opening and closing and the heavy weight of my gear for work they have stood up to the abuse. The only downside is the rattle of the drawers. Because of the metal locking systems and the tolerances allowed in the mechanism and latch they tend to work themselves loose and rattle like crazy. There is room for adjustment in them but kind of a pain to do. It could also just be the type of driving it endures.