
Sound Deadening the Doors, Floors and Rear Hatch on the 5th Gen 4Runner – Step by Step Install
Application of CLD (Constrained Layer Damper) is fairly simple once you get the hang of it.
Working with the material is easy as long as you have the patience to measure, mark, cut and apply where it’s needed.
There are a couple of ways you can approach your installation. You can apply the CLD material over every square inch or you can apply it over the large open spaces on your sheet metal only and leave uncovered gaps throughout.
With covering every square inch, you are ensuring that you are eliminating as much sound vibration as possible. And, although a minimal application might not stop every sound wave, it sure will help keep the noise levels down.
Regardless of which you choose (full or minimal application), the benefits of sound deadening the 4Runner will be very rewarding. In that article, we cover different types of materials including CLD, MLV, and Closed Cell Foam. We also covered what you can expect from deadening each area of the 4Runner.
Minimal or Full application:
- Money
- Time/Patience/Energy
Money
For about 75 sq ft of CLD, you are looking at $100. For an entire 4Runner application, you need about 150sq ft of material. That would cover the doors, floors, pillars, hatch, and roof, so about $200. If you are looking to do just the doors, floors, and hatch (not the sides or roof) like I did, then you can get away with around 125 sq ft, so expect $150. I did not measure the exact amount of sheets used so don’t put a hard quote on me for this.
With that said, you can do the entire 4Runner with 75 sq ft, you will just have less coverage all the way around. We are talking small strips places strategically instead of large sheets covering every square inch. In this post, I applied as much surface area as I could, but you can apply as much or as little as you think is best for your situation.
50 mil vs 80 mil sound deadener?
What’s the difference? About 30 mil. In all seriousness, the thicker you can go is probably going to yield better results. It’s not that much more expensive for the 80 mil and although I have not applied the 50 mil, I would still buy the 80 mil again.
Time/Patience/Energy
This is not a fast application by any means. If you are looking for something quick and dirty, you can cover the wide open sheet metal only. That would be much faster than cutting, marking, measuring and applying hundreds of little pieces throughout the 4Runner.
There are applications around the web that show CLD over the exposed wiring harness. I choose to apply the material underneath the harness, which did take much more time, energy and patience.
I am not saying my way is 100% perfect at all. Maybe I put too much sound deadening on, and possibly an expert audio guy can comment here to let me know how I did.
At the end of the day, I cut noise by 50% so I think I did pretty well. I would like to apply a minimal amount of CLD to our other 4Runner and see if there is a noticeable difference.
Tools & Time for Installation

You only need a few basic tools for the installation. Plastic pry tools, metric sockets, utility knife (razor blade), and a portable table with a cardboard base is about all you need. There are other tools that are recommended for the install but you don’t “need” everything. The staple gun will come in handy if your carpet stables get removed.
Material for install
- Dynamat (most expensive): Check Price
- MAT 66 80mil: Check Price
- Kilmat 80mil: Check Price
- Noico 80mil: Check Price
Update: Recently MAT 66 was out of stock, Kilmat is basically the same product.
Tools for install
- Plastic pry tools: Check Price
- Mini-pry tools
- Metric sockets
- Staple Gun: Check Price
- Drill
- Utility knife (razor blade): Check Price
- Portable table
- Piece of cardboard for slicing on
- Hole punch/screwdriver
- Sound Deadening Tool: Check Price
Time for install:
- Doors: 1/hr per door
- Floors: 6/hr total
- Hatch: 1/hr total
This entire process from start to finish can be done in a weekend, or even a day if you are feeling up for it. I would dedicate two days for the deadening application, especially if you haven’t pulled out the seats or door panels off yet. It’s not that complex, it just helps if you’ve done it once or twice.
Sound Deadening Doors
Remove covers and screws holding door panel in place

There are three tabs covering screw locations. Remove these three-panel covers and you will see a Phillips head screw that needs to be removed. There is one plastic cover that is very small. You should use a mini flat head screwdriver or a mini plastic trim tool here. Using a larger trim tool can damage the cover.
Remove A-Pillar Cap
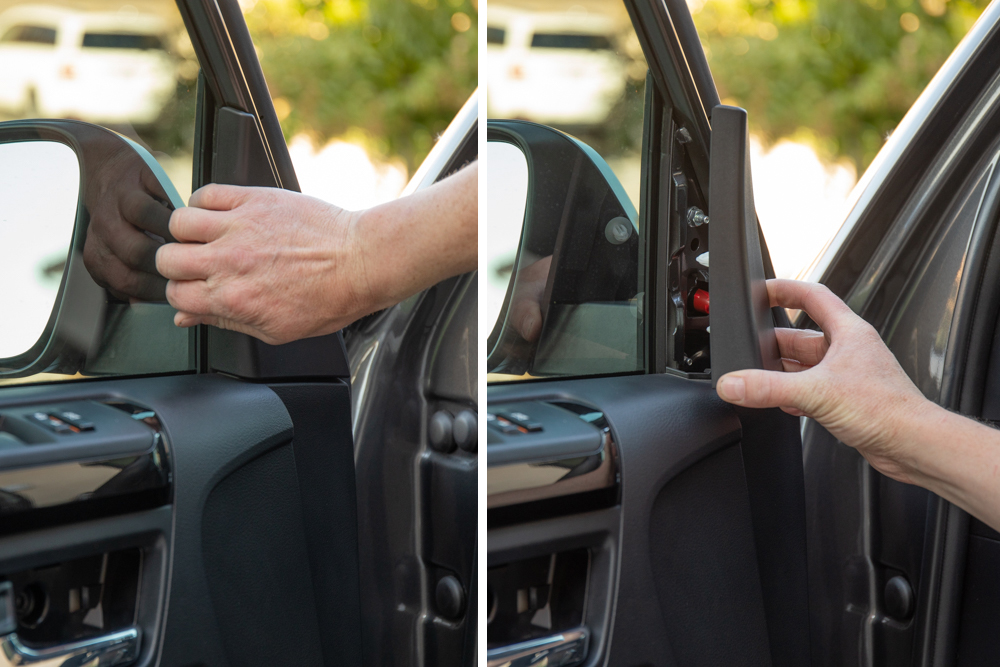
Pop the A-Pillar cap off of the door using your hands. It can be removed from the outside edge.
Remove Door Cover & Courtesy Light Clip

Grab the bottom corner of the door panel and pull straight out. You will hear a few pops from the tabs being released. Proceed to unclip the courtesy light from the door panel.
Tape Door and Create a Guide for Applying the CLD

It’s a good idea to tape the border of the door all the way around. This will prevent you from over-applying an excess of CLD material.
Remove Door Cover, Disconnect Cables & Pull off Plastic Cover

Remove the door cover and carefully disconnect the cables attached to the door. The cables do come off easily, they just pop right out of their socket. You can also remove and discard the factory sound deadening plastic cover.
Remember to reattach the push tabs stuck to the door back onto the door panel.
Measure, Mark and Cut the CLD

Hold up material to the door. Measure, mark and cut pieces according to where you plan on placing the sheets. For the wiring harnesses, I made a cut along the wires line and then folded the CLD around and under the wire harness. For clips, screw holes and other holes, I just marked a hole and then made a cut for that hole.
Place Sound Deadening on Sheet Metal

Next, peel back the CLD backing and apply the material. Using a plastic pry tool or a preferred sound deadening roller, flatten the material on the sheet metal. Looking back, I should have purchased the roller. Using the trim tools to flatten the material was not the best tool for the job. But it did work if you have nothing else.
Remove Styrofoam Sound Deadener

In order to lay down CLD on the inside of the door, it will help if this styrofoam block is out.
Sound Deaden Inside of Doors

How to Apply Sound Deadening Inside Doors

To get the CLD on the inside of the doors, it helped to slightly peel the backing first. Once you have a few inches of the sticky side exposed, place it as far inside the door as possible. After a small portion of the sticky side has been applied (holding position), peel back the remaining portion of backing and apply the remaining CLD.
Reinstall the Factory Sound Deadening Block

After the inside of the door has been covered, you can reinstall the factory sound deadener.
Be aware of Bolt Holes and Tab Holes

Be cautious about every hole in the door. You can always go back and cut holes into the CLD once it’s applied but you risk leaving marks in the sheet metal. And, it’s just easier to plan for it the first time.
Cut Out Speaker Area & Apply the Dead

I found that instead of placing small pieces of CLD around the speaker area, covering it with one whole sheet and then cutting out a hole was a lot easier.
Apply CLD Sheets over Large Open Area

After most of the door has been covered, you can place larger sheets of CLD over the large exposed opening.
Cut Hole in CLD Sheet for Door Cables

The last sheet you need to apply will fit the door cables. I cut a large opening and then left a layer of backing on the opposite side so the cables wouldn’t “stick” to the backside.
Remove Tape and Attach Door Panel over Door

Remove the guide tape and then reinstall your door cover.
Re-Installation of 4Runner Door Covers

Reinstalling the doors is much easier if you follow this tip.
Once you have the door cover removed from the door, remove the door covers window seal strip. This unclips from door cover. Place it on top of the door in between the sheet metal and the glass. Once you are ready to put the door cover back on to the door, press the door cover straight onto the door. Piece of cake.
Sound Deadening Floors
Remove Cargo Tray Cover

Using a plastic trim tool, pop the rear cargo tray cover. Then disassemble the rear cargo tray slide bracket.
Remove Cargo Compartment Tray Brackets

The cargo tray compartment is held in place by these two bolts and then two more underneath along the sheet metal.
Remove Cargo Compartment Tray

Once the top and bottom bolts are removed, you can remove the compartment.
Remove Slide Rails and Carpet

After the cargo slide tray bracket is out, you can remove the carpet and then access to the bottom floor sheet metal.
Remove Rear Seats

The rear seats are held in place by a collection of bolts from the underside and the backside. The backside bolts are easy to access with a small ratchet. The front bolts are best accessed with an extension.
Rear Seats – Rear Cover

In order to actually remove the seats, you need to access the bolts holding the seats on their bracket. This bracket allows the seat to rotate back and forth. These bolts are accessed by lifting the rear seat cover. Lift this cover (held in place by push clip) up and you will access the bolt attached to the bracket.
After you remove the rear back seats, you can remove the lower bench seats as well. The bench seats are easy, just uncover the bolt caps and remove the seats.
Remove Kick Panels and Plastic Seat Caps

Using pry tools, you can lift the plastic kick panels and the seat plastics.
Remove B-Pillar Seatbelt & Lower Plastics

Remove the seat belt bolt cover and bolt. Then process to remove the lower B-Pillar plastics.
Remove front Plastics

The front door trim plastics are held in place by one female threaded hole & a metal clip attached to the weather stripping. Pictured above is the circular dial just to the left of the footrest.
This was the last of the interior plastics that I removed. You can go another step and remove the entire center console but I didn’t think that was needed for my goals.
Sound Deadening the Front Seats

This was plenty of access for me to deaden the floors. You can take it another step and remove the center console but this was enough room for me to access what I wanted to deaden. I was able to reach up along the outside of the center console and apply multiple layers here. You can’t see it but I was also able to lay CLD directly underneath the gas pedal. I did lay CLD underneath the wiring along the edge of the door. This is not the finished product. I laid the material on thick here. Everywhere I saw exposed sheet metal, I covered it with CLD.
Holding Up Carpet with Zip Tie

To hold the carpet up, I zip-tied a portion of the base carpet to the center console. This gave me plenty of flexibility to lay CLD without having to support the carpet while applying the material.
Main Floor & Rear Floor

The floor is one of the easiest areas to apply CLD because it’s mostly just big sheets. Just remember to be cautious about covering bolt holes in the floor for the seats and other trim pieces.
Continue on with covering the entire floor which includes under the front seats, rear seats and entire cargo area. The more sheet metal you cover, the better. However, even if you only cover portions of the sheet metal, because you don’t have enough material, it will still make an improvement in sound quality.
Sound Deadening Center Floor

You may need someone to help with lifting the carpet in the center to apply a layer of CLD. Directly behind the center console was interesting to access because of the carpet.
You are pretty much finished up at this point. Just reinstall all the interior elements.
Reinstall Rear Seats

I started by reinstalling the large seat first. This was the biggest pain to get out of the 4Runner so I figured it could go in first. There is an L guide along with a bolt that locks into the bracket. Once you get these lined up, secure the bolt into the bracket and then proceed with screwing down the bottom bolt. Repeat this process with the smaller rear seat.
Reinstall Cargo Storage Tray

Proceed to reinstall the rear cargo compartment.
Reinstall Slide Tray

Reinstall the rear cargo tray. Just remember to install the parts in order. It’s easy to miss some of the parts when your garage is filled with every interior 4Runner part. Try to organize all your parts the way they came out so the reinstall goes smooth.
Sound Deadening Hatch
Remove Rear Hatch Cover

First, remove the 10mm bolt near the hatch pull strap. Then using your pry tools pop the rear hatch cover off. Pull down on the hatch cover once you have one push tab unclipped and all clips should pop off. Remember to remove any clips from the hatch and reconnect them to the hatch cover for reinstall.
Remove Speakers and Electrical Bracket

Remove the speakers, and disconnect the electrical harness connected to the support bracket. Once you have disconnected the harness, proceed to remove the support bracket and plastic cover. Discard plastic cover.
Clean inside of the rear hatch

The inside of the rear hatch is covered with grease. Cleaning this with rubbing alcohol or distilled water will make it easier for the CLD to be applied.
Placing Large Pieces of CLD on inside of Hatch

Reaching inside the rear hatch, apply large pieces of CLD from the top corners to the center covering as much surface area as possible.
Layers of CLD on inside of Hatch

Make sure you cut holes in the CLD for bolts that you may need to reach later. Removing the rear hatch cover is not uncommon if you work on your 4Runner often. I tried to leave all the bolts exposed in case I need to access them in the future.
Layers of CLD on inside of Hatch

Place a large sheet over the speakers and then make a cut accordingly using a sharp razor blade (utility) knife. This should leave you with a perfect open circle covering the speaker.
Final Layers of CLD on Hatch

Reinstall the speakers and support bracket. I left a large portion of the bracket area open in case I need to access the rear hatch again in the future. After the electrical is connected and the speakers are back in place, you can reattach the hatch door cover.
I just finished adding some Siless Closed Cell Foam on top of the Dynamat I had added to the doors years ago. That tip about removing the door cover window seal strip worked like a damned charm! Instead of wrestling with a door card for 20 solid minutes, each door went back on in a matter of seconds. Whoever figured this out: THANK YOU!!!!
Did the ccf help with more sound deadening?
Outstanding details and illustrations. Can’t wait to do this on my new ’24.
The level of detail in these write ups is insane. Thanks dude.
Great write up. Quick question is there any concern for the height of the CLD in the rear cargo area with a rear cargo deck. Is 80mm a good size or can I get away with 100mm and still lay the carpet down perfectly. Thanks again
I just completed sound deadening and noico 150 insulation on my stock 2022 TRD Pro 4Runner’s 4 doors and the hatch. I only put the Noico 150 on the inside of the outer most panel. I will be sound deadening the floor as soon as I get some time. The decibel reading on my phone while sitting in the driver seat and holding the phone was 85 pre install 75 post install at 50 mph. For comparison, my previous truck was a 2006 LR3 with just normal all season tires and had a 75 DB reading. I have no idea if the DB app on the phone is 100% accurate, but I figure as long as you use the same app you’ll have an idea what difference the sound deadening makes. 10DB is noticeable and I imagine it will get even better with the floor completed.
Hi Brenan I’ve been using this article to start my sound deadening project. Just did the drivers door following your instructions and I can already hear the difference between driver and passenger side on the road!! One thing I was wondering though is if you did all 4 doors or just the front 2?
I absolutely did all four doors. Huge difference.
Wow man, thank you for this. Do you have any plans of launching a follow up article on the roof, MLV or any additional sound deadening layers? Do you think its worth it or will you stop here?
If I happen to have the interior pulled apart, I would go the distance the second time around but I am not going out of my way to do it all again just for the roof and additional layers. I want to but man it would be a project to do it all over again.
Hi Brenan,
Thanks for posting. Really appreciate the detailed outline.
I have a 2011 SR5 (seats 5). I am interested in following your process outlined above. I have wanted to do this for a few years. I finally have the time. I plan on tackling the doors, liftgate, and beneath carpet. I will not do the roof.
I am concerned about plastic clips. I imagine anything plastic will be brittle and crack (vehicle is 9 years old).
Is this a legitimate concern? Are there many different plastic clips that need to be removed?
Are plastic clips universal? Or do clips differ across attachment points (door, floor, liftgate, etc)?
I am concerned that I will get the sound deadening material installed, but I will not be able to put the car back together because I will break 40% of the plastic clips. Finding the the right replacement clips on the Toyota OEM website could be problematic.
Thoughts?
Plastic clips can be a concern for sure. When I am pulling all the plastic trim off, clips WILL BREAK, it’s usually a part of my life. If you are super patient and use a clip removal tool, then you will usually have better luck. Even with a plastic trim tool, it’s not always guaranteed that all clips will stay in perfect shape once removed. They are not designed to come out easily and when you need to replace them, the OEM clips are very pricey. Sometimes, one OEM clip can be anywhere from $4-$8 (FOR ONE CLIP). It’s crazy what Toyota wants for clips. The aftermarket options are hit or miss. Sometimes you get a good variety pack for $20 and sometimes they are trash. I have purchased a few containers of clips just to see which ones were best. The white door clips will be your biggest challenge (at least that was mine anyway). When removing a door panel, one or two always seem to give me a run for my money. When replacing them, I have had pretty good luck with these clips. If you are diving in for a sound deadening job, I would grab a bag for backup.
Thanks so much for the quick reply. I really appreciate it. Ordered these today. I’ll keep you updated on my progress.
I did this mod to the doors and hatch of my 17′ ORP this past weekend. Here are a few things I took away that you might not get from Brenan’s write up:
1) If you do it right, applying the CLD to each door will take longer than expected. Unless you’ve done this before, it will likely take longer than an hour each door. It is a tedious process cutting the material and fitting it to each portion of your door. You know what they say, “measure twice, cut once”. Nonetheless, the material is easily cut with a utility knife and can be pressed/rolled into place without a lot of effort.
2) When you remove the stock plastic sound wrapping there will be some of the black tar-like adhesive stuck to the door. I wouldn’t worry too much about that material as it won’t affect the CLD from doing its job. It is a pain in the ass to get off the door anyways.
3) Getting the door panels back on the door. By the time you have finished up a door, the last thing you will want to do is fight with the tricky door panel. I found a much better solution on another 4R forum out there. Remove the black weather stripping at the top of each panel and place it on the metal bracket first. Then, all you have to do is line up the panel and press it straight into the door.
In the end, this mod is definitely worth it! Without even touching the floor yet, the sound was already improved. I still hear some noise from my A/T Tires but the bass is not nearly as muddy and there is less wind noise at highway speeds. The floor is a whole other beast but it’s up next!
Hey Ethan,
I also did the doors and your comment was very helpful! I was planning on doing the flooring this weekend and was wondering if you had finished your floor and if you had any tips! Thanks!
I removed my old carpet and put sound dampening and rubber flooring in and I Love it. Makes a big difference in both sound and ride.
Something I’m going to do in a future upgrade. I’m sure your sound system improved as well by eliminating vibration and outside wind noise. The acoustic benefit alone is worth it and can definitely make it easier to hold conversations from passengers riding in the backseat..
Thank you for the step-by-step. A video comparison of before and after to hear the difference in exterior noise level interference with and without music in highway would be very convincing. I’m going to go with Noico 80 Mil since I live in Miami. Cheers!
Awesome! I actually got a bunch of Eastwood Brand sound deadening last black friday and still haven’t gotten around to it. And this confirms that it’s a big job but this will help me immensely!