
How to Install a Fridge Slide to the BOSS StrongBox For Your 5th Gen 4Runner
A few weeks back, we did an installation coupled with a product review of the BOSS StrongBox. Don’t stress; it’s still badass! Trail4Runner was the first site to do an in-depth review and install article of the new-to-market 4Runner storage system. I did my best to cover every question I thought our followers would have but I knew I wanted to add some details down the road.
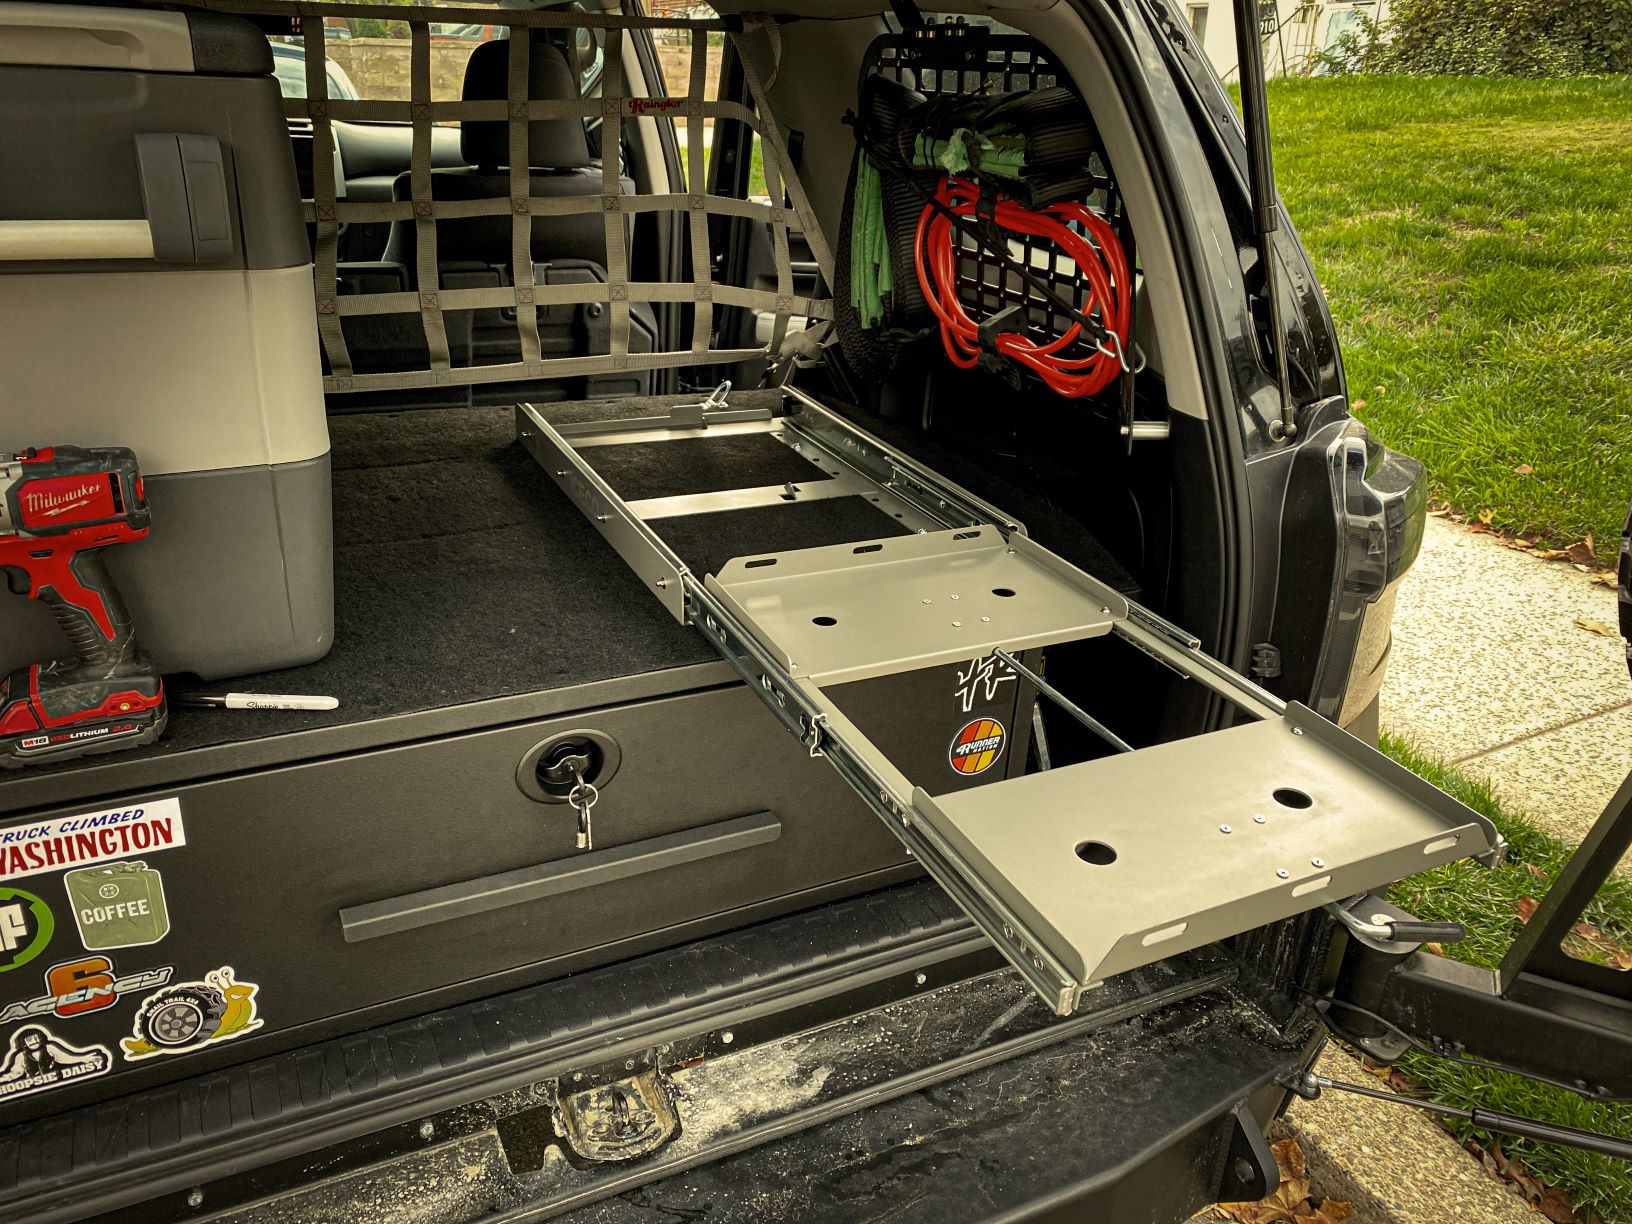
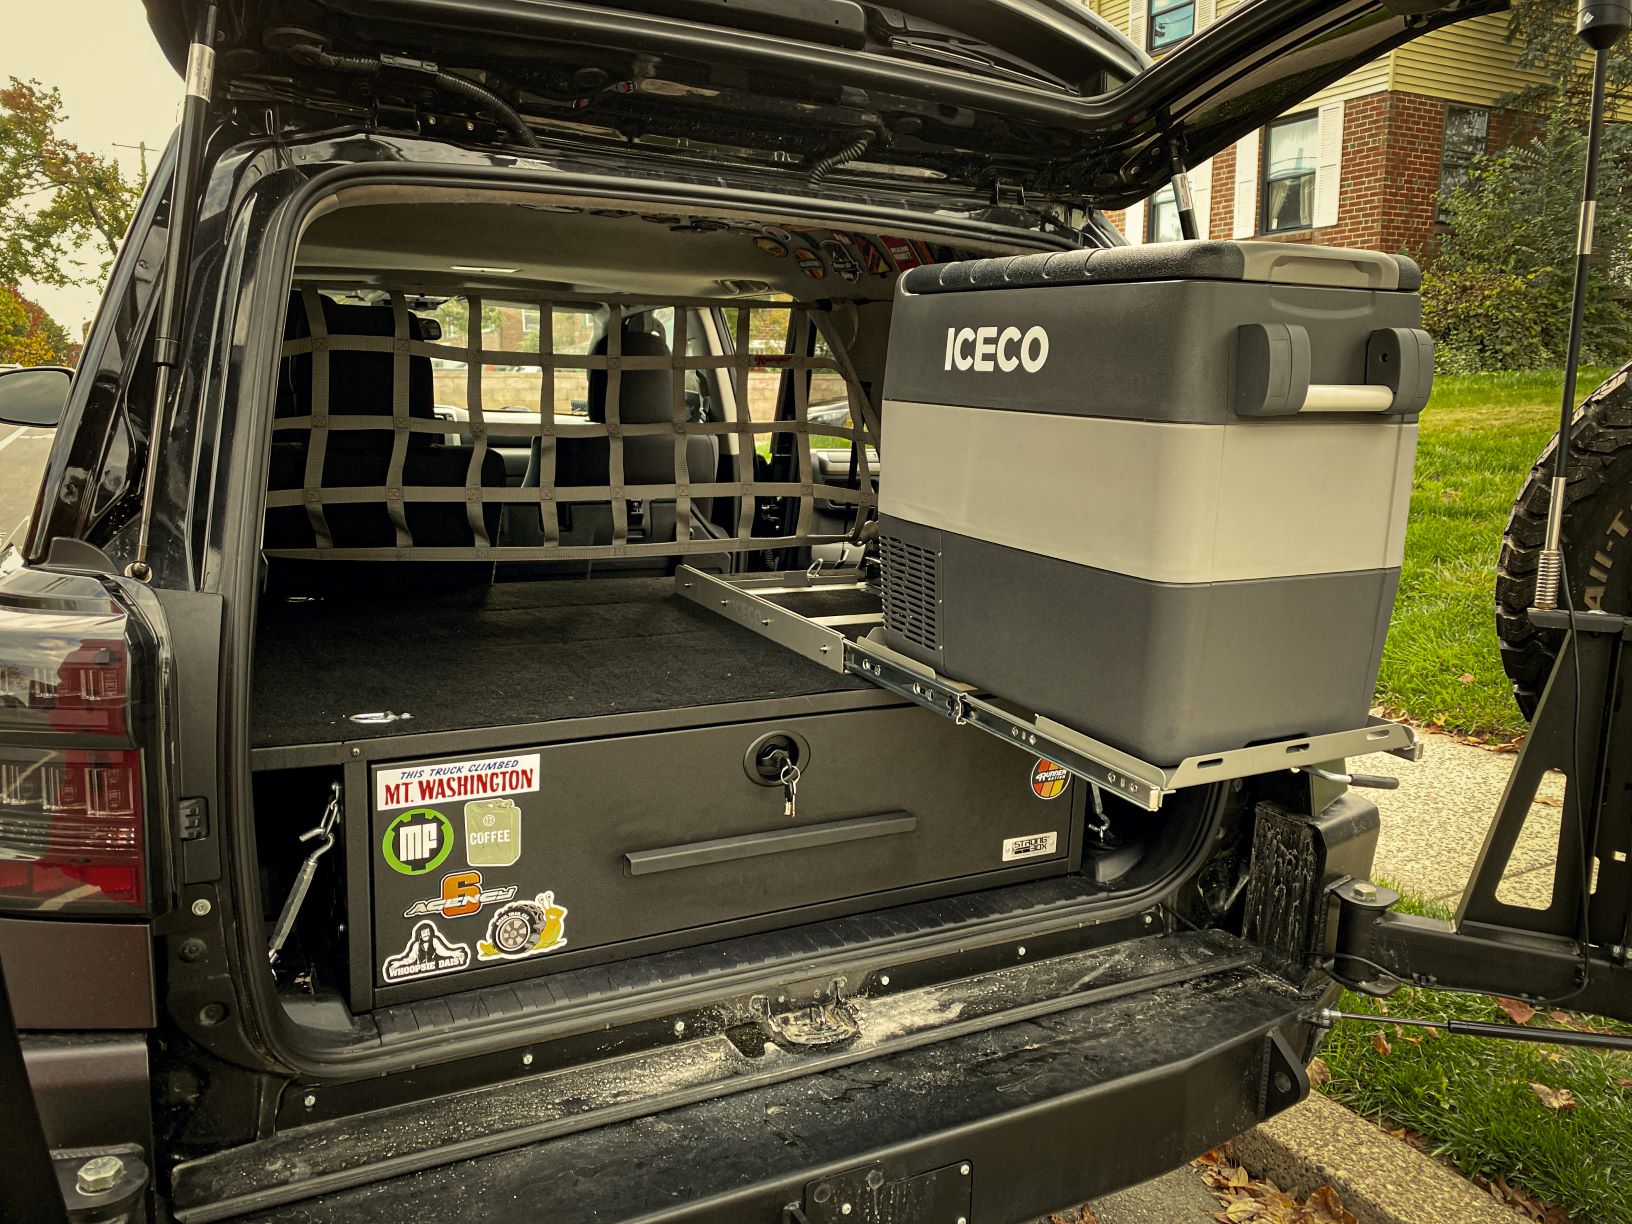
As you have probably seen from our previous article and the photo above, the drawers sit fairly high in your cargo area. There are obvious pros and cons to this; more drawer space to fill and lock the gear in, but less cargo space for things you don’t necessarily want or need to secure in the drawers (like groceries and baby strollers). I just so happened to like how deep the drawers are, and with a fully packed trunk, I keep all the items I go to regularly inside the drawers for easy access.
However, that height could potentially pose issues if you want to mount a sizeable fridge on top. Having never owned a car fridge before, I wasn’t sure how much space I’d have to work with. More importantly, I didn’t want to go with a fridge that was too small just to accommodate the large drawer system.
Features & Specs
We used this table in our previous article, but it’s worth bringing it back again for this article in particular.
| Weight | 115 lbs |
| Drawer Dimensions | 37”w x 32”d x 9”h |
| Top Platform | 55.5”w x 34”d |
| Outside Frame Dimensions | 41”w x 34”d x 12.5”h |
| Top of Platform to Headliner Edge | 23”h |
| Top of Platform to Headliner Center | 26”h |
| Material | 16-gauge cold-rolled steel |
| Finish | Black wrinkle powder coat |
Fear Not, You Have Space

Spoiler alert: If you haven’t seen the pictures above, everything worked out just fine.
In fact, we just did an in-depth review of the JP50 ICECO fridge and slide. Here’s some info at a glance:
- With the fridge mounted to the slide, it sits at 22.4″ tall
- The fridge capacity comes in at 50L (equivalent to 72 cans of soda… or beer)
- The temperate ranges from -0.4℉ to 50℉
- Fridge width is 13.8″
- Slide width is 15.9″
- DC cable easily sits behind the drawers and plugs into the 4Runner’s rear outlet
Long story short, we felt like we were able to fit in a fairly large fridge on top of the drawers and didn’t have to compromise on capacity.
Installation Steps
Installing the fridge slide is fairly straightforward. All in, you’re looking at roughly 25 minutes from start to finish with some tedious steps in between.
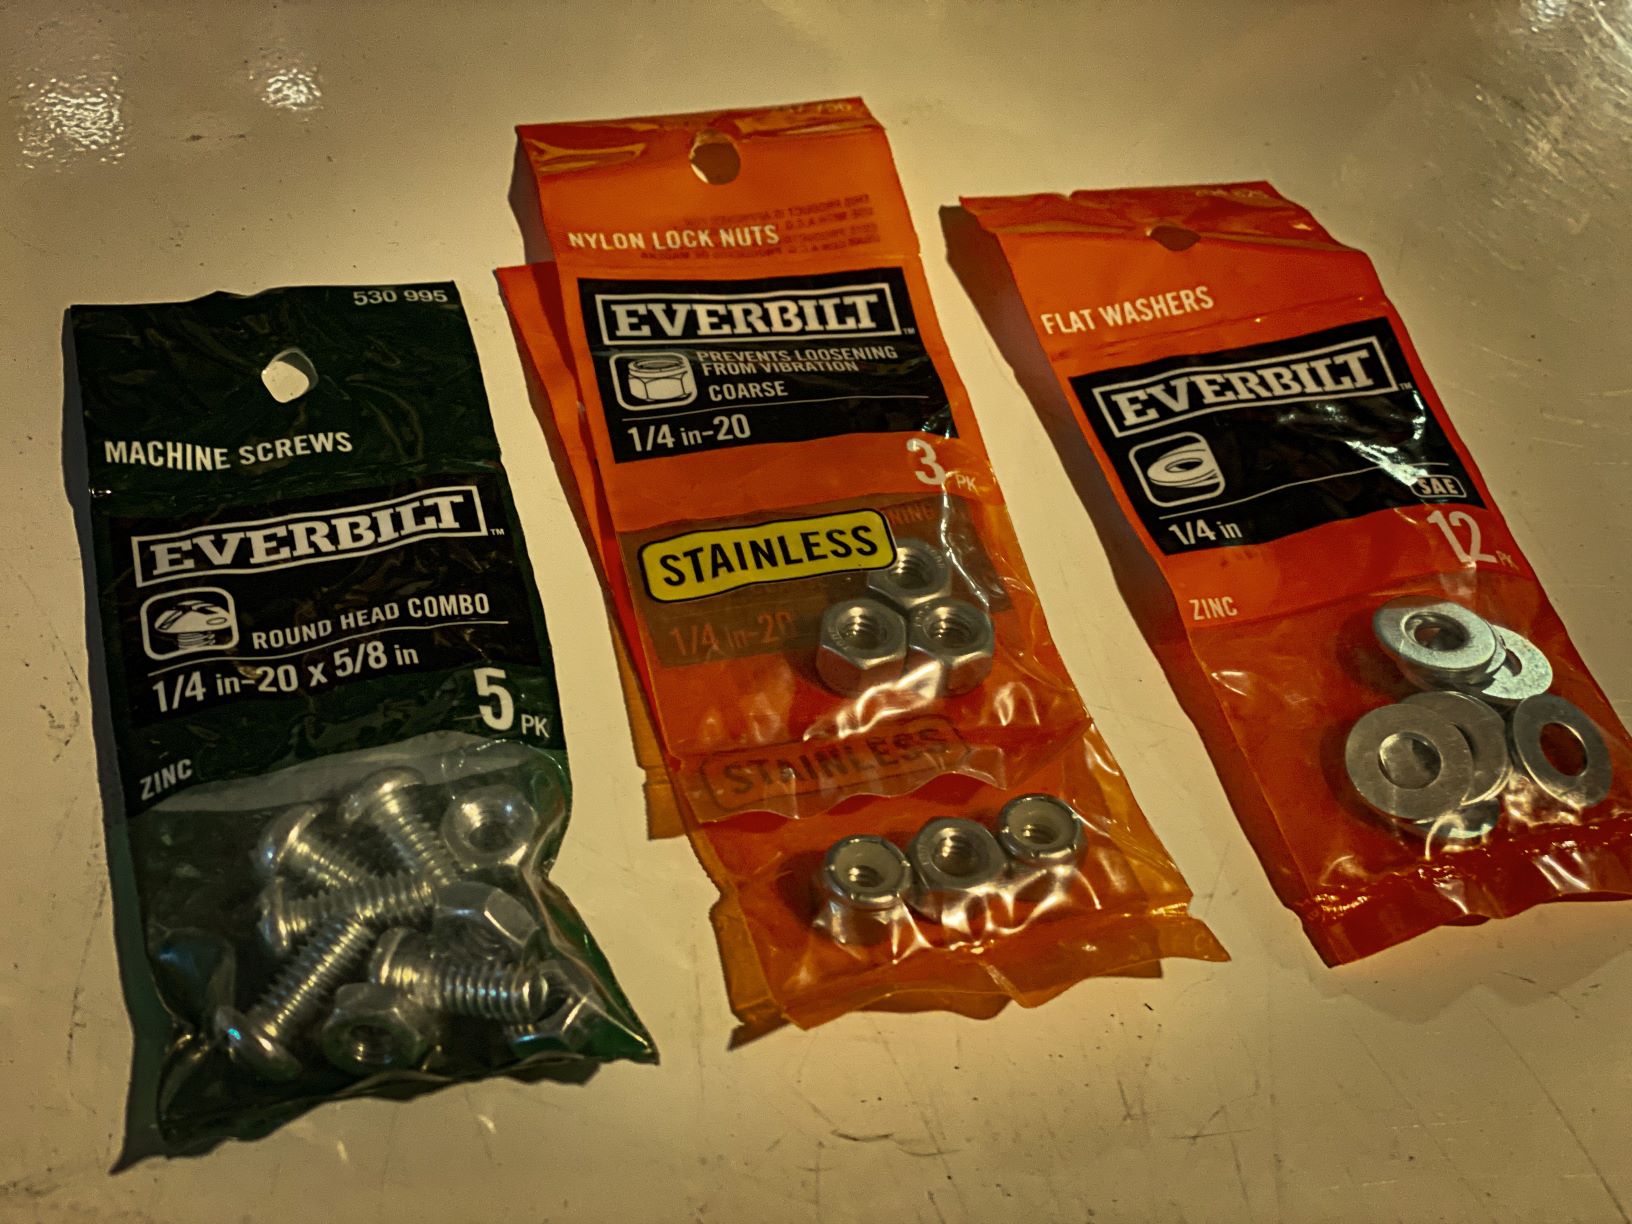
Tools & Materials
- Cordless Drill
- 5/32″ Bit
- 1/4″ Bit
- Permanent Marker
- Phillips Head Screwdriver
- Ratchet w/7/16 Deep Socket
- Masking Tape
- 1/4″-20 x 5/8″ Machine Screws (4-6)
- 1/4″-20 Nylon Locknuts (4-6)
- 1/4″ SAE Flat Washers (4-6)
Step 1. Measure Drawer Clearance
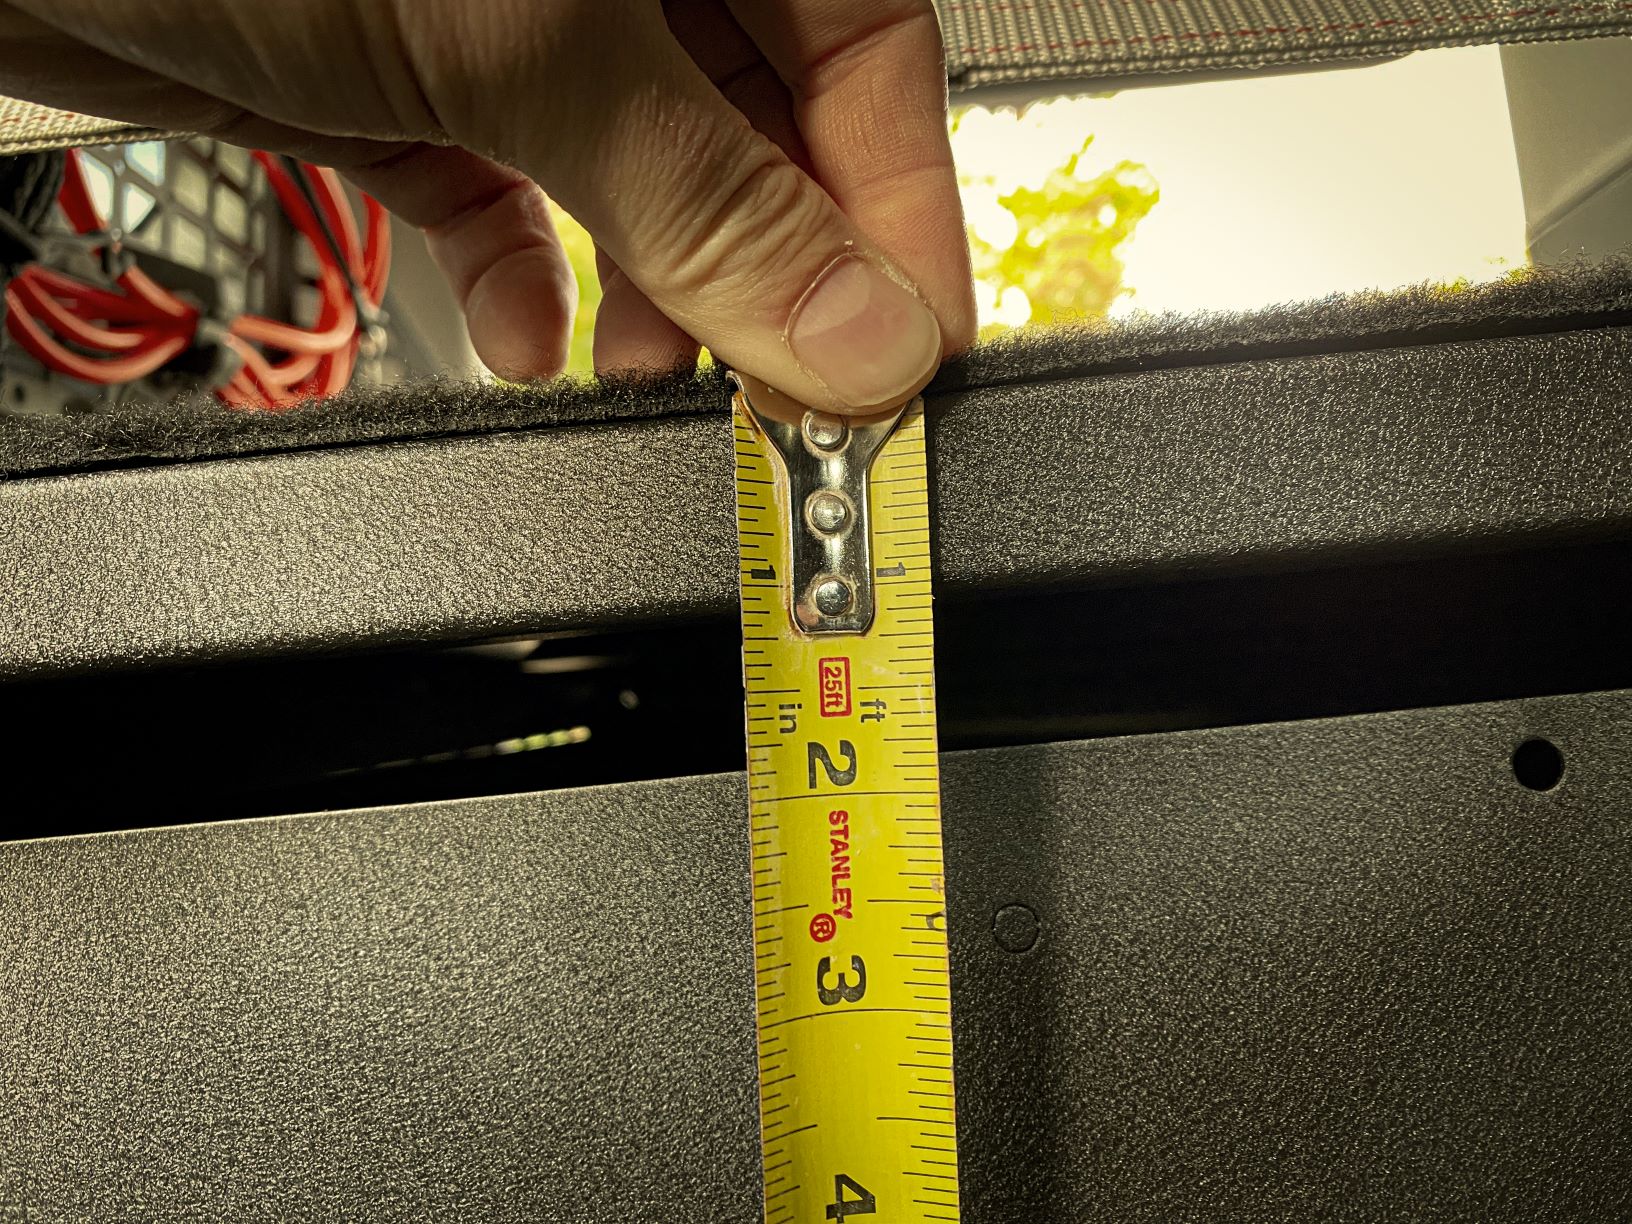
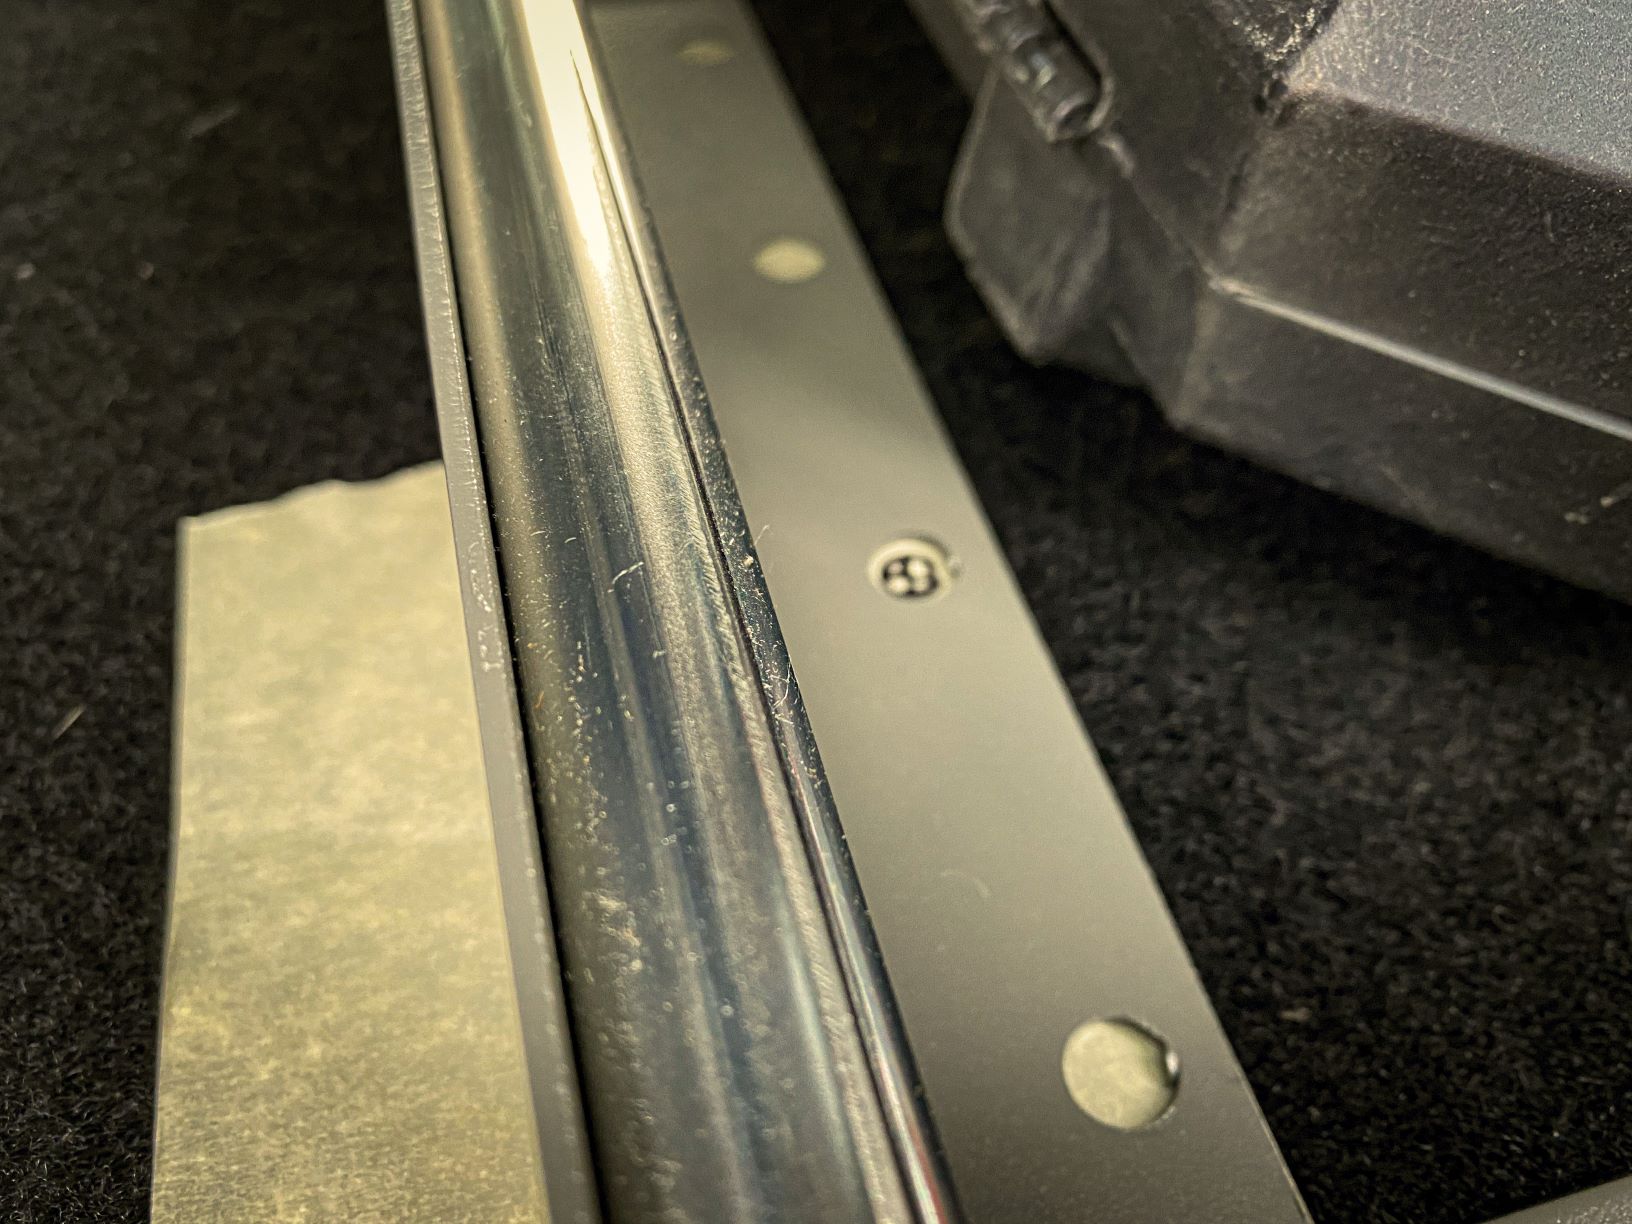
My suggestion is to go with the hardware I described above, but the decision is completely yours. Before I went out and bought the hardware, I measured the clearance from the top of the platform to the top of the drawer. You’ll want to make sure that with whatever hardware you go with, just remember to avoid long bolts which will compromise the smooth opening and closing of the drawer once the slide is mounted.
While it’s not the best picture, you have roughly 1 3/4″ factoring in the carpet thickness, the thickness of the slide (and mounting points) you go with, and the thickness of the metal used to build the platform (16 gauge cold-rolled steel).
Step 2. Measure How Far Back Slide Should Sit

With the slide and fridge in its ideal location, measure how far back you want it mounted to the drawers.
It’s important to take into consideration a few things here:
- Line up the potential mounting points and avoid drilling through anything that will be difficult to fasten to underneath.
- Recline the rear passengers’ seats all the way before marking your final mounting points; you’d hate to have a passenger not be able to recline fully because of the fridge
- Think about the length of the DC cable you have and what power source you’ll rely on. We’re utilizing the 4Runners passenger’s side DC outlet while on the road and likely our Jackery when we make it to camp. So, we decided to mount the fridge/slide on the passenger side to give us enough slack to fully extend the fridge while still plugged in.
- With the help of a friend, do a few test open/closes before it’s mounted. You want to make sure you have the headliner clearance and the ability to close the liftgate without any issues.
Step 3. Begin Taping Out Perimeter
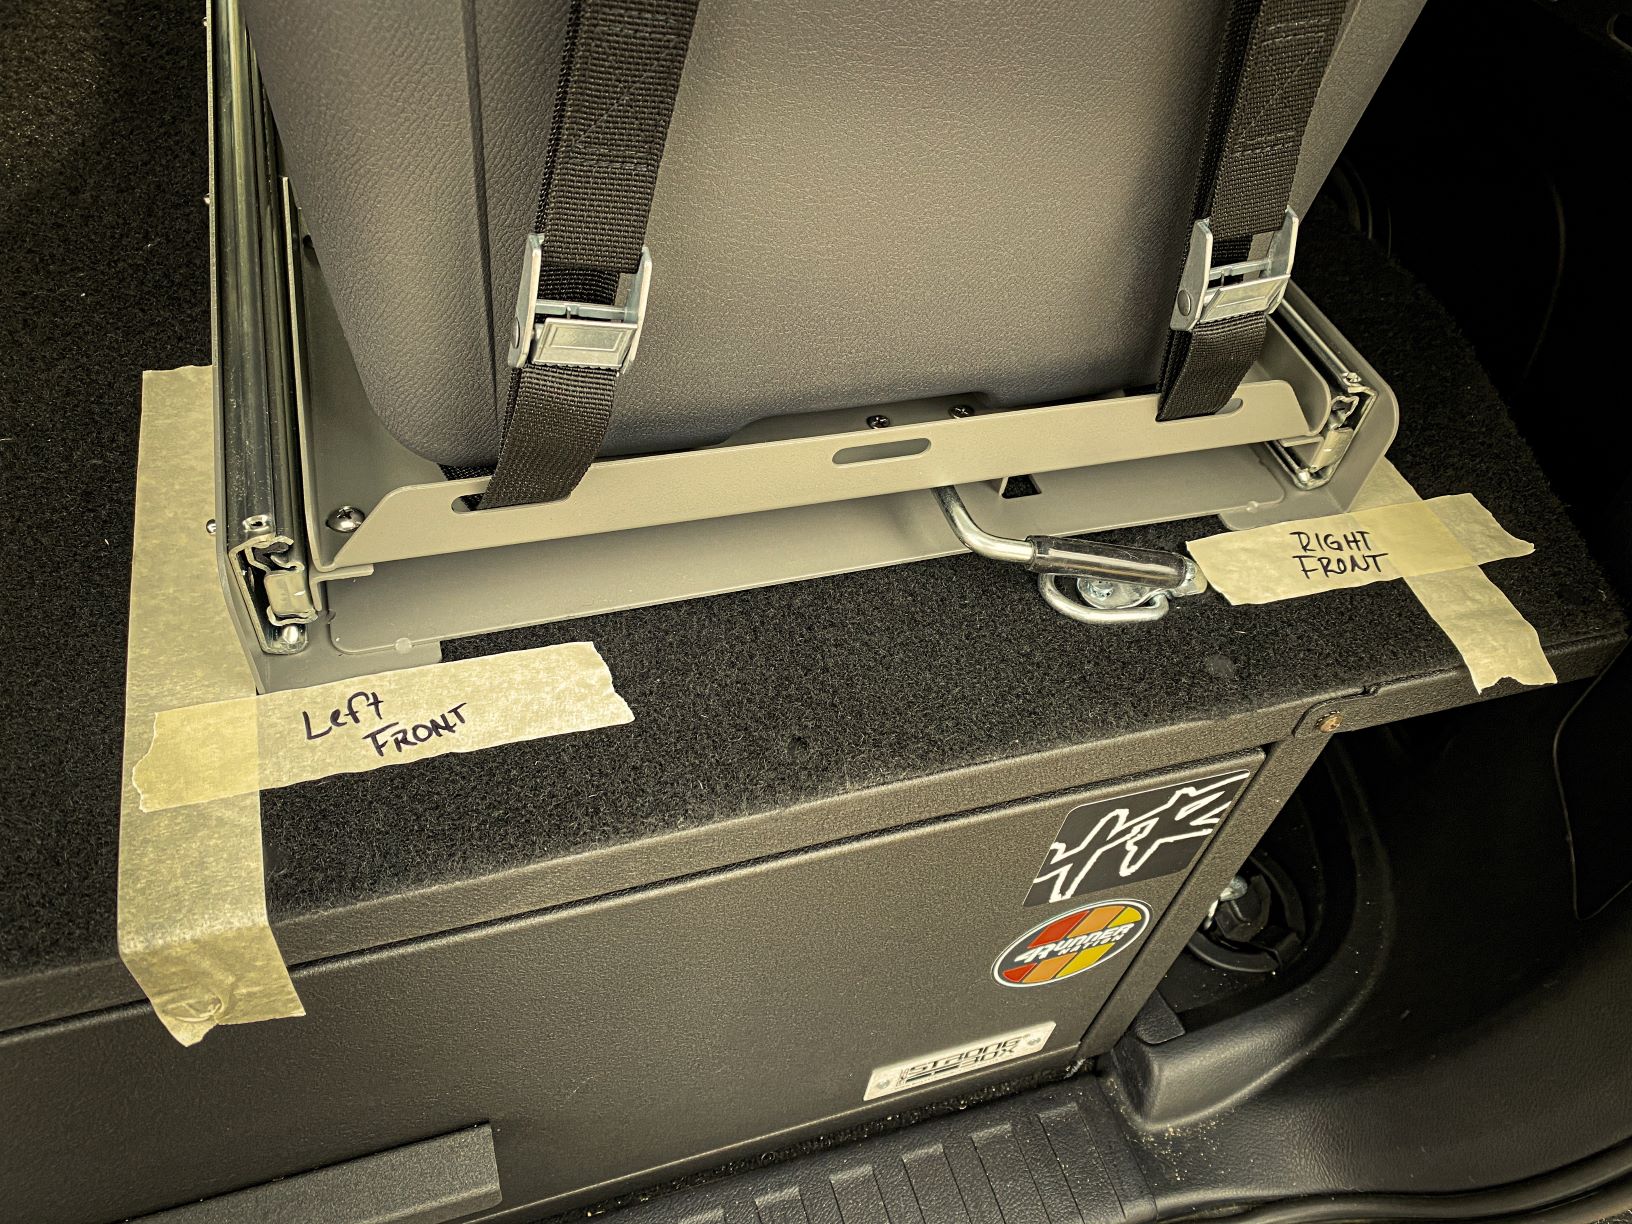
This may have been a bit of an overkill step, but we wanted to make sure, once we removed the slide and drawer to begin drilling, that we didn’t lose our desired final position.
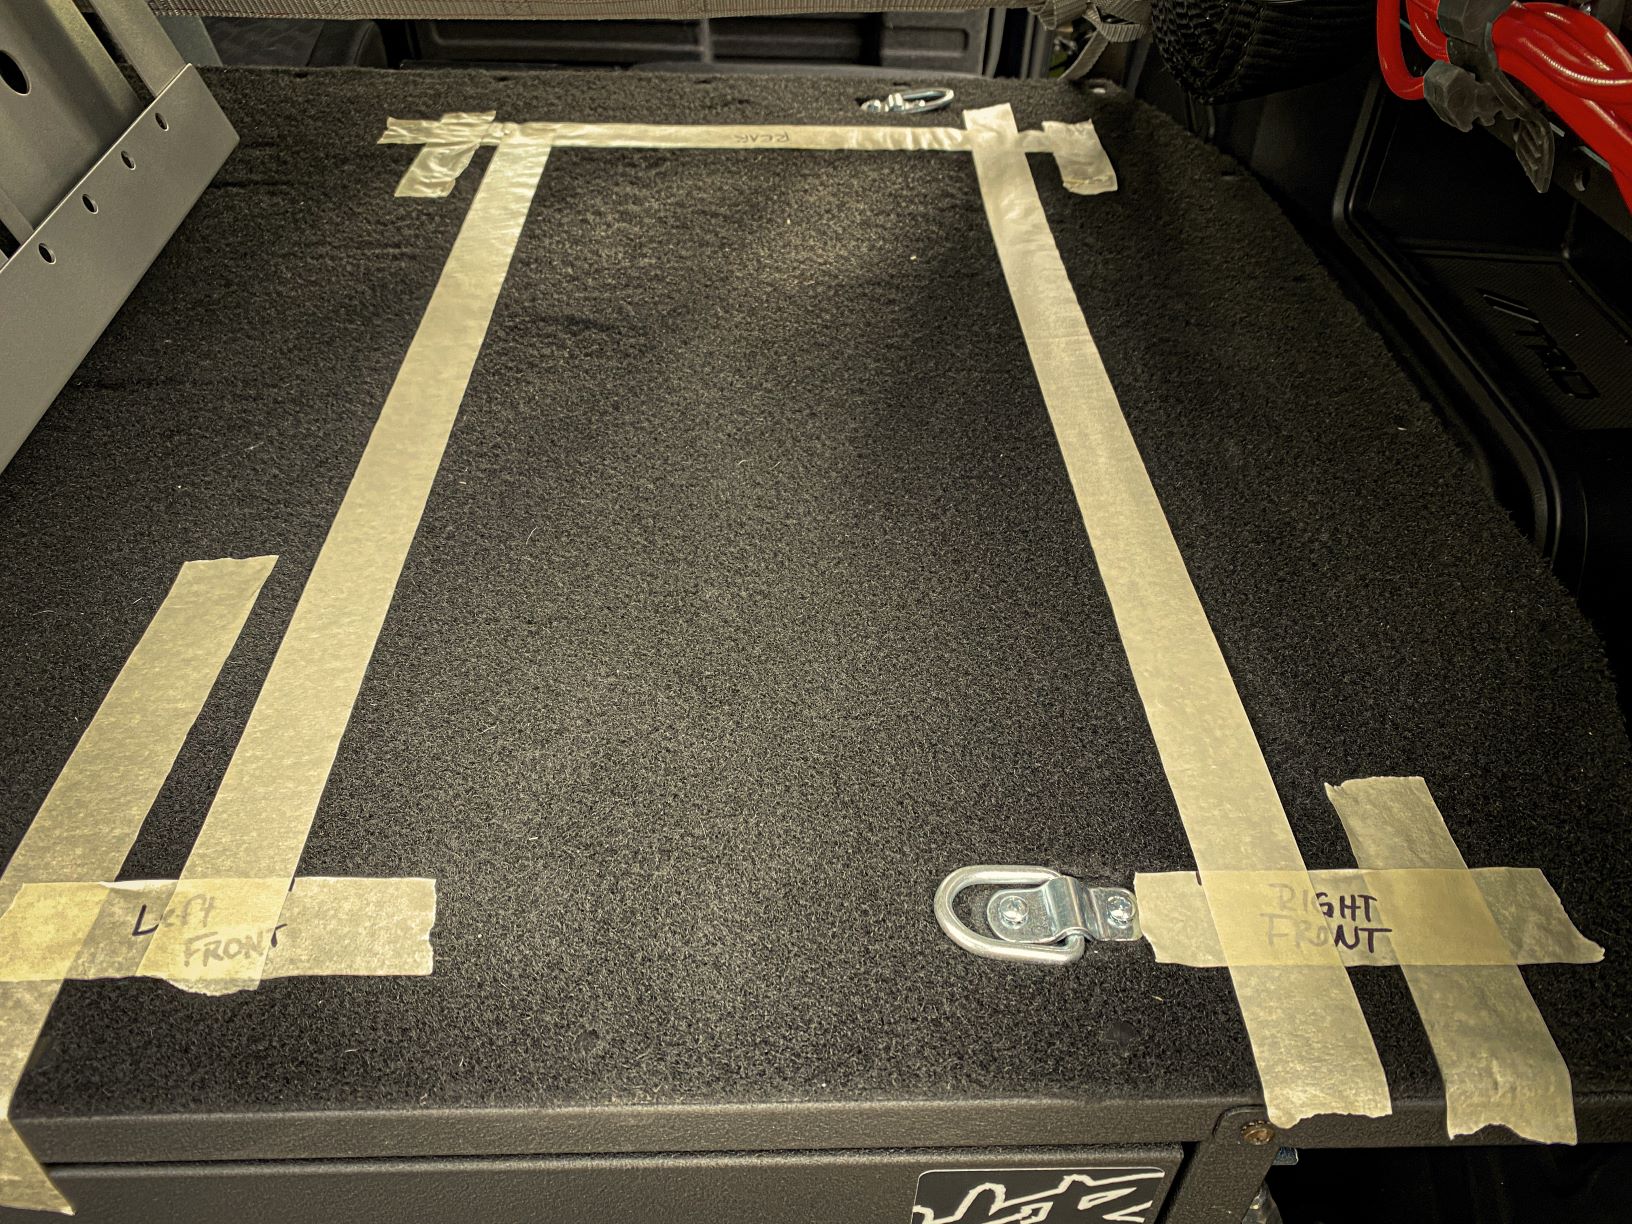
Using a few pieces of masking tape, tape out both the front and rear sides and label appropriately.
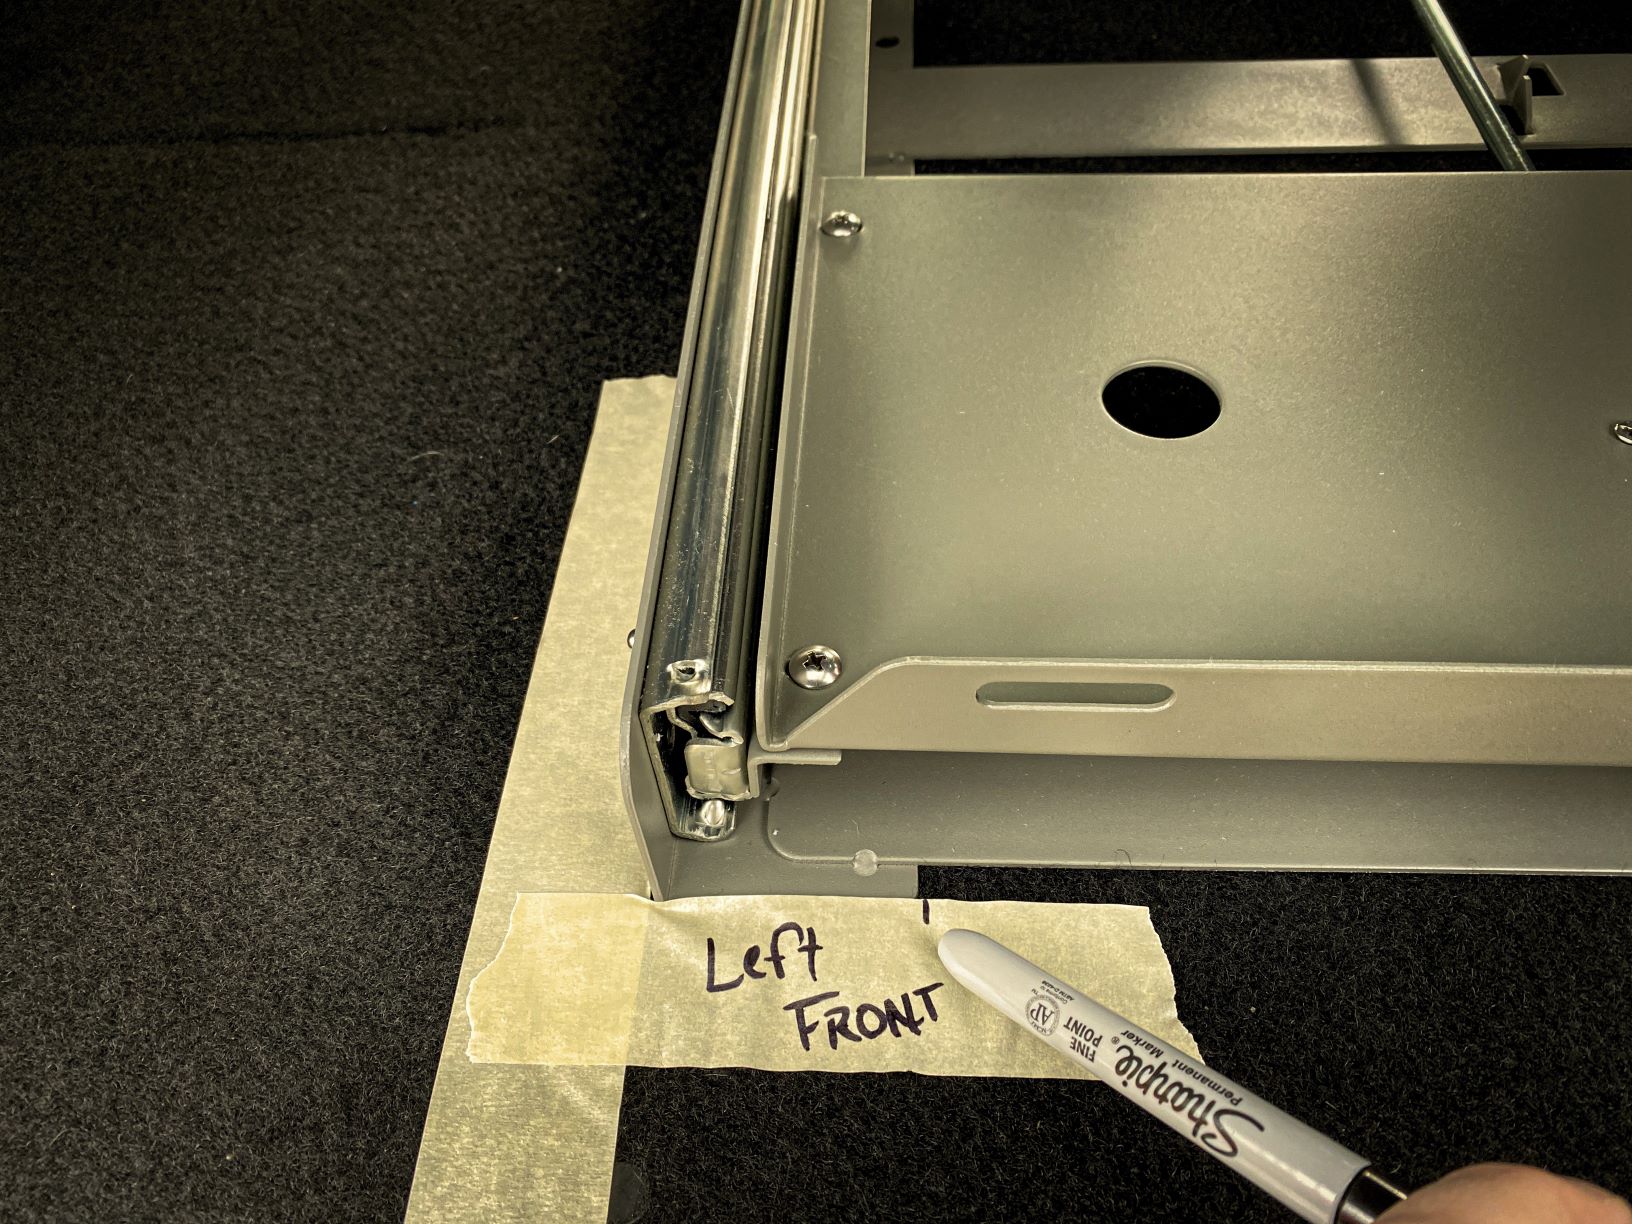
Be sure to also mark on all four sides where the mounting point bracket ends. This line will come in handy during the next step and will help identify exactly where the bracket will sit once the install is done.
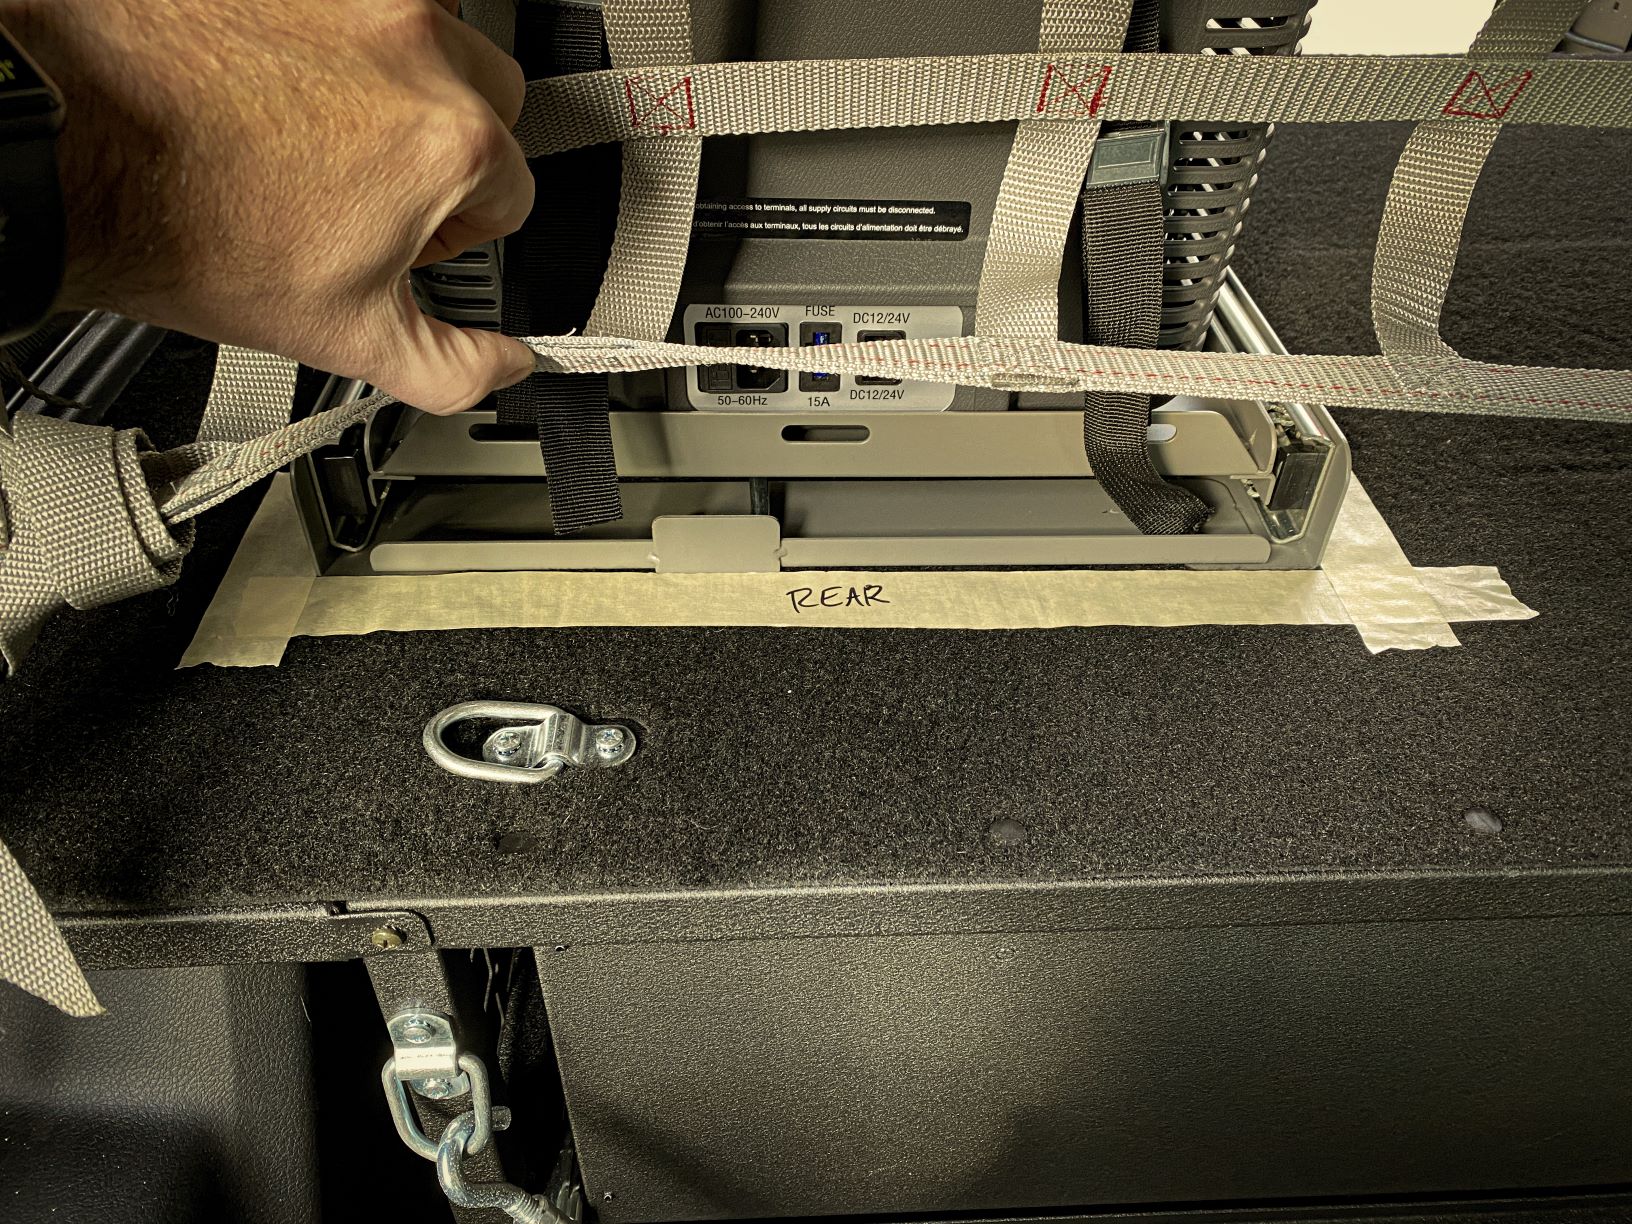
Step 4. Tape off Mounting Bracket Lines
Set aside the fridge/slide from the working area.
Utilizing the spots marked on the masking tape in Step 3, lay a long piece of masking tape from front to back on the inside of your marked lines. Again, this will be used to transfer your mounting point holes.
Step 5. Transfer Mounting Point Holes

To begin marking out your mounting point holes, remove the fridge from the slide. Lay the slide back into place and ensure everything aligns with the tape you placed on the drawer platform.
Fully extend the drawer to expose the mounting hole spots. If you have a friend helping you, make sure they keep the slide bracket in place while you open the slide. I did this install solo, so I just dropped a heavy toolbox on top of the drawer when it was extended.
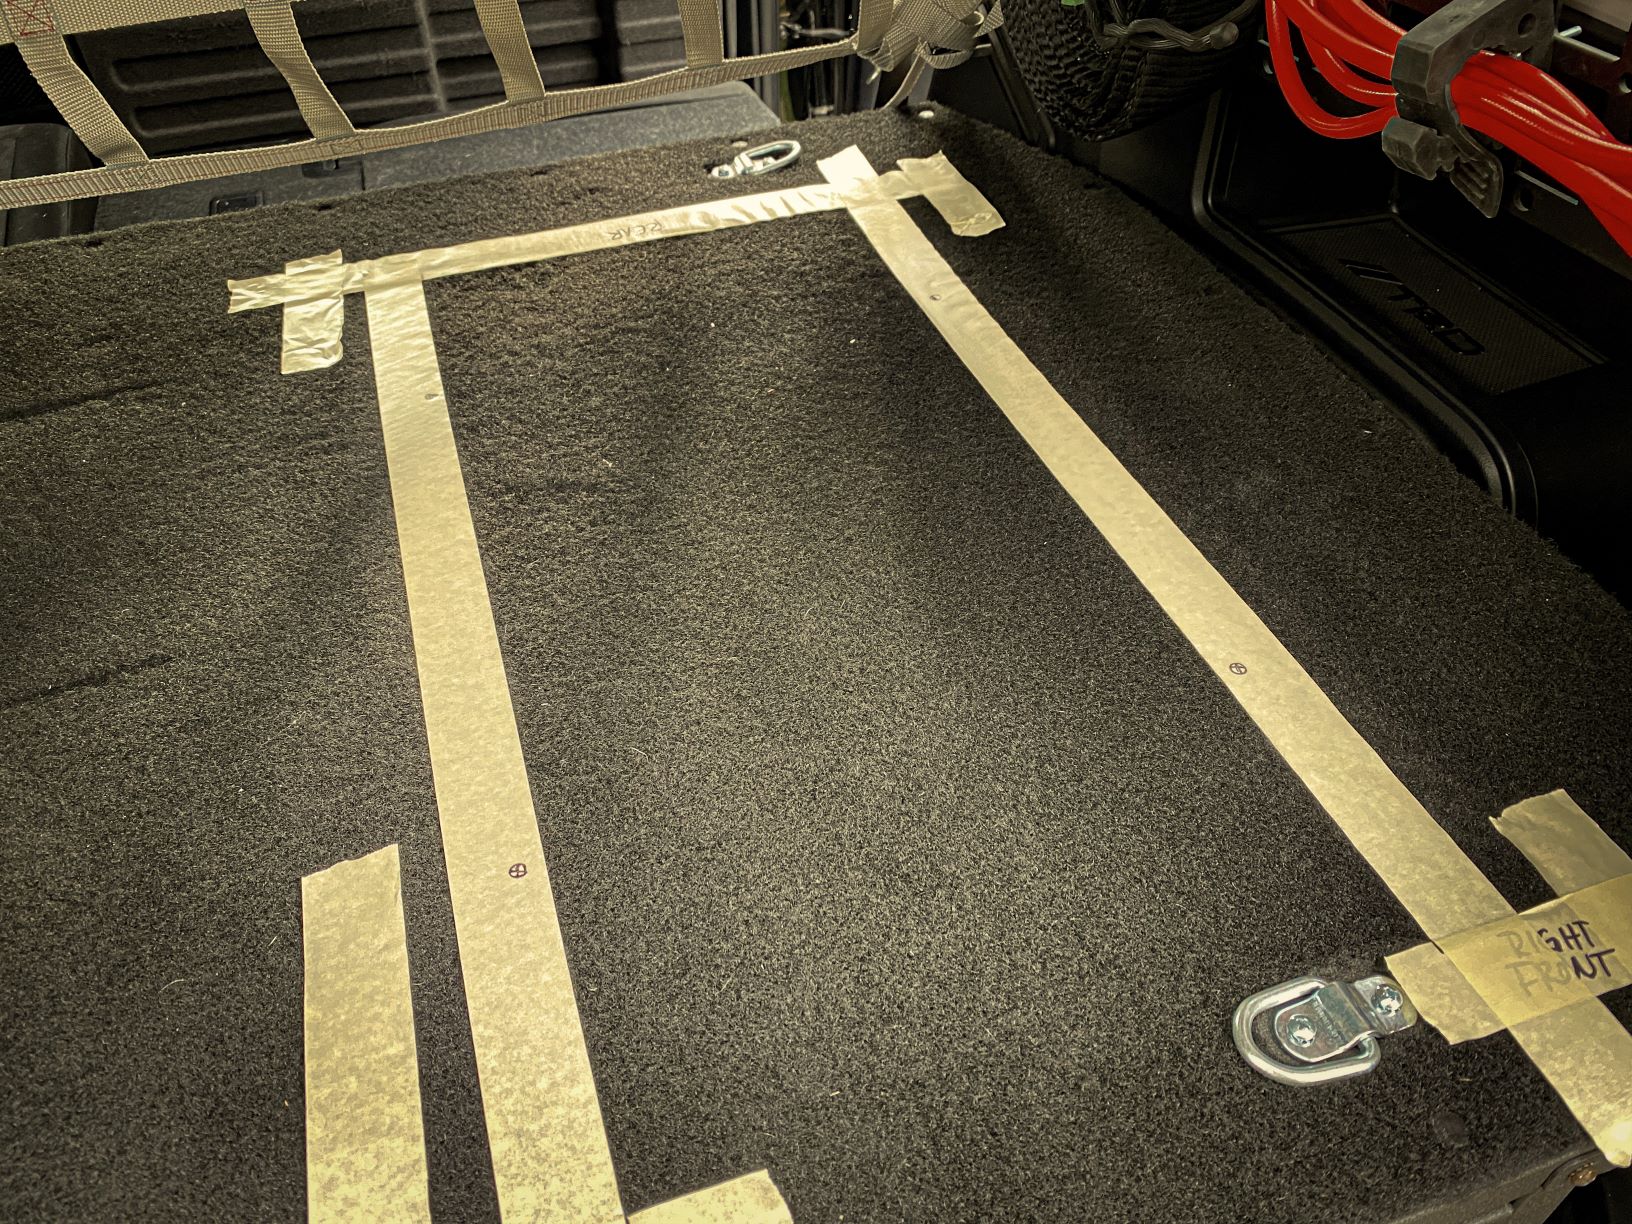
Using a permanent marker, transfer the desired mounting point holes into your slide bracket.
The ICECO slide we went with had roughly six (x6) mounting points on each side. You can drill as many holes as you want and in the materials section, we suggested 4-6. We opted to only drill four (x4) holes into the box (all points just one point below the furthest available mounting points).
Step 6. Drill Away

Before drilling any holes, I recommend opening the drawer completely. While most of the debris remained on the top of the platform, you don’t want your drill to puncture anything contained within the drawers. Plus, it’s easier to clean up debris from the carpet vs. anything that falls inside the drawers.
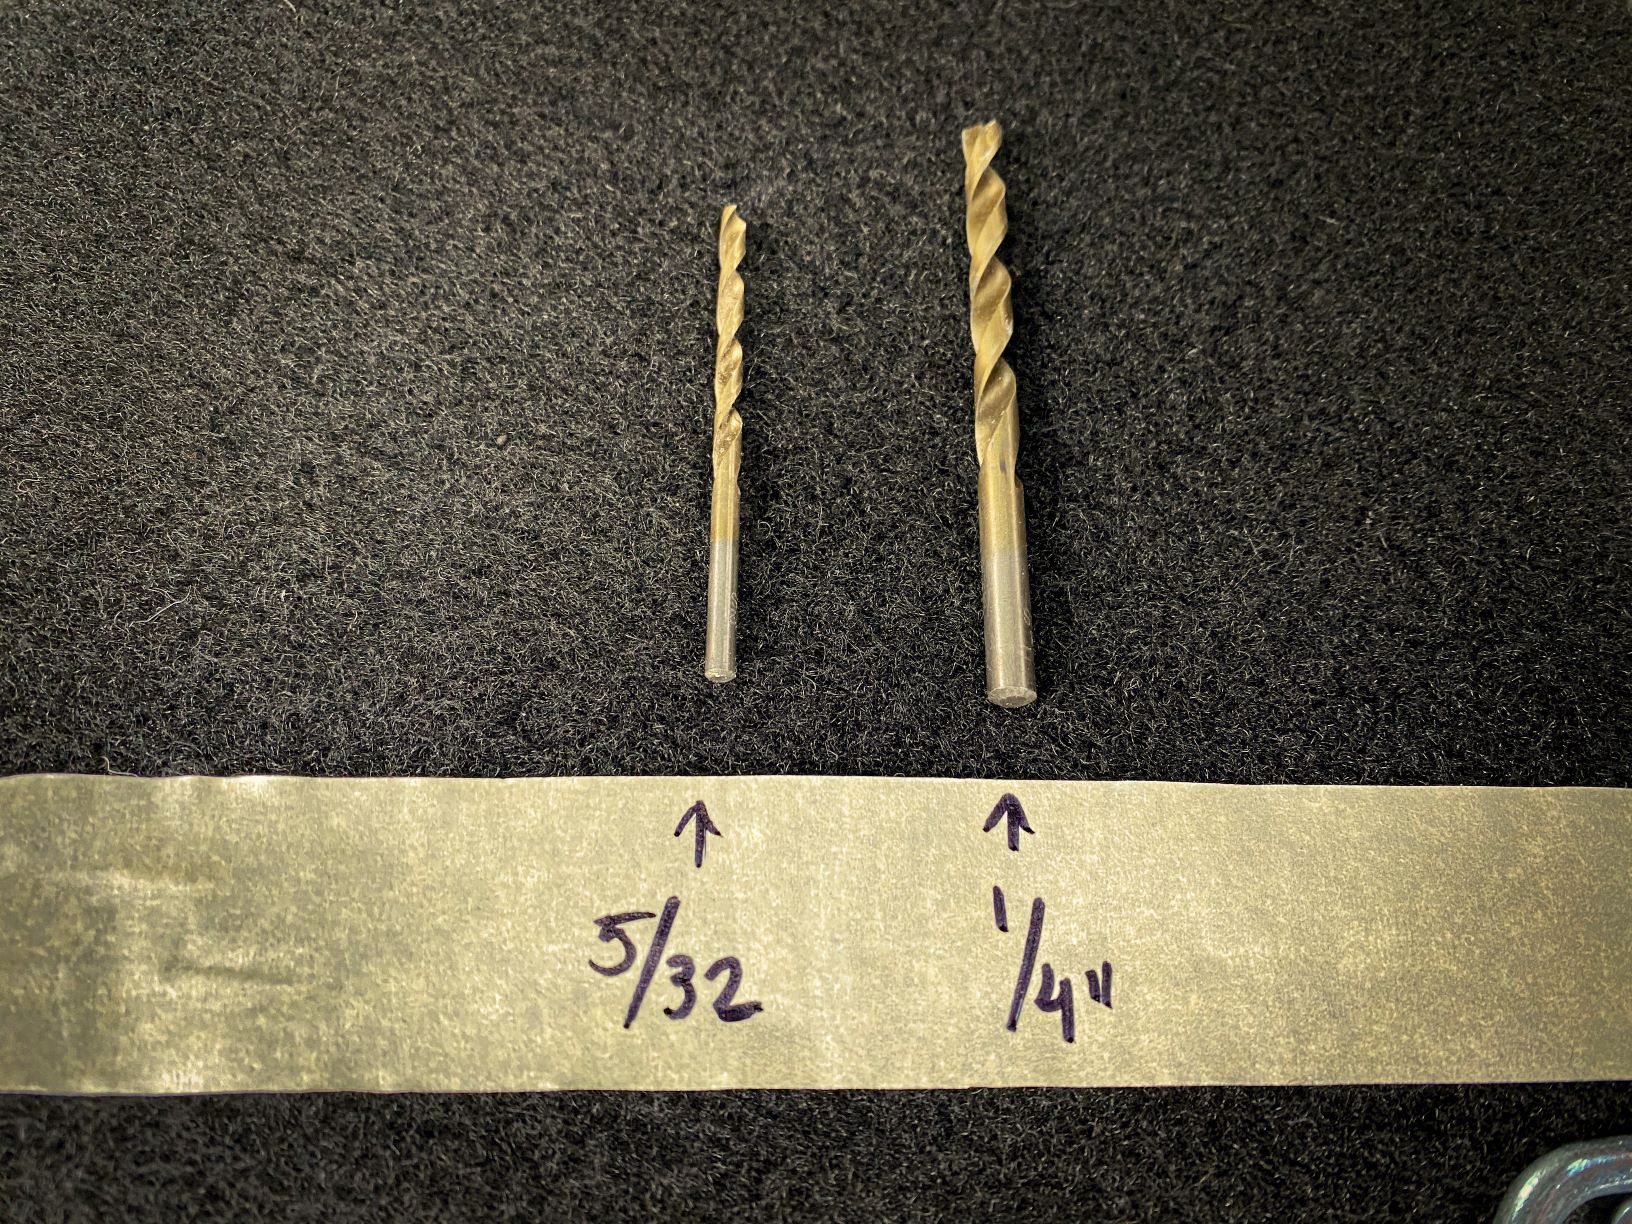
Start by drilling pilot holes with the 5/32″ bit. Once all four holes have been drilled, re-drill with your 1/4″ drill bit and remove the tape.
Step 7. Loosely Install Hardware
After a light cleaning of the area, it’s time to get the slide installed. Move the slide into place and line up the slide brackets with the newly drilled holes. Once you’re satisfied with its position, fully open the slide once again and make sure that it’s secured down and you haven’t shifted its position.
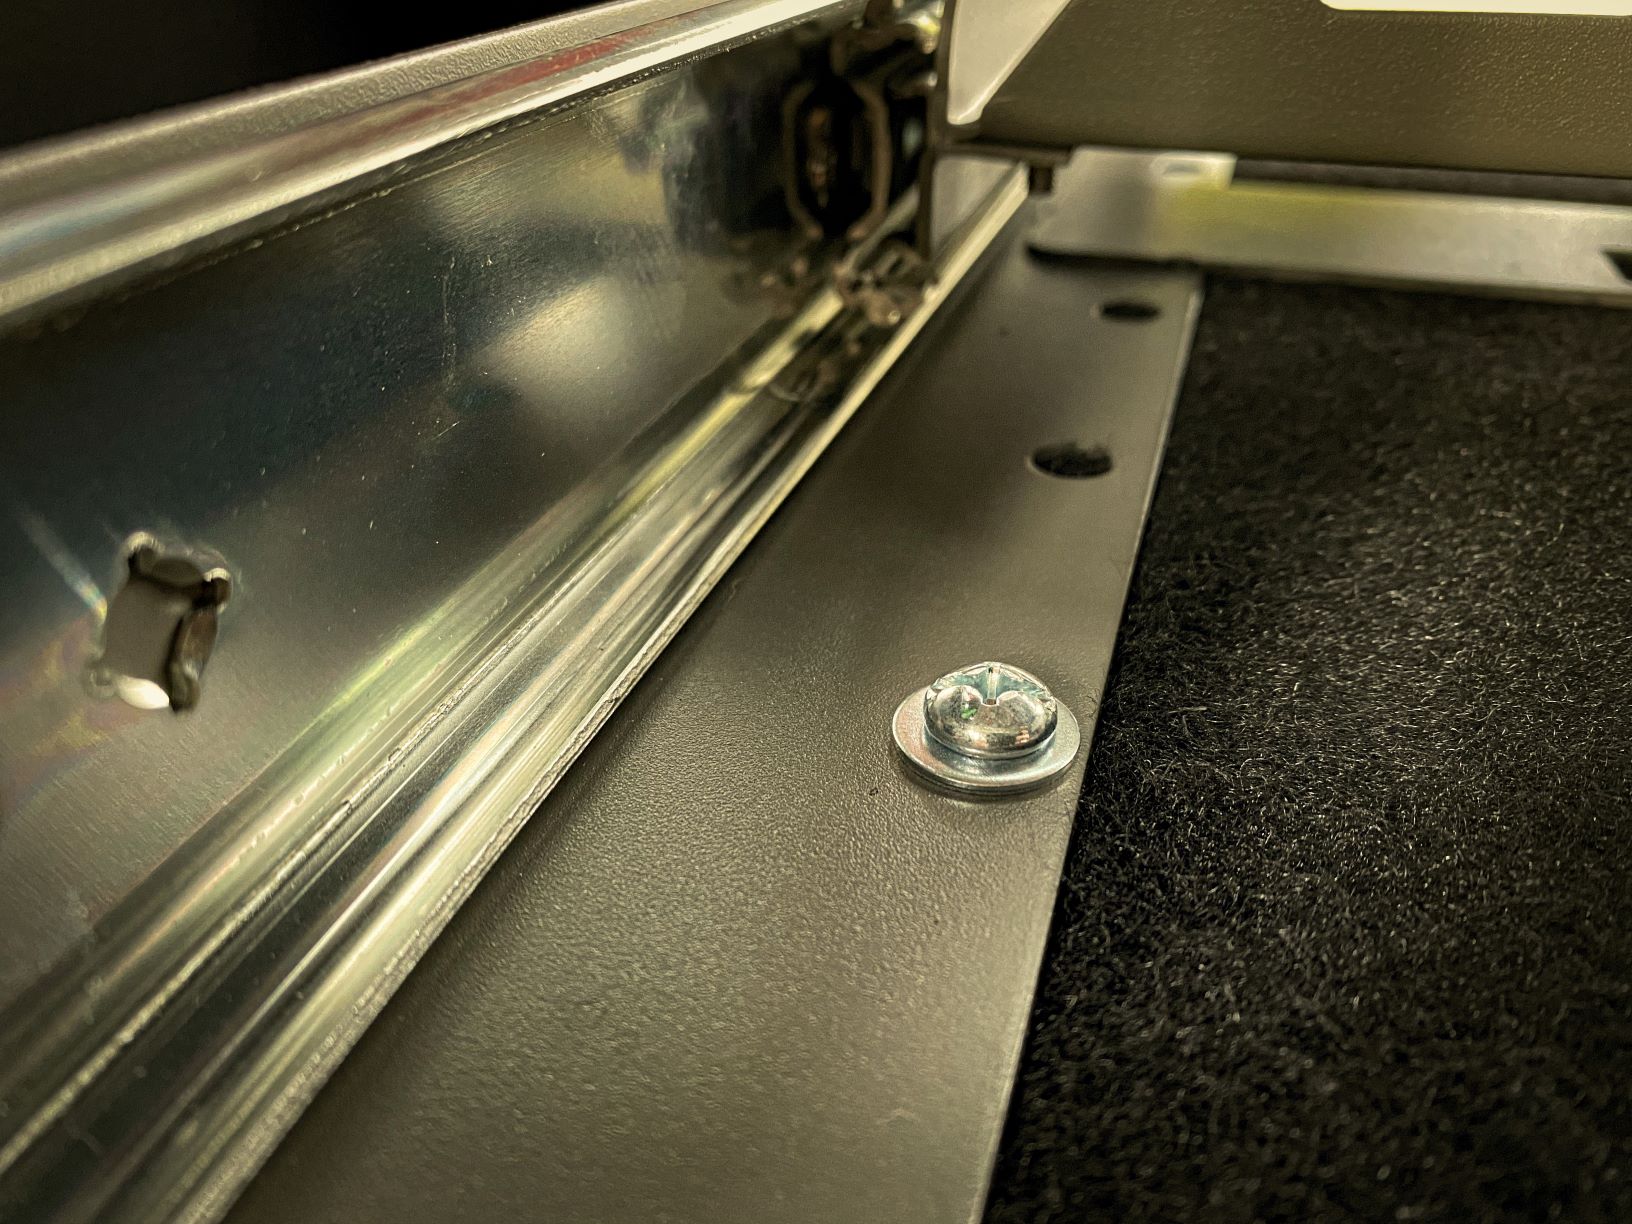
Open the BSB drawer again (if you’ve shut it after Step 6) and begin inserting the hardware from the top down. Start by taking your 1/4″ machine screw, placing a washer in between and insert the screws into your newly drilled holes.
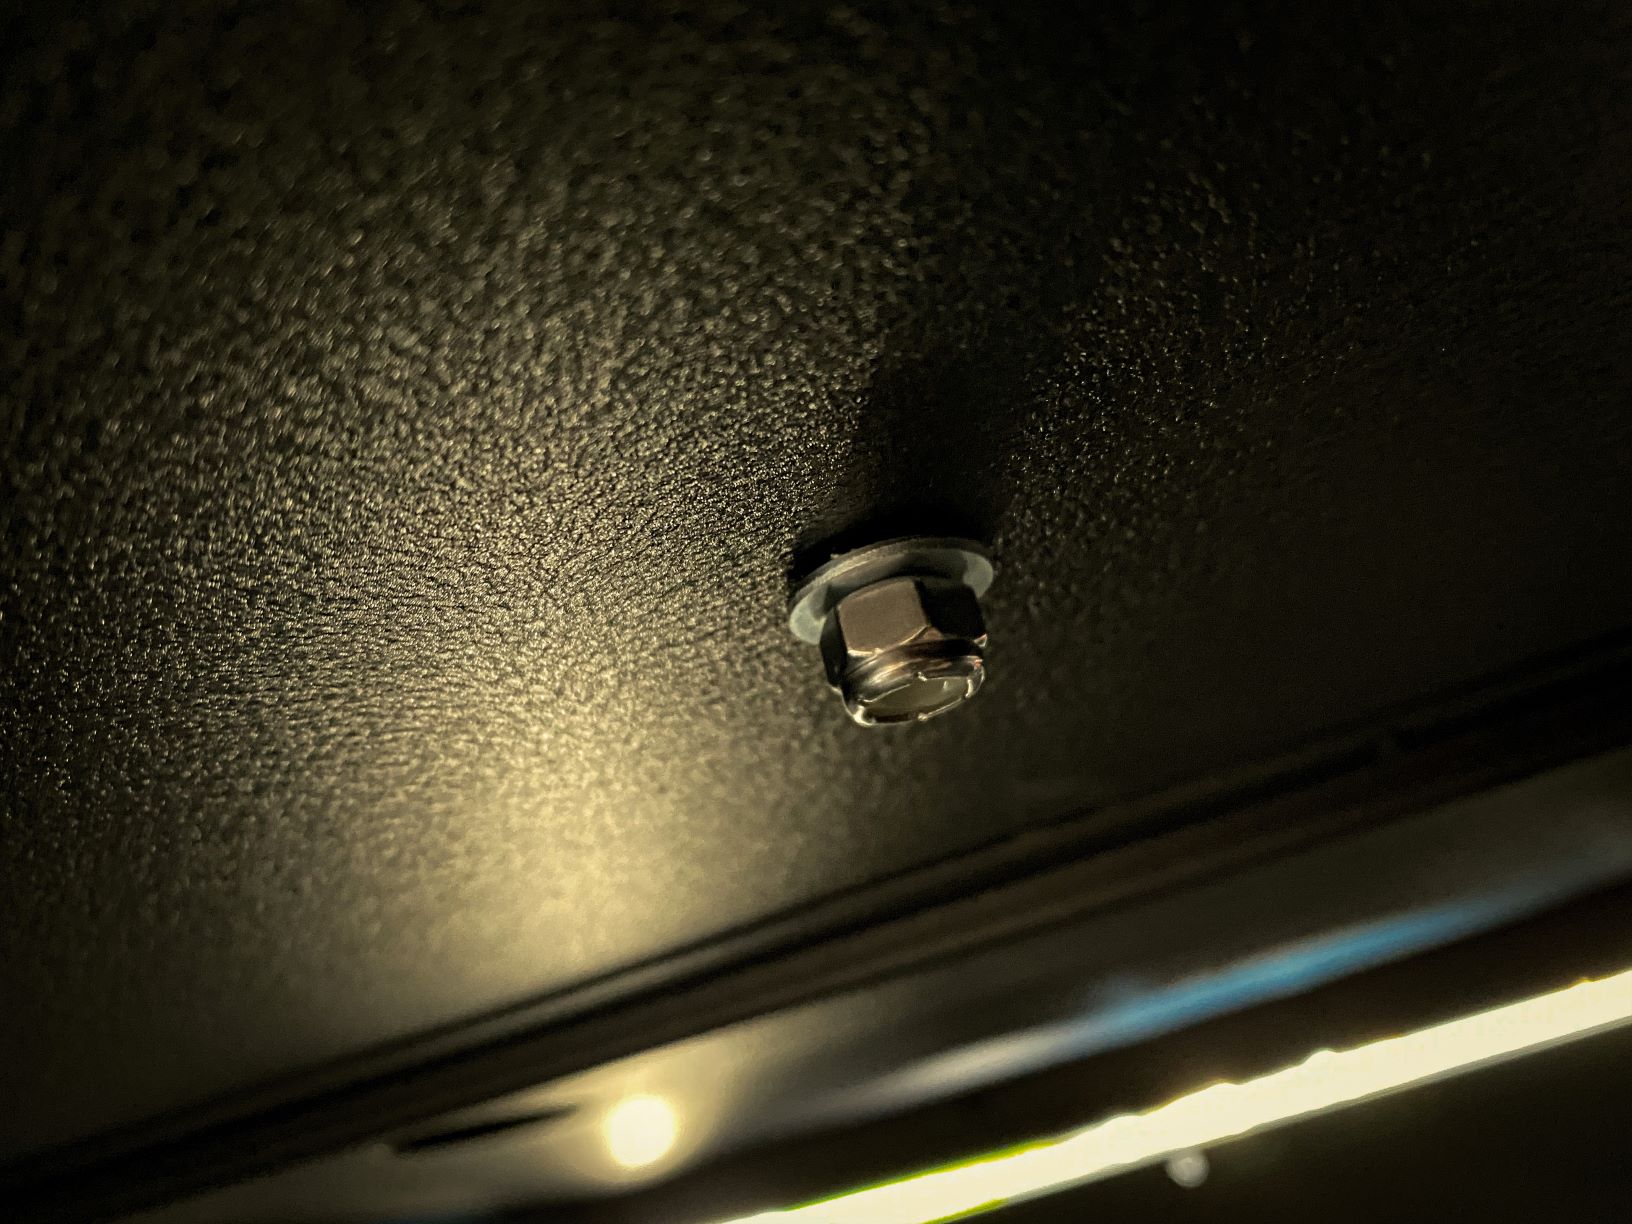
With all the machine screws in place, begin adding a washer and hand-threading on the nylon lock nuts from the underside.
Once you’ve attached all four and it’s fairly secure, make a few test open/closes to ensure the hardware you chose isn’t interfering with the slide.
If you’re satisfied with how the slide performs and its position, tighten down all of the hardware.
Step 8. Reinstall Fridge
With the slide locked down and tight, add the fridge back to the slide and again, perform a few test open/closes.
Make sure to open and close the liftgate without interference and confirm that your rear seats can fully recline regardless of the position of the fridge.
Step 9. Add Fridge Straps

Most fridges and fridge slides are fastened down with a few ratchet-type straps. Add the ratchet straps to your fridge and, voila, your fridge slide installation is now complete.
Final Thoughts

Candidly, we just did this installation yesterday and we haven’t taken it out on a trip just yet. However, we’ll save fridge performance and functionality for another review. What I will say though is this configuration looks like it will work well for us.
The clearance on the far right side of the fridge and the 4Runner headliner is slim, but that was by design. Since I already lost some rear visibility with the full-sized spare tire swingout, I felt that mounting the fridge in that same location would still keep the visibility fairly clear in the middle and on the driver’s side.
You might be asking, “How easy is it to access the inside of the fridge when the slide is fully extended?” Well, it’s not that easy. I’m roughly 6′ tall and while I can easily access the contents, it’s not going to be that easy for someone who is 5’6″ or shorter.
There are many fridge slides on the market to choose from; some are “angle slides” when fully extended angle downwards and some are “drop-slides” that quite literally drop your fridge down almost another foot when fully extended. Both slides are designed for easier access.
This ICECO fridge slide does not contain either of those features, but those who are mounting a smaller fridge or mounting inside the cargo without a storage drawer likely won’t have any accessibility issues.
Because of the hardware we went with, we don’t have any clearance issues and the drawer platform is still solid. So, an easy install with a perfectly functioning outcome!
Questions or Comments? Leaves them below!
Where did you get that cargo net shown in the photos?
I have the boss strong box as well. Any reason why you didn’t go with a sliding fridge that tilts also?
This was so helpful! I was able to install my BougeRV 53quart fridge with just a slight mod to the size of the bolts.
Glad that worked out! Any pics?
Looks awesome! Whats that cargo net setup?
Thanks Rux. That’s a Raingler net.
https://raingler.com/collections/2010-newer-toyota-4runner-heavy-duty-cargo-netting
Thanks for the quick response. Just ordered one!