How To Fix Your 5th Gen 4Runner’s Lean and Level Issues – Driver Side 4Runner Lean (Shim/Spacer) Correction Kits
This is also a common fix for Tacomas, Tundras, and FJ Cruisers.
If you have been around Toyotas for even a small amount of time, you know about “the lean”. This is typical of Toyotas because they tend to lean towards the driver’s side.
This is because Toyota places a lot of the heavier items on the driver’s side of the vehicle (battery, driveshaft, transfer case, fuel tank, etc). This leads to the driver’s side typically being ¼” to as much as ¾” lower than the passenger’s side.
On top of this, Toyotas are like all other car manufacturers where the front sits significantly lower than the rear which leads many people to buy leveling kits to lift the front end slightly.
Today, I will walk you through the install of a set of Cornfed spacers that fix both the lean and the level on my 4Runner.
You can also get these spacer kits from a wide variety of other vendors such as Ekstrom Design and Street Dirt Track. Ekstrom Design, Street Dirt Track, and Cornfed Spacers are all offered for the 4Runner, Tacoma, Tundra, and many other applications.
Find them online:
- Cornfed spacers (2010-2019 4Runner): Check Price
- Ekstrom Design Strut Shims (2005-2019 4Runner): Check Price
- Street Dirt Track (2003-2020 4Runner): Check Price
All of these kits are more or less the same, it just depends on how many you need. Confed and Street Dirt Track come with two. Ekstrom can be ordered in singles.
What is a Top Spacer & What Does It Do?

Top spacers are spacers that go on top of the coilover assembly.
These are installed between the coilover and the coilover bucket in the frame. They are available in various heights as shown in the photo above. These are not the same as the internal spacers that sit on the top of the spring or under the spring inside the coilover assembly.
What’s the Purpose of a Top Spacer?
 Courtesy of Bilstein
The benefit of top spacers is that they are much easier to install than an internal spacer and they don’t require tools like a spring compressor. The geometry of most front suspensions translates the amount of lift (height) at the coilover to double that at the wheel.
To say that more simply, a ¼” thick spacer at the coilover equals roughly ½” of lift and ½” spacer at the coilover equates to 1” of lift at the wheel. The image above (taken from Bilstein) shows one of the downfalls of spacers. Because they move the coilover essentially down in the frame when the coilover is fully compressed, the suspension may not contact the bump stop.
This can lead to problems with the coilover being damaged since the suspension will try to collapse the coilover on full compression. For this reason, Cornfed only goes up to ½” thickness on their top spacers.
Other Options For Installing Internal Spacer
If you want to go higher, you have the option of installing an internal spacer that sits inside the coilover at the spring and thus works with the spring to fully compress and allow the bump stops to do their job. Top spacers can also lead to excessive suspension droop which can lead to wear on the ball joints. The suspension on our 4Runners doesn’t seem to have an issue with top spacers, even ones as tall as ½” since the suspension can easily droop that extra ½” with binding.
While my 4Runner is a TRD Offroad and not a Limited I should note that these are great for you guys with Limited 4Runners that have the Xreas suspension since you can leave the Xreas system in place and add up to 1” of lift. These will also work with nonadjustable aftermarket systems such as OME suspension.
What Did I Get and Why?

I reached out to Cornfed and discussed my setup.
My truck is stock suspension with stock tires, and I had roughly 5/8” of driver’s side lean when my fuel tank is full. I also wanted my truck to sit more like a TRD Pro which comes with 1” more lift on the front than a standard 4Runner. Cornfed offers ¼’ (0.250”) top spacers like many others and they make several various thicknesses up to ½” (0.500”) for their top spacers.
My initial plan was to buy a ½” spacer for the driver’s side to lift it 1” and a ¼” spacer for the passenger side to lift it ½”. This would give me nearly perfect side to side as well as bring the front end up closer to how a TRD Pro sits.
Cornfed recommended a 0.330” spacer for the passenger side since they said the weight transfer and other factors may leave the passenger side too low with just a ¼” spacer. With the 0.330” on the passenger’s side, I should achieve about 5/8” of lift.
Again though, as you lift one side (front to back or side to side) weight can transfer slightly and you may not get an exact lift.
Options Online
- Cornfed spacers (2010-2019 4Runner): Check Price
- Ekstrom Design Strut Shims (2005-2019 4Runner): Check Price
- Street Dirt Track (2003-2020 4Runner): Check Price
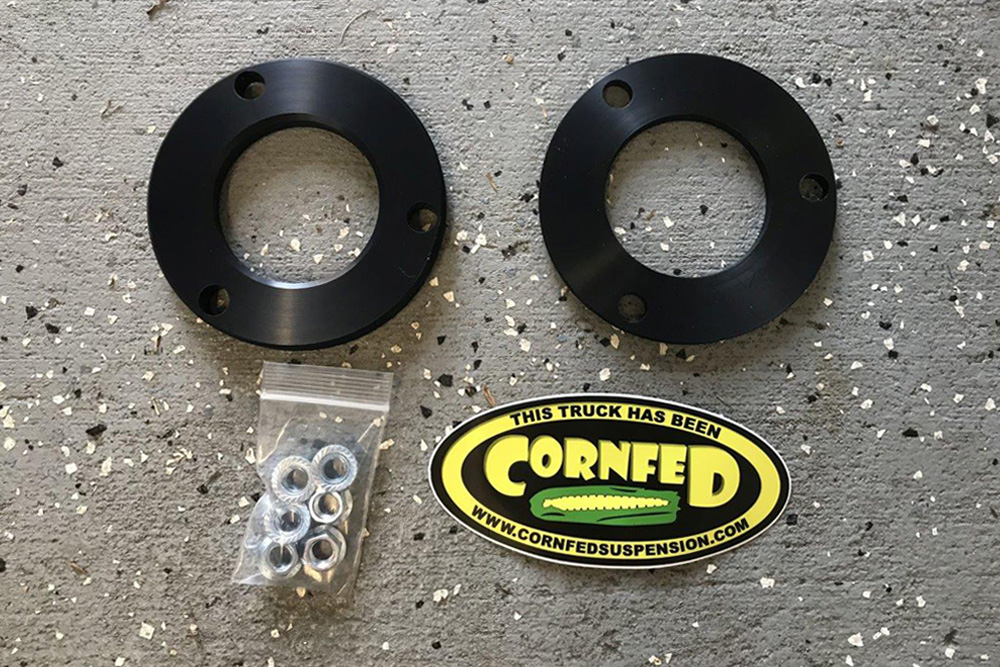
What’s Included With the Confed Kit?
The kit from Cornfed came with 2 different spacers, flanged nuts, and of course, a cool sticker. The flange nuts replace your factory nuts and as you can see in the picture above, the cornfed nuts (seen on the left) have a much shorter base.
When the spacer is installed, the coilover is pushed down and thus the 3 mounting studs for the coilover won’t stick up as far through the coilover bucket.
The factory nuts allow for about ¼” extra thickness, so anything over that requires the use of these shorter nuts.
Step-By-Step Install For Cornfed Top Spacers
The install of these spacers was super easy. In fact, if you have the tools, you can do it in under 2 hours.
The spacers come with a complete set of instructions that walk you through the entire process. The instructions also detail the additional steps for guys with Xreas suspension. The tools you will need are a jack, jack stands, metric sockets and wrenches, hammers/mallets, and a couple of good prybars.
Step 1. Set 4Runner On Jack Stands & Remove Front Tires
To begin, we jack on the vehicle, set it on jack stands and remove the front tires.
Step 2. Remove Main Engine Skid Plate

Next, we remove the main engine skid plate, the small plastic skid plate between the bumper and engine skid and the swaybar. The skid plates require 10 and 12mm sockets.
Once the skid plates are removed, you will need to remove the skid plate brackets that sit under the swaybar. With those out of the way, you can remove the sway bar.
Step 3. Remove Swaybar

To remove the swaybar, unbolt the mounts on the frame using a 14 mm sockets and a 17mm to loosen the nut from the swaybar link at the spindle.
Use a mallet to tap the swaybar link loose before removing the nut completely and dropping the swaybar. You should now have a nice pile of parts to set out of the way.
Step 4. Remove Coilover

With those items out of the way, we proceed to remove the coilover.
Before proceeding, use your jack to apply a bit of force under the lower control arm. Start with a 19mm to remove the nut for the bottom bolt. These use a 14mm to remove the 3 nuts from the top of the coilover. I had to use a wrench since I did not have a socket and ratchet that would fit in this space.
Once the 3 nuts are removed, you can tap out the bottom bolt. With the bottom bolt out, it’s simply a matter of carefully and slowly lowering your jack a bit and using a prybar and some muscle to yank the coilover assembly out of its position in the lower control arm.
Note: You don’t have to pull the coilover all the way out. Just drop it down enough to access the top of the coilover where the spacer is installed.
Step 5. Set Spacer & Remount the Coilover

With the coilover away from its mounting spot in the frame, now you can simply set the spacer on top and begin sliding it back into place.
Use the shorter flange nuts in the kit to remount the coilover. Use 1 or 2 nuts to loosely hold the top of the coilover in place then pry down on the lower control arm and set the bottom into place.
Pro tip: This step would be easy with 2 people; one to pry on the arm and a second to focus on setting the lower bolt in place. I was able to do this by myself by prying on the rear pivot point (as shown below) to push down on the control arm with one hand while manipulating the coilover with the other.
Step 6. Secure Coilover Placement & Torque Down

Once the coilover is in place, torque it down per the instructions.
At this point, I was right at an hour. I then moved on to the passenger’s side. The passenger’s side took about 15 minutes to repeat the steps for removing and reinstalling the coilover since I knew a few tricks from the driver’s side.
Step 7. Reinstall Everything
After this, you simply reinstall the rest of the items you removed.
You can begin by reinstalling the swaybar. (This step is easier with a second set of hands but can be done by yourself if you take your time.)
Lastly, install the brackets and skid plates, mount the wheels and tires and set the truck back down on the ground.
Congrats, you’ve finished the install!
At this point, I was 1 hour, 45 minutes into the project. With tool cleanup, it was easily under 2 hours. I gave the truck a quick once over and took it for a drive around the neighborhood to see how it felt and to listen for any odd noises.
Once I got back, I crawled under and around the truck to recheck the torque on the coilover top and bottom bolts as well as the swaybar links. I also gave the skid plates one last inspection. The instructions came with the torque requirements but Trail4Runner has a full list here you can reference if needed.
Additional Steps (& Notes)

Now that your lift is on, it’s always a good idea to take your truck in for an alignment and make sure all the adjustments are within spec.
One thing you may also want to consider is adjusting your bump stops. The general rule of thumb seems to be that the factory bump stops will still work with 1/4” thick top spacers. Anything more than that and you run the risk of over compressing the coilover shock under a hard compression.
To solve this, you can unscrew the bump stop and add a few washers on top to space it down some so that it makes contact sooner than the factory position as shown below.
I’m installing a set of Durobumps on the front of my 4Runner and will add a fender washer on the driver’s side to compensate for the ½” thick top spacer.
Until those are installed, I’ll just be sure not to go over any serious bumps.
Final Review

Top photo before; bottom photo after
After the lift was installed, I gave the suspension about a week of testing to let the suspension settle before getting the final height measurements.
I am impressed with this simple mod. For under 2 hours of time and less than $100, this makes a great visual impact. The front of my 4Runner is no longer squished down and the lean is not noticeable. Pictures don’t do this justice, but in person, it looks better and sits identical to a TRD Pro on my local dealer lot.
My final measurements were just over an inch of lift of the driver’s front and the side-to-side lean is within a 1/8” on a full tank of gas.
When the fuel tank is empty, it’s nearly dead level side to side. The side-to-side lean for the rear is gone. The driver’s front was so low originally that the passenger rear was pivoted up. After the install, the passenger rear actually came down a 1/8” making it dead level with the driver’s rear side.
For anyone looking for a simple lift and or level, I highly recommend using Cornfed Top Spacers, available on their website and through a number of vendors online.
Great write up! I’m considering lowering my rear. I installed some coils that gave me about 3/4 inch more than advertised! I already have my 6112’s maxed out in the front. I want a level look! My question is, if I install new coils in the rear that are about 3/4 shorter, will the front rise up? Or should I just add strut spacers like you just did? Thanks
I have a 2020 4Runner TRD OR with an old man emu strut and spring lift with a lean to the passenger side not driver, it’s an inch lower on the passenger side in the rear when compared to driver side, front is close to an inch also, more noticeable from the rear. Are spacers the main way to correct it? I’ve red/seen other companies recommending not to go more then an inch of lift in the rear… What can I do to help sit a bit more level? I know Toyota says 1/4 to 1/2 is “ok”
Andrew,
Daystar sells rear 1″ spacers and OME sells 10mm (~3/8) spacers for the rear springs. In general I wouldn’t have an issue running either one of those products. I would review your suspension to make sure something isn’t installed incorrectly. I’ve seen people make the mistake of installing the lower spring perches on the OME struts upside-down. Given how low the drivers side are on these trucks I find it hard to believe you are getting that much passenger lean.
M10-1.25 sound right?
Yes, the standard strut mount is M10-1.25 nuts.
Thank you for your writeup. I just ordered (4) 1/4″ Ekstrom shims. I have a Falcon level lift kit which uses the factory top hats and studs. With the two 1/4″ shims(1/2″ overall) I’m going to need to purchase 6 new flair nuts to replace the stock ones. Does anyone know what the size/thread pitch of those nuts are?
Thank you.
Very Interesting and Detailed.