
4xInnovations Full Skid Plate Step-By-Step Install & Review For the 5th Gen 4Runner
About Me and My Truck
I drive a 2011 4Runner Trail Edition that I purchased used in July of 2018 with only 58,000 miles on it.
I really wanted a gray truck and I wanted the Trail Edition, and boy was it hard to find. I finally found this truck at Luv Toyota in Jamestown New York, a little over 600 miles from where I live outside of Charlotte, North Carolina.
Normally, it wouldn’t seem worth it, but it was a fully optioned Trail Premium with KDSS and had been a one-owner vehicle that had been purchased from Luv Toyota, serviced there, and traded in there, so it seemed almost too good to be true.
My oldest son and I rented a Hertz one-way and drove to New York on a Sunday, stayed overnight, turned in the rental Monday morning and the dealer picked us up at the rental agency. I looked the truck over, gave them the money, signed the papers, and drove it home – 24 hours of driving in a span of only 34 hours. It sounds brutal, but it was totally worth it and I would do it again in a heartbeat.
I am a Civil Engineer and have been for 30 years. I do most of my own vehicle maintenance and have basic “handyman” skills around the house, so I am probably a lot like most of you. As an engineer, I was very picky when looking for skid plates and was looking for quality design and construction.
What to look for in a Skid Plate Package

If you are shopping for skid plates for your 5th Gen 4Runner, you should consider the new offering from 4xInnovations. Anyone considering armor underneath their 4Runner is most likely intending it to be more than a mall crawler.
Given this, there are several factors to consider such as strength, weight, coverage (more is better), and ease of installation (and removal):
- Strength: While I loved the look of aluminum, I wanted more than looks and did not want to have to be concerned about durability, so I decided on steel.
- Weight: Aluminum is about ½ the weight of steel, but for equivalent thickness, it is not as strong. It is also more brittle, so if it ever does get bent, it is more likely to crack and more difficult to bend back into shape.
- Coverage: I wanted skid plates that protected as much as possible underneath so I wouldn’t break anything out on the trail. I don’t ever intend to have a big lift, so I needed to compensate by being very well armored.
- Ease-of-Installation: All of the skid packages I looked at were bolt-on and used existing mounting points, so there was little difference there, but some have more mounting points than others, a couple did not require a separate transfer case cross-member (it is integrated into the skid plate), and very few went so far as to replace some or all of the factory supports (which allows for a more tucked-in installation).
The Purchasing Process: Why 4xInnovations?

I spoke with several companies in my search for skid plates and, since I already had the 4xInnovations Rock Sliders, I checked there first, but they did not make them at the time for the 5th Generation 4Runner.
I talked with people at CBI, Shrockworks, BudBuilt, RCI, and many others and they were all very helpful and had good options that provide good protection, but there was always something that I thought could be better, or I would like different things about each of them, but nobody ticked off every box. I wasn’t in a big hurry (and didn’t have the money yet anyway), but I also kept in touch with Adam from 4xInnovations as he was always helpful and didn’t seem to mind talking about 4Runners. One day, he told me that he was working up a design for 5th Gen skid plates and I knew that if they were anything like the sliders, they would be very well made.
When I saw the final design, I felt that they had done a few things that really set them apart from the competition and I placed an order:
- Strength: First off, 4xInnovations uses ¼ inch steel plate for the front two skids and 3/16 plate for the remainder. This adds a bit of weight, but the important bits that will take the hardest hits are well protected.
- Weight: 4xInnovations is probably about 30-40 pounds heavier than some of the competition, but I felt the tradeoff was worth it for the extra strength. Also, since some extra brackets and bracing are removed that are left in place with other skid plates, the difference is actually less.
- Coverage: This is where 4xInnovations really shines. I couldn’t find any other skids that offered both the width in the front and the frame-rail to frame-rail coverage for the transmission and transfer case.
- Ease of Installation: This is probably a little more challenging than some others because they weigh a bit more, but with the jack to hold the weight, I didn’t really notice.
Find it online:
- 4xInnovations Drivetrain Skid Plate Set | 5th Gen 4Runner: Check Price
- Silver POR15 Moisture Cure Rust Preventative Coating
- POR15 Stirling Silver Top Coat
- Metric/SAE tap and die set (M8x1.25 and 3/8×16 sizes)
- Pittsburg Floor Jack 3-Ton
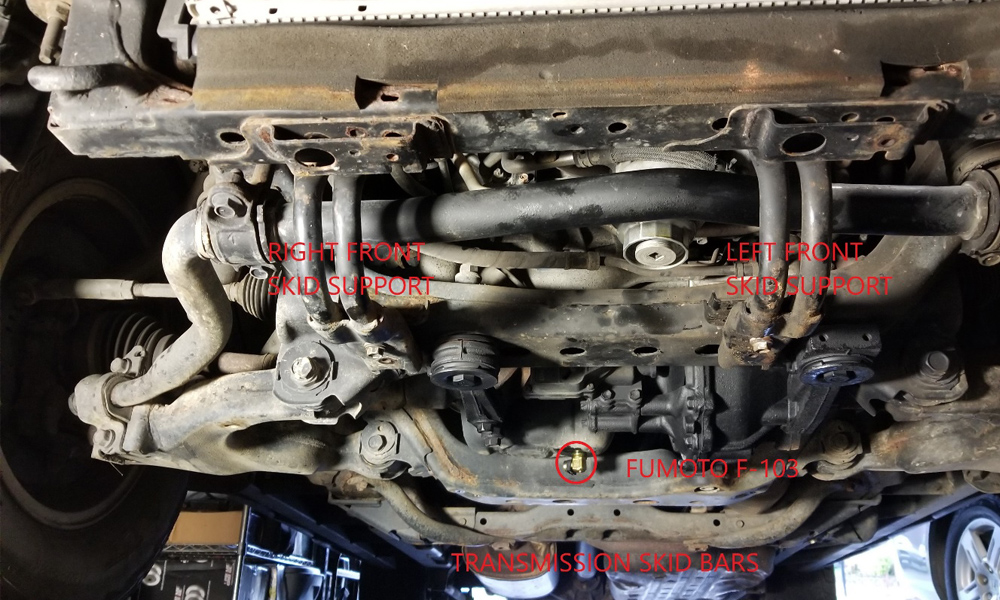
- Fumoto F-103 Valve: Check Price
- JDT Oil Filter Drain Tool: Check Price
What’s Included?

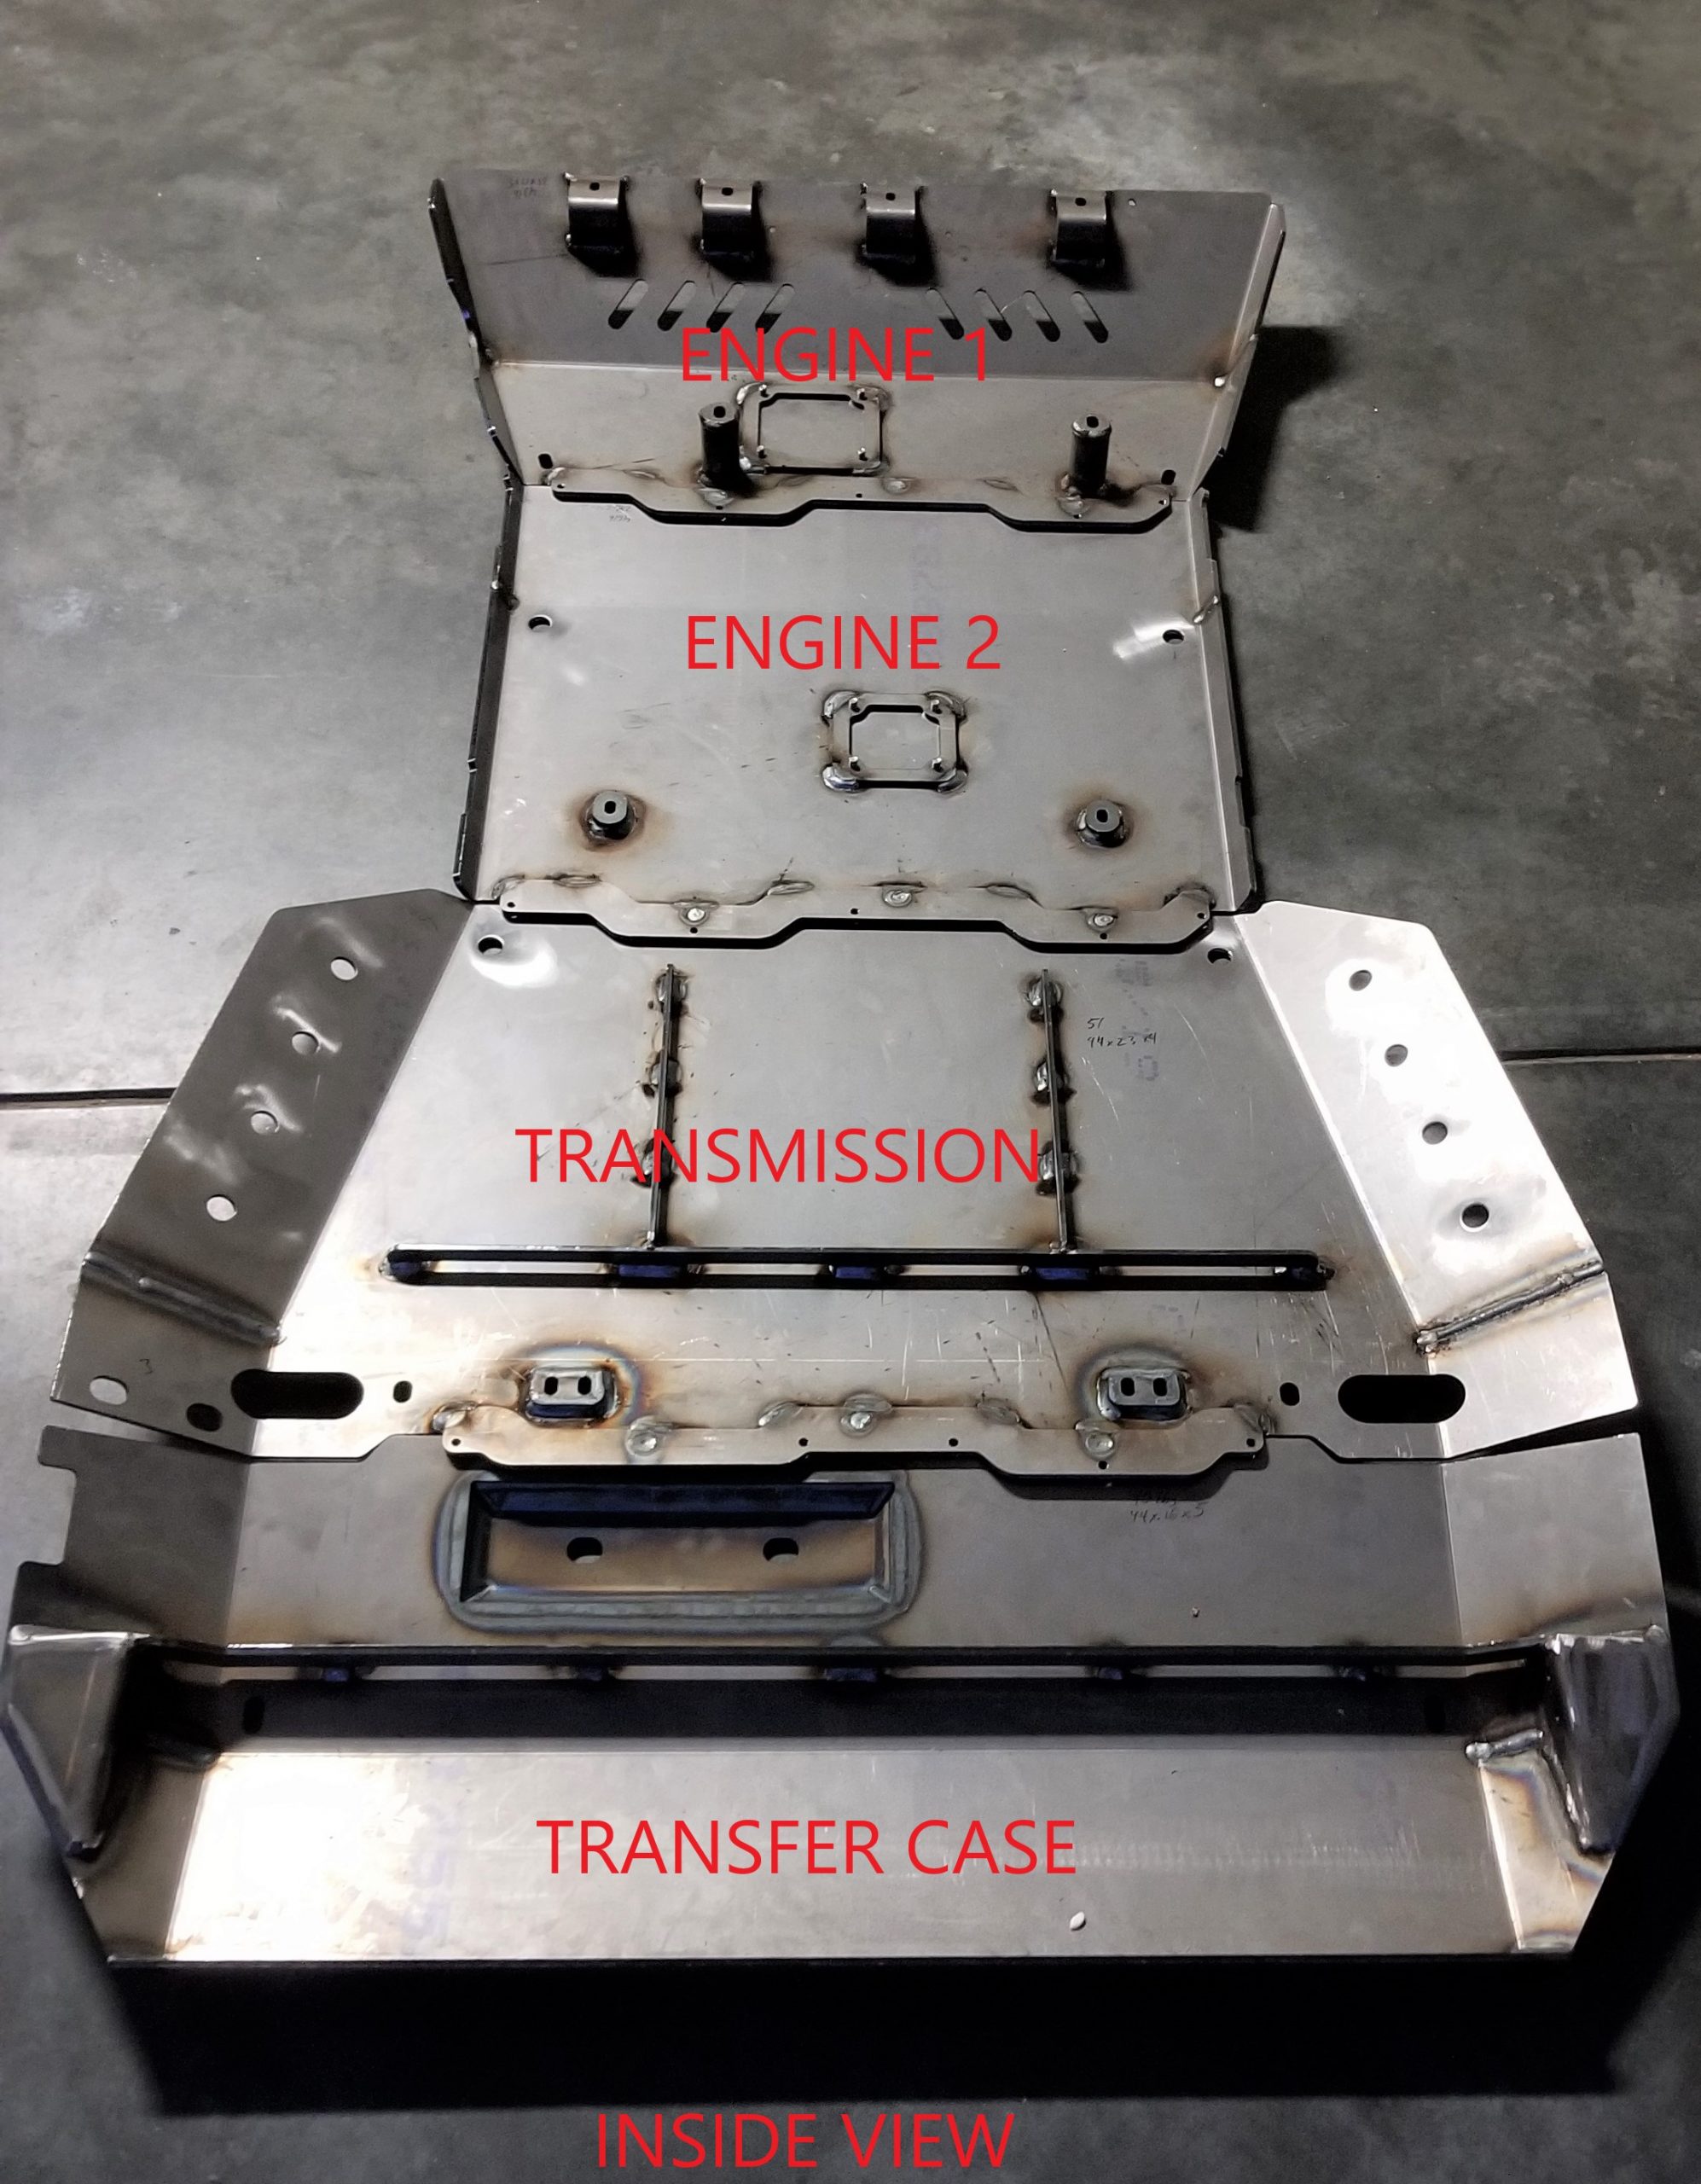
If you order the full skid plate package, it will come with:
- 2-piece Engine Skid Plate
- Transmission Skid Plate
- Transfer Case Skid Plate
Many of the other companies use a one-piece engine skid, but the 4xInnovations engine skid is 1/4 -inch steek and each of the two pieces weighs about 40 pounds, so two pieces make it much easier to handle.
The transfer case skid plate also incorporates internal bracing so that a separate cross-member is not required.
The Installation Process
Step 1. Prep and Paint Metal
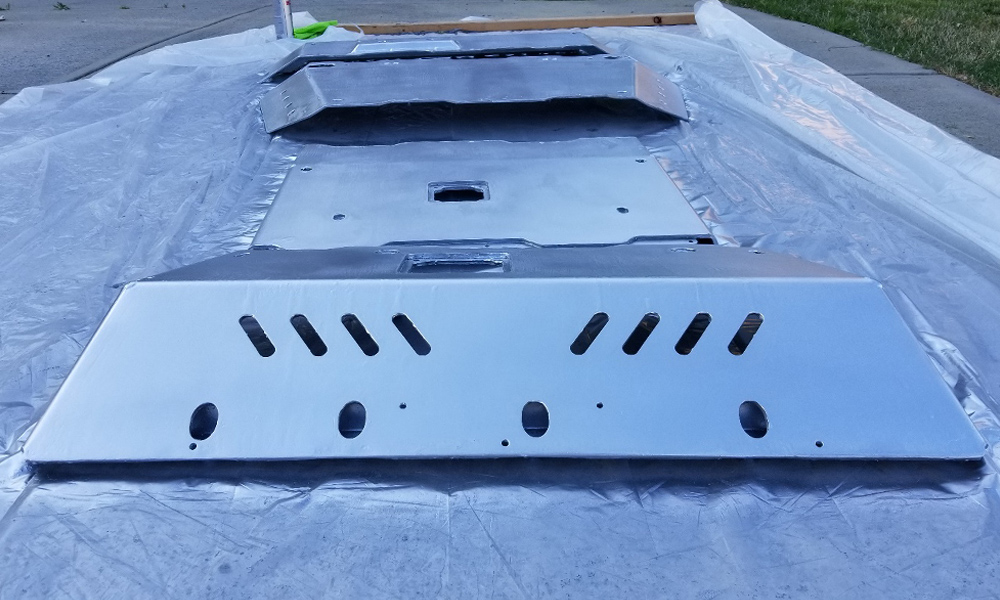
4xInnovations ships all of its products in raw steel and I chose to paint mine using Silver POR15 Moisture Cure Rust Preventative Coating for the base coat and, since the base coat is UV sensitive, I also chose the POR15 Stirling Silver Top Coat.
I have to admit that the painting process with POR15 is pretty involved and requires that you follow the procedures pretty closely to get a good result and I plan to cover that in another article.
As you can see from the final result in the photo above, the skid plates came out looking great with just the bare metal look I was hoping for, but it was an adventure getting to this point.
I noticed that most of the threaded holes on the skid plates had hardened POR15 residue in them and, after trying to put a couple of bolts in, I knew this would be an issue. I went to Harbor Freight and purchased a metric/SAE tap and die set that had the M8x1.25 and 3/8×16 sizes I needed and chased the threads on the skid plates with a tap before I tried the install (see photo below).

I knew that I wouldn’t have a lot of room under the truck and I didn’t want to be fighting to get the bolts in; I am so glad I did this ahead of time as there was a lot of POR15 in the holes and I never would have gotten the bolts in otherwise.
Step 2. Mount Skid Plates On 4Runner
Now that I had the painting complete, the next step was the installation.
Step 2A. Remove Existing Skid Plates & Support Brackets
There were no specialized skills required for this installation, and as I said earlier, I did the install on some plastic 6” wheel ramps and not on a lift (which would have been much easier).
There are two existing skid plates on the 4Runner and both of these are easy to remove (12mm bolts). Under the front skid plate, there are also two support brackets, and these are also removed (12mm and 14mm bolts).
Further back at the end of the transmission, there are also two angled braces that act as sliders to keep you from hanging up on the cross-member and these will be removed also as the new skid plates perform this function (14mm bolts). If you have KDSS, the skid plate for the KDSS tubing that runs under the frame rail is also removed as the new skid plates perform this function (12mm bolts).
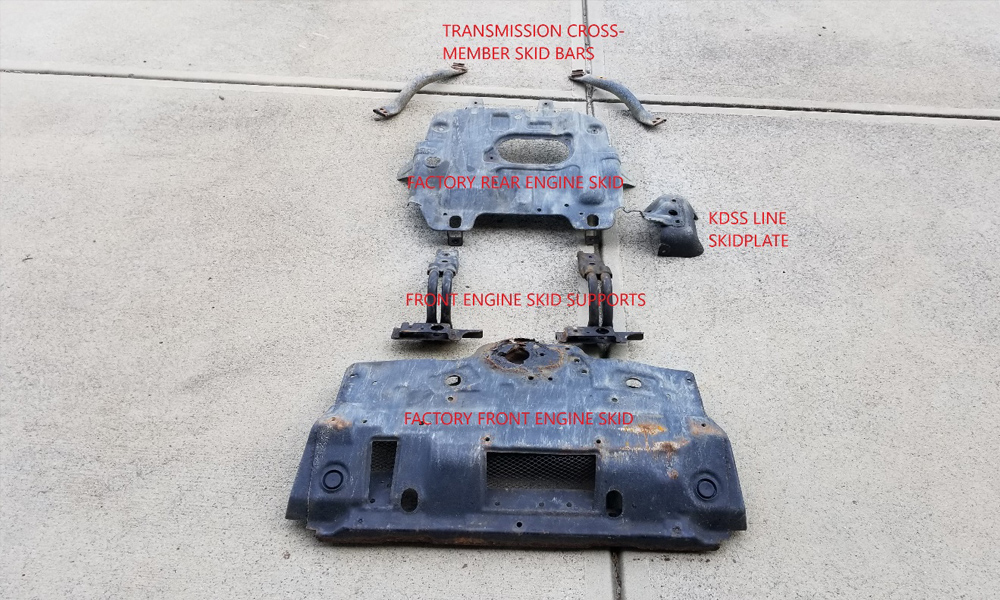
The photo above shows all of the factory skid plates and brackets that are removed to install the skid plates.
All in all, you are removing about 35 pounds of existing equipment and installing 180 pounds of new sliders, for a net gain of 145 pounds.
Step 2B. Mount New Skid Plates

I knew that these were heavy and that I would be installing them myself, so it was a perfect excuse to buy the 3-ton Low-Profile Rapid-Pump Jack from Harbor Freight you can see in the photo above and the 19 7/8” lifting height made the installation a breeze. I used a piece of 1×6 lumber that I had laying around to protect the new finish and was able to lift the skid plate into place and position it perfectly so that the bolts went right in. The front skid plate reuses four factory bolts in the front and uses two new 5mm button-head hex bolts in the rear.
The next two skid plates fit together like puzzle pieces and I used the jack to hold each of them while I bolted them down. The M8x1.25 button-head 5mm Allen bolts do a great job of fastening the skid plates together while also maintain a low profile that won’t hang up on rocks. The regular hex-head bolts are all recessed so there are minimal protrusions.
When I got to the last skid plate over the transfer case, I was toward the rear of the 4Runner and had less vertical room to work, so it was a bit more challenging.
Attaching Transfer Case Skid Plate

In addition, the transfer case skid plate is held up by brackets that bolt to the frame rail, and, as you can see in the two photos above, the bracket mounting bolts end up covered (and protected by) by the skid plate. This also means that there are no protruding bolts on the bottom of the transfer-case skid plate.
Transfer Case Skid Plate with POR-15 (After 4 Months)

As I mentioned before, I have the 4xInnovations bolt-on rock sliders and the black metal that you see wrapping around the silver plate at the bottom of the bracket is part of the bolt-on slider.
4xInnovations has brackets that will work without the sliders and should also work with most other manufacturer’s sliders. The tricky bit with the installing the transfer case skid plate is that there are four bolts that have to go in from the inside of the skid plate and that requires some contortionist moves that are uncomfortable for a guy in his 50’s working on the garage floor, but I pulled it off. If you have access to a lift or can get your vehicle up onto four ramps or some higher jack stands, the installation would be much easier.
The photos above and the next one below were taken about four months after install and, as you can see, there is no evidence of rust on the inside, so the POR-15 seems to be doing its job. The photo below is of the inside of the transfer-case skid plate and there isn’t a spot of rust anywhere. You can also see where the exhaust crossover pipe fits neatly in the bump-out on the skid plate.
Cutout For KDSS Models

In the photo above, you can see that a cutout is provided in the transfer-case skid plate for the KDSS lines. The factory skid plate for these lines cannot be re-installed with this skid plate, but the new skid plate provides all the protection you will need.
Fumoto F-103 Oil Drain Valve
I decided that, while I had everything taken apart, I would install a Fumoto F-103 Oil Drain Valve to make oil changes easier.
There are access panels in the skid plates for the oil drain plug and the oil filter, but the reviews on the Fumoto valve were very good and it seemed like it would make future oil changes easier.
I also ordered a JDT Oil Filter Drain Hose Tool which simplifies draining the oil filter. No more messing with the little plastic nipple Toyota provides and getting oil all over your arm; the tool screws in place in the bottom of the filter housing and all the oil drains nicely through a hose to your drain pan.
The Final Product

My ultimate goal was to have a truck that is a daily driver but is also equipped to hit the trails at Uwharrie (Uwharrie National Forest – Forest Service and Off-Roading, Uwharrie Style) with confidence that I probably won’t break anything.

With the new skid plates, I feel like my truck is pretty much bulletproof underneath and, in combination with the rock sliders, it would be very difficult to do any damage that couldn’t be repaired with a bit of sandpaper and some spray paint.
I plan to add a gas tank skid and some lower control arm skids in the future, but I am very happy with the protection I have right now.
Final Thoughts

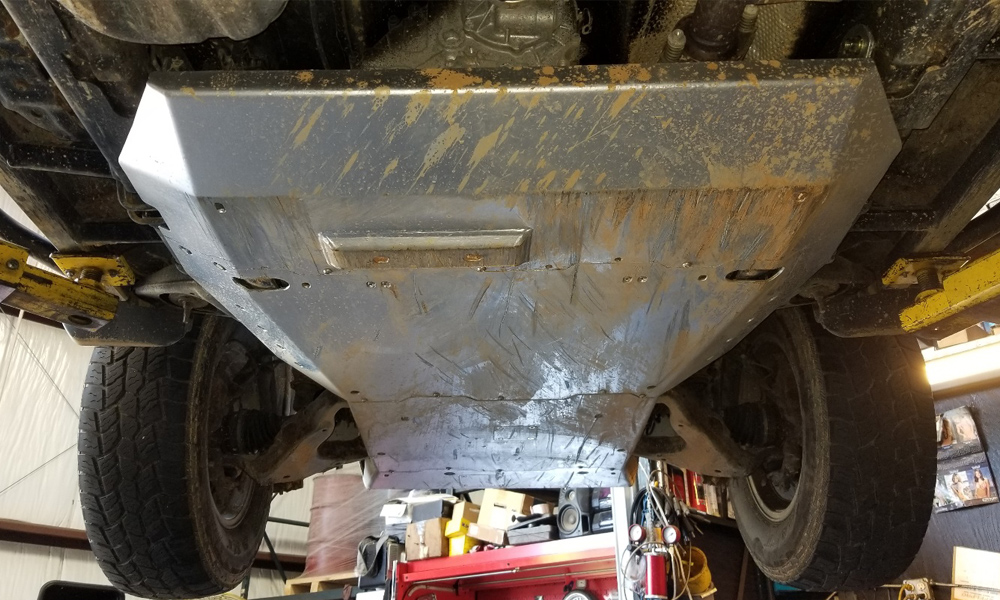
The photo above shows what the skid plates looked like after a trip to Uwharrie. I did not have the lift installed yet, so I got friendly with quite a few rocks. Other than some scrapes in the finish, there was no damage at all.
If you look to the left and right of the skid plates, you will see that the lift pads are on the rock sliders and not the frame. I checked the gap to the rocker panel and the sliders did not even flex when supporting the weight of the truck.
The Takeaway
In summary, if you are looking for underbody protection, there are a lot of good options out there.
However, after considerable research, I decided that 4xInnovations had the best option for me, and I think they are worthy of consideration. I just installed a lift on my 4Runner in early August (Bilstein 5100 front and rear), and the combination of high strength (¼-inch plate on the engine skids) and great coverage leave me feeling very confident on the trail.
I took the truck up to Uwharrie on Father’s Day (before installing the lift) and, as you can see in the above photo, I got my money’s worth. The POR-15 coating also held up remarkably well. Many scratches, but no chipping or flaking and very few of the scratches even made it to the metal underneath.
If you would like to see a video of part of my Uwharrie adventure, click here to see my YouTube video (taken and edited by my son).
Curious how these are holding up? I really like the build/look of 4XInnovations Rock Sliders and their skids look beefy as hell! Do you still feel that the 1/4″ steel is worth the weight? My 4Runner sees many more highway miles than it does difficult off-road trails (though it’s seeing more and more of those…), so I’m unsure if the added weight of 1/4″ steel is really justified when I think I’d be okay with 3/16″ steel if not a 3/16″ steel engine skid and 1/4″ aluminum transfer-case/transmission skids…
Great writeup, thanks for writing it!