
KC Lights Wire Hider – A Clean Wiring and Cable Management Option for your Offroad Build
Off-road lighting is one of the most common mods you can do to your 4Runner. From rock lights to ditch lights and roof rack lighting to bumper lighting, there is nothing quite like high powered off-road LEDs.
With all that off-road lighting, the wires have to run somewhere and oftentimes can make for an unorganized mess.
We have all used our fair share of heat shrink, zip ties, zip tie mounting brackets, and many forms of wiring loom. But, no matter how much heat shrink or wiring loom you use, running wiring harnesses never seems to come out looking “seamless”.
If you have experience with running electrical on an off-road build then you are no stranger to trying to hide the wires.
Every truck, every platform, and every build is different. There is no one-size-fits-all wiring loom that is perfect for every situation, but the KC wire hider comes close. It might not be perfect as there is rarely such a word but damn this is a cool little product!
Introducing the KC Wire Hider

KC just launched their new wire hider and I bet it’s going to become the industry standard for running and hiding wires on trucks and many other applications.
Previously, one of the cleanest ways to run wires was through some type of sheathing, rubber edge trim, and an obnoxious amount of zip ties coupled with braided wire loom. Now, don’t get me wrong, I’ve seen some pretty impressive cable setups on trophy trucks that some of us might refer to as “cable porn”. I’m talking some seriously high-end wire running that would give all of our builds a run for our money.
Now we all have a mainstream wire management option we can depend on for cleanliness; the new KC Universal Wire Hider.
What is the KC Universal Wire Hider?

Simply put:
It’s a low profile rubber channel that allows you to run and hide wires.
Technically:
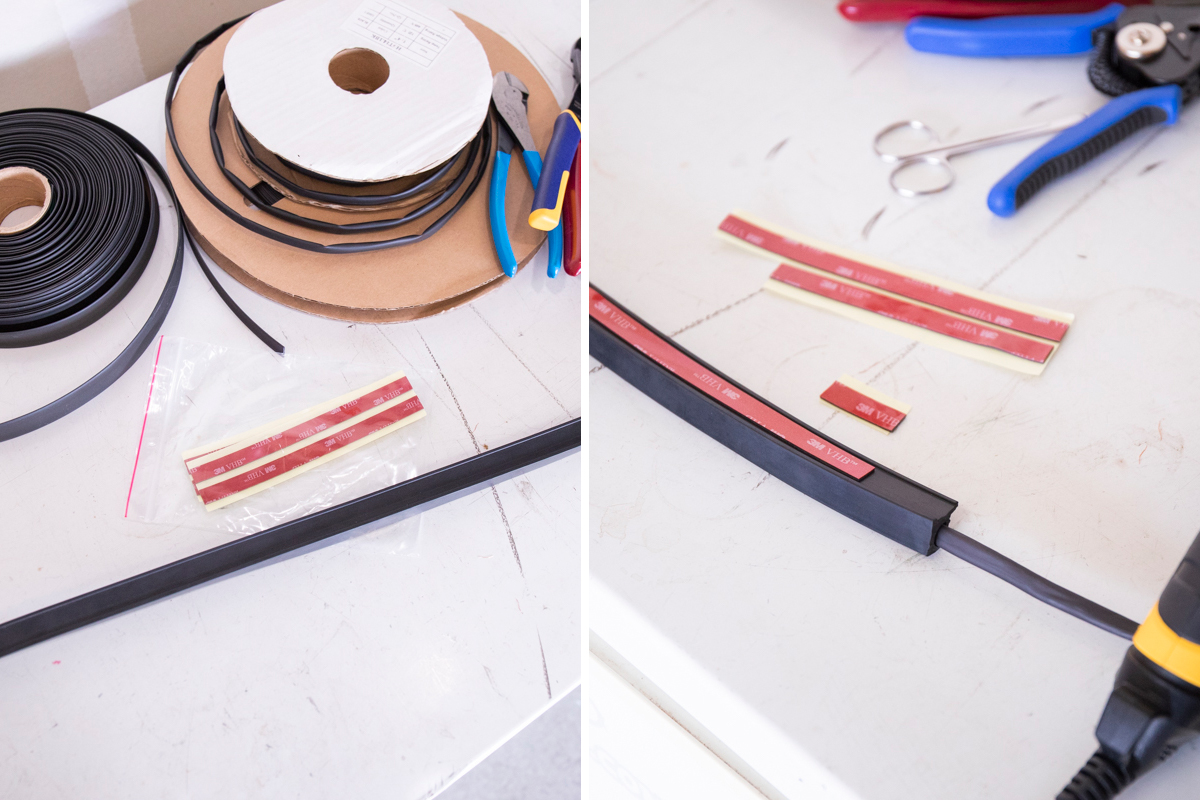
The KC Universal Wire Hider is a rubber extrusion with a large internal channel that lets you hide and run a single wire or multiple series of wires. The rubber strip comes in sections of 3ft and features double-sided 3M VHB adhesive tape that allows you to place it virtually anywhere. It features a massive internal channel allowing you to run at least a 6-8AWG comfortably and up to 0AWG (8mm) gauge snug.
This is an ideal wire management solution for many automotive and even marine applications alike. This is going to be a good option for you if you are sick and tired of looking at exposed wires running throughout your engine bay, through your cab, on your roof, in the bed of your truck, or even down your windshield.
It’s black, and it will blend in pretty well against most surface areas it’s applied to.
How to Hide Roof Rack Light Bar Wires on Windshield?

You can hide wires running down your windshield easily with the KC Universal Wire Hider. The internal channel was designed to accommodate multiple size gauges (up to 0 AWG/8mm) while hiding any exposed wires running down your windshield. The black channel blends in with the weather stripping so from a distance, it’s unnoticeable.
This is a great option to consider if you were looking to hide wires running down your windshield from a roof rack or roof-mounted light bar.
Options for running roof-mounted light bar wires
- Drill a hole in the roof and run it down the a-pillar (inside the vehicle)
- Run wires through your weather stripping and windshield (see that option here)
- Run wires down the front of your windshield in a bulky wiring loom (see that option here)
- Run wires down your windshield with the KC wire hider
As you can see from the options above, the cleanest and least intrusive option is going with a KC hider.
This rubber edge channel by KC protects wires and cables from chafing and arcing, hides wires, and features a flexible edging design allowing you to mount around curves and corners. Finally the wire hide blends in with the surface of most weather stripping on the outside of windshields.
Install Guide
The install is pretty straightforward depending on how you’re going to use the product. We are going to be hiding one positive and negative wire lead coming from our KC Flex 50″ mounted to our GFC RTT. Our wiring harness is going to run to our Switch-Pros.
Tools and materials
- 3M backing tape (provided)
- Wire hider (provided)
- Cleaner: Hot Sauce Boat Bling or Adam’s Glass Cleaner
- Utility knife
- Basic shop tools
- Microfiber towels
- Heat Shrink
- Heat Gun
Step 1. Straighten it out

As soon as you get the box open it up and straighten the rubber out. This is my only gripe with the product. It ships in a box curled up into a tight circle so it wants to hold its form and can be very stubborn. I had the wire hider laying out with heavy books on both ends to straighten it out before the install. After a couple of days, I removed the books and the wire hider wanted to return back to its circular position.
This is a good and bad thing. It’s an incredibly heavy-duty rubber extrusion that once put in its place and secured down, will not want to move. Before installing this I would give it well over 4-5 days with something heavy on top in order for it to keep a straight line. If you absolutely have to install the hider once you receive it, maybe leave it out in the sun in order for the rubber to gain some pliability back.
Step 2. Layout Wire Hider

Start by laying out your rubber strip to get an idea of where it will be mounted on your windshield.
Step 3. Clean surface area of the windshield

Using your glass cleaner of choice, proceed to clean the windshield thoroughly before you lay down the double-sided VHB.
Step 4. Measure Distance

Measure the distance from the bottom of the windshield to the top of the windshield, or wherever you are going to be running your wiring harness.
Step 5. Cut the strip to length

Once you have the desired length of your rubber extrusion, make a cut using a utility knife. A fresh blade will help to get a more accurate, precise, and clean cut.
Step 6. Cut any plastics for fitment

For exact fitment, you may need to cut or trim the A-pillar fender cap plastics in order for the rubber strip to fit seamlessly down the windshield.
Step 7. Final Fitment of Rubber Strip

After you have cut your plastics, proceed to place your rubber strip into the open section of plastic you have just cut.
Step 8. Apply heat shrink

Instead of forcing multiple wires through the open channel on the wire hider, apply heat shrink to consolidate the wiring harness down. This allows you to easily run the wire through the open channel without any wires becoming exposed through the process. Also allows for more control of the wiring harness.
Step 9. Apply VHB to the wire hider
Once you have determined the correct length of your rubber strip, apply VHB tape to the backside provided by KC.
Step 10. Peel back double-sided 3M VHB
Before attaching the first section, peel back the first portion of the VHB tape.
Step 11. Position strip onto the windshield

Align and apply the rubber extrusion parallel to the a-pillar and windshield weather stripping.
Step 12. Peel Back VHB Tape

Slowly start to peel back the underside of the VHB tape while pressing against the wire hider in order for the rubber extrusion to stick to the windshield. You should be pulling off the underside of the tape while pressing the rubber against the windshield.
Step 13. Run the wire through the channel

Finally, you can run your wiring harness up through the open channel and into its final destination.
Final product

If you aren’t looking for it, you probably won’t notice it. From a few feet away the wire hider is almost unnoticeable as it blends in against the black portion of the windshield’s weather stripping.
View from the top
View from the top of the rooftop tent looking down towards the A-pillar and the fender.
Final Thoughts?
The wire hider has held up as you would expect. Nothing out of the ordinary; no peeling, cracking, discoloration, etc.
Our truck has been sitting out in the sun for well over a month now with the wire hider installed and the rubber has not lost any of its solid black color but that may change with time. We washed the 4Runner using a pressure washer after a couple of trips already and the rubber strip has held its ground.
All in all, I’d say it’s a pretty ingenious product and one that I think the off-road and overland industry has waited too long for. Now we all have something we can depend on for wiring all of our harnesses down the windshield and anywhere else we see fit.
Questions or Comment? Leave them below!
Is this rubber strip big enough to hold two solar panel cables or would you need two?
An this be used on existing mounted lights/wires?
Yes, I actually pulled mine out of the weather stripping in order to move it to this format. It’s just a sleeve so any pre-existing wires will funnel right into the sleeve.
How many 12 gauge wires can this hold
I would think quite a few, more than 4. I used two of these wire hiders to hide an 8 gauge plus a couple 12 gauges on another build. I ended up moving this harness into dual wire hiders on both sides of the windshield. https://trail4runner.com/2020/09/28/kc-pro6-m-racks-install-on-5th-gen-4runner/
Can you recall if this created any additional wind noise? I know when my wiring comes out of the window seal track, it creates a ton of wind noise. Wondering if this corrects that, or increases it…
No wind noise for me, no.
Great product. I’ve had mine for a year, finding started coming off. Maybe I don’t clean it will enough but it was an easy fix.
Mine has been solid. No problems.
Would it make sense to “fill” the top with silicone, keeping water out of the rubber channel completely?
Anything involving more silicone or added protection is usually a plus in my opinion but if you want to go the extra mile, maybe add butyl tape instead? Butyl tape underneath the weather stripping would do two things. It would help the weather stripping stay in place and then also seal any opening just before the windshield channel. But, that’s probably overkill as that area is already sealed. To each their own, but its not going to hurt, that’s for sure.
That is one bulky piece of rubber! There’s already a channel along the A pillar and windshield for wires, I wouldn’t put this bulky thing on my windshield but it’s a nice option for a clean install for those who want it
For smaller gauge wires, the weather stripping channel does work but once you get into the bigger light bars that require larger gauge wires, you shouldn’t push your luck. Running large gauge wires down the weather stripping can open you up to water intrusion over time which leads directly to the A-Pillar kick panel where you will find a multitude of harness connectors with individual pins that can cause problems if corroded even slightly. Smaller wires in the16-14 AWG range would be fine but anything 12 AWG and up, I would look at a wire hider or loom or something outside the weather stripping.
Thanks Brennan, good info as always!
Nice Brenan! Is it reusable when the windshield gets replaced or do you have to get a new one?
You can reuse it. It would require new VHB tape on the backside but yeah it’s a burley piece of rubber for sure. Definitely reusable even if you wanted to transfer it to another build or something.