
23ZERO Peregrine 180R Awning Review and Overview – Mounted on GFC (Go Fast Campers) Universal Mounting Bracket
Before we start talking about the awning, we need to talk about where we are mounting the awning.
When it comes to mounting accessories on a Go Fast RTT or any rooftop tent for that matter, a good mounting bracket is key. If you are considering a GFC RTT or you already have a GFC and looking to mount an awning, this article is for you. This is where Go Fast really stands above the competition. Their universal mounting bracket features many different mounting points including pre-drilled holes down the center and slots for multiple accessories.
This post is not just about the GFC brackets though. We are also going to introduce a couple of new brands to the site; Spirit of 1876 and 23ZERO.
Before we jump into it, let’s back up a bit.
Who is the “Spirit of 1876”?
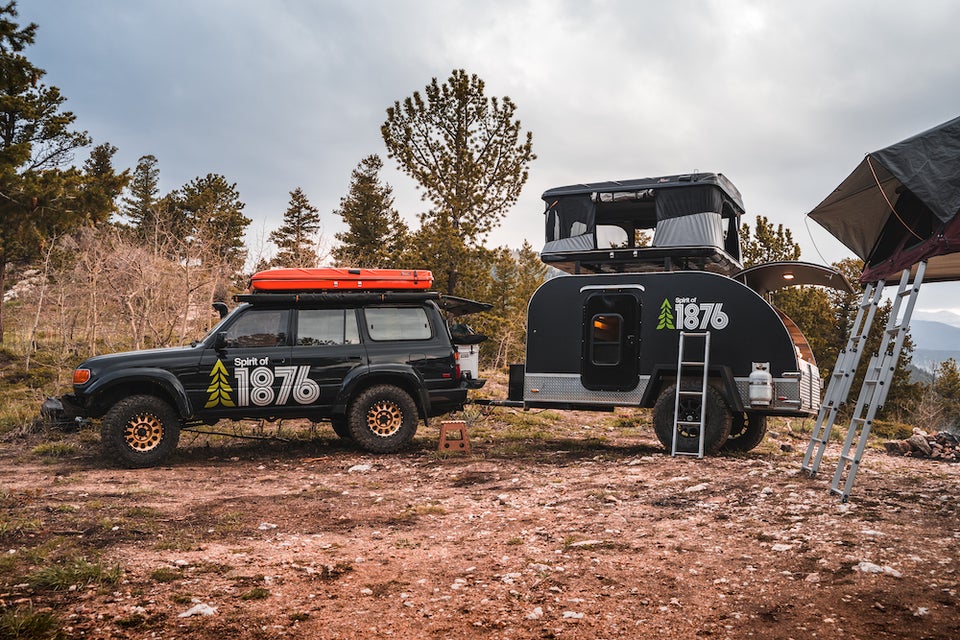
We landed on the 23ZERO awning because of the company Spirit of 1876.
Without calling Spirit of 1876 before-hand, I may have ended up with a different awning. Perhaps an awning that wasn’t for me. I explained my situation to Mike from Spirit of 1876 and he ultimately recommended the 23ZERO Peregrine 180R Awning.
After explaining my exact travel style and current roof rack/rooftop tent setup, it was clear to Mike that the 23ZERO Peregrine 180R was an exact fit for the GFC bracket, but it also fits the way I travel and literally covered all my needs.
Again, huge thanks to Mike at Spirit of 1876. Check them out if you have any rooftop tent questions, awning questions, or anything related to Car Camping and Overlanding, give them a call.
Located in Castle Rock Colorado, Spirit of 1876 is one of the only physical locations where you can literally go test out an RTT by jumping inside, touching the fabric, resting your hear, and zipping the zippers. Spirit of 1876 is Colorado’s premier outdoor adventure headquarters, specializing in premium brands to up your outdoor game. They stock a ton of the industry’s popular brands so if you are located within driving distance of their location, you should go check them out.
Check out their website: Spirit of 1876
Again, a really stand-up guy/company with tons of knowledge in the RTT and awning department.
23ZERO Peregrine 180R Awning Vs. ARB 2000mm (for reference)

This is a really high-quality awning. After installing the ARB 2000mm awning, and more recently the MoonShade portable awning, I have at least a couple awnings to compare it against. So, what’s different about this awning?
Let’s directly compare it to the ARB awning above for reference.
Compared to the ARB awning it spans 180 degrees, is lighter-weight (40lbs vs. 30lbs), much shorter (5′ vs 6’x7″), stays up without legs, and is easier to deploy. The real cons here are that the 23ZERO Peregrine 180R is more expensive, is larger in height/width, and is more challenging to pack up. There is a ton of material on the 23ZERO so to some, it might just be overkill.
ARB retains a sleeker look, and a more compact appearance from the front view while still providing plenty of coverage. Both products are really nice but the ARB wins the low profile height/width race and 23ZERO Peregrine 180R wins in the weight class and the dynamic option to deploy with or without legs. Also, the 23ZERO is much shorter than the ARB which may free up room on the side of your rack for scene lights or other accessories.
It’s almost an unfair comparison as they are so different but maybe it will give you something to consider.
23ZERO Peligrine 180R Awning Overview

As mentioned above, the 23ZERO Peregrine 180R does have some cool features. The awning is very easy to install, much like many awnings that feature slotted T-Rails for T-Nuts. This system allows you to mount your awning to almost any type of universal bracket. Because the 23ZERO Peregrine 180R was designed for the rear of a truck (hence the “R”), it is smaller in length than most awnings.
Features:
- Price: Check Price
- 5′ Length
- Opens to 14′
- Optional Wall Enclosure + $299
- Side or Rear Mounted, OK
- Freestanding unit – legs not needed
- Legs included for extra stability
- One person setup (two recommended)
- Aluminum bars with cast knuckles, hardened swivel pins, and brass washers
- 280gsm Ripstop Polycotton canvas with LST (light suppression technology)
- 2 heavy-duty universal mounting brackets with hardware
- 2 types of tie-down straps
- Guy ropes and stakes included
- Packed down: 60 Inch L x 5 Inch D x 7 Inch
- Weight: 29lb
Setting Up & Breaking Down the Awning

After a day trip to the lake under the awning, it’s easy to see that this is going to be a new favorite. The Peregrine 180R sets up in under 5 minutes and does not require using the legs, which is a huge selling point.
The heavy-duty aluminum bars hold the awning in place, and once you cinch the awning down to an anchor point, the system is rock-solid. You don’t need the legs unless you want extra support for extreme wind or severe weather.
Packing the awning back into the aluminum housing is daunting at first due to the sheer amount of material. Once you get the packing up down, it’s pretty quick. After packing the material down 3 times, I have it down to a science. I think this is a great awning design for the masses, and especially someone on the go that needs to pack up quickly.
The Coverage
If you are looking for the most possible coverage, this not your awning. Although the awning spans 180 degrees, it may leave you asking for more. For me and my little 3-person family, it’s perfect.
If you are looking to fit a family of 5 comfortably shaded away from the hot rays, maybe consider an ARB 2500mm or a 270 degree awning. This awning shines in the ease of use, and quick deployment department – not the largest material footprint coverage.
Side & Front View (packed up)

What does it look like when it’s all packed up?
Again, I will compare this to an ARB awning because it’s such a commonly run awning. Compared to an ARB 2000mm, this Peregrine 180R is shorter, however, it is taller and deeper.
The overall height sits at 7″ vs. the ARB at 5″ and the depth is 4″ vs the ARB at 3″. From the side view the awning packed up does take up a more profound footprint and is not as “low profile” as you might call the ARB, the same applies to the front view. This tent goes great with the GFC RTT but may look a little hefty on some lower profile roof racks.
GFC Awning Mounting Bracket

Although they are made for the GFC, these brackets would be great for CNC cut roof racks like Prinsu, KC lights M-Rack, Victory 4 x4, and many of the others looking to mount an awning. The GFC brackets can also hold many other accessories, such as shovels, Hi-Lift jacks, recovery boards, lighting accessories, and much more.
If you are looking for a universal roof rack or rooftop tent awning or accessory bracket – check out the GFC. This is a solid design that will work for much more than on the actual GFC RTT or GFC camper.
Find it online:
- GFC Universal Mounting Bracket: Check Price
23Zero Peligrine 180R Installation
Installation of the awning is pretty simple and can be done with one person but I would recommend help. The kit comes with heavy-duty mounting brackets which can be used with a roof rack or any other platform you choose. We used our awning directly to the GFC Universal mounting brackets for our install.
Step 1. Unpack all Hardware

Start by unpacking the contents and lay all your hardware out. The awning comes with all the necessary hardware you will need to install the kit along with guy ropes, heavy-duty mounting brackets, and really nice buckle straps. Because we are mounting our awning directly to the GFC brackets, we will not be using it’s not provided u-bolts and mounting brackets.
Step 2. Measure Awning and Desired Mounting Brackets
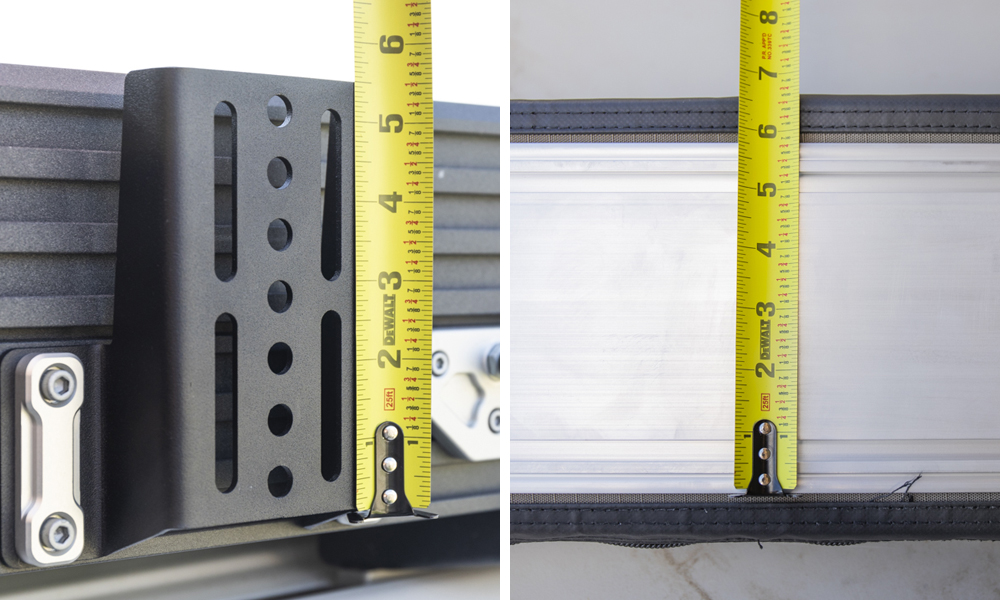
Start by measuring your brackets and the backside of the awning. Whether you are using the provided mounting brackets or something else make sure your nuts and bolts will align to the desired mounting points.
Step 3. Remove Velcro Backing

To access the backside of the awnings aluminum backing plate, you can simply pull off the velcro. Underneath the velcro you will find two rubber stoppers that will prevent Bolts from sliding out.
Step 4. Remove T-nut Rubber Stops & Insert T-nuts

Once your rubber stoppers have been removed, you can insert the T nuts into the aluminum channel and then fold down the velco flaps.
Step 5. Mount awning on the Bracket
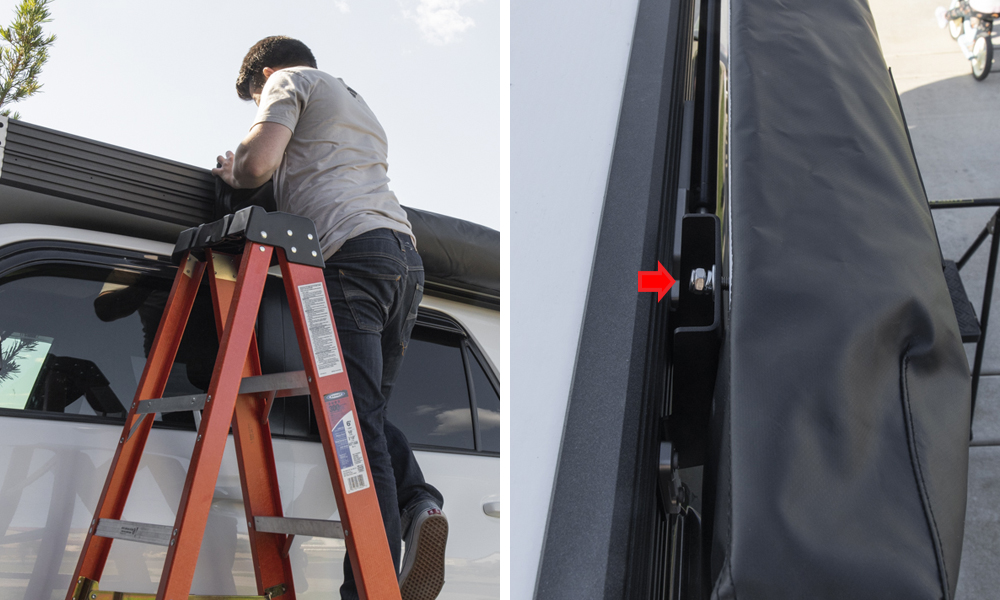
This is where a helping hand might be of value. Start by positioning one side of the awning on to one bracket and then proceed to the other bracket. While the awning is temporarily in place lightly thread down each nut. It’s probably a good idea to apply some Loctite to each bolt before threading down the nuts.
Step 6. Tightened Down All Nuts and Bolts

Once the awning is in place you can finish tightening down all the bolts.
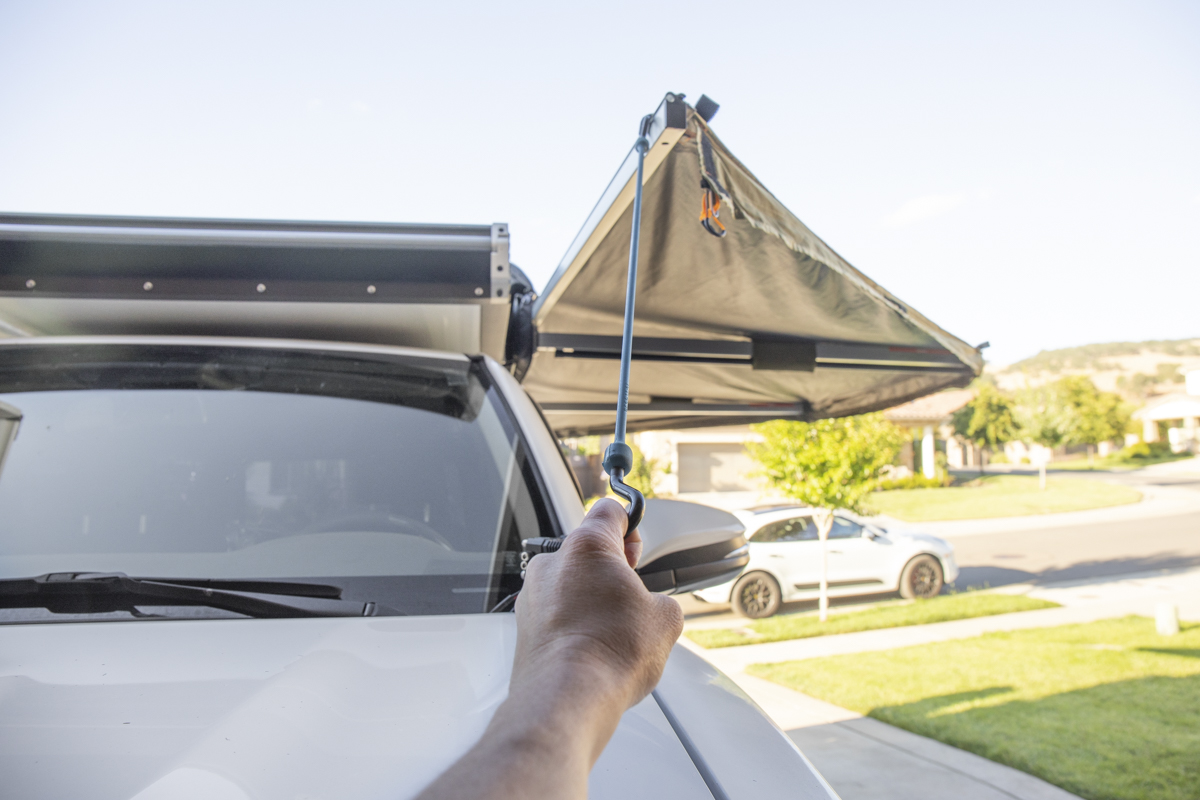
Deploy the awning

23ZERO makes deployment of the awning incredibly simple. Start by unzipping the canvas bag from around awning material and aluminum bars. Once the bag has been unzipped you can simply unfold and stretch out the canvas of the entire awning.
Securing the awning
In order for the awning to stay permanently deployed, you need to somehow mount the corners of the awning to your 4Runner. You have a couple of options here. 23ZERO provides nice buckle straps however we carry extra perfect bungees and Wrap Ties from Sloop Imports when we head out. So for us to carry another set of straps just adds more gear to deal with and to be honest, we really like our Perfect Bungees and Wrap Ties.
Perfect Bungees
If you are using a set of Perfect Bungees you can stretch each corner to whatever mounting point you can find on your truck. For the rear of the 4Runner we found a good point on our RIGd Ultra Swing on when the hatch was closed and to the actual hatch pull strap when the hatch was open.
Sloop Imports Wrap Ties

The same applies for Wrap Ties however you may have a little bit more flexibility with wrap ties as you can cover more distance here. With Wrap Ties, we were able to cinch the awning down to our front bumper and then to the RIGd Ultra Swing in the rear. You really do have quite a few options on how you can cinch the awning down to an anchor point on your vehicle. Whatever cinch strap you are using will probably get the job done.
Closing the awning

When the time comes to close the awning, this is where things may get a little challenging. Once you get the hang of it though, it’s actually pretty simple. There is definitely an art to reinstalling all of the fabric.
The best way to get the awning folded in is to let all the fabric hang down while folding all of the aluminum bars in. Some of the fabric is going to be attached on the inside of the aluminum bars but as long as you let most of the fabric hang down then all of the aluminum bars should fold right in.
Roll up the Awning Fabric

Once all your fabric is hanging down, and the aluminum bars are all folded in, you can straighten the fabric out and flatten it down.
Grab the bottom corner of the fabric and tightly roll it up in sections of about 4-6″ at an angle while keeping tight pressure on the fabric folds. Once you get the fabric to the top of the awning, grab the straps and suck that fabric down.
Final Thoughts
If you are looking to buy an awning for your rack or RTT, call Spirt of 1876 or check it out on their site here.
If you are considering the 23ZERO Peregrine 180R, its really nice. It doesn’t cover the largest footprint but you can tell it’s made of incredibly high-quality materials and is built to last. The one drawback I have is that it’s so bulky but I also understand you have to pack all that material somewhere while making really strong as well.
At the end of the day, it’s a solid product I’m stoked to be running it.
Questions or comments? Leave them below!
What’s the minimum distance required between mounted brackets?
Hi, great review. Does the 180 compact awning open flush to the truck or is there a gap? Thanks
Hey Brenan,
Thanks for the review of the 23Zero Awning, this is one I’m considering. I noticed in one of the pics you have a bracket to attach your RotoPak to what looks like a Gobi ladder. Can I ask where you got this bracket? I’ve been trying to locate one and have been unable to find. Also, what attached side steps are you using for the ladder?
Thanks so much!
-Larry
Hi
looking at 180r vs arb for my 2020 taco TRD-Off LB w leer topper and up top racks. Will it work with topper? Torn arb vs 23ZERO.
Brenan, such good writing and details on your reviews. I found this because I’m search of 23Zero 180R vids etc. before I purchase. The one question I can’t find an answer to is – How deep (or wide) is the 180R from the roof to the edge of the awning? I know it’s 14ft. end to end, but I was wondering about the center. Does that make sense? Thank you for any help. Keep up the good work. I’ve just bookmarked you. 🙂
I’m trying to buy the AUTOEASE POWER LIFTGATE REVIEW but I don’t anywhere Thai can add it
Would these work with racks like GOBI or BAJA tubular frames?
Yeah for sure, they come with some pretty beefy L brackets that would mount up nicely to any tube style rack.
Thx for the article. I’m sold on the 23zero now. Now I need to decide on the 180 or the 180R. I take it the 180 has more width. Is the 180R 5′ and would you know what the 180 depth is? I can’t find the size other than the 14′ width for both on their website. I take it you went with the 180R to leave extra room for add-ons on the GFC since the 180 is longer?
Good question, I would say it’s close to 5′ in depth. I can get an exact measurement soon.
Can you open the back hatch up without hitting the awning ?
If the awning is fully deployed and you open the liftgate, it will connect/collide with the edge of the awning. You can however, easily push the awning to the side, and then open the liftgate all the way.
Thx