
KC Lights 50 Inch Flex Led Light Bar Step by Step Wiring Overview
We stepped it up from a 40-inch flex to a 50-inch flex light bar so the wiring had to change as well.
If you plan on purchasing a KC Lights 50-inch flex LED bar or you are going up from any other light bar size to a 50-inch flex, this article will help you.
Wiring a 30-inch flex light bar and a 40-inch light bar is pretty self-explanatory as the directions are provided in each kit. The 50-inch light bar however it’s not your typical roof-mounted light bar that’s being installed on a regular basis so instructions can be challenging to find. With trial and error, we bring you the wiring guide that will get the job done.
I wanted to go over the wiring process because connecting five separate 10-inch flex sections has to be done specifically. This wiring overview is not difficult, you just need to wire it correctly or else the light bar won’t turn on.
If you are running an sPOD, a Switch Pros or even a DIY switch panel then this article will be specific for you. If you are not running a switch by now, you should probably consider one as they help clean up your wires and make future auxiliary lighting installs much easier.
PRICE
- KC FLEX (10″ – 50″ options): Check Price
- Lumens: 975lm-lux At10m: Spot 250lx | Spread 170lx
- Wattage: 50 Inch-250w
- Color Temp: 5,700k/IP Rating Ip68
- Amp Draw: 50 Inch-25a/voltage: 9v to 18v
Tools & Materials
- Basic shop tools
- Wrenches & Sockets
- Open-end Wrenches
- Screwdrivers
- Allen keys
- Wire Strippers/Cutters
- Wire Crimpers
- Heat Shrink Gun/ Lighter
- Waterproof Butt splice & ring connectors
- Combo Pack of Heat shrink
- 3/8 Heat Shrink to cover butt splice connectors
- 1/2 Heat Shrink for big sections
- 1/2″ Wire Loom
- Electrical Tape
- Tessa Tape – high-end electrical tape
- Extra Zip Ties
- Cable Clamps/ Fasteners
- Double-Sided 3M tape
- Plastic Pry Tools
- Deutsch Connectors
Wiring overview
The KC Flex can be powered with one or two 10″ sections at a time, but not 3 or more inline. Additional sections need to run somewhat in parallel.
When you are wiring a 20″ flex light bar (2 X 10″ sections), you power two 10″ sections inline using a KC linker kit (power is connected from one 10″ section to another).
When you are wiring a 30″ flex light bar (3 X 10″ sections), you power two 10″ sections inline using a KC linker kit (power is connected from one 10″ section to another). The last 10″ section is running on its own power and ground.
When you are wiring a 40″ flex light bar (4 X 10″ sections), you power two 10″ sections inline using a KC linker kit (power is connected from one 10″ section to another). The remaining two 10″ sections are powered the exact same way.
For a 50″ flex light bar (5 X 10″ sections), you power two 10″ sections inline using a KC linker kit, another two 10″ sections using a KC linker kit, and then finally the last 10″ section is on its own harness. For a 50″ flex you should have three leads running off the main harness in order to power all five 10″ sections.
Step 1. Strip the Harness
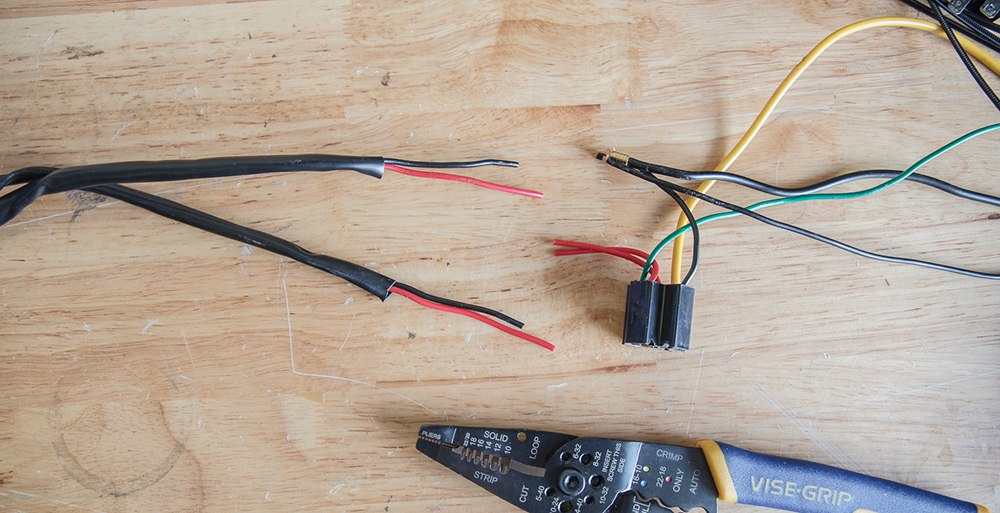
For an overview on how to strip the harness, please reference our previous KC Flex wiring guide. Again, we are using our switch-pros to connect to so we will not be using the provided switch from KC.
Step 2. Build your final harness
The final harness (as mentioned above) should contain one master lead and then off that master lead you should have three individual positive and negative leads.
Step 3. Removing Deutsch connectors & Add Shrink

If you need to add heat shrink too short leads on your wiring harness, you can do that by disconnecting the positive and negative leads from the Deutsch connectors. Once you slide on new heat shrink reconnect your connector.
Pro Tip: Make sure you take a mental note on the orientation of the positive and negative leads. If you reverse the positive and negative leads then you will reverse polarity and your lights will not turn on.
Step 4. Applying heat shrink two all leads

Since this light bar wiring harness is going to live in the elements (rain, snow, etc.) we are going to add heat shrink on all leads. This is on top of the waterproof butt splice connectors and terminals rings we have all the way around.
Water is the enemy.
Stop 5. Organize leads behind light bar

Using light-duty electrical cable clamps you can organize exactly where the lead sits on the back end of the light bar. I attached 4-5 cable clamps on the back end of the light bar using the provided grounded bolts holding the plastic backing on.
Step 6. Zip tie leads down

I zip-tied the main leads down to the linker kit leads and even the linker kit bracket itself.
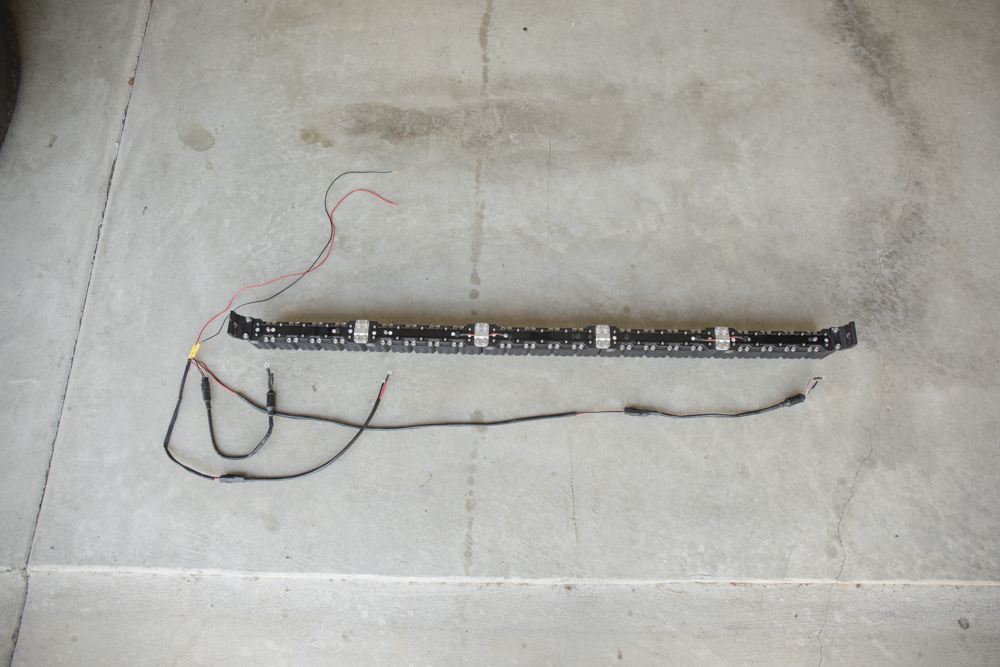
Step 7. Final wiring harness

Pictured here, you can see the final wiring harness before mounting it up to our rooftop tent. Nice and clean, and well protected from the elements.
Step 8. Butt Splice Connector (Option 1)

If you don’t have a spare Deutsch connector (or any connector) then you can connect your light bar main lead directly to the battery using waterproof butt splice connectors and heat shrink.
Step 9. Deutsch Connector (Option 2)

I would recommend using some type of connector in order to make your light bar serviceable. Just in case an LED or something fails on your light bar you can simply unplug the harness and send the light bar in for servicing. With a hard-wired harness, you would have to cut your positive and negative leads in order to remove the light bar for servicing. Unplugging your lead sounds easier than cutting and crimping new connectors when you need to reinstall your light bar.
Step 10. Zip tie your final lead

Once you’re happy with the final wiring harness zip tie everything down.
I will likely come back and add zip tie mounting points on the backside of the light bar bracket and then add new zip ties. This will keep the zip ties from being visible from the outside.
Finally, make sure to upgrade your inline fuse from the 20 amp (or whatever you’re running) to a 25 amp in order to support the last 10″ Flex section.
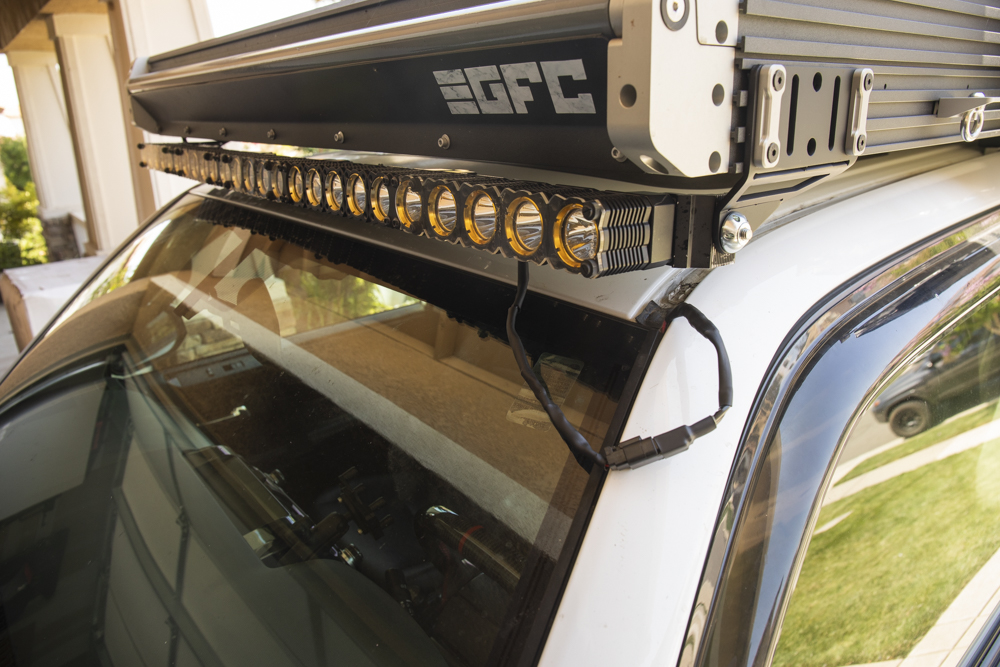
What bracket did you use to attached your light bar to the GFC? Looks great on the GFC BTW! Thanks for the detailed info in the article also.
The bracket was custom made by @StellarBuilt in Sacramento, CA.