
sPOD BantamX 8-Circuit Switch System Review + Step-By-Step Install For 5th Gen 4Runner
Aftermarket accessories for a 4Runner are plentiful. Whether you are looking for additional lighting, some protection from skid plates and bumpers, or maybe a fridge to keep your food and drinks cold… there are plenty of options for the 5th Gen 4Runner.
A large number of aftermarket accessories are electrical, such as:
- Lightbars
- Scene Lights
- Air Compressor
- Fridge
- And more!
With any electrical device, you need to have the right equipment to power it. This can require a lot of knowledge and wiring.
An Overview of Equipment Needed:
- Fuse wires to protect your circuits
- Relays to transfer enough current
- A power switch controller
- Penetrations through your firewall
- A spot to mount your switch
And if you really want to do a top-notch job, you’ll need a method to turn off your accessory should it start to drain your battery too much and even a circuit breaker should the inevitable occur.
sPOD BantamX: Power & Control Your Accessories
As I started to add some lights to my 4Runner and look at other accessories I would like to add, I quickly realized that wiring can get messy – quickly. For example, you will have four (x4) wires coming off your relay and typically three (x3) wires from your switch.
Each accessory will also need to attach to your battery for power and ground. For one accessory alone, this isn’t terrible, but the more accessories you add, the more wiring required. The wiring can get out of hand easily, and before you know it you have a mess under your hood and even potential fire dangers.
You might even inflict damage on some vehicle’s electrical system considering that newer vehicles utilize a CAN-Bus system which is basically a series of networks that enable communications between computers… and you don’t want to tamper with these systems.
I looked into options that would clean things up (a bit). Items such as Blue Seas fuse blocks, relay holders and bus bars can really help to provide a clean setup, but they still require a lot of wiring, time and knowledge.
What if there was a solution to:
- Only have two (x2) cables that attached to your battery, no fuses, no relays, and only one cable that runs through your firewall to a touch screen switch controller?
- Have a setup that would be independent of the vehicle’s factory electrical system?
- Power up to eight (x8) different accessories?
- Having a controller for this system that allows you to dim, strobe, flash, or even link one switch to turn on multiple accessories simultaneously?
Well, there is… and it is called the sPOD BantamX!
Find It Online:
- sPOD BantamX 8-Circuit Controller with HD Switch System: Check Price
Overview of sPOD BantamX

In my opinion, I would have to write a very lengthy article to express just how much the BantamX can do…there is simply that much. sPOD did a great job of providing a platform, but you can take it even further with customizable controls and programming.
A Few Key Features of sPOD BantamX:
- Fully-programmable, digital controlled system
- 8 circuits rated at 30 amps at 12.5 VDC per circuit
- 16-position terminal block (easily attach accessories)
- 2 controller ports (RJ45) for Ethernet cables
- Integrated low voltage cutoff (LVCO) battery protection w/ optional override
- One ATM mini-style fuse for LVCO protection & reset
- Failsafe self-healing fault protection system (from 1.5 to 30amps)
- Current-sensing MOSFETs controlled by a microprocessor (no fuses & relays)
- 50amp auto-resetting circuit breaker
- Nylon braided battery cables are hi-strand crosslinked copper wire with a silicone jacket
- Operates on 12VDC or 24VDC
- 8-position input terminal block for controlling outputs
- Built-in Bluetooth capabilities for remote control
- Protection against: overheating, over-current, shorts, reverse polarity & field collapse
- Ignition control and safety lock-out for switches 1 and 2 (optional)
- Up to 4 BantamX units can be daisy-chained & controlled by one Touchscreen
- On-demand wireless software updates/upgrades
As you can see, the BantamX is not lacking in features, and there is no debate about this; however, one of the biggest questions most people will be asking is if it is worth the money.
I will agree that the BantamX is not a cheap accessory. It is a big investment.
When I first stumbled upon sPOD (in particular the BantamX), I was a little surprised by the price. At just over $915 the BantamX is not cheap; however, when you consider all the wiring it saves, the controllability, safety and the abundance of features provided, along with the peace-of-mind that your vehicle’s electrical system will not be jeopardized, $915 is a reasonable price to pay.
Not to mention the outstanding customer service I had with sPOD and that their products are 100% made in the USA!
If you’re only running one or two accessories…

If you are only running one (x1) or two (x2) accessories, the BantamX may be an over-the-top solution (and you may be better off with one of sPOD’s six (x6) circuit systems that are more budget-friendly). For the enthusiast that plans to add more than two (x2) electrically powered accessories to their 4Runner or any other vehicle, the BantamX is a good investment.
I think a good way to see why the BantamX is worth it is to look at the install process.
So, how easy is it to install the BantamX and how easy is it to hook up an accessory? Let’s find out!
sPOD BantamX Step-By-Step Install
Part 1. Setting Up sPOD BantamX
The first step to installing the BantamX is simply deciding where you want the unit to go.
There are several different solutions for mounting the BantamX under the hood of your 4Runner, including custom fabrication, aftermarket brackets, and what I think is the easiest and cheapest solution…mounting it on top of the factory fuse box.
Step 1. Remove Cover For Factory Fuse Box

Open the hood of your 4Runner and remove the cover to the factory fuse box. Clean the surface of the fuse box cover and then position the supplied mounting template where you want the BantamX to be located.
I chose to center my BantamX on the fuse box, but you could ultimately do whatever you’d like as long as you have clearance.
Step 2. Drill & Mount BantamX To Fuse Box Cover
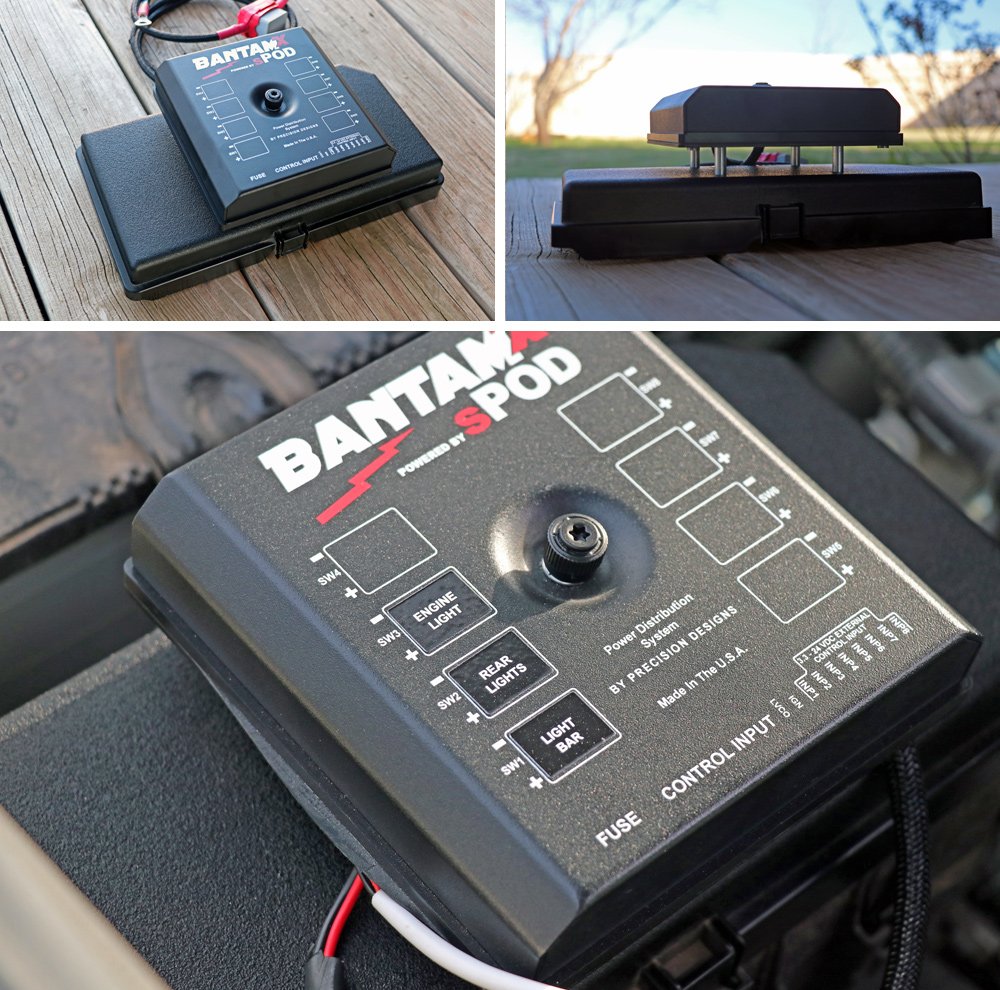
Now that you’ve positioned the supplied template, use a 3/16” drill bit and drill the four (4) required holes. After doing so, mount the BantamX to your fuse box cover using the supplied hardware.
Note: The BantamX can be mounted in four directions since the hole pattern is square…I suggest mounting the battery cables toward the battery and the Ethernet connection towards the firewall. I think this gives you the cleanest setup.
Other than this, you are done with mounting the BantamX! Pretty crazy. Now we need to mount the controller inside the cabin.
Step 3. Choose Spot To Mount Controller
In addition to mounting the BantamX, you will need to find a location to mount your touchscreen controller with the supplied articulating bracket. Once again, there are several different options with RAM mounts, other aftermarket mounts, and simply bolting the controller somewhere on the dash of your 4Runner. The mounting location is really up to your imagination.
While I try to minimize drilling into my car at all, sometimes this is the cleanest, best solution. I chose to mount my controller just above the factory switches on the far left side of the dash.
Note: This location will slightly impact the airflow of the left A/C duct. I took this into consideration and debated this location quite a bit, but ultimately decided the impact to cooling (and heating) would be minimal (if even noticeable).
Step 4. Remove “Mini-Dash”
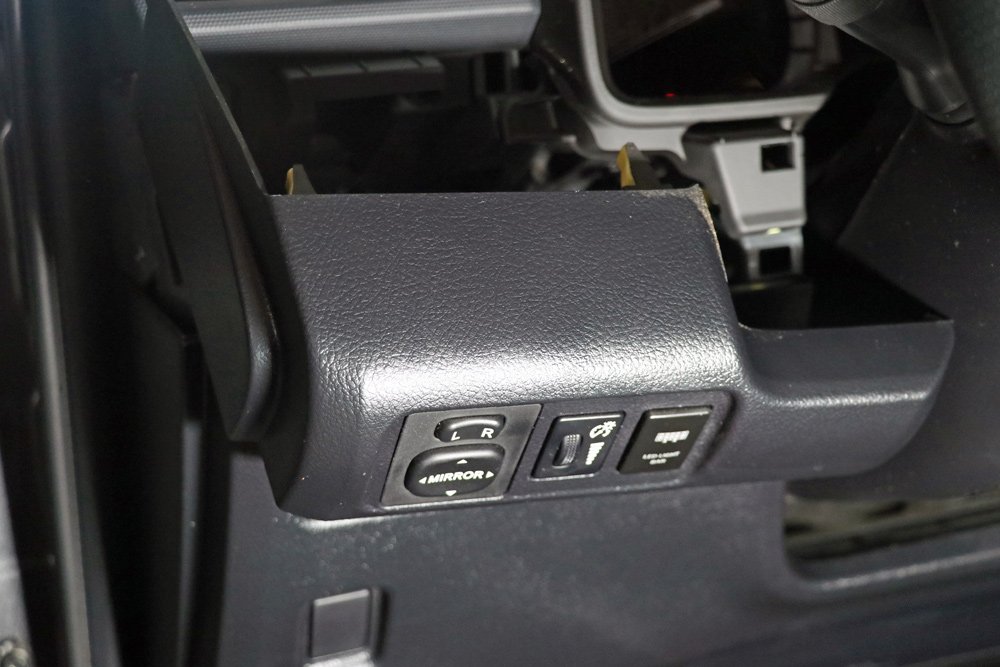
Remove the “mini-dash” from the main dash. You can do this by prying in the corner near the steering wheel and eventually this mini-dash will pop off.
Be careful not to pull the mini-dash too far away from the main dash, as the factory switches do have wiring connected and you need to disconnect these switches after you have removed the mini-dash.
Step 5. Mount Controller On “Mini-Dash”

I then positioned where I wanted to mount the controller on the mini dash. If I placed the mount too far right the steering wheel impacted visibility, so I tried to center it as far forward as possible for best visibility and usability.
I decided to use the provided self-tapping screws (x2), machine screws (x2) and nuts (x2) for the most secure mount. Go ahead and drill four (x4) small holes where you want the mount/controller to be located and then use the two (x2) self-tapping screws, two (x2) machine screws, and two (x2) nuts to secure the mount to the mini-dash.
Step 6. Drill 5th Hole For Ethernet Cable (Optional)

I wanted the cleanest possible look I could get, so I decided to drill a fifth hole (or more so slot cutout) in the mini-dash to run my Ethernet cable. I located this slot on the mini-dash right behind the mount so the Ethernet cable could connect straight to the touchscreen controller. Essentially, you won’t even see the Ethernet cable (unless you are looking right behind the controller).
You might be wondering why I didn’t just drill a hole. So, why did I make a groove instead? Like I mentioned, I wanted a clean look. If I drilled a hole it would have needed to be the size of the Ethernet cable end connection. By making a groove, I could simply have a hole/groove the size of the Ethernet cable (which is smaller than the end connection of the Ethernet cable). This might not make much sense right now, but pictures of the finished install should provide a clear picture of why I did this.
Step 7. Route Ethernet Cable Through Firewall

Now you have to route your Ethernet cable through the firewall. This is the hardest process of the whole install in my opinion…but still quite simple if you take your time. I chose to use some small string as a “fishline” and run that through the firewall first, and then tie this string to one end of the Ethernet cable so I could pull the string and route the Ethernet cable through the firewall.
sPOD supplies you with a protective Ethernet cable connection cap…but I found that using electrical tape to depress the tab on the Ethernet connection worked better. The protective cap sPOD provides you with is great, but it will require a larger hole through the firewall because of the increased thickness from the protective cap.
When you are pulling the Ethernet cable through the firewall, make sure to take your time and don’t rush. It really helps to have an assistant who can push the cable from the engine bay while you try to gently pull it in from the cabin. Also, you can check out Brenan’s install where he used a different method of getting cable through the firewall.
Once you have the Ethernet cable routed into the cabin you are almost done!
Note: Make sure you avoid the area where the parking brake lever is (or your cable could get damaged).
Step 8. Reinstall “Mini-Dash” & Connect Factory Switches
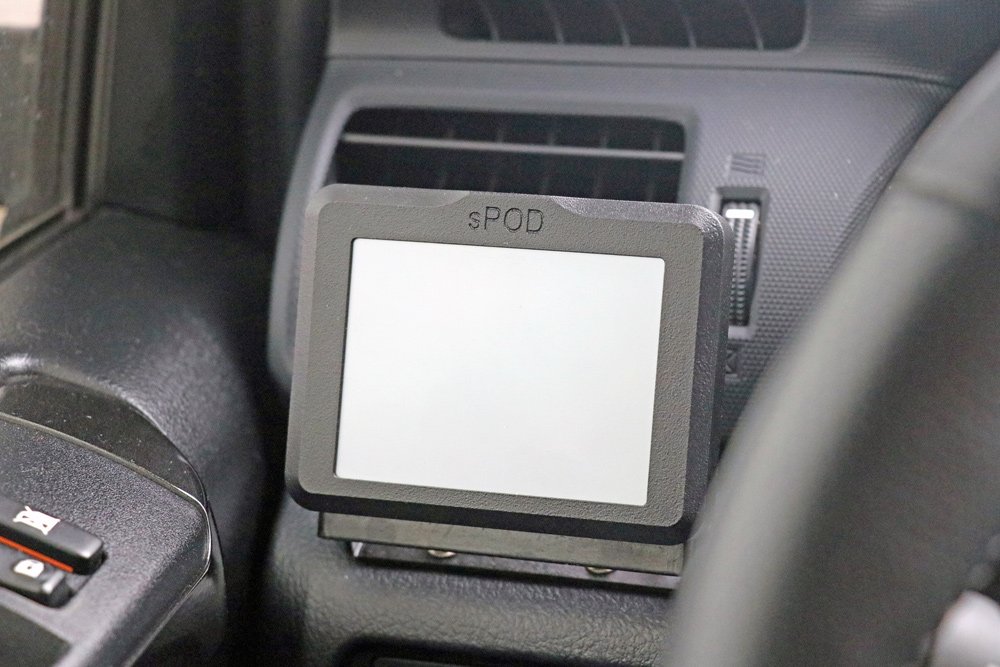
Now you need to reinstall the mini-dash and plug in all the factory switches. After doing this you can now mount your controller to the mount you installed on the mini-dash. Last, go ahead and plug in your Ethernet cable.
Hopefully, you can now see why I chose to make a groove in the mini-dash versus drilling a hole…I think this setup is super slick!
Step 9. Connect Ethernet Cable Into sPOD
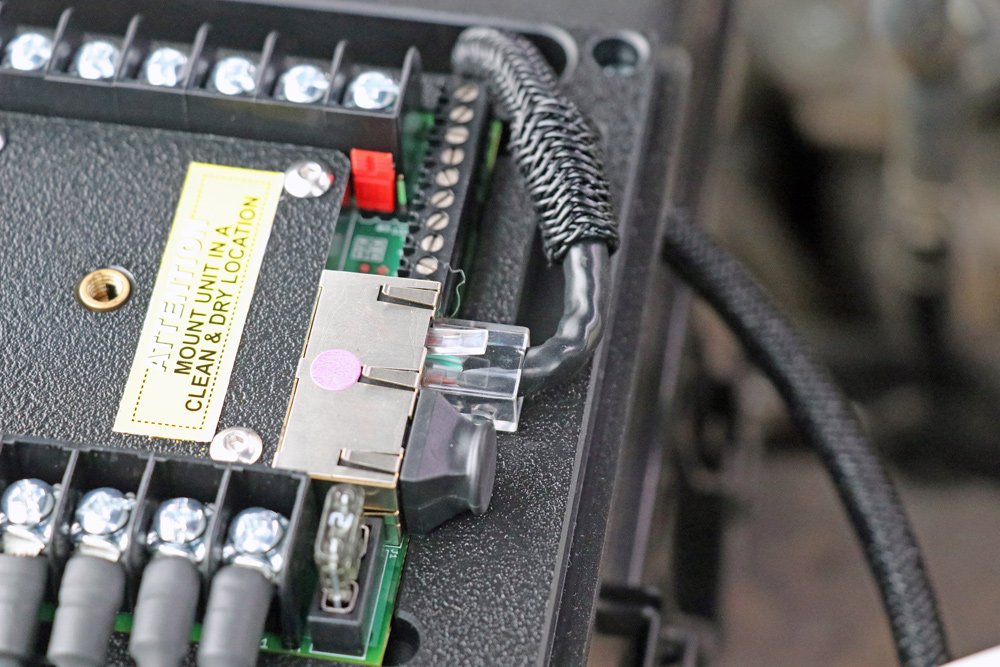
Last, you need to plug your Ethernet cable into the BantamX under the hood. I will note that you probably need to coil the Ethernet cable up and secure it with zip ties, as the cable is pretty lengthy.
One other point to mention is I think sPOD could improve the way the Ethernet cable is connected to the BantamX. You have to route the Ethernet cable through one of the “wiring slots” on the bottom of the BantamX and then make the cable bend 90 degrees to connect to the connection. This isn’t easy to do and I was worried that I might break something… but it all worked out. This isn’t a huge issue, but I do see possibilities to improve how the Ethernet cable is connected to the BantamX. Potentially a designated opening just for the Ethernet cable from the back of the system.
Step 10. Connect (+) and (-) Battery Cables
Connect the positive and negative battery cables to your battery and you are done with the installation! Don’t forget to start the vehicle and let it run for about 30 seconds to initialize the BantamX!! Once the system fires up, you may turn off the vehicle.
Part 2: Connecting Your Accessories
Now for the fun part, connecting your accessory lights.
Tools & Materials:
- Klien Tools Crimps
- IRWIN Wire Cutter
- Heat Gun
- 6 AWG wire
- 6 AWG ring terminals + heat shrink
- 8 AWG wire connectors
- 10-22 AWG ring terminals
- 10-22 AWG connectors
- 10-22 AWG wire
- Universal heat shrink
Step 11. Route Accessory Wiring To BantamX
If you have any electrical accessories already installed, you will want to cut off the relay, fuse & switch that came with the lights. Route the positive and negative wires from your accessory to the BantamX. Cut the wires to length, but provide just a little bit of slack.
Step 12. Heat Shrink Each Wire

sPOD provides spade terminals and shrink-tubing to help keep your wiring tidy and clean.
Place one piece of the supplied heat shrink on each wire. Then crimp one of the supplied spade terminals to each wire. After doing this, slide the heat shrink over the crimped part of the terminal and use a heat gun to shrink the heat shrink.
Step 13. Route Connectors Through sPOD

Route the connectors up through the bottom of the BantamX through one of the two (2) wiring slots. There are four (4) outputs (positive and ground) on each side of the BantamX, for a total of eight (8) possible accessories. Slightly loosen the positive and ground screws for the switch you want your accessory to connect to and slide the end connections into place. Tighten the screws snug to secure your wiring in place.

This is all you have to do. No relays, switches, fuses, or anything like that. Just connect the positive and negative wires to the BantamX and you are good to go. Look how clean this setup is!
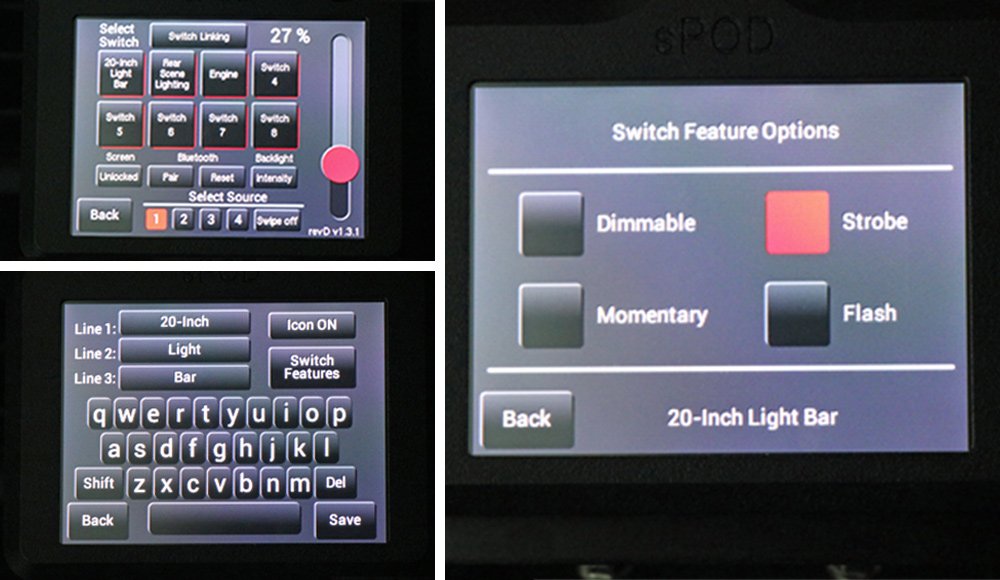
sPOD BantamX’s HD Touchscreen Controller

The sPOD touchscreen controller is essentially the switches for all of your accessories. From the controller you can, of course, turn an accessory on or off, but you can also program each switch.
What are some of the programmable features?
- Strobe
- Dimmable
- Flash
- Switch Linking (so one switch can turn on multiple switches)
- Custom Names / Labels
- Custom Icons for Each Switch
These are just some of the features. On top of all this, you can view the temperature of the BantamX under the hood and your battery voltage. In addition, when you turn on an accessory the controller shows you how many amps each circuit is pulling…pretty cool!
The Touchscreen controller?
Well, I’d say it was adequate. It isn’t something that you look at and are blown away, as it isn’t super clear…but it is plenty sufficient.
The touchscreen isn’t as sensitive as an iPhone either…as it seems to require actual pressure (but not too much) to operate because it is based on “resistive touch”, unlike the phones that are capacitive touch.
I think this is something sPOD could improve on in the future. However, I do want to say the touchscreen is awesome, I just think there is room for improvement. sPOD also offers other types of controllers (with more traditional switches/buttons), so you can find the best fit for your application.
Another cool feature is the controller will automatically turn off after a set amount of time, which I think is great to save your battery. All you have to do to turn the touchscreen controller back on is touch the screen. You can also dim the controller for nighttime use / your preference.
Overall, the touchscreen controller is an awesome option, as you can customize many things from the controller itself…not to mention you can link to a Bluetooth compatible device to control your lights! This is pretty neat.
What I am running off the sPOD BantamX
As previously mentioned, the BantamX can run up to eight (8) accessories (or up to 30AMPS per circuit). As of now, I only have three (3). Let’s walk through each of them.
Switch #1. Baja Designs S8 20” Light Bar

For switch 1, I am running my S8 20” light bar from Baja Designs. NOTE…some lights come with a low-beam light built into it, if this is the case, forgo the low-beam light and use the dimming feature on the sPOD controller to make the light any brightness you want!”.
This can put out some serious lighting and is really nice when driving off-road or down some rural roads at night. I originally was going to use the BantamX inputs trigger option to tie my light bar and high beams together.
This would ultimately turn my light bar on when my high beams are on, however, I quickly realized (or more so remembered) that the DRLs serve as the high beams on a 4Runner which meant I couldn’t use this setup. I am still looking into other options to trigger my light bar to come on with my high beams, but I haven’t found a great solution yet.
With the installation of my light bar to the BantamX, I noticed one other improvement sPOD could make. The way the wiring slots through the plastic and silicone gasket are set up on the bottom makes smaller gauge wire (which is actually larger diameter wire) hard to pass through and hook up to a terminal.
While this isn’t a concern for most accessories, it will make wiring accessories that use heavier gauge wire a little more difficult to route to the terminals on the BantamX.
Switch #2. KC Hilites C2 Rear Scene Lighting

Seeing behind your vehicle is just as important as seeing in front. This is why I installed some KC Hilites C2 rear scene lights. Eventually, I will trigger my rear scene lighting to come on with my reverse lights using the BantamX’s input control. This should be quite easy to do, I just need to take the time to wire up the trigger to the BantamX input.
Switch #3. Diode Dynamics 40” LED Under-the-Hood Strip Lighting
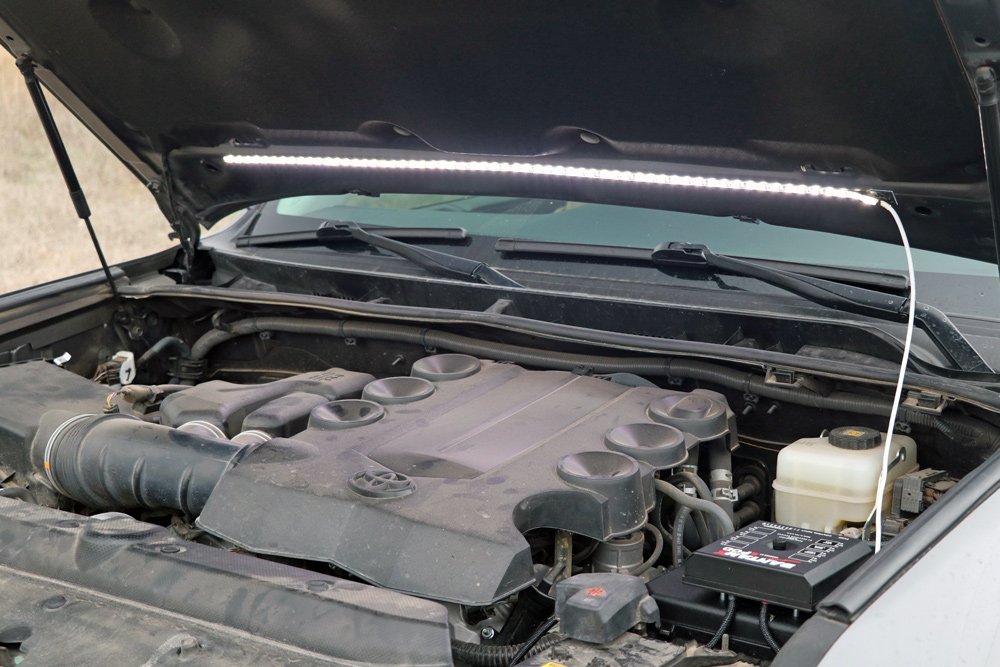
If you have ever worked under the hood of your car at night, you will quickly realize that adequate lighting is a must. I usually have my Coast headlamps, flashlights, and lanterns ready to go, but I wanted something that put out a lot of light hard wired to the BantamX should I need to get under the hood. This is why I installed a 40” strip LED from Diode Dynamics…and this light is bright!
While these are the only accessories I currently have, I already am planning to add an air compressor, wiring for my newly acquired ARB Elements Fridge / Freezer, ditch lighting, and front floodlighting.
What’s really cool about the BantamX is that I will be able to add all of these accessories so quickly and safely! It really is that easy to wire accessories up with the BantamX.
Final Thoughts

To conclude, I would highly recommend the BantamX (or one of their other models) to anyone looking to run more than two (2) accessories on their vehicle.
The BantamX will ultimately provide a safer, cleaner, and more versatile system. Yes, you do have to invest a little bit of money because the BantamX isn’t cheap…but it is well worth the money.
The controllability you have with the BantamX is simply remarkable. The built-in safety features, programmability, and sleek design are all but some of the contributing factors that make the BantamX my choice for powering electrical accessories on my 4Runner.
I had no idea you could wire lights up directly without the relay and fuse! I’ve been beating my head against the wall trying to figure out how to wire my BD lights with the fuse a relay and have a huge coil weird under my hood. Thank you so much for the writeup and insight! I’m going to cut all that wiring down get rid of the fuses and relays to clean things up.
I purchased the BantamX. The instructions say to connect negative terminal to chassis ground and not negative terminal on battery. Is there a reason you connected negative to battery terminal?
Stu, I checked with sPOD and that is a general statement that only applies to vehicles with “smart charging” systems. The 4Runner does not have a smart charging system, so you can just connect to the negative battery terminal.
Thanks for looking into it. I went ahead and did mine to chassis ground and works fine. But the more you know the better so appreciate you looking into it.
Sure looks easy to install. Thanks for the write up. Once it’s installed and everything is wired up, how hard is it to remove the fuse box cover?
Tim, it is not very difficult. If you left enough slack in all of your wires you can simply pop the fuse cover off as usual…but if you didn’t, you simply have to disconnect a few wires and you are good to go.
This has been on my list for a while. Thanks for the great write up!
Thanks Ben!
Finally getting to this upgrade. Were there any issues with connecting the negative wire from the Bantam direct to the negative terminal on the battery?
There’s a warning flyer that came with mine warning against not connecting to the negative battery terminal and instead connecting to an engine or chassis ground if the vehicle has a “smart charge” charging system. I have a 2018 TRD Pro 4runner if that matters.
Ben, no there is not. I checked with sPOD and they have a general statement in the install instructions to attach to chassis ground…but that only applies to vehicles with “smart charging” systems. The 4Runner does not have a smart charging system, so sPOD said you can just connect to the negative battery terminal. This is what I did and haven’t had any problems since.
Thanks for the reply! I actually just got done installing it and ended up connecting the negative connection from the Bantam to the main chassis ground. Boy this really cleans up the wiring – wish I just did this at the start!