
How To Build Your Own CO2 Tank or “Power Tank” – A Few Options To Consider When Building a DIY CO2 Tank For Airing Up Tires
Let’s be honest, Power Tanks are expensive. Extremely badass, but expensive.
I have had the privilege of test-running a 10-lb power tank for the last couple of trips. Big thanks to Tyler at MORRFlate for lending me his setup to see if CO2 was for me. My mind was blown when I saw all four 35″ tires air up in less than 60 seconds. You literally watch 15PSI reach 35PSI on four tires in real-time. Squishy turns to firm… fast.
The specific Power Tank I used was decked out with the Super Flow CO2 regulator kit (XP400 Pro Series) with the Super Coupler. This setup is seriously impressive. The build quality of the regulator alone is pure eye candy. The red on black with the Power Tank logo branded gauges might be enough for you to pull the trigger. The regulator, when connected to the tank, is far more impressive in person than pictures do it justice, and it operates flawlessly, as you would expect given the cost.
The XP400 is their top-of-the-line regulator and has some staggering numbers. It features 48 CFM (cubic feet per minute) flow rate at a maximum outlet pressure of 400 psi. Compare that to the ARB Twin we have installed with a 4.68 CFM flow rate at 29 psi with a max pressure output of 150 psi. There is literally no comparison here. This is not apples to apples, this is apples to something far more delicious.
How much are Power Tanks?

Power Tank outperforms any portable compressor on the market when it comes to speed, and if speed is what you are concerned about, then a Power Tank is absolutely for you. Performance comes with a cost though.
Power Tank kits with the tank and regulator can run anywhere from $450-$750 or more depending on the accessories you buy.
XP400 or HP250i?

The XP400 kit alone (with no tank) runs around $380 but you can find it for about $350 from other sites. If that’s a little too expensive, no worries, you can grab an entry-level regulator, the PT HP250i.
The HP250i features a 45 CFM flow rate at a maximum outlet pressure of 250 psi. This more affordable version is only $325 and you can find it other places online for $299.
I found a few of these on Craigslist for about 20% less than you will find online. If you do your research through Craigslist and Facebook marketplace, you might find a decent deal.
Power Tanks are Badass, let’s buy one!

Oh that’s right, they are super expensive and I can’t afford one. Ok, let’s build a cheap one.
Well, the cost of building an exact replica of a dual gauge adjustable regulator like a Power Tank version can actually get pretty expensive. Before going all-in with a DIY setup, let’s address some items:
Questions to ask yourself:
- What is your desired PSI output range?
- Do you want to monitor tank pressure?
- Is fixed-rate ok, or do you need to regulate output pressure?
- Do you need a dual, single or no gauge?
- What air hose and psi gauge are you using to fill up tires?
- Do you plan on using air tools?
- Do you plan on resetting Beadlock wheels?
Power Tanks Vs. DIY Power Tank

A DIY Power Tank is going to achieve the same end-goal for most users when compared to the brand name. With that in mind though, Power Tank does have multiple options with their tank sizes and regulators, so it’s important to consider the psi you need before deciding on either direction.
Running Air Tools?
Air tools made for general use with portable air compressors typically require 0 to 5 cubic feet per minute (CFM) at 70 to 90 pounds per square inch (psi), whereas with larger tools connected to stationary systems, the requirements usually exceed 10 CFM at 100 to 120 psi. – quincycompressor.com
Regulator & PSI?
Depending on the regulator you are running, you will see different psi output. With the Power Tank, you have a 400 psi and 250 psi regulator option. With a DIY version, you can run the fixed rate 150 psi regulator or something like this 400 psi (Power Tank replica) version. I cannot speak to the performance of this 400 psi replica version, but it has decent reviews. If you don’t want to piece together your own regulator, consider the replica version.
How much psi do you need?
For the most part, 150 psi will cover most air tools you may need on the trail along with airing up tires quickly. If you don’t “need” 250 psi and don’t want to fork over the coin for a Power Tank, then maybe look at a DIY option. It really just depends on your situation. For most off-roaders and overlanders, 150 psi is plenty. The difference between 150, 250 and 400 psi is speed and power. The higher the psi flow, the faster you can air up your tires. Finally, some air tools require a high psi which is another reason why you might want to go with a high-flow psi regulator.
DIY CO2 Tank: Tools and Materials
Let’s look at the components that make a portable CO2 tank with a decent regulator.
- 10lb CO2 Tank
- Primary Regulator (tank pressure)
- Secondary Regulator (output pressure)
- ARB Coupler
- Scuba Tank Handle
- Coiled Yellow Hose
- ARB Tire Inflator
Note: I used a 5-lb tank from an old kegerator I had. However, I highly recommend the 10-lb tank if you are going to build one. I will explain why later. Just know that is likely the only thing I would have differently below.
CO2 Tank

For a tank, you can grab a 5-lb or 10-lb tank from Amazon, or even Craigslist. If you can jump on Craigslist, sometimes you can find a really good deal on a CO2 tank. But, just be careful here and know what to ask when shopping. The Department of Transportation (DOT) requires that most portable CO2 tanks, both new and used, be recertified every five (5) years so always ask how old a CO2 tank is before buying one. If the tank is 5+ years old, don’t buy it or just low-ball the person and then exchange the out of date tanks for the standard fee + recertification cost at a fire extinguisher company near you.
5-lb, 10-lb or 20-lb tank?
If the budget allows, you should opt for a larger tank. The smaller the tank, the more often you will need to refill it, but on the other hand, it is the most compact of the three sizes. The 10-lb tank is going to be the middle of the three and is probably the happy-medium of pressure capacity and physical size as well. A 20-lb tank is likely going to be too big for most 4Runner and mid-size off-road builds but may work on some full-size off-road/overland builds given you have space to accommodate it.
Regulator

The regulator is the most important part of your DIY CO2 tank, so what features do you want?
Let’s start with what psi you need.
As previously mentioned, you can keep it fixed at 150 psi output, or even less. For running air tools, you can also run that same 150 psi and likely be fine. If you for some reason need to adjust the psi coming from the tank into your tires or tools, then an adjustable CO2 regulator is what you want, which is what Power Tank offers.
On our DIY tank, we added a secondary regulator in order to drop our psi down from that fixed 150. If you are looking to fill air lockers with CO2, 150 psi will be too high and you will want to regulate your air down to about 80-100 psi so you don’t blow any seals. You can add a secondary fixed regulator to the 150 psi fixed regulator in order to air up your lockers. If you are going this route though, you should probably be looking at an adjustable regulator like the PT or the replica version, or of course, you can just build your own.
For our case with 35″ tires, I don’t see the need for 400 psi or even the 250 psi regulator; but if you have other needs like airing up 40″ tires really fast, then maybe larger rated psi regulator is for you.
Some air tools require really high psi as well, so if you are looking to run air tools with high psi requirements then consider a higher psi rated regulator.
Fixed-Rate 150 psi Regulator
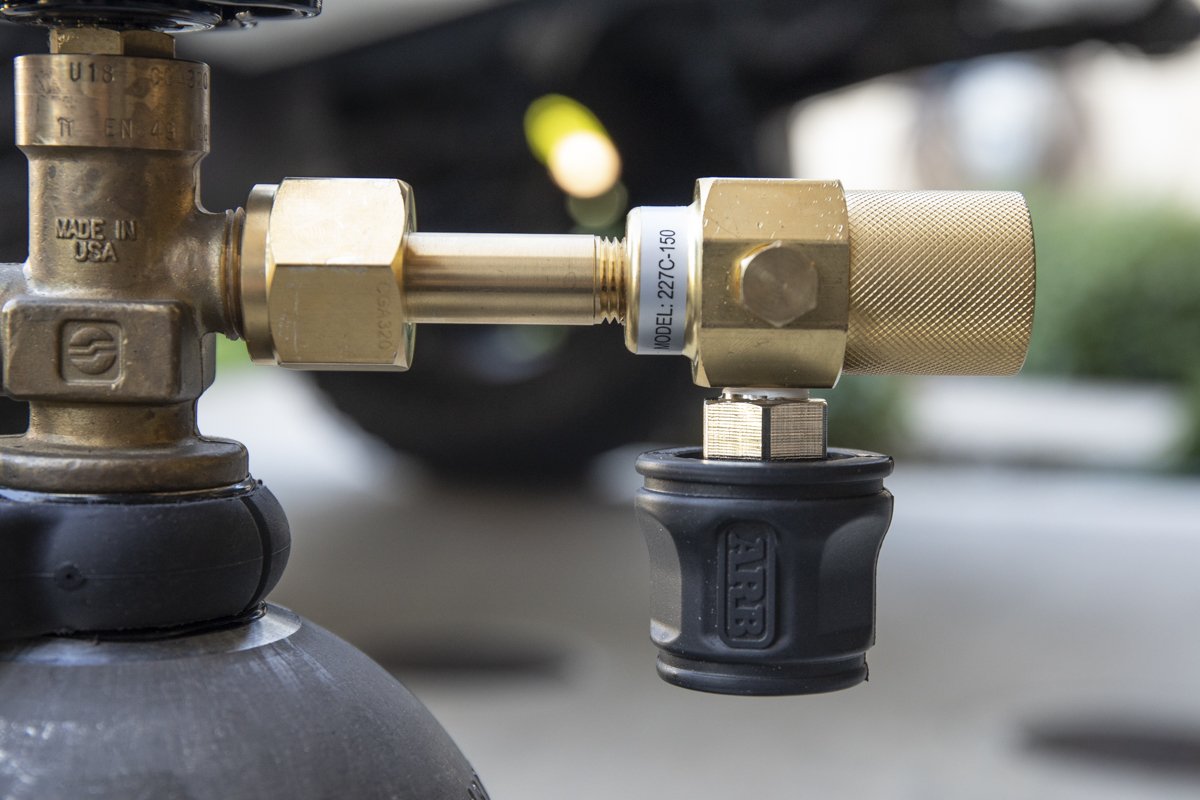
Pictured above is the fixed-rate 150 psi regulator and a single ARB quick connect 1/4″ air coupler. This is the most basic DIY regulator you can run. You can connect an air hose straight to this regulator/coupler and start airing up your tires.
The fixed-rate (no valve to regulate the pressure) 150 psi regulator will provide a “fixed-rate” of 150 psi into our tires.
There is nothing technically wrong with this setup at all. It’s quick, easy and just works.
We went a step further with ours though.
Second Regulator (Output Pressure)
Your secondary regulator is going to control the pressure coming out of your first regulator. If your first regulator is a static 150 psi, then your second regulator can drop that psi down further.
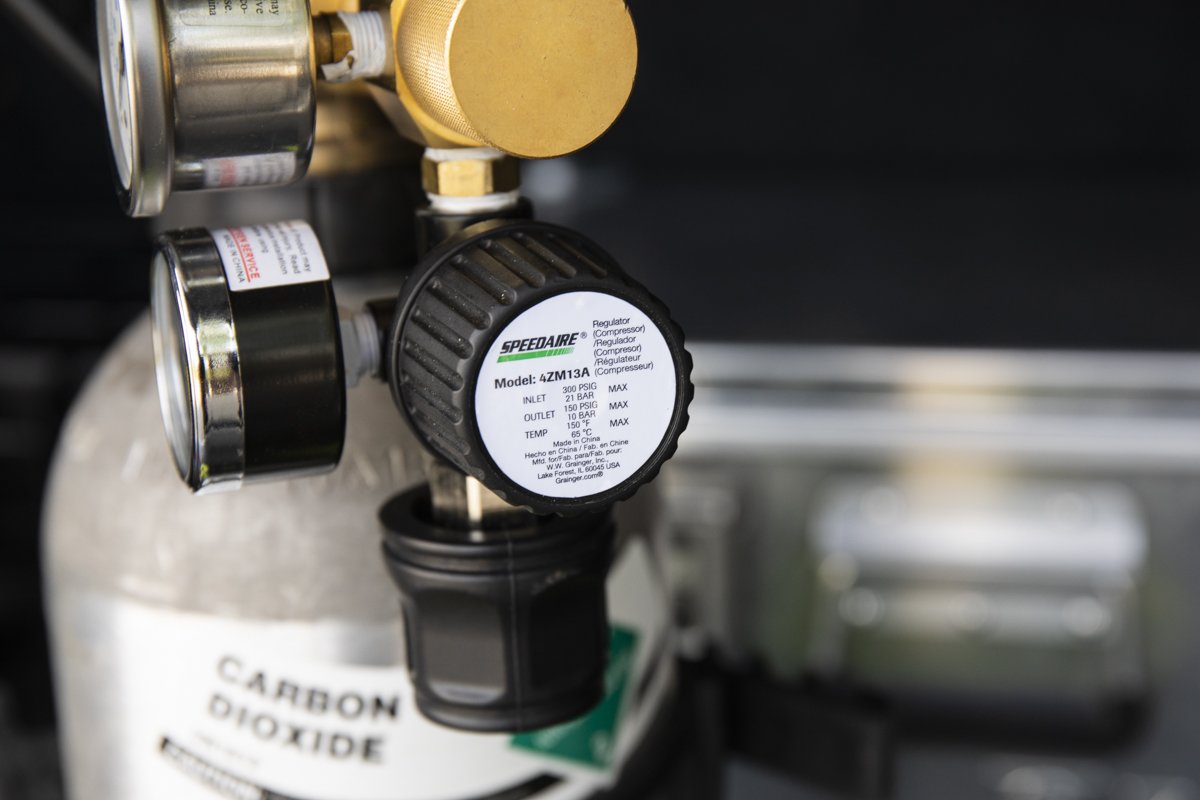
If you need to air your lockers or anything else that requires a lower psi, then this regulator will control that. From here, we can adjust our psi down to 80 psi or even lower depending on our needs. For this part, you can go with an affordable option like the Bostitch (1/4″ inline regulator with 1/8″ gauge fitting) or step it up and go with an upgraded option when you buy a 1/4″ regulator and 1/8″ gauge independently of each other.
Originally, I purchased the Bostitch and even though it works, I wasn’t thrilled with the performance. The adjustment dial started sticking after a few times of use. After quite a bit of digging online, I found the SPEEDAIRE air regulator and it has worked great.
Gauges

Adjustable, dual gauge, single gauge or no gauge?
You don’t “need” a gauge on your regulator to air up your tires, but they might help, depending on your situation. At the end of the day, all you really need to air up your tires is the one main regulator and a coupler. That’s it.
Top Gauge: Tank Pressure
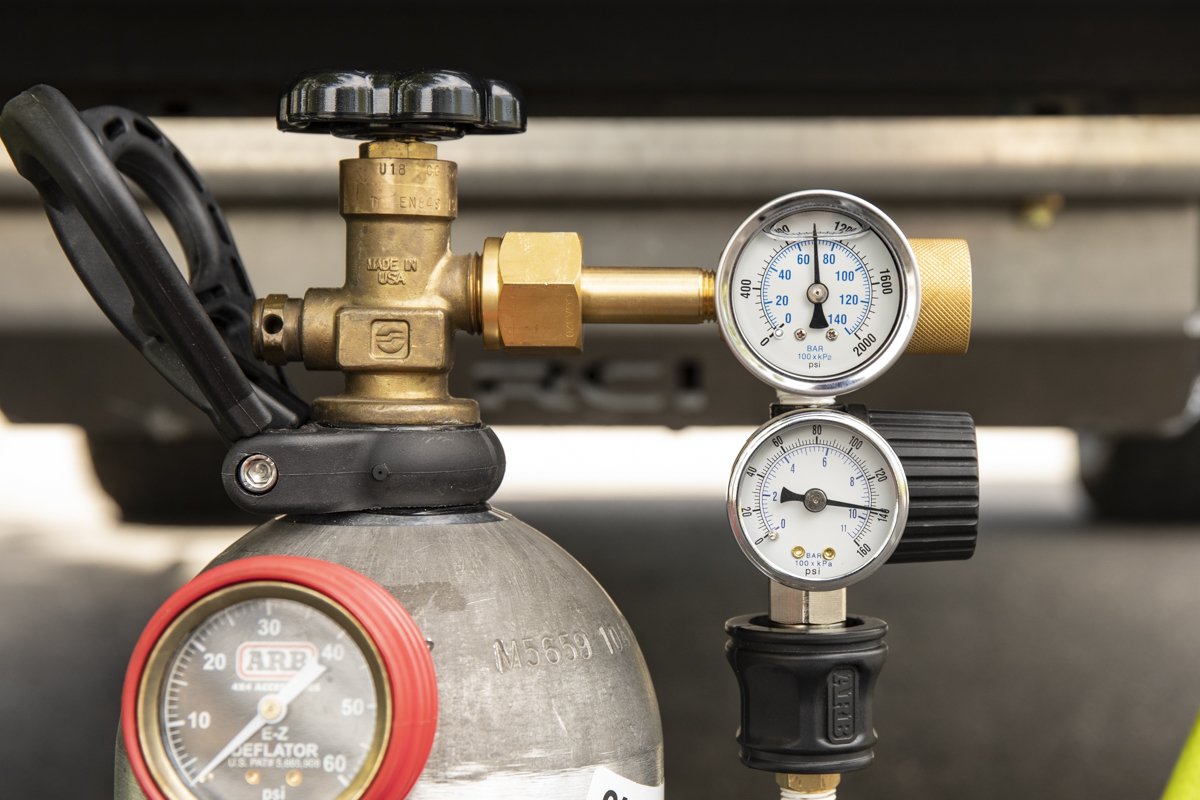
If you want to read the pressure inside your tank, then you would want to add a psi gauge that is rated for that tank. For example, a 5-lb or 10-lb CO2 tank when full will read 600-1000+ psi depending on the temperature so you use will a gauge that is 800 psi or over in order to read that tank. In our case, we are running a 0-2000 psi gauge.
But, just because your tank reads 600-1000+ psi doesn’t mean you have a full tank. CO2 is mostly a liquid state inside the tank and a small portion of gas at the top. The 600-1000 psi should stay constant throughout uses. Psi will drop or rise depending on temperature. If the tank is nearing empty, then the psi will drop drastically but only once the tank has reached mostly gas, not liquid.
You really don’t need this gauge, though. You can feel when the tank starts to get empty just by lifting it up.
Bottom Gauge: Output Pressure

With a fixed regulator like the Gentec 227C-150, you have a set psi (150) that is coming out of the tank. That means you can’t lower or increase the pressure unless you add a secondary regulator.
Our bottom gauge is connected to the SPEEDAIRE air regulator. This is a 0-160 psi gauge that will read the output pressure of the tank and we control that with the SPEEDAIRE regulator adjustment knob.
With the SPEEDAIRE air regulator, we can control the exact psi coming out of the tank.
Coupler

There are lots of couplers out there.
From the ARB quick connect we used to basic brass 1/4″ couplers on Amazon or Home Depot, you can find affordable options out there. You may even have one laying around your garage. There are high-end brass fittings and then zinc-plated steel fittings for cheaper.
Some of the universal zinc-plated steel kits from China can have warped threads while the single brass fittings tend to be higher quality, but not always. Some pre-packed kits can be nice. It really just depends on the brand.
We had a left-over ARB coupler from the ARB twin compressor we are running so that’s what I used.
Handle

We went with a pretty cheap version for a handle. You can find the “Power Tank” style handles on eBay or Amazon but even the off-brand versions are expensive, sitting around $40+.
Whatever you are looking for when it comes to a handle, just make sure the inside diameter of the handle matches the outside diameter of your tank. There are lots of scuba tank handles out there but not all of them match regular co2 tanks out there.
We had to modify our handle with a file in order for it to fit the circumference of the co2 tank. We took about 1/8″ off around the entire inner diameter.
SAFTEY DISCLAIMER: This handle is not an added level of protection. Pease do not travel with this regulator attached to the tank while driving. The handle on this tank does nothing in the way of protecting your regulator. Power Tank on the other hand offers an extremly strong handle designed to protect the regulator and the main valve. You can find the Power Tank handle here, or the cheaper DIY version here. There is no gauruntee that the DIY version is going to be as strong as the branded version. Use yoru best judgement. Trail4R.com is not responsible for transportation methods of DIY tanks.
Coiled Air Hose

For the most part, we are going to run our setup through a MORRFlate but there are many options.
If you do not have a 2- or 4-way tire inflation/deflation kit or don’t want to spend the money on one, there are plenty of single options out there. You can find many 150 psi rated straight or coiled air hose lines for around $20-$50.
For coiled lines, you can go with a cheap option from Interstate Pneumatics or an upgraded option from Flexzilla, like their Air Recoil Hose.
For flat lines, you want to look at Flexzilla Pro Air Hose, they make some of the best non-binding hose options out there, but there are many other options.
Inflator
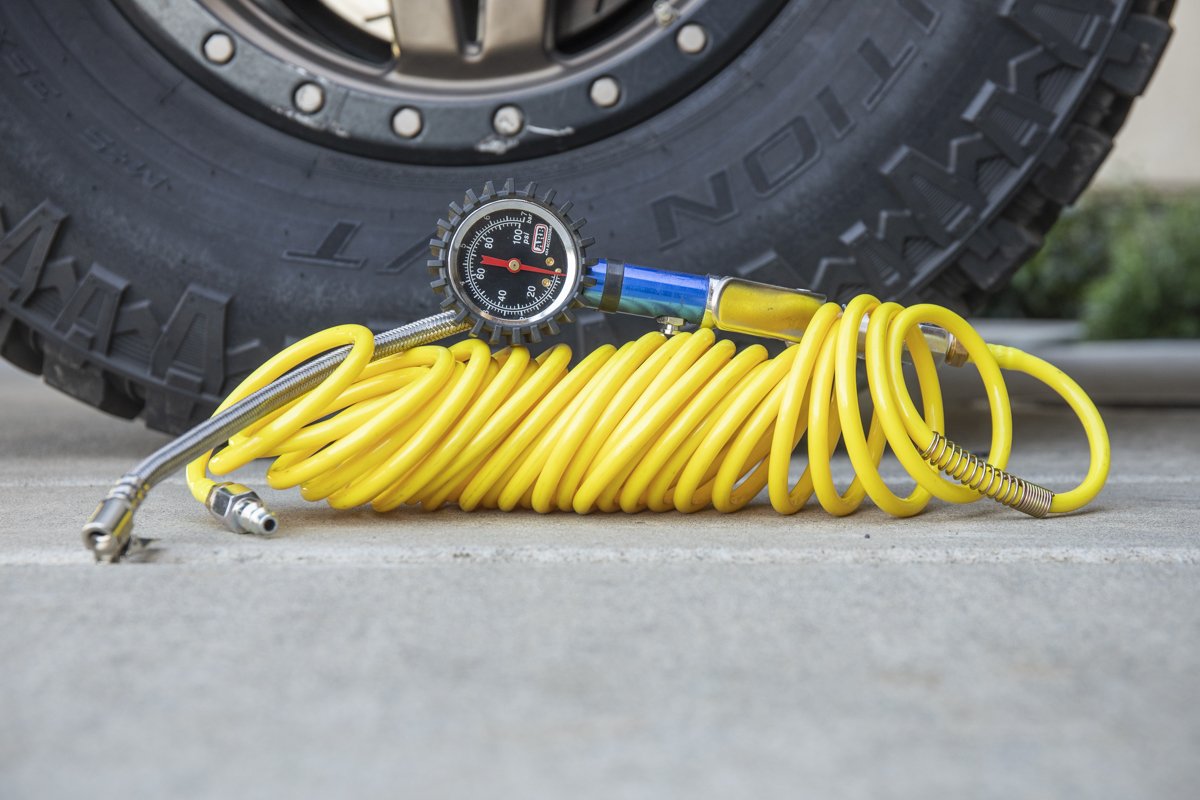
Your inflator and/or inline tire pressure gauge is incredibly important. This is one area you don’t want to skimp. Tire pressure gauges can range from $15-$50+.
Having a nice gauge is important because, typically speaking, the higher the quality gauge you have, the more accurate the reading of the psi is.
If you buy a cheap gauge, your psi readings may be off and can result in inaccurate tire pressure. You want your readings to be as accurate as possible so all four tires are running the recommended tire pressure.
Final Thoughts

After 3 months of testing the Power Tank, and the DIY tank, I learned a lot. There was a lot of trial and error while building the regulator. I was constantly testing new parts and products which resulted in blowing through CO2. This caused the need to drive 30 miles both ways to go refill the tank in order to keep testing. At the end of the day, the regulator is solid and works for how I intend on using it… airing up my 35″ tires.
Between the Power Tank and the DIY version, the Power Tank obviously wins. It’s a much higher-quality build, has a lifetime warranty, and is more capable than this DIY option.
Testing the tanks:
I tested both units using the MORRFlate on four 35″ (35×12.5R17) Tires.
- 10-lb Power Tank (150 psi): 18-35 psi in 43 seconds.
- 5-lb DIY Tank (150 psi): 18-35 psi in 56 seconds
The DIY version was fixed at 150 psi and the Power Tank was running the 400 psi regulator but set at 150 psi. I think the Power Tank was pushing a true 150 psi but the DIY tank was not technically pushing exactly 150 psi out of the tank. I was able to get two full refills from the 5-lb DIY Tank (150 psi) at 18-35 psi. I did have about 10% left in the tank but not enough for a full refill.
I will come out with another article that compares multiple tank sizes, swapping regulators, and for the sake of the blog, I will likely buy my own Power Tank. They really do make a kick-ass product. I still have a lot to cover here; storage in the 4Runner, mounting the tank, Nitrogen, testing air tools on the DIY regulator, airing up lockers, setting a bead, and more.
What should you buy?
If you are reading this then it probably comes down to cost. I just added everything to my Amazon cart and it came out to $165.76 + $18 for the secondary SPEEDAIRE regulator. Your grand total would be around $183 for a DIY 10lb version vs. $500 for a 10lb basic package Power Tank. If you want a fixed-rate 150 psi CO2, you can get a 10lb tank set-up for around $120.
I’m planing to build this only to inflate my tires. How do I control the final tire pressure on the tire if using the fixed 150 psi regulator? It might go up to 150 psi in my tire and blow them, no? Sorry, I’m very new to this.
Great Article. Thanks
Great article on building your own CO2 tank for airing up tires! DIY solutions can be a lifesaver for those of us on a budget. How much money you can save by putting together your setup is impressive. Thanks for the detailed breakdown of the components and options to consider. Safety is paramount, so your disclaimer about handling the DIY tank is essential. DIY or not, always prioritize security. Happy off-roading.
Been using the 10lb PowerTank for a little over 3 years now, and it really is just an awesome tool. It was expensive in the beginning, yes, but it has paid itself off 5 times over. Quick refills and way more tire inflations than I thought would be possible before a refill, it was a great investment.
Did you notice that co2 inflated tires seep co2 at a fast rate? Meaning at Some point after filling with CO2 did you have to top the tires off with regular air?
Great article! Looks like some of the prices have gone up with the ‘Rona inflation lol I’ll be using this as a guideline to build my own PT like kit, since my Viair P400 was stolen… along with my truck 😒😒 But got the truck back, felt like this was the perfect excuse to change over to a tank vs a slow compressor.
Thank you 🤜🤛
You neglected to include how many tires you can reinflate with a 5 or 10lb tank.
Great info otherwise
Yeah, not sure how I missed that one. Updated at the end. I was able to get two full refills from the 5-lb DIY Tank (150 psi) at 18-35 psi. I did have about 10% left in the tank but not enough for a full refill.
You left out the one part that I need ,the rubber straps that mount the bottle.
Yeah, those are Quick Fist Mounts. I left that out because I just didn’t have a solid mounting place for them at the time. I was considering mounting those straps to a Molle panel on the back of the 4Runner but before I do that I want a plate for the CO2 tank to rest on as well in order to fully support the weight of a full CO2 tank. I’m getting close to a solution there but here is the link for the Quick Fist Mounts.
Thanks ! I have fifth wheel and I have been carrying Argon on my long trips ,but no way to mount the bottle thanks again.
Nice setup! I was wondering, can the speedaire adjustment regulator withstand the cold air coming from the co2 tank? Will it freeze up the adjustable regulator?
It hasn’t yet. I have run 3 tanks of CO2 through the Speedaire and its been fine. No clogs and the airflow has been as expected.
Hi Brenan,
This is Tyler from Power Tank. Great write-up. We are no strangers to seeing home-made CO2 setups and encourage them if that means people are getting out and exploring their public lands. A home-brew CO2 system beats the pants off of a similarly-priced budget compressor when it comes to airing up tires after a long day on the trail.
However, what your article fails to mention is safety. Safety during transport and safety during use. While our Power Grip Guard Handles provide a nice way to carry your Power Tank or hold your tools, the main function is to protect the valve and regulator and it is why we do not sell our regulators without one. Our patented handles are machined out of billet aluminum and solid aluminum rods for unmatched strength. The handle you are using provides zero protection in an accident. Every copycat handle we’ve come across was made by casting which leads to a brittle part that cracks easily, not much better.
Here is a Power Tank that survived a rollover accident with the regulator in tact and not an oz of CO2 had leaked: https://www.instagram.com/p/Bty-GqejfXQ/. Not to mention the countless rock crawling competitions and off-road races that Power Tanks have been put through.
The other Power Tank difference is in our Super-Flex hose. Nearly every hardware store air hose on the market is made to be used with a compressor which puts out hot air. CO2, in contrast, is sub-freezing when used. Hoses made for high-temps from a compressor can get brittle and shatter when subjected to sub-freezing temperatures. Power Tank hoses are triple-layered and are rated for 400 psi working pressure, 1200 psi burst pressure at sub-freezing temperatures.
For use with a MORRFLATE, you can use our 10 ft Super Flex hose between your regulator and the MORRFLATE as CO2 is coldest as it exits the regulator and warms up as it is exposed to atmospheric temperatures.
The Power Tank regulator kit prices quoted in the article above include both a Power Grip Guard Handle and a Super-Flex hose along with our limited lifetime warranty. If you’re on a budget but safety is paramount, it’s a good entry point into CO2. Rent a CO2 cylinder from your local gas supplier and you won’t even have to worry about finding a place that refills CO2 (some gas suppliers can exchange rented cylinders but won’t refill personally owned cylinders). Just make sure it is then mounted securely in your vehicle.
I don’t mean to step on any toes, Brenan. I’m a fan of your work and articles like this reduce the barrier to entry into the off-road world, helping more people to get out and explore their public lands. Like I said, we’re fans of the DIY spirit. It has led to the creation of countless jobs and innovations in this industry alone, including Power Tank. But safety is paramount for us and we never compromise on safety to save a buck or two.
Tyler, thanks for commenting. I agree with you 100%, safety is of the utmost importance. Mounting the tank, and safety is an article in itself. For my follow-up article (already drafted) “Running a DIY CO2 Tank – What to consider”, I was planning on dismounting the regulator while traveling to and from the trail, with the tank off. The regulator we put together sits well outside the surface area of the tank. Like most guys, I carry a tool roll so all it would take is a few turns of a crescent wrench in order to mount and dismount the regulator. Carrying the regulator would be fairly easy, in a simple case like this. Once off the trail, you can throw it on and air up. While traveling, the tank would be set off, mounted on a M.O.R.E bracket and the regulator tucked away in a case. That was my intended method of travel with this DIY set up; traveling with the tank off, secure and no regulator attached. Would you sign off on this method? I will update this post with a disclaimer in the handle section. Good call, and thank you! As I said in the article, I still have many areas to cover and consider around CO2; best practices, why CO2 over nitrogen, the accessories, storage, mounting options like the M.O.R.E bracket, the Power Tank Bracket, and so much more.
Removing the regulator during transport is a great idea. You can leave the MORRFLATE or your hose attached to the regulator while it’s stored, saving a bit of time when setting up your system for use. It may even be worth it to carry a separate crescent wrench in the case with your regulator so you don’t have to pull out your tool roll as well. We’re all about saving time, even if it’s a few seconds.
The M.O.R.E bracket is a great way to hard mount a Power Tank. In fact, we are in talks to carry that bracket so we can sell an all-in-one 5th gen T4R Power Tank package. By hard mounting the CO2 system to your vehicle, you prevent it from becoming a projectile during a sudden change in acceleration.
We have a great write-up on CO2 vs N2 on our website and would be happy to answer any questions you have on future articles. We reference outside sources to minimize bias. https://powertank.com/pages/nitrogen-truths-and-myths
We’re all about spreading knowledge.