
M.O.R.E. (Mountain Off-Road Enterprises) Air Tank Mount Step by Step Install & Power Tank Super Bracket On Rear Cargo Area for 5th Gen 4Runner
Taking a compressed CO2 tank, or a Power Tank, out on the trail is a great way to air up your tires on the trail.
To secure your Power Tank in the rear cargo area of the vehicle, Mountain Off-Road Enterprises (M.O.R.E.) has a way to mount your tank, unitizing the factory holes and mounting points with no drilling.
This is a quick and easy installation, to safely secure your Power Tank in your vehicle.
This install time will take around 20 minutes.
Kit Used:
- M.O.R.E. Air Tank Mount for 5th Gen 4Runner: Check Today’s Price
- Power Tank Super Bracket: Check Today’s Price
Preferred Tools:
- 3/8” Socket Wrench
- 3/8” Crescent Wrench
- 10mm Socket Wrench
- Phillips Screw Driver
- Power Tank Super Bracket (Attaches to Tank)
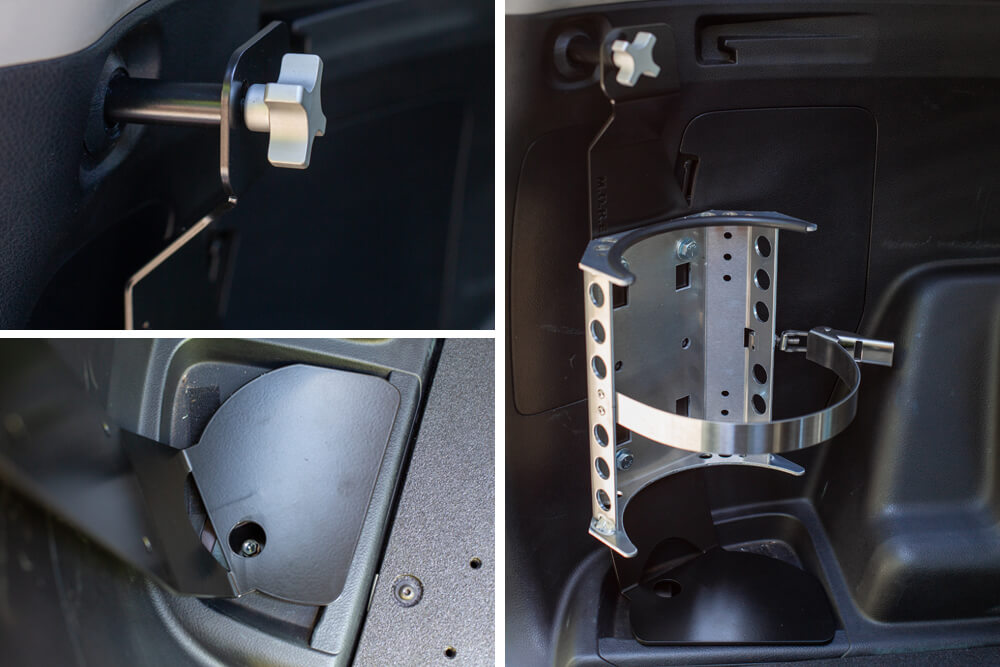
STEP 1. Remove Factory Tie-Down

On the driver’s side, twist left to remove round tie-down knob.
Then, use a Phillips head to remove the screw underneath the tie-down.
STEP 2. Remove Factory Anchor Point

Using a panel tool or flat head screwdriver, uncover the 10mm bolt under the driver’s side anchor point.
Use a 10mm socket to remove the bolt and the anchor point.
STEP 3. Attach Super Bracket to M.O.R.E Bracket

Using the supplied hardware, attach the Power Tank Super Bracket to the M.O.R.E. Power Tank Mount.
STEP 4. Secure M.O.R.E Bracket
Install the spacer in the top hole (previously the tie-down knob) and insert the foot of the bracket into the anchor point of driver’s side cargo area.
Use the factory 10mm bolt to secure the bottom of the bracket to the cargo floor.
Feed the thumb screw, through the bracket and spacer, securing it to the vehicle.
Final Step

Secure Power Tank into the bracket and secure with the latch.
NOTE: To access factory jack, the thumb screw will have to be removed and the bracket turned away from the cargo wall to allow access to the factory jack.
Conclusion

By far one of the easiest installs I have ever completed.
M.O.R.E created a simple, yet effective bracket to secure a Power Tank in the 4Runner.
The mount feels sturdy and tucks a 10 lb. power tank out of the way for unimpeded use of the cargo area.
Currently, M.O.R.E only makes a driver’s side option; however, it would be great if they had a passenger side bracket option as well.
To ensure the load of the Power Tank remains secure, I recommend going back through and applying Loctite to threads of both the mounting screw and the bottom anchor bolt.
Any other interior mount option for a co2 tank?
I would never put a co2 tank on the interior of any car. Does safety not come to mind? CO2 produces no color, no smell, on taste and it can kill you. Be smarter than this
Thousands of co2 tanks for decades of use. Not a single death. Your csm heater or bad driving decisions are thousands of times mire likely to kill you. Or driving home. Or your alcohol consumption. Do the math. Understand the risk.
So, I definitely dropped the bolt (10mm one on the bottom mounting bracket) inside, and it is lost to the underworld… any idea what size bolt that is, or maybe a part number? The people at Lowes couldn’t have been more useless if they tried. Thanks in advance!
I usually buy all my replacement bolts/clips from Toyota Parts of Atlanta. They have great customer service… usually. Or, you can buy replacement bolts and clips on eBay/Amazon. They are all over the place. Do a Google search for “10mm bolt Toyota parts interior” or “Toyota bolts 10mm hex replacement”. Sometimes if you buy a pack of bolts, you get lucky and they all work but I have ended up with wrong bolts, and push tabs more than once. If you know it’s a particular bolt or push tab, you should call a Toyota Parts department and have them find the exact bolt. Be patient though, you really have to spell things out to the new guys. Just ask for someone else if you arent getting anywhere. But, for the most part, many 3rd party 10mm hex bolts work on a Toyota as long as they have “Toyota bolts” in the title. So do most of the 12mm, 14mm, etc. Hope this helps.
Just a note on roof rack side rail blackout . The directions are well written and worked fine. What you may want to check is the red thread locker is probally a thread sealant . As much as was on the threads they came loose effortlessly . I used a bit of locktite high temp thread seal to reinstall . If you’ve ever felt with the red locktite this is usually not the case. If anyone knows for sure I’d be interested to find out.
It’s easier to bring a compressor for the tires. Use the bracket for a fire extinguisher.
You can’t make beer with a compressor;)
I have one of these as well. It’s good. However, the release clamp on the bracket from power tank is on the wrong side, making it difficult to remove.
Would it be possible to simply flip the PowerTank supplied bracket so the release clamp is on the outside? I personally like it tucked out of the way on the inside but seems like there might be a simple solution for those who want it facing outwards.
Yes, you can orient the Super Bracket in any orientation. If the upside down decal bothers you, you can remove it and flip it. If it doesn’t seem to stick as well, please contact us and we’d be happy to send you a new one. info@powertank.com