
Southern Style Off-Road (SSO) Slimline Hybrid Winch Front Bumper Step-By-Step Install For the 5th Gen 4Runner
4Runners have an abundance of aftermarket parts to choose from.
I’ve upgraded many different aspects of my TRD Off-Road 4Runner: suspension, wheels, tires, lighting, ladder, roof rack, etc.
One thing I have been wanting to install for quite a while is an aftermarket front bumper. Why a front bumper?
What a Front Bumper Can Offer
A front bumper first and foremost can change the aesthetics of your 4Runner quite a bit. I will say that this can be for the better, but also for the worse in some cases.
There are several companies coming into the Toyota 4Runner aftermarket parts market, and while this is overall a very good thing, sometimes there are companies that enter into the market without the needed thought, research, and development to make a high-quality aftermarket component.
In such cases, front bumpers can sometimes look bulky or even awkward with oversize bull bars or brush guards.
However, in the case of high-quality, well thought out bumpers, you can definitely make your 4Runner look pretty awesome.
Practicality vs. Personal Preference
The next point I want to make is more a point of practicality versus personal preference. If you have ever been stuck in your 4Runner, you will quickly know that there is not a good front recovery point! This is something Toyota really needs to address in the 6th Gen 4Runner.
Factor55 Hitchlink + D-Ring Shackle
For the rear, I simply added a Factor 55 HitchLink and D-ring shackle so I have a good recovery point. The front isn’t as easy or cheap. A front bumper usually will have some good spots to attach some D-ring shackles. This is a huge benefit in my opinion because you will most likely struggle to recover your 4Runner or someone else’s vehicle without an aftermarket front bumper.
You can always add a front recovery point but installing a bumper will get you two recovery points and added strength.
A front bumper can also be used to mount light bars, scene lighting, and many other forms of lighting. Some bumpers even have custom brackets and cutouts to fit a specific light. This is great as you will have a simple, sturdy way to mount some aftermarket lighting.
The 4Runner already has relatively good approach angles, but a front bumper can increase your approach angle even further. While this might not be the most important buying point for a lot of people on the market for a front bumper, it is something to consider.
Last, but not least is the obvious – protection. Front bumpers are really designed to offer you additional protection when going off-road.
Aluminum vs. Steel

Something I have debated is the benefit of aluminum versus steel for a front bumper. I could write a single article simply on aluminum versus steel, but here are some of the main deciding factors in my opinion: weight, corrosion resistance, impact resistance, and cost.
Steel is going to provide the best protection; the only downfall is it weighs more than aluminum and requires paint or powder coating to prevent corrosion. If you have a good powder coat you have nothing to worry about.
For ultimate strength and cost savings go with a steel bumper. For a lightweight and corrosion-resistant option go with aluminum. This is really as far as I want to go with the aluminum versus steel debate, but I hope you can see the pros and cons of both materials.
You can also read more on aluminum vs. steel in this skid plate buyers guide written by Max.
The Southern Style Off-Road Slimline Bumper

For those of you who consistently read my articles, you will know that I like sleek, high-quality products.
I don’t install a product simply to install it… I evaluate several different manufacturers against one another and compare what each has to offer.
After doing so, I will install what I believe is the best option. I researched front bumpers for quite some time, and I debated if I wanted steel or aluminum. Did I want a full front bumper or more of a “middle” bumper? Did I want a bullbar? Was the need for a light bar critical?
There were lots of options I considered, but ultimately, I narrowed it down to one option – The Southern Style Offroad (SSO) Slimline Bumper.
Find It Online:
- Southern Style Offroad (SSO) Slimline Bumper: Check Price
- Baja Designs 20″ S8 Light Bar: Check Price
SSO is based out of Louisiana and is relatively new to the Toyota parts market. They primarily manufacturer aftermarket parts for 4Runners, Tacomas, and Tundras, but they also make some products for other vehicles.
Ultimately, the Slimline bumper from SSO is configurable to what you would like.
Here are the options you can choose from:
- OEM + or Universal Winch Opening
- Bullbar or Flat Top
- Light Bar Cutout (Various Options Available On the SSO Website)
- Bare Metal or Matte Black Powder Coat
Of course, the various options have different prices associated with them, but I think it is neat that you can customize the Slimline bumper to your liking and budget.
So, let’s go ahead and run through what options I went with and why.
The SSO Slimline Bumper I Customized
Winch Opening
To be straightforward and honest, I do not plan on running a winch too soon. Yes, in the future I do see the possibility of adding a winch, but I just don’t have quite the need to have a winch for what I currently like to do.
I did need to choose a winch opening though. After getting some input from SSO, I ultimately went with the sleekest option, the OEM+ option. The OEM+ option simply has the main hole in the middle for your winch line without two (2) additional holes/access points on the side to access your winch. I wanted the sleekest option available, so the OEM+ option worked best for me.
Bullbar
I wanted to have a little extra protection so opted to have the bull bar on my Slimline bumper. The bull bar gives your 4Runner some additional protection, particularly in regard to your radiator. I also think the bull bar on this SSO Slimline bumper looks awesome.
Light Bar
Prior to installing the SSO Slimline bumper, I had a behind the grille light bar.
I wanted to take the opportunity of having a custom light bar mount and cutout on this bumper, so I went with the best I could get – a Baja Designs 20” S8 Light Bar.
I could have gone with a 30” light bar, but the 20” looked a little better in my opinion. This is completely my personal opinion, so if you want even more lighting go ahead and get the 30” cutout. In the case that you don’t want a light bar at all, you can choose to not have a cutout.
Built-in Light Bar Cutout
One important thing to mention about SSO is the fully open light bar cutout.
Some companies have a metal design in the light bar opening or put their logo there. SSO provides a completely open front light bar cutout so that your light bar will not have any light blocked. This is pretty cool, as several other bumper manufacturers do not have a fully open light bar cutout. I know this might seem like a small design aspect, but I will say that it did not go unnoticed in my eyes.
Powder Coating
If you plan on powder coating your SSO Slimline Bumper something other than matte black, then I would recommend getting the bumper shipped to you as bare metal. This will save you additional costs and give you the base platform to powder coat whatever color you’d like.
I wanted the bumper to be matte black and it was convenient for me to get it powder-coated through SSO, so I opted for the matte black powder coating option.
Initial Impressions

The first aspect I want to mention on the SSO Slimline bumper is how it was shipped.
It was packaged very well, and it was very clear to me that SSO takes pride in its products and wants to deliver your bumper without any damage whatsoever. This might seem like a given, but I have ordered some parts from companies that will actually arrive damaged because they weren’t packaged well.
You do not have to worry about this with SSO. The bumper was shipped in custom molded foam to form fit the bumper. Excellent job SSO!
As much as the packaging for the bumper impressed me, let’s get to what really matters – the bumper itself.
The Slimline bumper from SSO is very well made. The powder coating was excellent and the welds on this bumper were very good and had a consistent bead. You can easily tell that SSO has some skilled welders working for them.
The SSO Slimline Bumper Shackle Mounts

The shackle mounts were aligned perfectly and also had great welds.
Flawless, Powder-Coated Finish

All edges, corners, and holes had received powder coating in an even application.
Maybe what impressed me the most was the light bar cut out. The Baja Designs S8 I installed has a unique front fascia (it is not just a rectangle, it kind of has a wavy pattern to it), and SSO matched the pattern perfectly.
I have to say the craftsmanship and quality of this bumper are very good!
SSO Off-Road Slimline Step-By-Step Install
- Remove All Clips For Radiator Engine Cover
- Remove Remaining Clips For Front Bumper
- Remove Front Plastic “Skid Plate”
- Remove All Bolts/Fasteners For Front Fender Liner
- Disconnect Fog Lights
- Make Sure To Remove All Plastic Clips + Bolts
- Carefully Remove Front Bumper Cover
- Repeat Step 7 On Opposite Side
- Remove Light bar Assembly, If Any
- Remove OEM Aluminum Crash Bumper
- Cut Front Bumper Cover To Fit SSO Bumper
- Make Your Cuts From Sharpie Line
- Remove Airflow Ducting
- Reinstall Bumper Cover, Fog Lights + Fender Liners
- Smooth Out Cut w/ Sandpaper + Install Edge Trimming
- Install SSO Slimline Front Bumper
- Install Remaining SSO Brackets Under 4Runner
I am going to give you my run through on how to install the Slimline bumper from SSO. I do want to mention that I simply followed the installation instructions from SSO without any problems at all, as I thought they were very straightforward.
In consideration of this, I’m pretty much going to give you a very similar step by step install (that essentially follows the recommended steps by SSO), but I will share some of the tips and tricks that helped me out.
Step 1. Remove All Clips For Radiator Engine Cover

Remove all the plastic clips holding the radiator engine cover in place. In order to do this, press the center of the pin all the way down.
Once you have the center pushed down you should be able to pull the clip right out of the mounting hole.
Step 2. Remove Remaining Clips For Front Bumper
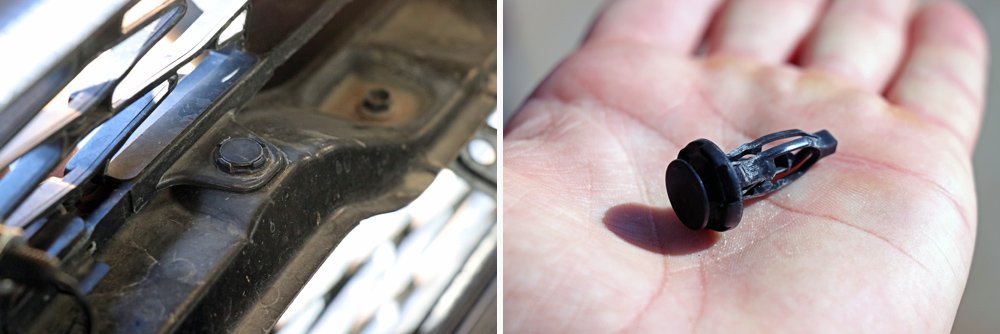
After the removal of the top cover, you will need to remove the remaining clips holding the front bumper onto your 4Runner. These clips can be found between the headlights near the grill area.
Use a flat head screwdriver to pry up the center section and then you can remove the clip by the base.
Step 3. Remove Front Plastic “Skid Plate”

Now you need to remove the front plastic “skid plate” on the underside of the OEM bumper.
There are several 10mm blots that you will need to remove as well as one (1) clip in the center of the “skid plate”.
Step 4. Remove All Bolts/Fasteners For Front Fender Liner

Remove all of the bolts/fasteners that hold the front of the fender liner to the front bumper cover.
There are three bolts on the main radius of the wheel well and a couple more on the bottom of the front bumper cover.
Step 5. Disconnect Fog Lights

I would go ahead and recommend disconnecting your fog lights now.
I found that unplugging the fog lights now made the front bumper removal easier (especially if you are doing this yourself).
Step 6. Make Sure To Remove All Plastic Clips + Bolts

Before continuing to remove the front bumper, make sure that all plastic clips, screws, bolts, etc. that are holding the OEM bumper cover onto your 4Runner have been removed.
To remove the front bumper cover, start by prying/pulling down and out at the corner of the bumper cover near the wheel well. You will need to use quite a bit of force to undo the clips, but once you apply enough force the corner will pop out and look like this.
I will mention that it took much more force than I anticipated it would to pop the cover off. Be careful and take your time, but it does require some grunt.
Step 7. Carefully Remove Front Bumper Cover

Next, stand in the front of your 4Runner on the same side that you started removing the bumper cover.
Continue removing the front bumper cover by pulling at an upward angle and towards you to disengage the large plastic latches. Your front bumper cover should look like this around the headlights now.
Step 8. Repeat Step 7 On Opposite Side

Now you can repeat this same process on the opposite side and carefully remove the front bumper cover. If the bumper cover does not come off easily, you need to check to make sure all bolts, screws, and clips have been removed/disengaged. Be sure to place your front bumper cover on a soft blanket or something similar so you don’t damage / scratch any of the paint.
When you have the front bumper cover removed your 4Runner should look more or less like this.
Step 9. Remove Light Bar Assembly, If Any

As you might have noticed, I previously had a light bar installed behind the grill on my 4Runner.
If you have a light bar installed, you will need to go ahead and remove it now.
Step 10. Remove OEM Aluminum Crash Bumper
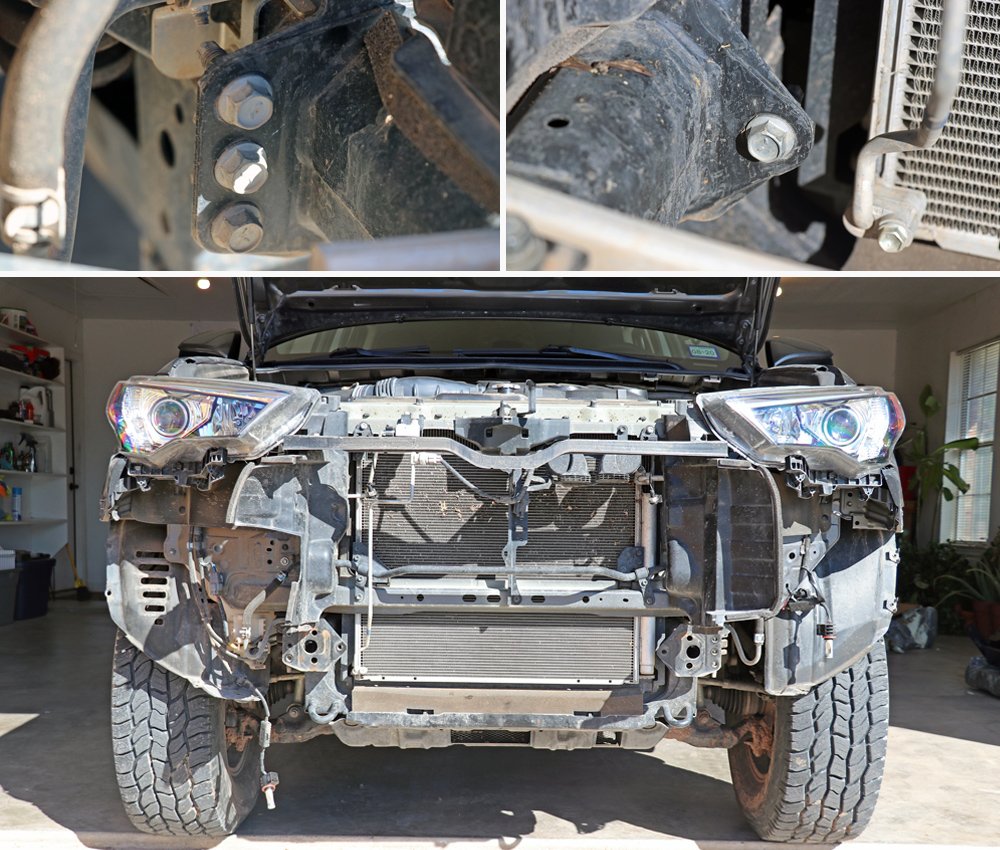
You will now need to remove the OEM aluminum crash bumper. There are eight (8) 14mm bolts that hold the bumper onto the frame.
Step 11. Cut Front Bumper Cover To Fit SSO Bumper

Next, you will need to cut your front bumper cover in order for the SSO Slimline bumper to fit.
I have a TRD Off-Road 4Runner (so the same process will apply for Trail and TRD Pro 4Runners), but if you have an SR5 4Runner you will need to utilize a slightly different method (that is detailed by SSO).
Essentially, you simply use the front valence bumper as your cutting template. I recommend using a sharpie and tracing around the valence bumper.
After tracing around the front valence bumper you will need to remove it by disengaging several small white clips on the back of the bumper cover.
Step 12. Make Your Cuts From Sharpie Line

Take your time and carefully cut along the sharpie line you made.
Do not rush this process, as you can only cut once! Go slow and remember you can always cut / sand away more…you can’t put back though.
You will also need to cut away some small tabs on the front bumper that can be seen in the picture above.
Step 13. Remove Airflow Ducting

Now remove the black plastic airflow ducting on either side of the radiator.
Step 14. Reinstall Bumper Cover, Fog Lights + Fender Liners
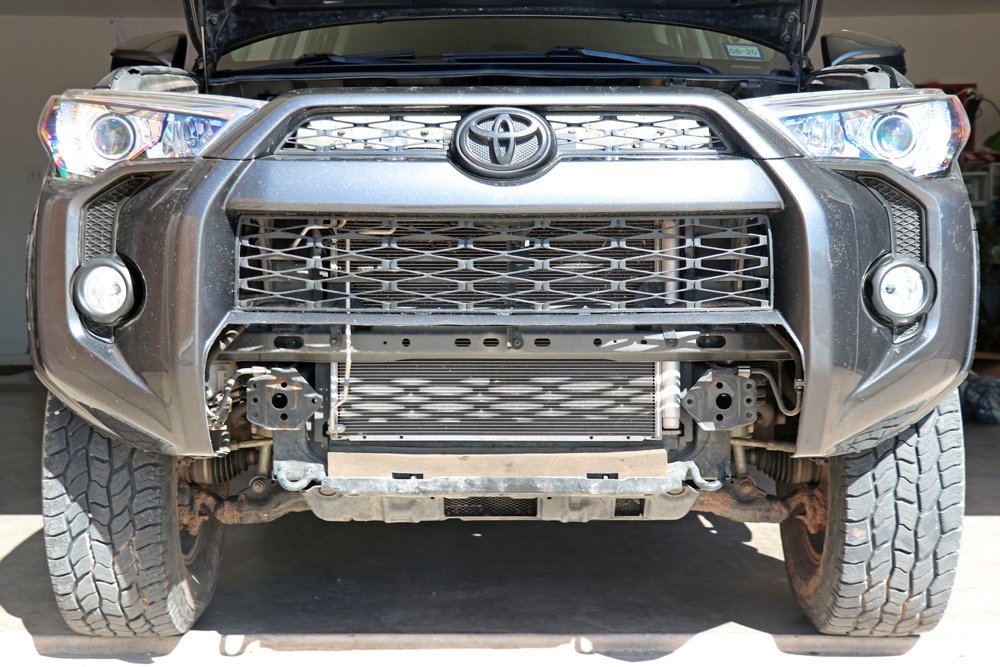
Reinstall the front bumper cover, plug your fog lights back in, and make sure your fender liners are all aligned and installed properly.
Step 15. Smooth Out Cut w/ Sandpaper + Install Edge Trimming

I utilized some sandpaper to smooth out my cut slightly, but if your cut is dead-on, then you probably can skip straight to installing the edge trimming.
Using the supplied edge trim from SSO, cover the cut edges all the way around the hole in the OEM bumper cover.
Step 16. Install SSO Slimline Front Bumper
Now you are ready to install your SSO Slimline bumper. If you have a light bar or winch that you are going to install, go ahead and do so now.
The Slimline bumper can be installed by one person (as I did it all myself); however, I will say it would greatly benefit you to have an assistant if not two.
Go ahead and align the Slimline bumper to the mounting location and utilize the supplied bolts from SSO to loosely secure the bumper. Before tightening the bolts that hold the Slimline bumper in place, take this time to get the bumper aligned everywhere. There is a little bit of room to move the bumper whatever direction you may need.
After you have the bumper aligned, torque the m10 bolts to 60 ft/lbs and the m12 bolts to 75 ft/lbs.
Step 17. Install Remaining SSO Brackets Under 4Runner

Install the remaining brackets (provided by SSO) under your 4Runner on both sides. These brackets are to reinforce the OEM bumper cover by providing a rigid surface to mount to. Install the short portion of the L bracket to the Slimline bumper by using the supplied bottom head bolts and washers. Align the two holes on the OEM bumper wing to the newly installed brackets and tighten down with the supplied bolts and washers.
That’s It, You’re Done!
Congratulations, you now have installed your SSO Slimline bumper!
SSO Slimline Bumper Impressions

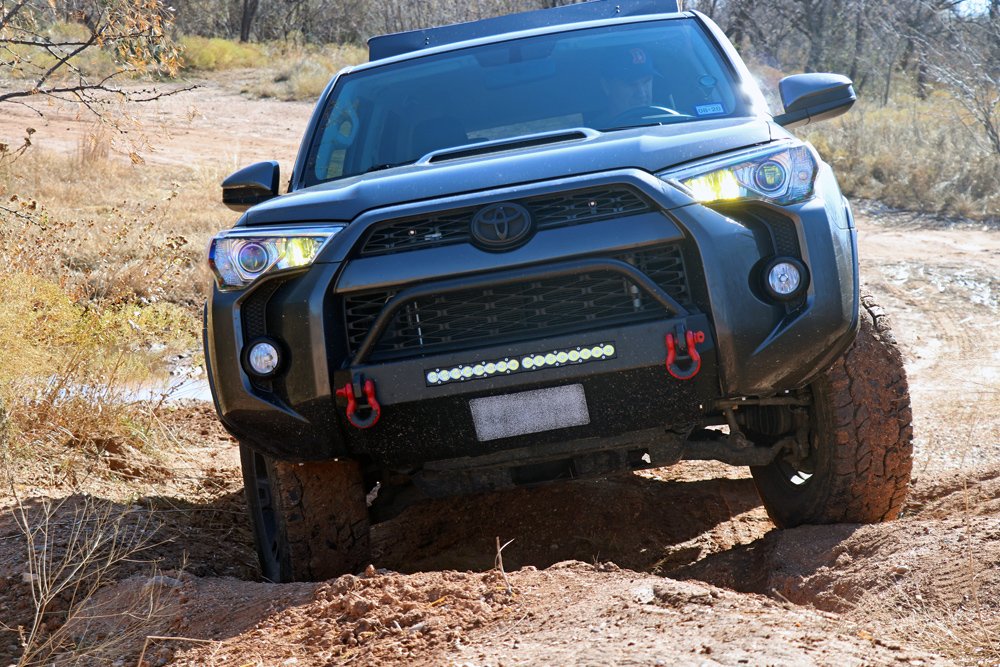
The first thing that most people will say about this bumper is, “Man, that looks awesome”, and I couldn’t agree more. The Slimline bumper from SSO is very sleek and looks great on a 5th Gen 4Runner.
This bumper doesn’t bulge out very far, the quality is excellent, and it truly transforms your 4Runner into something special.
So how does it affect driving? Are there any noticeable effects from the added weight? Does the light bar work well from this location?
Let’s answer these questions.
Effects from the Added Weight
According to SSO, this bumper weighs only 30 pounds more than the OEM bumper. This isn’t too substantial but is some additional weight at the front of your rig.
I was slightly concerned about how the extra weight would affect my ride quality and if my front suspension would need new coils to compensate for the extra weight.
I can say I would have no way of knowing there was 30 extra pounds upfront just from driving my 4Runner. It handles just like it did before, my front lift height was maintained, and I haven’t noticed any decrease in gas mileage either.
From my perspective, I am happy I decided to go with a steel front bumper because I know I have much better protection than aluminum and I can’t feel a difference in handling – so it is essentially a win-win.
Using the Baja Designs 20” S8 Light Bar

This bumper provides an excellent mounting location for a light bar. As I previously mentioned, I went with a 20” S8 from Baja Designs.
Maximum Light Output For Any Off-Road Trailing

This light bar provides so much additional light it is crazy!
Not only this, but I personally think this Light bar looks great mounted on the SSO Slimline bumper.
Recovery Points

Prior to the installation of this bumper, I did not have any solid front recovery points…now I have two!
I installed some Smittybilt ¾” red D-ring shackles and they work and look great. I have used red as an accent color to my predominately gray and black 4Runner, so the two red shackles up front add a nice contrast.
These recovery points work very well. They are strong, out of the way, and are very easy to utilize when the time comes.
The only thing I’d recommend is installing some D-ring shackle isolators.
I used Rhino USA isolators (which were very inexpensive for a pack of 2). The isolators are essentially rubber washers and a rubber semi-circle that you place on your shackles to prevent rattling.
The isolators work much better than I thought they would.
In fact, I don’t hear the front shackles at all!
Overall Impression

The SSO Slimline front bumper is an excellent aftermarket part to install on your 5th Gen 4Runner!
It increases the visual appeal, recovery capabilities, protection, and lighting (if you choose to install a light bar).
I can’t mention enough how impressed I am with the craftsmanship and quality of this bumper. The Slimline bumper from SSO is a legitimate, high-quality bumper that was well thought out and designed.
If you are looking for a front bumper to install on your 4Runner, I’d recommend taking a look at the Slimline from SSO – it is great!
excellent post!
Thanks, Clint! Great write up! I have a new 2021 TRDpro on it’s way, I can’t wait, and the biggest project I’m planning is a new front bumper, and SSO was top of my list, and now I feel certain I’m making the right decision. This will be my first car ever purchasing (I’m 46!!) and I’m stoked. Thanks for your help! -rob
What cover are you using for the winch opening? Something that holds the license plate it looks like.
I have the hybrid slim winch bumper in, with winch, and slimline high clearance bars in. Everything was good. It’s 2019 trd pro, stock fox suspension. But… Just recently, when I turn onto a curb, there is a light bang coming from passenger front side. Have no idea what it is… Nothing else was touched. Think I need to adjust something in front suspension? I’ve been reading searching online, but it seems no one else has this problem
I’m pretty sure it’s your high clearance hitting the factory bumper when you go over bumps. The metal from the HC hits randomly on mine.
Great write up. I’m thinking about the same thing and have a couple of decisions to make. I have a 2020 with TSS, so the bull bar either needs to be much lower or 1.75″ higher (1.75 is their standard for the 2020’s). I can’t decide which one would look better… thoughts?
Also, I’m thinking about the Stage 2 high clearance side protection. Any thoughts on those? I’m surprised your 285’s don’t rub without something like this.
I have the bull bar on mine and it still blocks the sensor even though it’s above. I would definitely recommend not getting the bull bar if you care about the TSS.
Thank you! I decided to go with the C4. Hope the bar doesn’t block the sensor on that.
Great write up!!! I have the SSO without bull bar, slim winch line opening & 30” S8 cut out, along with the stage II clearance wings awaiting an early spring install. I went with an OEM style light bar switch and plan to do the ignition acc. “on” to operate method. Also run the S8 DRL to my fogs.
I appreciate your reviews & detailed write-ups,,, thanks!
Treetop
Thanks! Sounds like you have an awesome setup! I need to run my S8 DRLs to something soon…I don’t have them wired yet. The fog lights is a good idea
@Clint, Unrelated but what size tires and rims do you have. I have th TRD 6X9. What about the lift kit?
Shaf, at the time this article was published I had 275/70R17 tires with the TRD Sema wheels which are 17×7. For the suspension I had Bilstein 6112 up front and Bilstein 5160 in the rear. The front has a 2.0-inch lift from the adjustable 6112 shocks, and the rear has a 1-inch lift via Bilstein coils that are 1-inch longer than the factory. I recently upgraded to 285/70R17 tires though and kept the same wheels. When I upsized to the 285s I also raised the front an additional 1/2-inch for a total front lift of 2.5-inches (via the adjustable 6112 shocks set at 2.0-inches and an aluminum spacer that provided an additional 1/2-inch of lift = 2.5-inch front lift). If you have any other questions about this setup feel free to contact me.
@Clint, I cannot give you more props! Excellent! I have been hesitant on doing big jobs like this or suspension myself. I know it saves a lot of money
How do you get the motivation and courage to do this? I am in my mid forties and I have no garage space.
Thanks Shaf! In the past, I was also hesitant about completing suspension work, anything that involved cutting, etc. It does save a lot of money though, and if you take your time you can ensure that the job is done correctly. The best advice I could give you would be to research a project as much as you can. There are lots of articles and videos on the internet that have helped me tremendously. Having family or friends that can help out is another good idea. I work on my 4Runner with my dad a lot and it is a huge help. Something that can help mentally on bigger projects is realizing that they are mostly composed of a bunch of smaller projects…meaning if you go step by step they aren’t as big as they might seem. If you do decide to move forward with a project, research it, take your time, and if you have any questions feel free to reach out and contact me. I hope this helps some!