
Genesis Off Road Dual Battery Kit Install & Review: Toyota Stock Battery Replacement For the 5th Gen 4Runner
Warning: Nerd References Ahead
We don’t have the power, Captain! (1)
Overland Rigs are energy hungry beasts, with over 360-degree LED lights around and under, winches, fridge/freezers in the rear, communications gear and personal electronics.
It is amazing that the batteries just don’t give up… Well, they do actually.
Stock batteries are not made to handle these kinds of loads that we require of them. So, like the old saying goes: “One is None and Two is One,” so goes it for batteries as well.
Power requirements are very individual based off of your individual needs.
Toyota 4Runner Stock Battery System

My 4Runner is built with reliability and capability as the primary objectives.
However, on the other hand, since it is still a daily driver comfort and convenience are our secondary objectives. Using these four objectives guide every modification and purchase.
When it comes to power, there’s no way for the stock battery system to reliably keep up with the power requirements that we, wheelers, put on it. That is why so many 4Runner owners upgrade their battery systems with Group 34 and 31 AGM batteries.
We’re not going crazy with power, but a dual zone fridge causes me enough worry if it will kill the battery.
So much so that, even after setting it to HIGH, I lost all my food after my stock battery turned off, once again.
After I added the winch in there, then that’s when my concerns grew even greater.
So, in comes the Genesis Offroad Dual Battery Kit.
This upgrade allows me to regain reliability, comfort, and convenience–all while adding to the capability of my rig.
1.21 Gigawatts, Great Scott! (2)
There are many options when it comes to dual battery systems for the 4Runner and a few have already been covered by T4R.org and some on Trail4Runner.com as well.
The idea of adding a full tricked out battery system seemed awesome.
I started to nerd out over the latest tech, wiring and power computations and the cost started adding up. While I knew that quality batteries are not cheap, however, just adding two batteries will be around $500!
So, when the super trick systems started to push around $1000 without batteries, pushing totals up to $1500. I almost wrote it off altogether.
Then I happened to be wondering around Overland Expo West where I found the Genesis Offroad Battery Kit.
Power! Unlimited Power! (3)
Requires 2 identical Group 25 size batteries, sold separately.
- Genesis Offroad Battery Kit (X1): Check Today’s Price
- Odyssey 25-PC1400T Automotive and LTV Battery (X2): Check Today’s Price
I am not going to compare the Genesis Offroad Dual Battery Kit to others as each has their strong points and weaknesses. And, choosing the right one to meet your needs will be a personal choice.
For me, it fit my requirements perfectly.
Enough capacity to run my Dometic Dual Zone Fridge, lights and to sustain winching during a recovery.
Plus, it’s completely pre-wired and ready to drop in…almost.
Some of the stand-out features are:
- The compact system replaced the stock battery location with two groups 25 batteries.
- Includes boost switch to jump starter battery with accessory battery.
- Smart isolator automatically dictates charging profiles.
- Positive and negative accessory terminals.
- Optional monitoring screen available.
Boost Switch + Smart Isolator For Lasting Max Power

When both batteries are full (13.2V) the Isolator will send juice to both batteries at the same time.
Accessories that are based on the stock vehicle power system will continue to drain the starter battery if the engine is turned off.
When the starter battery starts to gets drown down to a near critical level (12.7V) the isolator will separate and draw from the accessory battery.
If somehow the starter battery is fully drawn down then one minute after the boost switch is activated it will allow power from the accessory battery to be used to start the vehicle.
Once the engine is started, the alternator will charge the starter battery first. Then the isolator will switch it over to the accessory battery and, then, reconnect the two when fully charged.
Note: The alternator is only charging one battery at a time so it will not put a strain on the alternator, or the batteries.
Keep it Together Man! (4)
This is not a typical install thread as Genesis Offroad has great instructions and a video guide.
What will be covered is my impressions of the install.
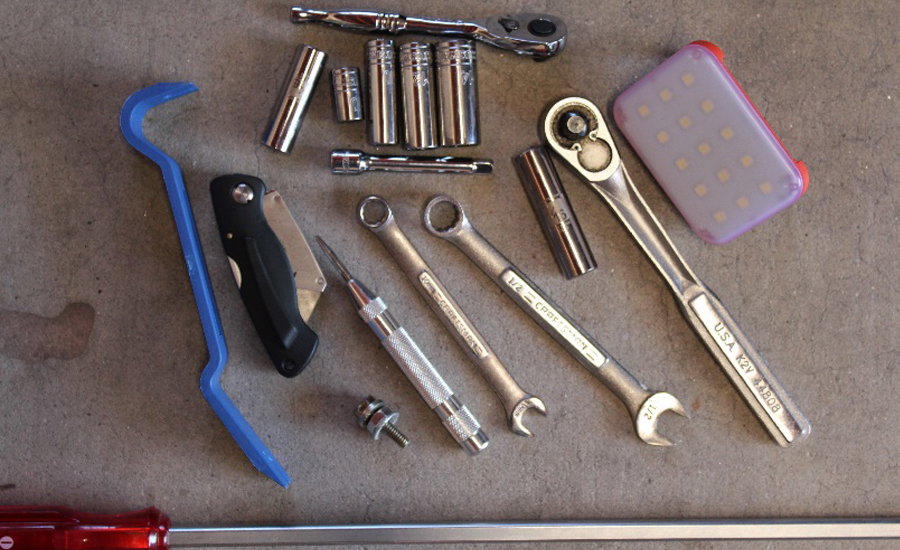
Tools & Parts Needed To Install Dual Battery Kit
Do Not Start Installing without a 25/64” Drill Bit!!!
This is for installing the Nutserts and it is a real pain in the ass to get to the hardware store without a battery in your vehicle.
Find Parts & Products on Amazon:
- Genesis Offroad Battery Kit (X1): Check Today’s Price
- Odyssey 25-PC1400T Automotive and LTV Battery (X2): Check Today’s Price
Tools You’ll Need (more extensive list than the instructions provide):
- 25/64” Drill Bit (+ smaller pilot hole bit)
- Two Oddesey Extreme Group 25 batteries
- Ratchet with Extension. (I used two sizes; depends on space and amount of ‘oomph’ needed.)
- 10mm and 12mm Sockets
- 10mm Wrench
- 7/16 Socket
- ½” Wrench
- Center Punch
- Utility Knife (to cut plastic tabs and positive battery cover)
- Long Screwdriver (for bending battery bracket tab)
- Upholstery Tool
- Work lights (it’s dark in there)
- Touch Up Paint (I actually used a white flex seal.)
- Shop-Vac (to clean out dead bugs and dirt under the stock battery.)
Step 1. Remove Stock Battery + Loosen Fuse Box

Removing the stock battery is very easy, except for the bracket next to the fuse box.
There is a plastic retainer at the base and it did not want to let go. The white plastic loom clip was a pain to remove, as I did not want to break it.
However, it took a good amount of force to come off.
Step 2. Align Brackets to Fuse Box

Once I loosened up the fuse box, it still didn’t have as much slack, as shown in the image above.
It made it challenging to align the brackets up to the fuse box, but it’ll work.
Hold my bolts, please.

Side Note: Is the plastic engine cover made to hold bolts or what?
Step 3. Bend AC Line Away

I may need to spend more time in the gym, but the air conditioning line was harder to bend out of the way than I thought it would be.
It’s aluminum… I thought it was vibranium.
Step 4. Use Nutsert Tool + 1.2″ Wrench

A real Nutsert tool would have been handy but I can’t justify the purchase.
The kit included a bolt/nut/washer combo which actually worked really well, however.
Step 5. Tighten On Tray / Cover

The tray goes in well but it is super tight.
Next, just connect the negative(-) and the positive(+) end on the terminal accessories.
Step 6. Connect (-) and (+) Terminals

Wrap it up, B! (5)
All in all, this install is easy-ish. The few issues are inconvenient but easy to overcome.
Working with electricity is unnerving, but as long as you keep the positive and negative connections away from your heart, you should be good to go.
Final Thoughts: Oddesey Extreme Group 25 Battery

The engine compartment remains semi stock in appearance beside the bright red Oddesey Extreme battery tops.
I also added a Power Tray for a sPod. Thus, moving the fuse box an inch which makes it very cramped to get to the tray’s brackets.
Also, I did not get the optional monitor as the sPod has a monitor on it.
And, finally… Nerd Answers REVEALED!
(1) Star Trek; (2) Back to the Future; (3) Return of the Jedi; (4) Monsters Inc.; (5) Chappelle Show
Thanks for the great writeup. I just installed the same kit in my 2020 TRD ORP. Works great. Only issue is I mounted it a little too close to the fuse box and the fuse box cover will not close completely so I’ll have to find a solution for that. I ordered the G Screen as well and I’m trying to figure out where to mount it in the cab. Anyone have any ideas?
Too heavy for stock 4runner battery platform if you’re going to actually be off-roading. Pulled one nut rivot completely out and stress cracked around others. I don’t get crazy but I don’t mall crawl either.
Thanks for sharing. When did you buy your Genesis hardware? In the comments on this video, he says they did a re-design to distribute the load better. I’m curious if you had their original or newer design. https://www.youtube.com/watch?v=RhDPiXjSNpU
Hi, thanks for your writeup, huge help. For a dual genesis setup, what do you use to plug in your 12v fridge in the back? Does it connect to the stock 12v outlet in the trunk?
Unfortunately the added battery doesn’t affect the stock 12V outlets and I really wish Toyota would be able for owners to switch them to full time. I will be adding a fulltime 12V hookup in the cargo area soon. I am currently using a small Goal Zero Yeti (don’t think this works with Li version) to charge the fridge when we are stopped, and the Yeti charges as we drive.
This post is helpful! Currently I run a Jackery with a Costway fridge. I would love to have a battery setup and ditch the Jackery.
1) Does the battery setup allow you to run your Dometic when the vehicle is off? Or do you need additional wiring?
2) How long does this battery setup run your Dometic for?
Great question, the rear DC outlet still runs off the ACC switch so you would have to run a dedicated wiring to the rear. Not sure how long it would last as it depends on how you travel, for us that are on the go every day so the battery never noticed.
Thrilled with this install! I followed this write-up and watched the Genesis Video and the combination made it very easy. Thanks for the pointers. It has only been a few days but my first notice was that my 4Runner starts quicker and cleaner now. Thanks again!
Glad that you are enjoying it! I didn’t notice any change with startup but it has been great, zero issues!
would a bigger alternator still be a good thing or would it mess something up as it charges only one battery at a time?
Good question but I don’t think it is necessary. On a track I had the AC running full blast (as it was 113deg), 50L fridge going and had to run the winch and it didn’t even phase the battery. In the middle of the recovery I didn’t think about checking the draw at the time. However, an hour later when we got into camp I checked and it was all ready 100%. In my book it has been Tested and Proven.
I love this setup because I won’t need to reroute cables around the compartment and the batteries don’t take up space that could be used for an air compressor or other stuff.
I still can’t find out any information on what a Group 25 battery is though and I would love to know more about it and why the size is smaller.
Thank you again!
Thanks! I actually have plans down the road for the space on the opposite side where a lot of 2nd batteries are mounted. So this worked perfectly for my application.
The group 25s I used are the Odyssey Extreme.
https://www.genesisoffroad.com/4runner-dual-battery-kit
They have great specs and reviews on the interwebs. Also, the are recommended by Genesis. They are smaller so 2 can fit in the same footprint as the stock. I thought about switching to lithium for weight savings but then I saw the price tag… and I thought the Odyssey’s were expensive!
Thanks Trevor! Didn’t know lithium batteries are a thing for cars, guess they are.
Great article! I am now considering this over the traditional dual battery set-up. How are you liking it so far? How do you plan on monitoring the health of each battery (Using a CTEK or something else)? Are you going to run your sPod to the accessory battery or the terminals on the bracket?
So far it’s been great. No issues.
I’m hooked into the accessory terminals with the sPod, which is to the accessory battery. It gives me the the voltage on my touch screen. However, this isn’t for both.
I am unsure of if I want or need a dual battery monitor system. Still researching.
Trevor, thanks for commenting on the dual battery voltage monitoring. I saw that you opted for the sPOD to monitor. I’m curious if you ever felt the need for the G Screen from Genesis?
Great question! I think the G Screen would defiantly be a better monitoring solution and piece of mind. However, after a few weeks of just looking at the voltage for learning (and novelty) I haven’t really thought about it again. It works every time I need and have never had an issue.