
Rago Air Compressor Mount with ARB Dual Compressor Review & Install + Rhino USA’s Tire Pressure Inflator Gauge
So you finally broke down and decided onboard air is an absolute necessity in your arsenal of overpriced overlanding gear. Join the club.
Pulling the trigger on one of these things will eat up a good chunk of your tax return, but what the hell; buy now, cry now! While there are a few different onboard air compressors on the market, the ARB 6.16cfm compressor seems to be the popular go-to and one of the most trusted brands on the market.
You can go with other versions like the Smittybilt 5.65cfm or even a smaller Viar 400p compressor, however, ARB makes it very simple to mount out of the box. Other than going with C02 like the popular Powertank, the ARB twin compressor may be among the top in its class of onboard air compressors.
You’ll also quickly find out that the price difference between the single vs. the twin compressor can be almost double the cost. However, this article isn’t about ARB’s compressors per se; it’s more about what you should do after you made the purchase.
Rago Fabrication offers a whole hell of a lot of aftermarket bolt-on products for the 5th generation 4Runners. So naturally, they decided to make an aluminum self-assembled mount for ARB’s two compressor offerings.
Once we decided on the twin ARB compressor and Rago’s mount, we chose to upgrade our tire gauge game with Rhino USA’s 200 PSI Tire Pressure Inflator Gauge.
Products, Prices, and Features
These mounts ship out quick in a flat box with all the necessary hardware. The material itself is aluminum, so it doesn’t require paint and it adds very little weight to your truck.
The mount comes in two pieces that mount together with four provided bolts. Once assembled, the compressor mounts into five existing mounting points on the right side of your engine bay with no drilling or cutting required.
Maybe if you’re looking for an OEM look, this too can be purchased through Rago’s website, however, you can also find the switches a little cheaper through aironboard.com.
These switches come with 4 wires to connect and fit perfectly inside a dashboard “blank” of your choice. Shelton DoodRunner covers the wiring conversion in another Trail4R article.
The ARB twin compressor pushes 6.16cfm and can tackle everything from your lockers to your 35″ tires. The ARB twin compressor comes in two packages, either a self-mounted kit (like the one pictured here) or in a self-contained storage box.
You can accessorize the ARB twin with most compatible pneumatic add-ons, like gauges and standard fitting hoses. There is lots of documentation on this product so whatever you are looking to do, odds are someone has a write-up on it somewhere.
Given its beefiness, the thumb trigger digital gauge comes packaged and bubble-wrapped to prevent damage during shipping. The solid brass 360° swivel and “no-leak” braided hose keep the gauge protected in harsh conditions, while the 2” LCD backlit screen can be seen in sunlight and darkness (parts of it even glow in the dark).
The package also contains interchangeable brass chucks, a 1/4″ NPT (National Pipe Taper), quick-connect male fitting and a small role of thread tape to seal your connections.
Installation Guide
Rago has an installation video on their website, but we figured its best walk you through the process with some details not shown in the video.
TOOLS NEEDED:
- 14mm wrench
- 10mm socket and ratchet
- Socket wrench extension bar
- Universal joint swivel
- 5mm Allen wrench
- 6mm 1.0 tap (not to make threads, but to clean the existing ones)
- WD-40 or any type of grease/lubricant
PARTS INCLUDED W/RAGO MOUNT:
- Rago Fabrication Air Compressor Mount: Check Price
- Use code – TRAILCO – to save 10%!
- ARB Air Compressor: Check Price
- Three (3) 6mm Allen head screws, three (3) 6mm locking nuts, and three (3) lock washers
- Two (2) 8mm bolts and two (2) washers
- Four (4) flat head socket cap screws and four (4) locking nuts
- Top mounting plate
- Lower mounting plate arm
Step 1. Compressor Mount & Mount the Compressor

Rago recommends that you first assemble everything “on the bench” which includes putting the mount together and then mounting the compressor to the top side of the plate.
On the top side of the mount, run your flat head socket cap screws through and hand-tighten the locking nuts to the bottom with the arm in place.
Ratchet the locking nuts down.

Since we went with the ARB twin air compressor, we had 4 bolts to use for mounting to the plate. The ARB single air compressor only has two bolting locations. Sit the compressor on top and line up the holes.
There are eight mounting points to choose from on the compressor itself, so we simply staggered the bolts provided with the compressor.
Run the washers through the bolts, slide the compressor back and forth to the desired spot and ratchet them down.
Step 2. Clean and Tap Mounting Points
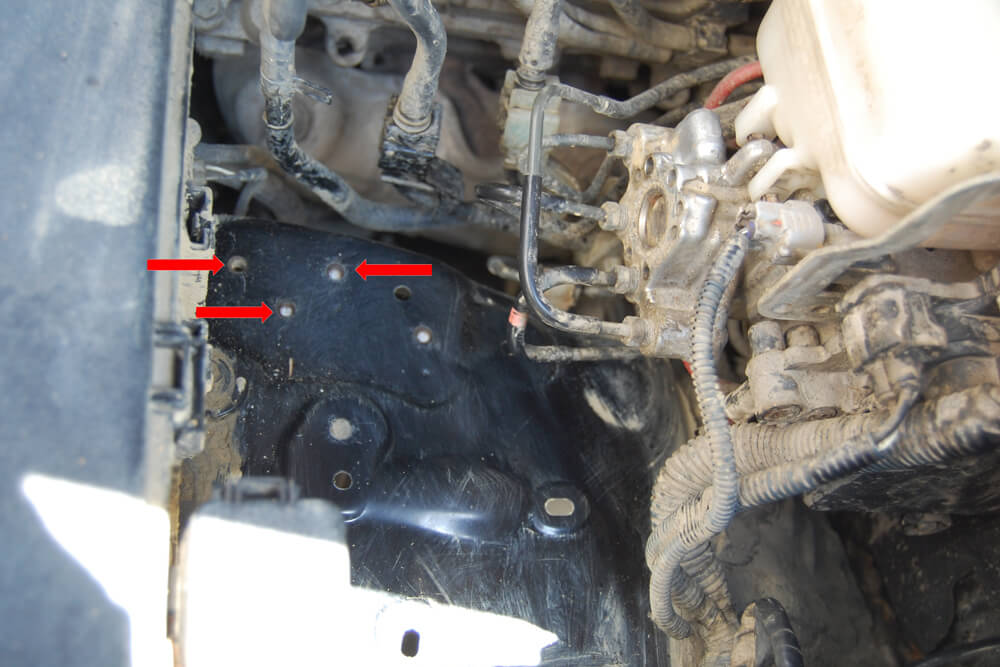
Rago also recommends using a 6mm tap to clean the mounting points on the bottom of the compressor mount (the lower arm).
First, we ran a piece of baling wire through the holes because they were filled with dried dirt and mud. Once they were cleaned up, we sprayed some lubricant into the three holes and began to run our 6mm tap through by hand.
Because space is limited down there, we used a pair of vise grips to clamp to the tap and hand twisted it through each hole until the tap came out the bottom.
Again, it’s important to note you’re not actually tapping holes from scratch; this step is to simply clean the threads for the three Allen head screws that will later serve as studs to the lower arm.
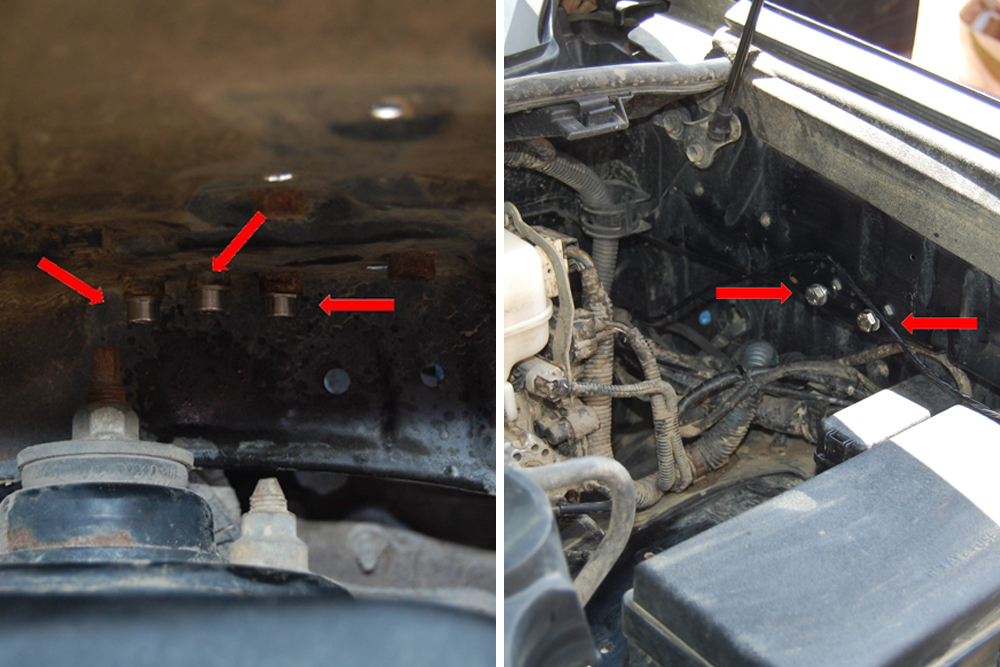
Step 3: Install Bolts and Screws
This was probably the hardest part of the install and to be honest, it really wasn’t even that challenging.
You’ll start by hand threading in the 6mm Allen head screws from the driver’s side fender well right above the shock tower.
The only challenging part is that once again, space is limited. With the smaller side of the Allen head wrench, we were able to tighten all three bolts in.
Next, you’ll hand thread two 8mm bolts (use the wrench if necessary) and leave the bolts sticking out about 1/2”. These will be tightened down later with the 14mm wrench once you slide the mount into place.
Step 4: Install Compressor Mount
Since Rago’s mount is on the driver’s side, we first roughed in all of our wirings through the firewall and highly suggest you do the same.
Otherwise, your entire assembly will be in the way.
Now that all of the bolts are in place, you can slide in the compressor and the mount.
First, make sure the washers on the far right side are on the inside of the plate when you drop it into place. Simultaneously, carefully slide the mount over the three studs.
With the mount in place, it’s now time to tighten the 8mm bolts with the 14mm wrench. Take your time as space is limited and you don’t want to scratch any of that sweet blue anodized paint on the compressor!
After those are tightened, move over to the three studs. Place a washer over each and hand tighten the locking nuts.
From there, use the 10mm socket wrench with the extension and the joint swivel. Tighten everything down and that’s it!
Rhino Tire Pressure Gauge

What good is onboard air without all of the bells and whistles?!
Luckily, Rhino USA makes one of those bells that we found essential to running onboard air. Rhino’s 200 PSI Tire Pressure Gauge is easy to use and comes with interchangeable brass chucks.
Once you’ve assembled the gauge components, use of the gauge is pretty simple.
Run your compressor hose to the bottom of the NPT, then connect the brass clip-on chuck to the tire valve stem. With the compressor on as well as the power on the pressure gauge, press down on the thumb trigger and watch as you fill your tires to the desired PSI.
Pumped too much air in? Just press the air bleeder valve to bring the PSI down to the desired level.
It’s really that simple.
All of that said, you don’t actually need an onboard air system to use Rhino’s pressure gauge.
If you’re using an old fashioned pump at the gas station that doesn’t have a PSI gauge, you can use it there too!
Review

In summary, the Rago compressor mount and Rhino pressure gauge are two items we were very pleased with.
The Rago compressor mount was easy to assemble, all of the hardware was packaged individually, and the video on their website covered just about everything.
The mount was durable, it fits nicely into the void under the hood, zero rattling, and it has spacing to add a switch system or two down the road.
It was priced competitively to others on the market and from what we could see, it was the only easy-to-come-by, driver-side compressor mount option on the market.
As for the Rhino USA digital pressure gauge, we just don’t leave home without it.
Accurate PSI readings are essential and while they make analog models at lower prices, the convenience of the thumb trigger and digital readings bring this tool into the 21st century.
It’s beefy and the LCD display is housed in thick rubber, a tire-like tread that will save our butts when we inevitably drop it on the sidewalk!
Trying to use this mount in my 2023 5th gen. Having issues with the fuse/relay box hindering the bracket from dropping down and being able to use those two 8M bolt locations for the bracket. Any solutions?
Found the answer on Rago’s website. Helps to pay attention. One most modify the relay/fuse box mount and mount it on it’s side. That fixed the issue.
I can’t help but notice that it appears to overhang the fuse box. Is access hampered significantly?
I am also very interested in the fitment of this setup along with S-Tech Switch System and the Genesis Dual Battery Setup. I am curious to see if it will be too cramped or if there is enough room for all three installed on the driver’s side of the vehicle.
Very helpful writeup! Do you think there is enough room for both this and a Genesis dual battery setup on a 2018 4Runner? Thank you!
From the pictures I’ve seen, I believe so.
Great write up! Do you know if this would work (is there enough room) in combination with the Genesis Dual Battery setup? Thank you!
I really like this setup and think I’ll follow it, but I also want to add a SPOD system and it attaches to the fuse box. Do you think there would be enough room for both?
Yessir it does. The mount gives you the option to connect up to two different power switch systems. We’re not there yet with our build, but we will be down the road and it’s easy to connect it to the back of this mount.