
Slee Off-Road Bracket with ARB Compressor – Step by Step Install on 5th Gen 4Runner
If you own anything with wheels, chances are good that you will need to use an air compressor at some point in that vehicle’s life.
On board air systems are becoming increasingly popular, especially in the off-roading world to air up tires after a run on the trails.
I won’t be getting into the details of how to air up/down your tires when off-roading, but rather touch on the reasons to why I decided I needed an onboard air system.
Why I decided to install onboard air on my 2018 4Runner:
- To be able to air up my tires (for off-roading and cold temperature adjustments).
- For airing up my other vehicles tires when I don’t want to pull out my large compressor
- Airing up pool/lake toys
- Blowing out debris from small crevasses during car detailing
At first, I did not think I would want or need an onboard compressor, but now that I have pulled the trigger on the install, I can see the hype and convenience of it.
You don’t need to be a hardcore off-roader to justify keeping an air compressor in your vehicle.
I decided to go with the ARB CKMA12 compressor, which is the company’s middle-sized compressor. The reason for going with the ARB brand is well… it’s ARB.
The reasons I did not go with the larger, twin compressor was because of the significantly higher price and lack of need for using air tools.
Products/Parts Recommended for Install
- ARB Single CKMA12: Check Price
- AOB (Air On Board Switch): Check Price
- Slee Bracket: Check Price
- ARB Air Inflation Kit: Check Price
In my opinion, for the average joe, the middle-sized compressor will not disappoint.
ARB makes a smaller compressor than the CKMA12 model, but it is only good for air lockers and is not recommended for airing up tires.
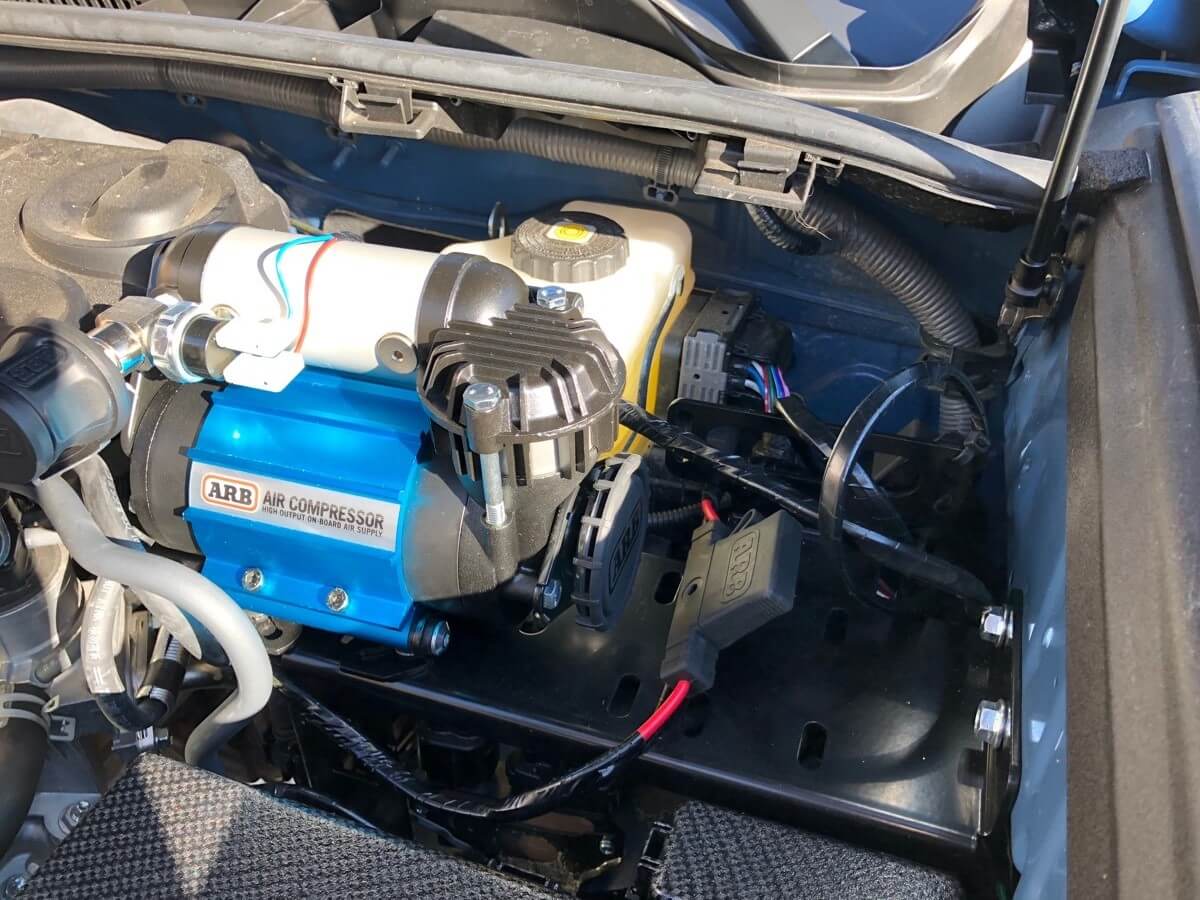
ARB Compressor Mount for the 4Runner

In regard to the compressor mount, I decided to go with a bracket made by Slee Off-Road. I found this company by searching 4Runner forums and decided to order their product over others by the location of the mount and price.
I wanted to mount the compressor on the driver’s side of the car for convenience and to leave room for a potential dual battery setup on the passenger’s side behind the intake.
Slee Off-Road has a website where you can look at the bracket, but to order, you must email or call the company. I decided to call and ended up ordering the bracket from Christo Slee, the company’s owner.
He was very helpful and made sure I was getting the correct product. This bracket can fit the ARB single or twin compressor and could be used to mount other items as well.
Installing the Slee Off-Road Mount

Installing this bracket is very straight forward, but every install always has some kinks that can make it harder than needed. I recommend bolting the compressor to the bracket BEFORE installing the bracket into the 4Runner.
This is so you will not have to contort and destroy your hand trying to tighten the compressor mounting screws while they are upside down.
Use your bolts that come provided with the compressor to mount it to the bracket. Once you have the compressor mounted in the desired configuration, you are ready to mount the bracket. You will use 4 screws total mounting the bracket in the 5th gen 4Runners engine bay.
Bolting Slee Bracket to the Engine Bay

I started with installing the two biggest bolts, threading them into the side of the engine bay, but not tightening down all the way.
After getting those in, you will need to line up the base of the bracket and install the two screws at the bottom. Once all 4 screws are in, you can tighten everything up.
The mount does wiggle some, but after completing the install, I do not hear any extra noise/vibrations coming from the engine bay. I give the bracket 4/5 stars.
My only gripe with the bracket is the available positions the compressor can be mounted. I wanted the compressor in the middle of the bracket, but that would have required drilling two holes. The powder coat is quality.
I decided to mount the compressor far left and continued on with the compressor install.
Installing the ARB Compressor

My first and probably most helpful piece of advice for this project is to start by laying everything out.
This will help you visualize all of the pieces with this kit and help you understand the mess of the wiring harness.
I don’t have a picture of the entire harness unwrapped because I will explain what I did with it, step by step. If you have it in front of you, you will understand it easily.
I will start with step 1 assuming the compressor has been mounted since this write up includes the Slee bracket. There are various mounts available for different locations throughout the 4Runner. Also, I have decided not to use the provided ARB switch.
I will be using a switch from Air on Board to match my existing aftermarket switches lower left of the steering wheel. I will explain how I wired the AOB as well.
Before we get started, realize that I am not a pro and basically learned how to install all of this through other’s experiences shared online.
There are endless setups for switch locations, but I’m not getting into all of that. Here is how I did it…
Step 1: Preparing the Wiring Harness

I started at the battery end of the harness, clamping the two yellow battery rings to the negative wires and the blue one to the positive.
You want to make sure to clamp these well. I took it a step further and installed some wire shrink before clamping the rings. You can pick up a pack of these at any auto shop.
I love having these on hand because all you need is a hairdryer to shrink them.

Next, push the relay into the only place it can go on the wiring harness. The relay also only fits one way into the connection. Straight forward.
Step 2: Drop the Dash
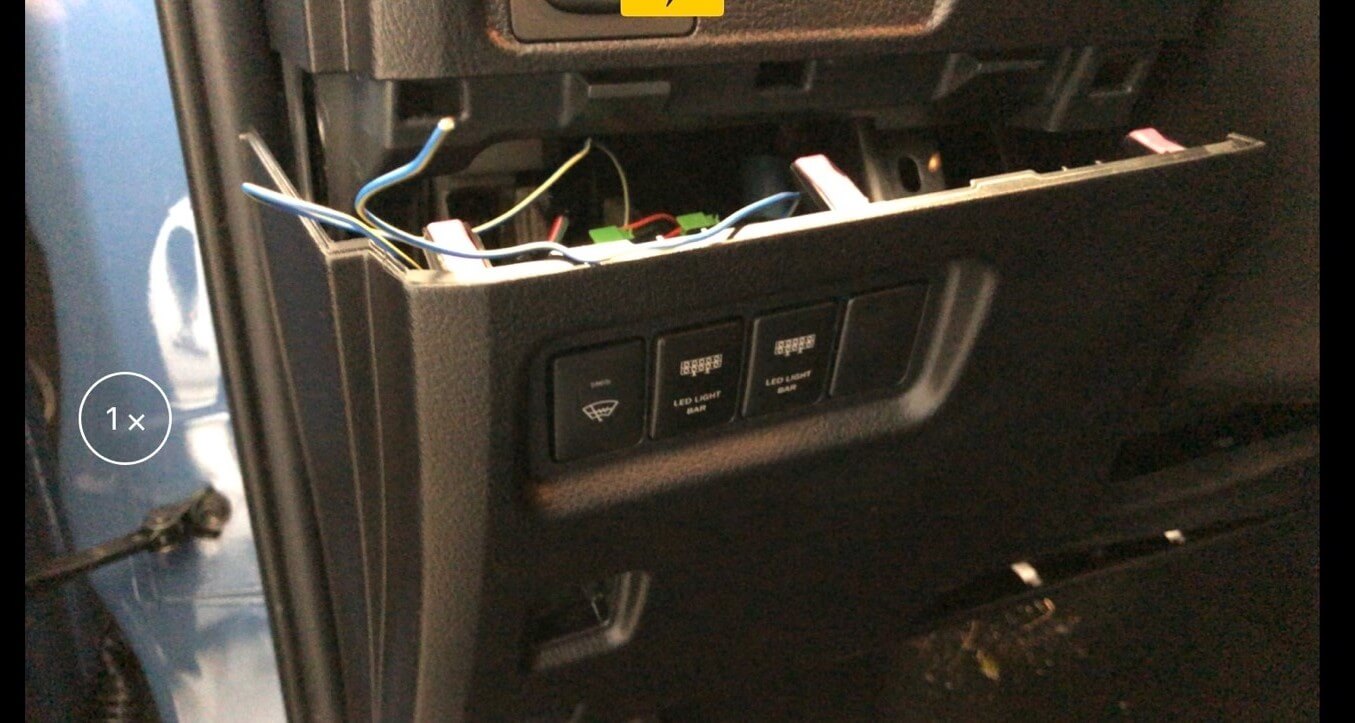
Assuming you are doing this my way, you will need to drop your lower dash to access the switch panel and firewall grommet. Google how to do this because there are countless videos/writeups on how to drop your lower dash.
Step 3: Getting your Harness inside the Cabin

This is a frustrating step that can be made less frustrating with lube. It also turned out WAY simpler for me because I am not using front lockers; hence, I did not use the smaller switch harness provided with the ARB kit.
If you are wanting to install a switch inside the cabin, cut the wiring harness off at the end of the opposite side of the battery terminals.
By doing this, you can do the following:
- Hook this directly to an aftermarket switch as long as you don’t need the rocker switches
- It will make fishing the harness thru the firewall grommet so much easier.
I used a piece of clothes hanger and yes…petroleum jelly. I put a minuscule amount of jelly on the end of my wire with the harness electrical taped to it.
I decided to run the harness next to the engine hood latch because I used the provided “blank” hole form my light bar harness.
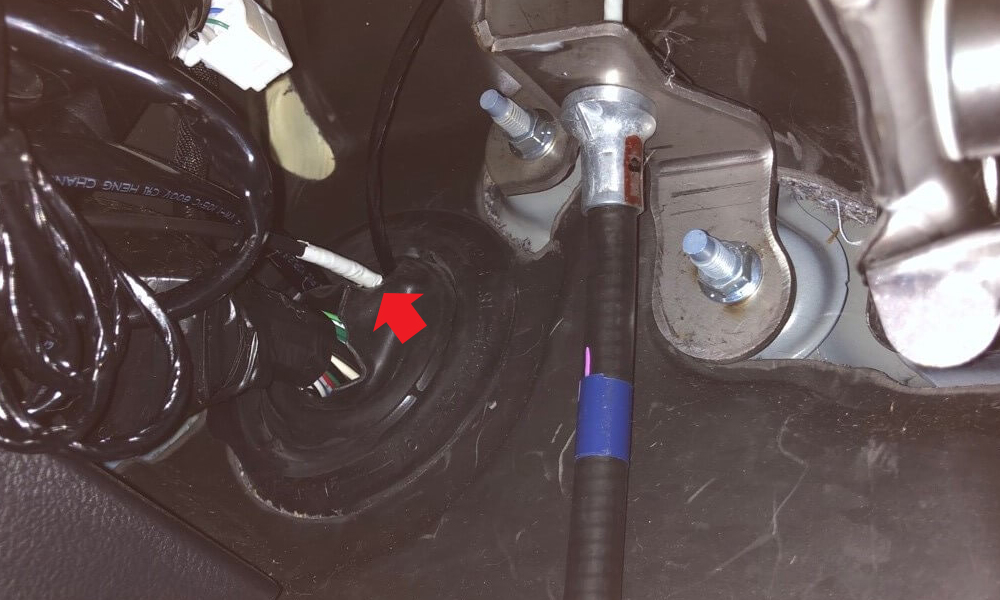
Another tip, it helps GREATLY if you have TWO people. One person can be pushing the lubed wire rig thru on the engine side, and the other can grab the clothes hanger with some pliers.
It works very well. Once you have enough slack fished thru the firewall, you are ready to hook up the switch.
ARB Compressor Wiring to AOB switch

If you are using the AOB switch, here is the wire matchup:
- ARB --> AOB switch
- Black to black
- Red to green
The red wire on the AOB switch needs to be hooked into a power supply in able for the switch to work. I tapped into another AOB switches red wire that runs my light bar. You can also use an add a fuse to do this.
The blue wire on the AOB switch is used to hook into your dash lights. I do not use this feature, so I did not connect the blue wire to anything. I also put my shrink wrap on each wire connection BEFORE using the wire connectors.
*I did not need to use either of the yellow or green wires on the ARB harness because those are for use with the air lockers. Apologies if you are planning on using this compressor for air lockers, because this write up will not be much help to you.
Once you have your switch installed, you can put your dash back together, AFTER you make sure the compressor will turn on 😉
Step 4: Hooking up the Harness/Testing the Compressor

Now you should have your switch installed and ready to hook up everything else. Find the pressure switch wires and the compressor power wire.
The power switch only connects one way. The pressure switch wires do NOT have a preference, just firmly press each one onto each pressure switch tab.
Regarding the wires that would run the air lockers, I used electrical tape to tape them up but probably could have done away with them. Again, if you are installing air lockers, I’m sorry I couldn’t help.
Finishing up, you are ready to connect the harness to the battery to power everything up.
Hit the switch and the compressor should turn on, fill up to 100psi, and cut off.
The pressure switch plays an important part in not turning the compressor into a grenade, but I believe ARB has a backup blow off valve in case that fails.
Once you see everything is working fine, you can put your dash back together and clean up the wiring harness. I folded up my excess wiring and zip tied it to the back of the Slee bracket.
Also, I plan on “mounting” the big fuse on the wiring harness to the Slee bracket; right now, it is just sitting on the bracket.
Finished!
On a couple of side notes, I did purchase the ARB tire inflation kit.
This kit included the parts that mount to the compressor in order hook in the air hose adapter. Do yourself a favor and buy the kit. It’s like $40 bucks that you can afford if you are able to buy an ARB compressor.
I’m really happy with the quality of the air hose and it easily reaches around to the back of the 4Runner.
You can also adjust this compressor into different configurations to be able to fit it into different places.
If you loosen the black Allen screws under the ARB logo, the sliver chamber will rotate.
You can also screw on the fittings for the pressure switch and hose attachment in multiple ways.

I hope this install helps! Feel free to ask me any questions!
Is there a way to mount the compressor without a bracket?
This does not fit the 2020 4Runner due to an additional relay & fuse box.
Great write-up! I’m having trouble understanding the battery end according to this though. You said you attached the two yellow terminals to the negative wires, and the blue one to the positive. But the picture it looks like the yellow ones are on one positive and one negative, which makes sense since that’s the only way they fit. Then the blue looks like it goes on the small black wire, but isn’t that a negative that can tie in with the large black wire? Just trying to wrap my head around it before I mess something up. Thanks!
I’m a little confused on what to do with the red wire from the AOB switch that needs to attach to a power supply. What fuse did you use for your earlier switch?
This is perfect, exactly what I needed. One thing I’m trying to clarify, what type of add a fuse should be used and where would it plug into?
Thanks!
If you are talking about the Air On Board switch, you can get an “add a fuse” kit for the switch illumination that plugs into a blank 10v fuse spot on that fuse panel under your steering wheel thats got the white cover. This will light your switch up with the other switch dash lights.
Thanks for replying. I was referring to when connecting the ARB wiring harness to the AOB switch. It is mentioned in the article that the red wire on the AOB switch was connected to an existing AOB but using add a fuse would also work. I do not have an existing AOB switch so was going to go the add a fuse route but trying to confirm where it gets plugged in.
If you are looking at that fuse panel under the dash, then look at the blank spot 5 up from the bottom on the left most column of fuses. You can place a fuse between those the two 10v fuses. Hope this helps
Great article. I have the same compressor. Any idea where to purchase the fitting in the last photo that the pressure switch and hose attachment connects to? My compressor didn’t come with that one. Thanks,
Those pieces came with the ARB Inflation Kit I purchased separately from the compressor, which also came with an air hose and other goodies.
Does this work with the powertray setup?
No, you will need a passenger side compressor mount when using the Power Tray
Great write-up! I was just talking to a buddy about how I’d have to piecemeal at least 4 different write-ups to get this thing installed but this made it much simpler. My difficult is wrapping my head around the wiring as I know jack about electrical but this should help. I’m pulling the trigger on components this week but going to give the dual compressor a go.
Yes, the ARB inflation kit comes with these red and blue plastic tips. Im not sure what exactly those are for, but they look perfect for getting dust/dirt out of those places vacuums cannot reach. Also, you get the metal needle that you use to blow up balls with so you could use that to do some extreme detailing. The ARB inflation kit does come with some useful items.
“Blowing out debris from small crevasses during car detailing.”
Can this be done with the parts/supplies you listed in the article? If not what would I need besides those parts you mentioned?