For those tight off-road obstacles or navigating a fully built rig through the city, front and rear cameras are a pivotal enhancement. One in the front can help save your front bumper or pick the best line without needing a spotter or getting out of your vehicle. Meanwhile, a good rear setup can help with towing and, backing into tight spaces.
What sets the aptly named, Anytime Camera system apart, is that it allows you to activate them at any time, not just when you’re trying to park. That’s a welcome addition to the factory rear one that only activates only in reverse and earlier 4Runner model years that didn’t have the option for a front one.
Note: I am doing this install on a 2020+ 4Runner. It may vary for earlier years.
Table Of Contents
Installation

This is a relatively simple installation that integrates well with the factory head unit. The installation steps will mainly revolve around the front camera, as this kit utilizes the factory rear backup camera. The additional wiring just allows you to activate it on demand.
Tools Required:
- 5/32″ drill bit
- 5/16″ drill bit
- Box knife
- Flathead screwdriver
- Wire crimpers & strippers
- Heat gun
- 10mm socket & ratchet
- Zip ties
- Drill
- Coat hanger
- Tape
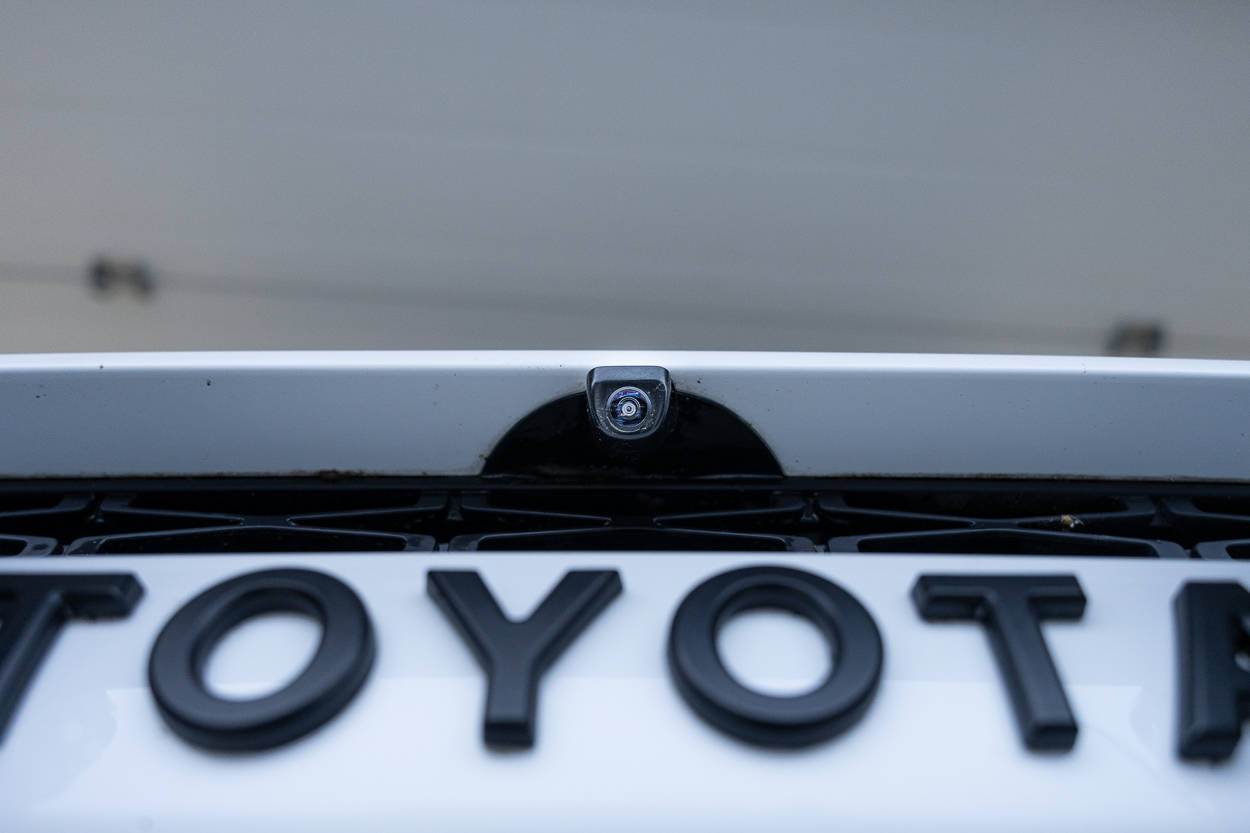
Step 1. Mount Front Camera
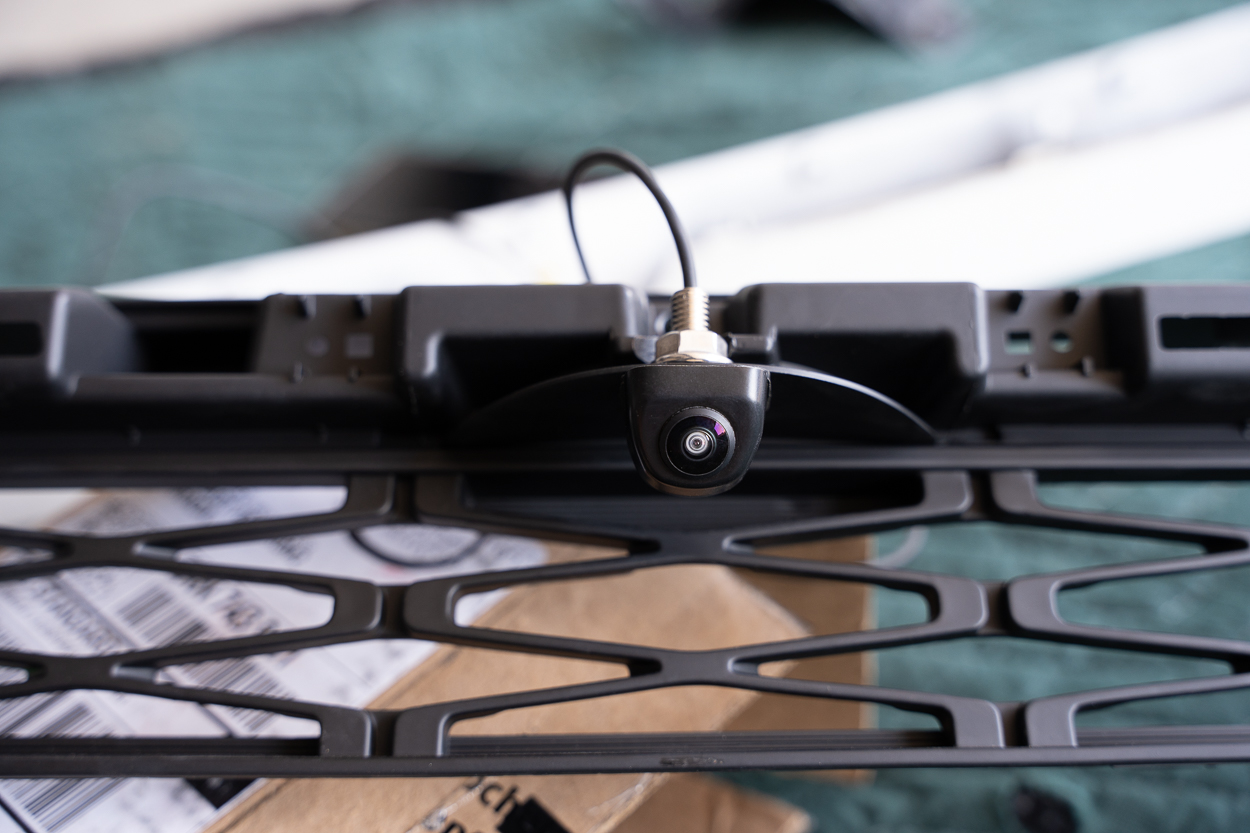
To mount the front camera, you’ll need to remove the upper grille insert.

First, remove the radiator cover via the 13 pop clips.

Next, I removed the four plastic tabs with a flathead screwdriver. Then, I removed the 10mm bolt in the middle.

After that, I drilled a small hole in the designated area to feed the wires through and then drilled another hole for mounting the camera. I made sure to find the center point and drilled a hole for the vertical positioning. Once satisfied with the placement, secure the it in place.

With the camera mounted, the next step was to guide the wires into the cab. I used a coat hanger, taped the wires onto it, and pushed it through.
I ran the wires through the passenger side behind the air box and zip-tied everything loosely for now until everything was finalized.
Step 2. Disassemble Dash

You’ll need to remove the center console to access the wiring for the head unit. To begin, gently pull the front side plastic trim pieces towards you, which will release the locking tabs, and set it aside.

Next, remove the four 10mm bolts as indicated in the picture above.

Now, all that’s left to do is to pull the radio head unit towards you, and it should come out smoothly.
Ensure you support the unit to avoid putting any stress on the wiring harnesses located behind the radio.
Step 3. Head Unit Wiring

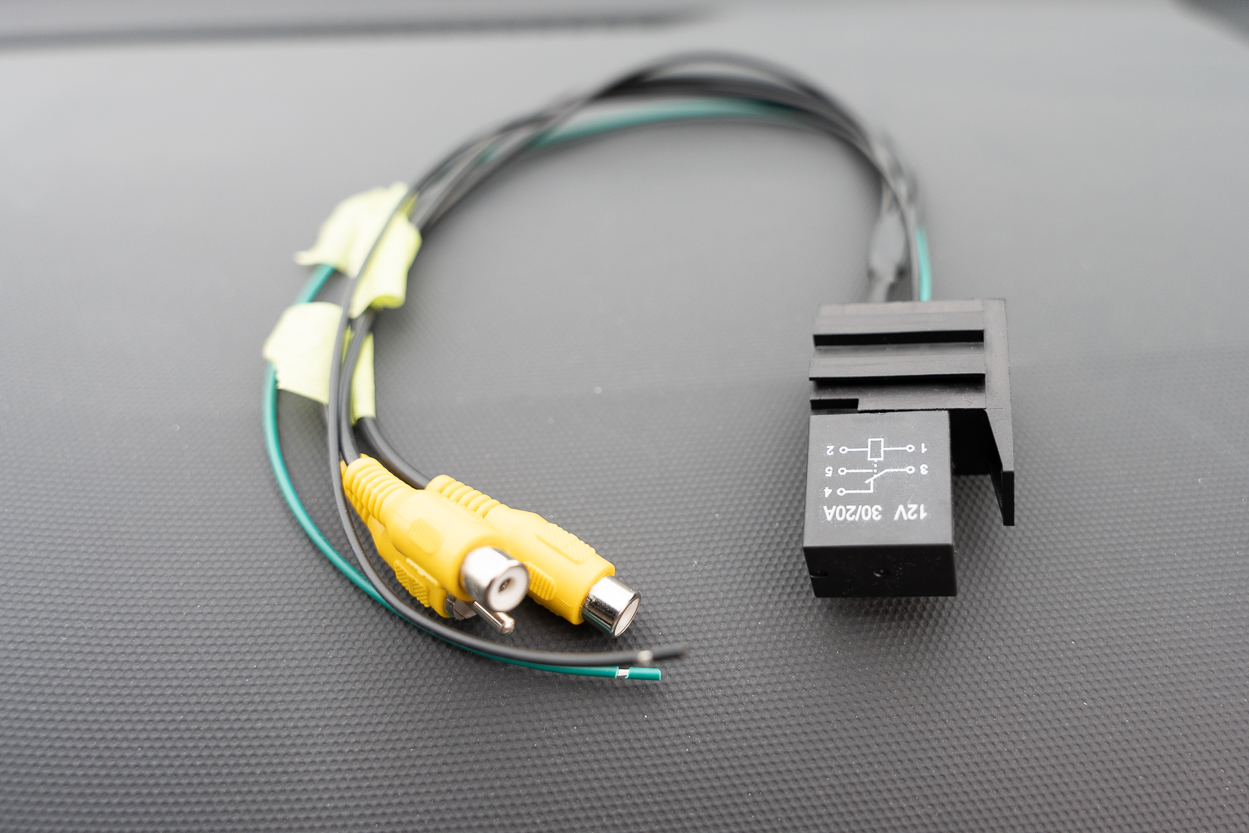
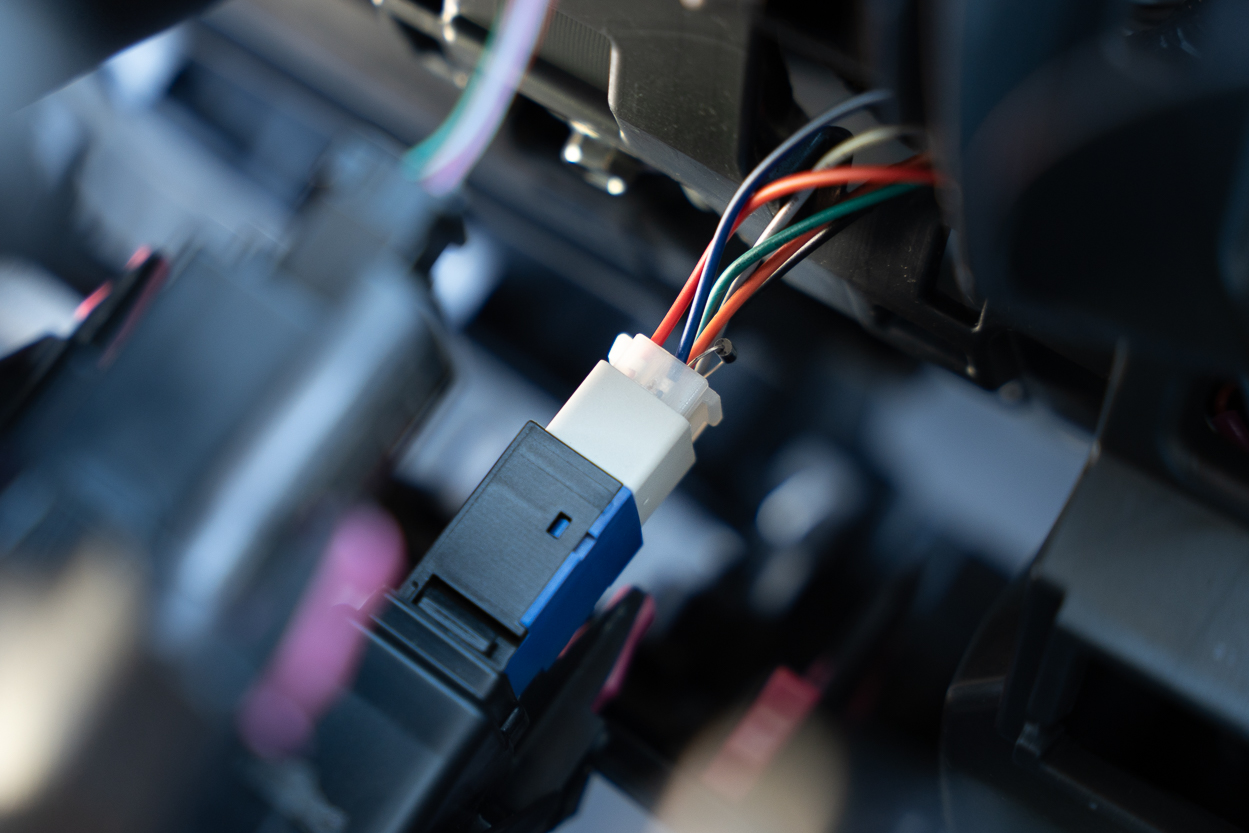
The kit comes with a bunch of wiring harnesses. To simplify the installation process, let’s quickly differentiate between them.
- Video harness – Comprises 2 male RCA connectors, 1 female RCA connector, a blue wire, and a grey wire.
- Override harness – This harness includes only 2 wires, one red and one orange.
- Relay harness – Has 2 female RCA connectors (one with a sharpie mark and one without), 1 male RCA connector, a green wire, and a black wire.
- Switch harness – Comprises 6 wires: red, orange, green, black, blue, and grey.
- Front camera harness – Has 1 male RCA connector, a red wire, an orange wire, and a green wire.

Let’s begin with the RCA connections. Find the OEM harness shown above. It’s located in the middle beneath the white and grey connectors on top. Plug the male end of the anytime video RCA harness into the radio and connect the female end to the OEM harness.
Next, we need to link a part of the relay harness to the video RCA harness we just installed on the radio head unit.

The relay RCA harness has two female ends (one with a sharpie mark and one without) and one male end.
Connect the male RCA from the video RCA harness (the one plugged into the head unit) to the sharpie-marked female RCA in the relay harness. Then, connect the female RCA from the video harness to the only male RCA in the relay harness.

Moving on to the override harness with the red and orange wires, connect it to the back of the head unit. This harness should be positioned under the green connector shown above and beside the first harness we installed in the earlier step.
Plug the male OEM harness connector into the female part of the override harness and the male part of the anytime harness into the back of the radio unit.

Finally, the remaining female RCA on the relay harness should be connected to the male harness coming from the front camera harness that we guided inside the cabin.
Step 4. Wiring The Switch

First, you’ll need to attach a ring terminal to both the black ground wires from the switch harness and the relay harness. Then, secure them to the side of the head unit, following the reference in the provided picture.

Next, take the green wires from the relay, switch, and front camera harnesses, twist them together, and crimp them together. Disregard the other two wires from the front camera harness as they are not necessary for this setup.

Next, crimp the red and orange wires from the override harness to the corresponding red and orange wires on the switch harness.

Then, crimp the blue wire from the video harness to the blue wire on the switch harness. Lastly, crimp the grey wire from the video harness to the grey wire on the switch harness.
Once all the connections are made, I recommend using heat shrink tubing over the butt connectors for added security and weather resistance.
Step 5. Switch Install
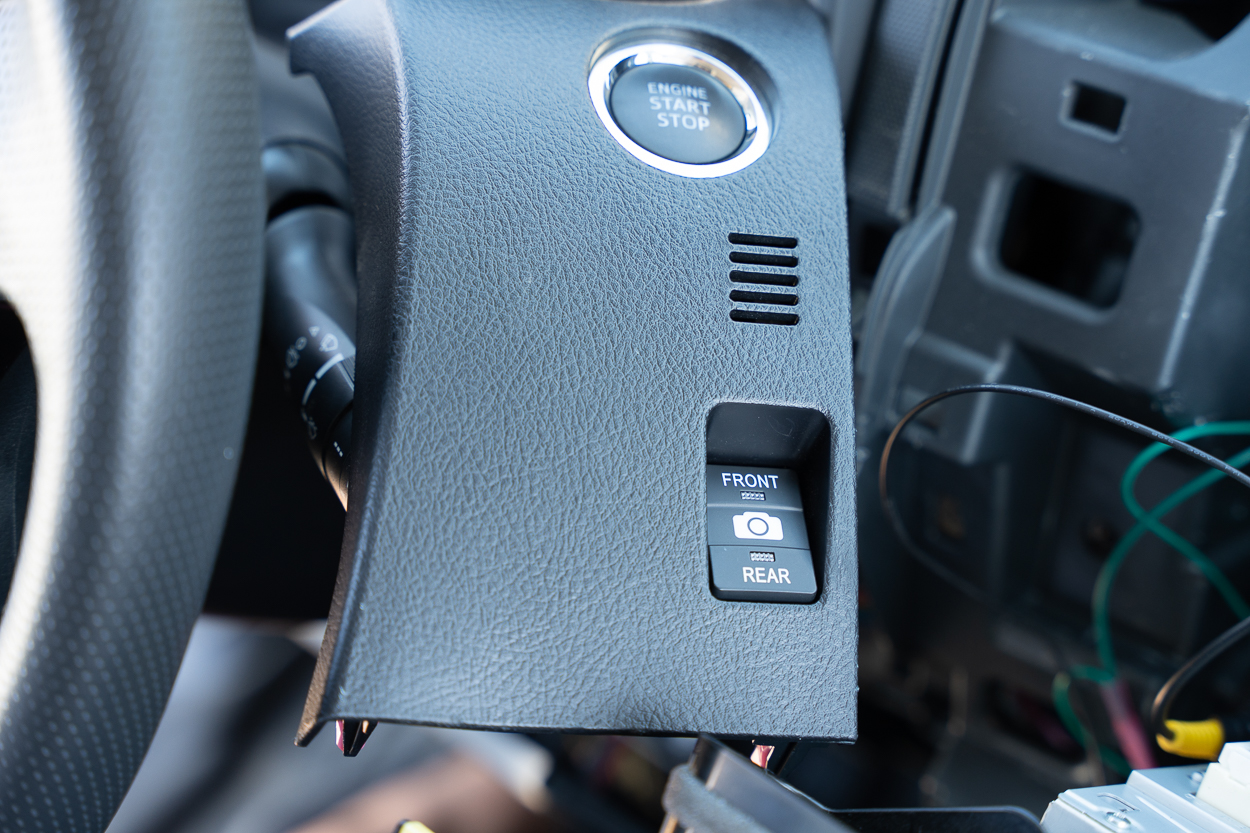
I opted for the OEM empty switch located below the start/stop button for the Anytime Camera switch.
Before installing the switch, gently remove the plastic trim piece covering the area by pulling it toward you. Take care during this step to avoid damaging any other wiring harnesses behind it.
Once the trim piece is removed, push the blank switch from behind and insert the switch.
Next, take the male part of the switch harness and insert it firmly into the switch until you hear a solid click. This would be an ideal time to test everything. Start the truck and toggle the switch for the front and rear cameras, ensuring that the feed is visible on your head unit.
Additionally, check that the radio and HVAC function normally.
Step 6. Reassemble Dash

Zip-tie and tuck all of the wires back into the dash making sure that none of them get pinched when you reinstall the head unit. Don’t forget to reinstall the four 10mm bolts.

After securing the radio unit, reattach the plastic trim pieces. Zip-tie any excess wires behind the trim pieces to keep them organized and out of the way. Lastly, snap the trim piece with the camera switch back into place.
Final Thoughts

This project involves a decent amount of wiring, but don’t let that intimidate you. The color-coded connections make it relatively straightforward. Take your time with the wire connections and crimps and do them right the first time to avoid any of them coming loose in the future.
The Anytime Camera system is truly a game-changer! The convenience of switching between the front and rear with a simple flick of a switch is incredibly handy. I find the front one most useful off-road in tight-squeeze situations. Additionally, for those towing trailers, being about to use the rear for real-time monitoring is extremely useful.
Overall, I would highly recommend this upgrade to give your 4Runner some modern technology that’s actually useful.
How do you like the location of the front camera up higher on the grille? I’ve only seen the installation with the camera below the “Toyota” logo.
Does anyone know if it’s compatible with the T-10 V2 head unit? Or if not what head units it is compatible with?
Yes it is, I’ve installed it on my T10 V2.
I had this mod for almost 3 years and it has been really helpful for additional peace of mind, especially when rock crawling and on shelf road. It took a while to figure out the installation but it’s really worth it!
Totally worth it! Also comes in clutch while parking in to tight spaces.