
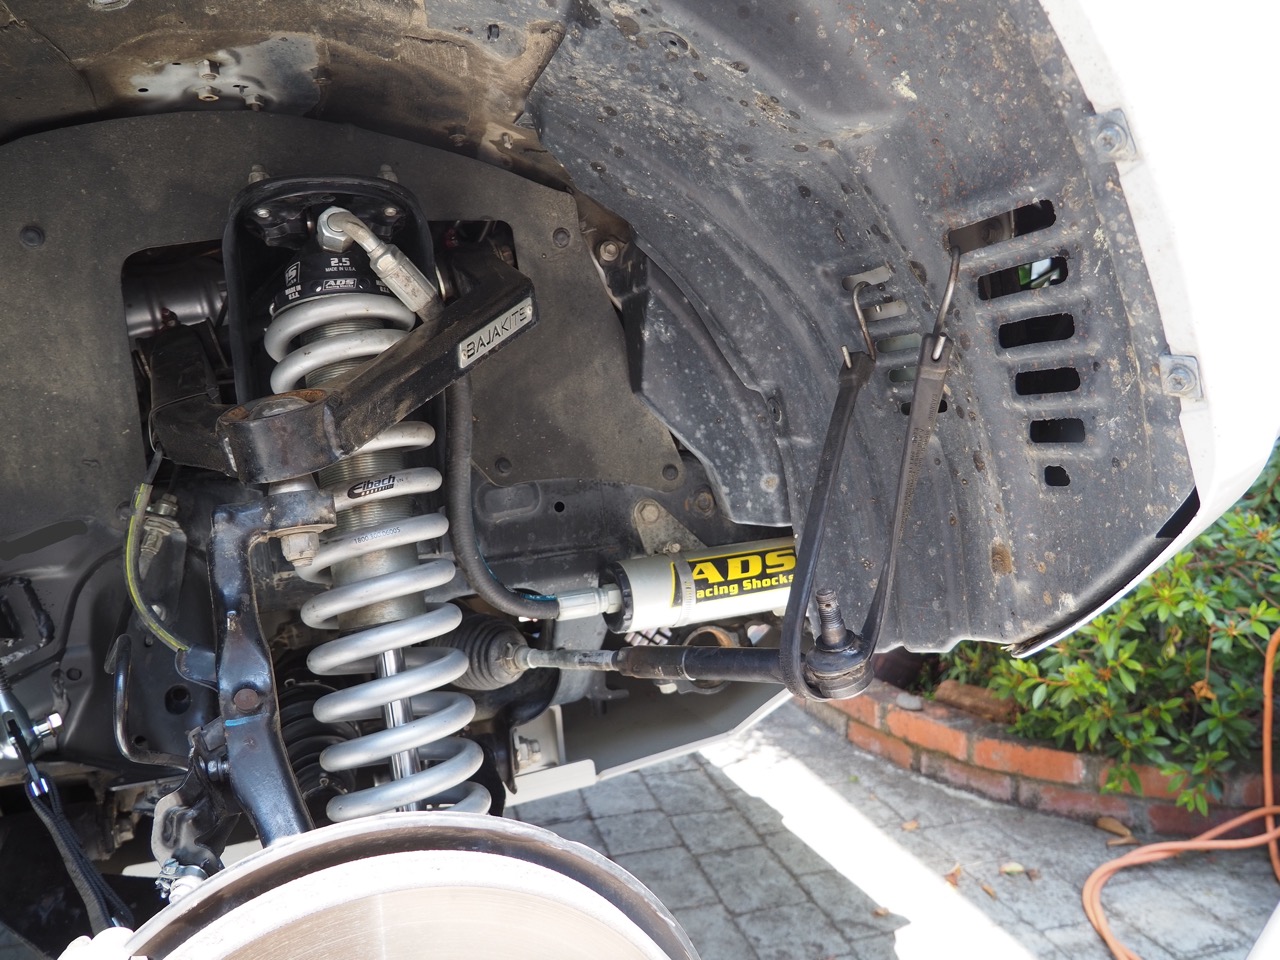
If your 4Runner has ever looked like the photo above, it’s not the end of the world. I will warn you, though, that this is a messy project. You might give up trying to get the axle out (I did once), but it’s worth trying and learning how to do it yourself.
The unfortunate thing about tearing the outer CV boot (wheel side) is that you have to remove the axle and the inner CV boot (differential side) to get to it. I recommend ordering a kit that includes both inner and outer boots. You have to remove both, so why not replace both? I have also learned that you get what you pay for with CV boots, and cheaper boots may not save you money in the long run.
I have torn the outer CV boot on the passenger side three times in the past two months, and I have changed the boots a total of five times during my ownership of the 4Runner. My main culprit is long travel without limit straps. With too much droop when the tire is in the air, the CV contacts the lower control arm and tears itself open.
The solution: weld and install clevises and limit straps. Despite this solution, you’ll notice that I still managed to tear the CV boots. This was due to my over-tightening the clamp, which tore the boot on the trail. Yup, lesson learned: spend the money and use the right tool.
Note: If you need a temporary patch for a puncture on a CV boot, use JB Weld. I’ve driven 200+ miles with it on the boot and it was solid. Don’t push it though, and replace the boots when you get home.
Find It Online:
- OEM Toyota CV Boot Replacement Kit (P/N: 04427-60131): Check Price
- (Optional) CV Dust Cover (P/N: 41336-35020): Check Price
- (Optional) CV Axle Nut (P/N: 90178-28002): Check Price
Table Of Contents
Installation
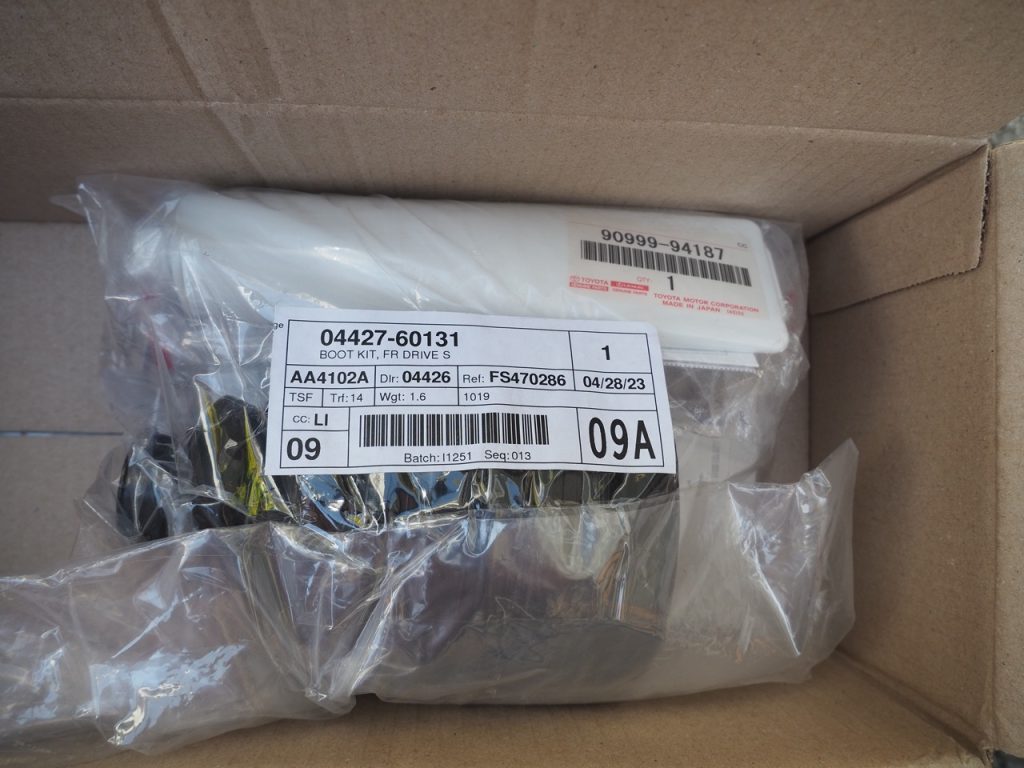
This kit includes everything you need to replace CV boots on both sides:
- 2 X Boots (inner-diff side and outer-wheel side)
- 2 X Small clamps
- 2 X Large clamps
- 2 X Types of grease (yellow: inner, black: outer)
- Axle clips
Tools Required:
- LOTS of Shop Towels/Rags of Choice
- Floor Jack- rated for the weight of your vehicle
- Jack Stands (x2)
- 1 rated for the weight of your vehicle
- 1 stand for the Hub to rest on
- Tire chocks (x2) for rear
- 1/2″ Breaker Bar
- 1/2″ Drive Socket(s)
- 19mm (for LCA Bolts and Tie Rod End)
- 21mm (for OEM Wheel Lugs)
- 35mm (for Axle Nut)
- 3/8″ Drive Socket(s)/Ratcheting Wrench
- 10mm (for brake line bracket)
- 12mm (for ABS line bracket)
- Pliers
- Wire cutters
- Cotter Pins
- 7/64 x 1″ for Tie Rod End
- 5/32″ x 1 1/2″ for Axle Nut
- Tie Rod End tool
- Bungee cord (x3) or multiple ratchet straps
- x1 to hold the tie rod out of the way
- x1 to hold the weight of the axle
- x1 to pull Hub out of the way
- Paint marker (mark orientation of the Rollers and Spider)
- Rubber Mallet/Dead Blow Hammer
- Large Flathead screwdriver or Pry Bar (to remove Axle)
- Small Flathead screwdriver (to remove Snap Ring and Spring Clip)
- Red Loctite 263 (for LCA Bolts)
- Silver Anti-Seize (for the hub to axle)
- 1/2″ Torque Wrench (rated 50-250 lb-ft.)
Recommended Tools:
- CV Boot Clamp Pliers (HIGHLY RECOMMENDED)
- Air Compressor & 1/2″ Impact air gun or 1/2″ Impact Wrench
- Internal/External RETAINING Ring PLIER
- Degreaser
- Ear and eye protection
- Nitrile Gloves
Optional Tools:
- 5-gallon bucket for hub stand
- Special Axle Removal Tools
- Cardboard
- Mechanics Gloves
- Nitrile Gloves
Alternative Parts:
- Budget-friendly (EMPI):
*Both include grease and axle clips per boot kit.
- Not So Budget Friendly (RCV):
*Axle clips are included per boot, but grease is a separate purchase
*If you have a long travel and go wheeling frequently, go with OEM or RCV*
Step 1. Remove Tire

Before working on your vehicle, always make sure:
- The vehicle is in Park
- Parking Brake is applied
- The rear tires are chocked
- Using Jacks and Stands that are rated for your specific vehicle’s weight
- Safe jack points
- Ideally, on flat and level ground
For this job, put the vehicle in 4WD. It will stop the axle from spinning while removing the axle nut.
Safely jack the side of the vehicle that needs the boot replaced, place it on a stand, and remove the wheel/tire. The OEM wheel lugs are 21mm.
Only jacking up the side you’re working on will prevent unnecessary differential fluid loss because the system is balanced. Lifting both driver and passenger sides evenly will cause fluid loss. Use gravity to hold that expensive diff fluid in there.
Step 2. Unbolt Brake Line & ABS Sensor

There is a 10mm bolt on the spindle to unbolt the brake line bracket.

Next, there is a 12mm bolt located behind the brake dust shield to remove the ABS sensor.

Next, pinch the ABS sensor connector to remove it.
Step 3. Unbolt & Bungee Tie Rod End (TRE)

To remove the cotter pin on the castle nut, bend it back until it’s straight enough to pull out. Set it aside if you want to reuse it. However, it’s generally recommended that you just replace it with a new one.
Next, remove the 19mm castle nut on the tie rod.

To help align the TRE bolt, I lifted the lower control arm (LCA) with a floor jack. Once it’s lined up, I smacked the bolt with a rubber mallet to unseat it.
Once the TRE is free, tie it up and out of the way; I used a bungee cord.
Step 4. Remove Axle Dust Cover & Nut

Wedge a flathead screwdriver (or flat-sided tool) between the cover and the hub assembly and lightly tap with a rubber mallet around the cover to pry it off.
Note: You may damage the cap while removing it, so be gentle or have a replacement on hand.
CV Joint Oil Seal Dust Shield (Part Number: 4344235060)

Next, remove the cotter pin on the retention cap. You can set it aside for reference or reuse it later. However, replacing it with a new one is generally recommended. Set the retention cap as well; this will be reused.

To remove the axle nut, you’ll need a 35mm socket.
You might be strong enough to remove the axle nut with a breaker bar. I’m not, at 5’1″ and 110 lbs on a good day. So, I use power tools. I used a 1/2″ air impact gun.

To unseat the axle, give it a good hit with the mallet. When it’s freed, the axle will have a little rebound.
Step 5. Unbolt Lower Control Arm (LCA)
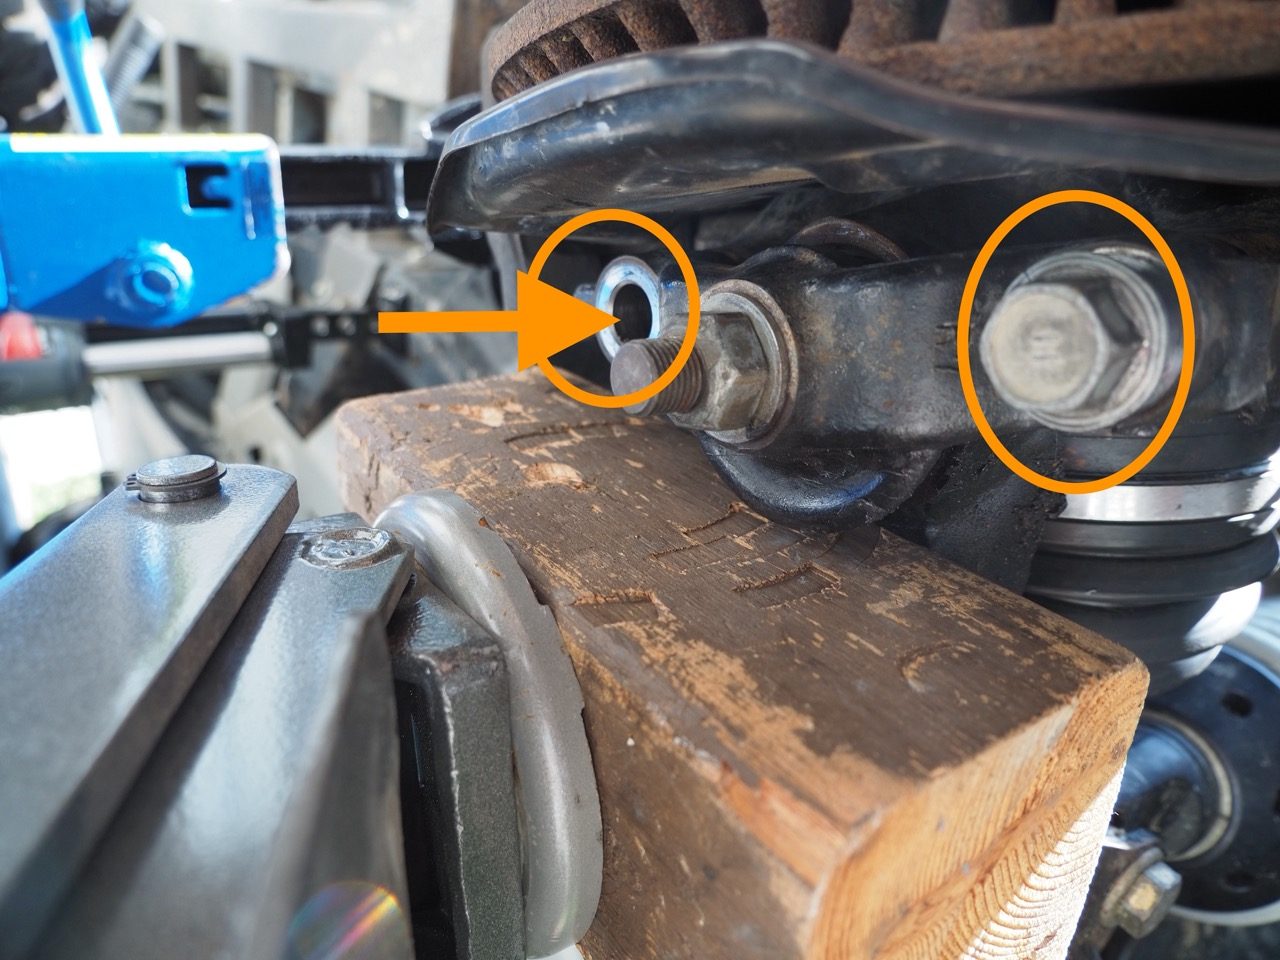
Next, remove the lower control arm bolts via x2 19mm bolts. I already removed one before taking the photo from underneath the LCA.
Step 6. Remove Hub From Axle

This step will require some muscle and planning.
Prepare the stand or 5-gallon bucket and bungee or ratchet strap so you can rest the hub assembly and upper control arm (UCA) on it, towards the back of the wheel well. I didn’t realize how heavy these parts were until I was standing in the wheel well, hunched over, trying to move. Yes, I can easily fit in the wheel well while holding the hub assembly.
My removal method involves grabbing the hub, pulling some tension away from the axle, and smacking the axle one more time with the mallet for good measure. Next, lift the hub up and away from the axle, towards the back of the well, while pushing the axle in the opposite direction with the other hand.
Once the hub is free, put it on the stand and carefully place the axle on the LCA.
Step 7. Remove CV Axle

Hurray! You have finally gotten to the axle.
This step was the most frustrating, but I figured out a method that works (at least for me). After 2 hours of my first go, I finally got the axle free. For the second CV boot job I attempted, I threw the “towel in” after 1 hour of trying to get the axle out and took the 4Runner to the mechanic. For the 3rd job, there was no way I was returning to the mechanic within the same month, so I got pumped up and got the axle out in 5 minutes!
First, bungee the axle to support the majority of its weight and help balance it level with the diff opening.

Next, slowly rotate the axle with one hand, while firmly(slightly rough) hitting the back of the inner cup with a pry bar and mallet. There is an internal clip holding the CV axle inside the diff (you will see it once the axle is removed). In order to release the axle, the clip has to line up perfectly, so rotate the axle in small increments.

You might have to turn it a couple of times to get it. Also, make sure the axle is level with the diff and has support under it. I suggest watching this video on the technique.
Note: There will be some play with the axle and diff. Don’t worry, that’s totally normal!

If you cannot remove the axle, skip to Step 17 to put everything back on so you can drive to the mechanic.
Slide the axle out carefully. When it starts to move out, tap lightly and be prepared to catch it. Make sure to take care of the splines.
Step 8. Plug Diff With A Clean Shop Towel

If you’re working outside, where it’s windy and debris can get into the diff, plug it with a clean shop towel.
Step 9. Remove Inner Boot

Since this inner boot is old, I didn’t take care to take it off nicely. I used wire cutters to cut the clamp off.

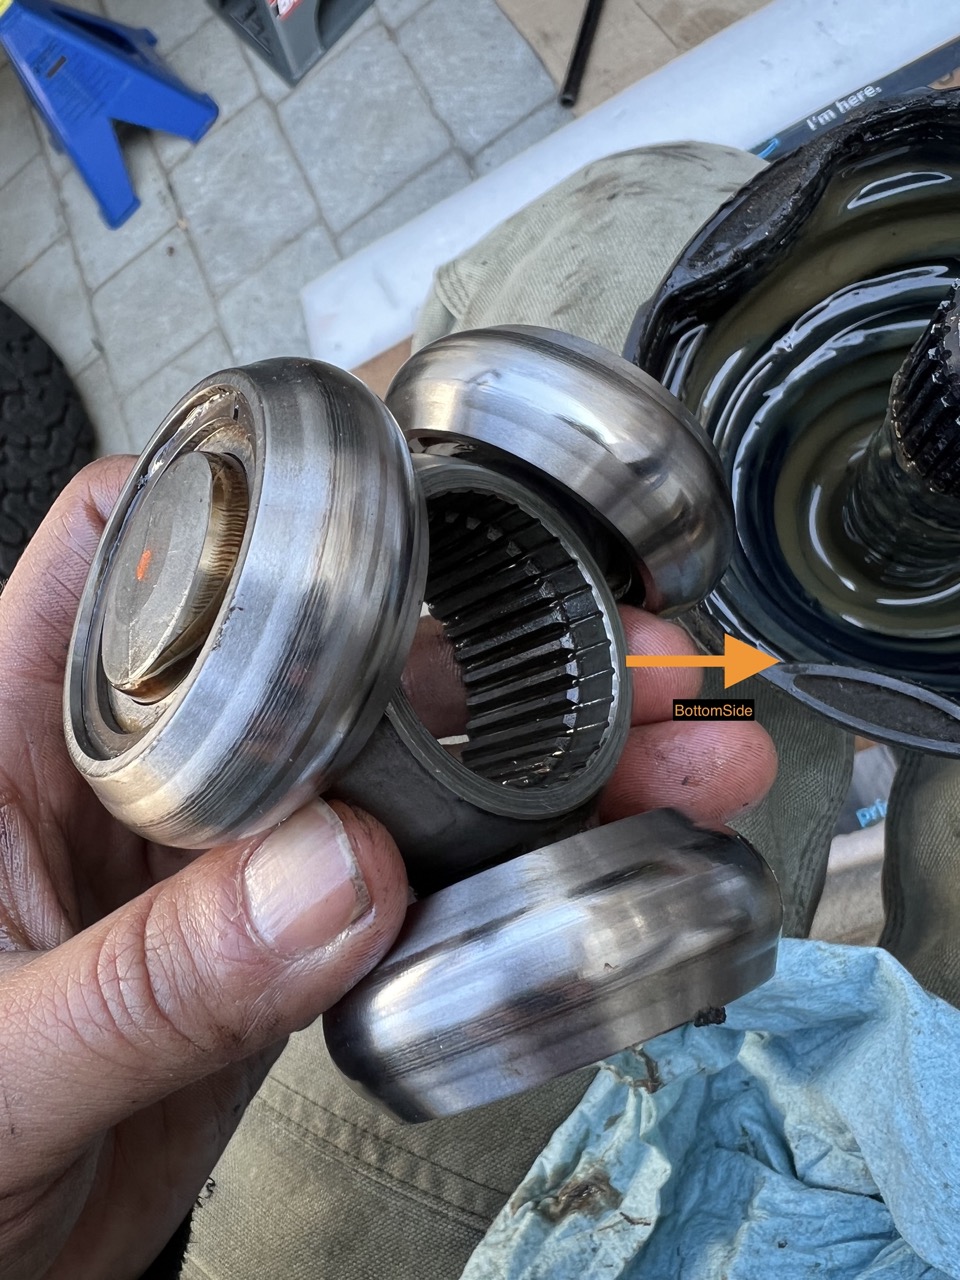
After removing the clamp, you can remove the roller and spider/tripod housing (cup) to expose the roller and spider components (I call it the flower).
As you can see, mine is pretty dry. I didn’t see any signs of leaks on the inner boot which was surprising.
Step 10. Clean & Mark Orientation Of Rollers & Spider/Tripod

Next, clean the rollers and spider/tripod with towels or rags.
Mark the orientation of the rollers and spider/tripod per the shaft. This step doesn’t have to be extremely accurate, but close to how it was, so everything goes back properly.
My thoughts about marking the tripod are that it would even out the wear, but it won’t really make a difference how you drop the rollers back in.
Step 11. Remove Snap Ring

I suggest wearing eye protection before removing the snap ring. Remove the snap ring holding the rollers on the axle with a flathead or snap ring pliers.

Important: Note the inner spline design in the flower! Flat teeth face the smaller end of the inner boot downwards.
Step 12. Replace Outer Boot

First, remove the outer boot and wipe/clean everything; it doesn’t have to be spotless.
Use black grease and repack the axle assembly. Moving the axle shaft around helps get the grease into it. Don’t worry about packing all the grease at this step.

Slide the new outer boot on the axle with a small clamp.
There are grooves on the shaft that help hold the boot in place. Crimp the small clamp down by pinching the elevated area together, but not all the way.

With the big opening at the top of the boot, offset it and squeeze the rest of the black grease into the boot.
Push the air out of the boot and make sure the boot is seated along the housing. Then, crimp the big clamp. Next, push the air out and crimp the small clamp.
Finally, firmly crimp the clamp things on both.
Step 13. Grease Axle Rollers

First, make sure you put the small clamp over the axle. Otherwise, it’s a mess. Do this by sliding the inner boot onto the groove and lightly tightening the small clamp.
Next, apply yellow grease over the axle shaft and inside the rollers. Put the greasy rollers on the axle with the flat side down and align them as close as you can to the marks you set. You should be able to rotate the boot to accommodate the orientation of the rollers.
Next, get the new spring clip from the kit and get it seated where the old one was.

Push the rollers together and orient the housing (cup) so the flower can fit. Then, push the air out of the boot and crimp the clamp, similar to the outer boot.
Firmly crimp all bands.
Double-checking the bands’ crimps in this step is easier than trying to crimp them when the axle is back in the diff.
Step 14. Remove C-Clip On Inner Axle (Diff Side)

Using spring clip pliers or similar tools, remove the old C-clip and install the new one provided. Be mindful of the splines when removing the clip; you don’t want to damage them.
The old clip can be thrown away.
Step 15. Reinstall CV Axle

Important: Make sure the axle splines are clean before reinstalling.
Here are 3 key points:
- To go back in, the axle teeth/splines need to be lined up with the diff splines. You probably won’t get it lined up the first time, so be gentle and test how it feels.
- The C-Clip’s open side must face down. If the clip rotates, the axle won’t slide into the housing.
- The axle needs to be in line with the diff opening.
Once everything is lined up, tap the pry bar with a mallet to get everything back into the diff. It should kind of “pop” in. Get the mallet and smack the end of the axle for good measure. You can also visually confirm that the axle is seated properly by looking at it from the bottom. The dust cover will be pretty close. There will be some play with the axle and diff, that’s totally normal.
If the CV doesn’t want to pop in, pull it out and check the clip orientation. Don’t be too rough with it.
Step 16. Reinstall Outer Hub

Time to turn into the Tin-Man. A little goes a long way with anti-seize. Apply it to the axle so it’s protected from rust.
Next, get your back ready to carry the hub back onto the axle. You will have to find the way that works best for you.
Step 17. Reinstall LCA Bolts with Red Loctite

Just like anti-seize, a little goes a long way. Don’t go crazy.
Use a 19mm socket to torque the two LCA bolts to 118 lb-ft.
Step 18. Reinstall Axle Nut, Retainer, Cotter Pin, & Cover
Use a 35mm socket to torque the axle nut to 174 lb-ft. The cotter pin size is 5/32″ x 1 1/2″ or similar to the one you initially pulled off.
Then, evenly hit the cover back onto the hub with a mallet.
Step 19. Reinstall Tie Rod End

It might help to lower the jack with the LCA on it, line up the bolt, and jack up the LCA to get the rod end in line.
If you have the strength, you could probably smack the rod up with a mallet to make it seat. The bolt will spin if it’s not seated.
I used a tie rod tool that was not made for this setup, but I got by.
Use a 19mm socket to torque the TRE to 67 lb-ft. The cotter pin size is 7/64″ x 1″ or similar to the one you pulled off.
Step 20. Attach Brake & ABS Line Brackets and Sensor

- Brake bracket on the spindle: 10mm socket
- ABS line bracket lower spindle: 12mm socket
- ABS sensor: Use your hands to connect
Wrapping Up
I like to use Super Purple to degrease the wheel well. Spray and let it sit but not dry for a bit and power wash. Then, I’ll do a second round and use an old brush to scrub and power wash again.
For the wheel and tires, I like to use Simple Green and Jason Denney’s AKA @tacodust cleaning method. With the grease, I’ll hit it with the brush after the Simple Green is applied. Let it sit and then power wash off.
Reinstall Wheels & Tires
Get the wheel on and hand-tighten the lugs in a star pattern. Then, lower the car back on the ground, and torque in a star pattern to the appropriate spec. For the OEM wheels and lugs, use a 21mm socket and torque to 85 lb-ft.
Check Torque On All Bolts
- Lower Control Arm (LCA) Bolts (x2)
- 19mm
- 118 lb-ft.
- Tie Rod End
- 19mm
- 67 lb-ft.
- Wheel Lugs (OEM)
- 21mm
- 85 lb-ft.
Congratulations, YOU DID IT. Take your 4Runner on a test drive. Some grease might flick out, but that’s probably just excess air escaping.
Final Thoughts

In my area, the cost of labor for a shop to replace CV boots was $320. This price doesn’t include the OEM parts that I used. At the rate I tear CV boots, I was determined to learn how to replace them on my own!
If you have an afternoon and want to get to know your 4Runner a little better, learning how to replace CV boots is the perfect job.
Hey Lindsay, say I received two tubes of grease for inner boot and I was just wondering if I needed both tubes or if one was an extra just in case.
What a great write up. This really helped me. Just a suggestion, when I did the inner boot I just left the housing in the differential, pulled hub out of the way, and when the CV boot clamp for the inner is removed the axle pulls right off. This allows you to just change the inner and not worry about losing any diff fluid, or hassle with getting the housing out of the diff.
Great article Lindsay! The only issue I have with replacing the boots is that the kit costs as much as an entire aftermarket CV axle, it’s insane. For anyone who breaks axles on the regular, do yourself a favor and grab a spare Cardone cv axle off of RockAuto or similar.
Thanks for the advice Jason! In my case, it’s cheaper for me to replace boots because a new 2+ custom axle would cost $,$$$. I haven’t had an axle break… so changing the boots works for me. If the day comes and an axle breaks, my plan is to buy a new one, rebuild the old one and use the rebuilt as a spare.
That makes perfect sense Lindsay. Not just an off the shelf axle replacement for you if you’ve got custom axles.
Jason, good call. Nice price: https://www.cardone.com/product/cv-axle-assembly-66-5235hd
Have you run these?
HI Brenan, not me personally but a friend of mine does. He runs 40s on his 5th Gen so it’s a more common thing to have break. I’ve got a set sitting in my garage as spares though.
Great article!