
If you’re like me and enjoy doing your own maintenance, dealing with the transmission seems daunting. It’s a large and expensive component that you want to take care of to ensure it lasts a long time. I really didn’t want to mess anything up or damage anything, so I considered just having Toyota take care of the transmission fluid for me. After contemplating for around 10,000 miles, I finally decided to do it myself.
I wanted to learn for both the experience and so it would be easier/cheaper for me to do it down the road. The cost alone for the supplies was around $174 (6qts). Taking it to a dealership, I’d imagine, would be a pretty penny. I just needed to ensure I could find all the required supplies for the task, along with some guidance.
As this was my first time servicing a transmission, I searched online for quite some time, only to find vague results for the 5th Gen 4Runner. Eventually, I managed to gather all of the part numbers, and I’m happy to present you with a complete guide on how to replace the transmission fluid for the 5th Gen 4Runner.
Disclaimer: I must warn you that I am no master vehicle technician, nor do I disassemble transmissions. I am also not a scientist. There will be a wealth of compiled information and my personal opinions, based on my research and personal experiences as an aircraft mechanic. It is completely okay to have your own opinion; my goal is to help out the 5th Gen community with a guide for DIYers.
Please take what you want from this article and use it for what you need!
Table Of Contents
The Overall Service & Fluids Used

The task might seem overwhelming, but in reality, it’s not too bad. You don’t need any special tools, although a way to read your transmission temperature is super helpful. Set aside a reasonable amount of time for this service, especially if it’s your first time doing it. I planned for about 6 hours just in case I needed any extra parts or tool runs. Once you start this process, you can’t drive the vehicle at least until you get fluid back inside.
As for transmission fluid, I opted for genuine Toyota ATF WS, primarily because it’s what the manual recommends. If I hadn’t used official Toyota fluid with the exact additives required, I might be kicking myself later. I was able to acquire it at my local Toyota dealership for $9.45/quart, which isn’t bad. I highly recommend just using the required fluid.
From the 2019 owner’s manual: “Using transmission fluid other than ‘Toyota Genuine ATF WS’ may cause deterioration in shift quality, locking up of the transmission accompanied by vibration and, ultimately, damage to the vehicle’s transmission.”
How To Read Transmission Temp

Go ahead and start thinking about a way to read your transmission temperature. This part brought my maintenance tempo to a halt because I wasn’t as fully prepared as I thought I was. I found out that there are a couple of ways to get this read out.
The 4Runner’s Maintenance Mode or Trans. Temp Check Mode

This is always possible, as long as you can obtain a 16-20 gauge wire for your OBD-II port. In this method, you will jump to two different terminals and put the vehicle in maintenance mode. After doing so, follow the specific steps to prepare your vehicle for the transmission temperature check. I’ll explain this one later.
Have An ODBII Device For Read Out

This one comes in many shapes and forms: ScanGauge, various phone apps, UltraGauge, and even readout tools designed for maintenance.

I was able to use my UltraGauge MX. The only issue with having the UltraGauge is that it needs to be programmed to read out manufacturer-specific information.
You need specific manufacturer codes to access this information. It can be a complex code entry on your device to obtain this. After conducting extensive internet research, I was able to locate the codes for the UltraGauge MX.
Programming and code are something I know very, very little about, so I won’t get into it here. Above are the exact codes I used to program the transmission pan temperature on the UltraGauge MX.
Laser Temperature Gauge
I would use this as a last resort due to the potential for inaccuracies. You would also need a laser thermometer, which I don’t have on hand. I read this was possible with the laser pointed at the more forward section of the pan, where the filter/strainer suction happens. Hey, you’ve got to do what you’ve got to do sometimes.
Why Knowing The Transmission Temp Is Important

In the picture above, “1” represents the overfill plug, and “a” represents the fluid level. As fluid temperatures increase, they tend to expand and become more viscous depending on their specific properties. As the temperatures decrease, the opposite happens; they contract and become less viscous.
This is crucial because the fluid check valve/overfill plug on your transmission pan is designed to be read at a specific temperature range. If you pull out the fluid check plug on your cold transmission, nothing should come out, because the fluid is contracted and rests below the overfill on the inside of the plug.
If you pull the check plug on a hot transmission that has been running, some fluid might come out due to the thermal expansion of the fluid. The fluid level would sit higher in the pan, allowing fluid to flow out of the overfill. To ensure the proper amount of fluid is in the transmission, it must be within a specific temperature range of 104°F – 113°F.
You will be able to see this better later when you pull the pan off and examine the overfill plug.
Drain & Fill Vs. Full Fluid Flush

This is a debatable topic, and I would recommend researching to form your own opinion. It is your vehicle, and how you take care of it is up to you.
I chose to go with a drain and fill method, strictly based on the color of the fluid when I initially drained the pan. If my fluid appeared very old and degraded, I would have likely flushed the entire system.
Your transmission has many moving components; some of the components will break down faster than others on a relatively small scale. The older fluid lacks the lubrication properties and heat dissipation capabilities of the new fluid. Therefore, it causes a more rapid breakdown of components.
Depending on the life of the fluid and its composition, some of the suspended material from components breaking down can actually help specific components, such as the clutches, especially if they are worn. Overall, some of that suspended material from component breakdown might be what is helping your clutches shift from gear to gear with the added friction.
Your valve body has numerous passages within it, and over time, material and sludge begin to accumulate. With newer ATF fluid having excellent cleaning properties, flushing the entire system can potentially clog passages by moving sludge or debris through them. Personally, I believe this could only have happened if you never performed the necessary maintenance on time.
So, if you are at a regular interval (like mine) or on time for maintenance, everything should be fine. For transmission fluid that looks close to new, you can’t go wrong with either a drain-and-fill or a full flush. A flush would more than likely be overkill.
If your 4Runner has high mileage or you’re unsure of its previous maintenance history, then checking fluid quality and performing a drain and fill is probably safer, in my opinion.
Why I Chose To Drain & Fill

The 4Runner Maintenance Guide mentions replacing the transmission fluid for the first time at 60,000 miles. I wanted to check the condition of the fluid first, then make my judgment.
Based on my above findings, I chose to perform a drain and fill because I wanted to retain some of the older fluid in the transmission, along with some of the suspended material. Additionally, my transmission fluid wasn’t nasty, and I didn’t want to overdo it. By pulling the pan, the filter, and letting everything drain for a bit, I was able to drain approximately 5 quarts of transmission fluid. For reference, the total volume is about 11.3 quarts.
Removing nearly half of the fluid will introduce enough new fluid to the system, keeping components properly lubricated, but also leaving some material in the fluid. That basically means it should help keep components clean on a gentler scale, rather than forcing new fluid through all at once.
Considering how the fluid appeared at a 60k interval, I plan to perform drain and fill operations in 30k intervals in the future. The Maintenance guide calls for the next check at 120k miles, so cutting that interval in half at 30k miles will give me peace of mind. It also gives me more time to decide between a drain and fill or flush.
Here are a couple of informative videos and articles on transmissions that I thought were helpful
- The Car Care Nut – Specific to an early 5th gen (Toyota Master Diagnostic Tech)
- Chris Fix – General scope of transmissions (5 min mark talks about internal components)
- Toyota A750 Transmission – Back story and design of the 5th Gen transmission
DIY Guide

The most challenging aspect of performing this maintenance is the temperature check. The parts, tools, and supplies required are relatively minimal.
As for the transmission filter, you don’t need to replace it unless it’s in rough shape or clogged with metal. I chose to replace it because I was dropping the pan, and I had previously purchased it as a precaution.
Prices may vary by location, but I will give my prices here in Hawaii just for reference:
Parts
- Check/Overflow Plug & Drain Plug Gasket
- PN: 90301-15004
- Quantity: 2
- Price: $3.10/ea
- Fill Plug O-Ring
- PN: 90430-18008
- Quantity: 1
- Price: $2.84
- Oil Pan Gasket
- PN: 35168-60010
- Quantity: 1
- Price: $28.19
- Transmission Filter
- PN: 35330-60050
- Quantity: 1
- Price: $69.34
- Transmission Filter O-Ring
- PN: 90301-31014
- Quantity: 1
- Price: $3.99
Supplies
- Toyota Genuine ATF WS
- PN: 00289-ATFWS
- Quantity: 6qts for drain and fill, 12qts for flush
- Price: $9.45 a quart X6 = $56.70
- Drain Container To Catch Fluid
- Container To Measure
- Shop Towels
- Gloves
Tools
- 10mm, 12mm, and 14mm Sockets
- Shallow Wall 24mm Socket
- Ratchet
- 5mm Allen
- Fluid Transfer Pump
- Level
- 16-20 Gauge Wire
- Torque Wrenches For:
- 62in-lbs
- 7ft-lbs
- 8ft-lbs
- 15ft-lbs
- 29ft-lbs
Step 1. Find the Level Location & Allow The Transmission To Cool

This is one of the most important steps. To obtain an accurate reading, the vehicle must be level or have all four corners off the ground.
Letting the transmission cool is essential for the temperature check. The transmission heats up relatively quickly, and your 104°F to 113°F window is pretty small. Having all the extra time for you to do the check and install the check plug is nice to have.
Step 2. Remove Refill Plug

The 24mm refill plug will be located on the passenger side, towards the upper rear end of the transmission. Removing the refill plug should happen first as good practice. If you first remove the drain and later find out you cannot remove the refill, you’ll be stuck (literally and figuratively).
Step 3. Remove Drain Plug & Catch Fluid

Catching all the fluid is essential to know how much to refill later. The 14mm drain plug will be located at the far aft end and resembles a standard drain plug. The other one with the 5mm Allen key socket in the center is the fluid check plug. It also has the word “check” at the end of the plug.
Step 4. Fully Drain, Then Start Removing Pan Bolts
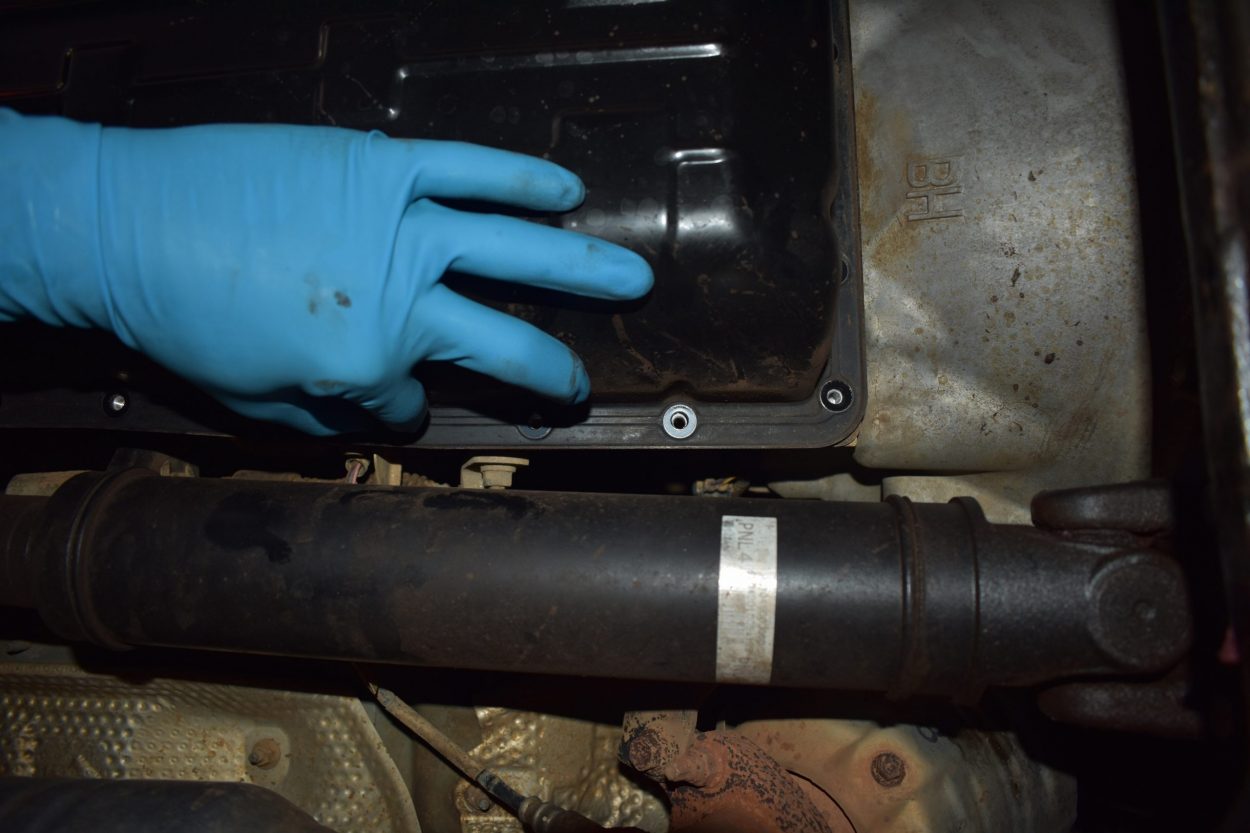
Once your fluid has been drained, soft-install the drain bolt and begin removing the pan.
Step 5. Attempt To Catch The Remaining Fluid

The transmission pan will likely have a significant amount of fluid still in it. Fluid will also continue to drain from the valve body and transmission filter. Lower the pan slowly and set it below to catch the remaining fluid for a bit.
Step 6. Remove The Filter

If you are replacing the filter, a significant amount of fluid will be released upon removal. For this reason, keep the drain pan or catch can nearby. Remove the filter by loosening the four 10mm bolts that hold the filter assembly in place.
Gently move it back and forth until it is unseated. Make sure to remove the O-ring as well; mine decided to stay behind.
Step 7. Combine All Drained Fluids

I used the pan itself as a catch device and an old jug to get my total amounts. I used the jug to pour the fluid into old quart-size jugs for my measurement. In total, I was able to drain 5 quarts.
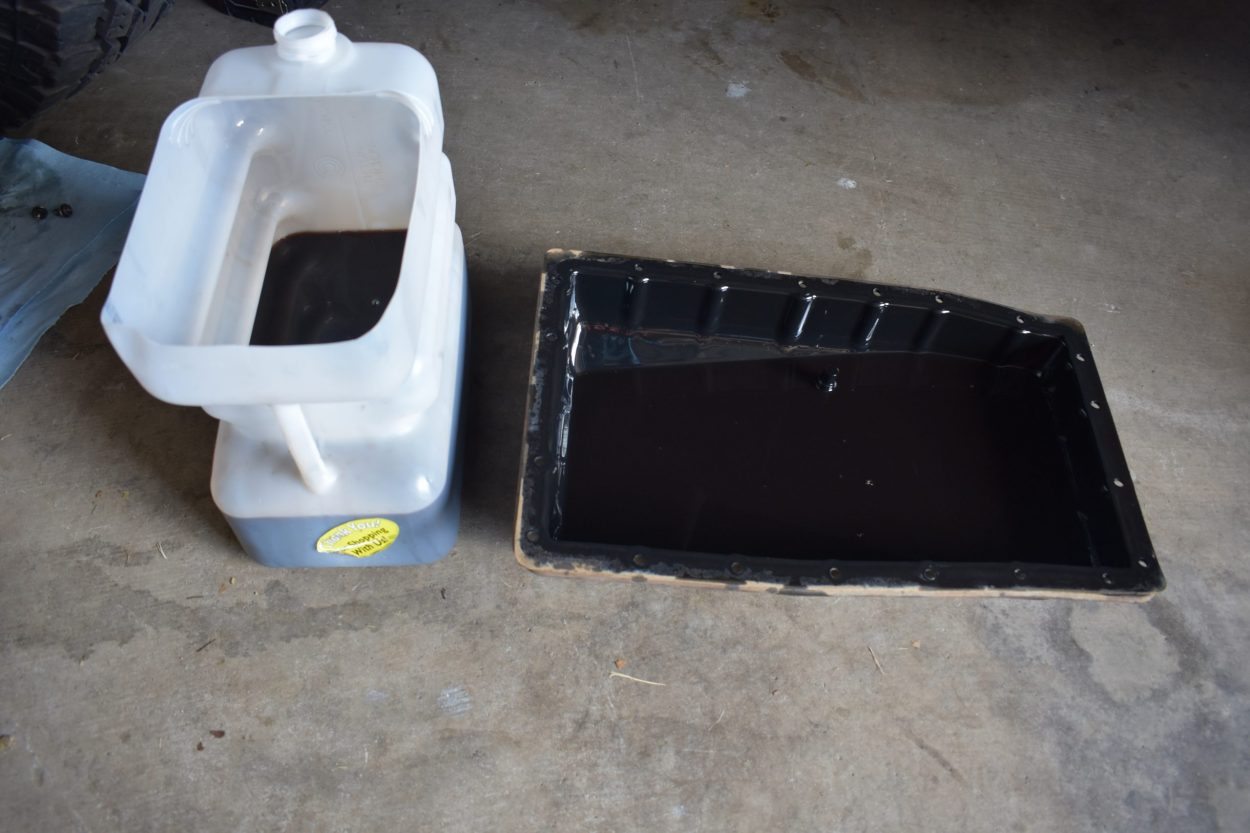
Compare and inspect your fluid with the new fluid to decide whether you want to do a drain and fill or a full flush. Either way, you will reinstall the pan and refill it with the same amount of fluid that you drained.
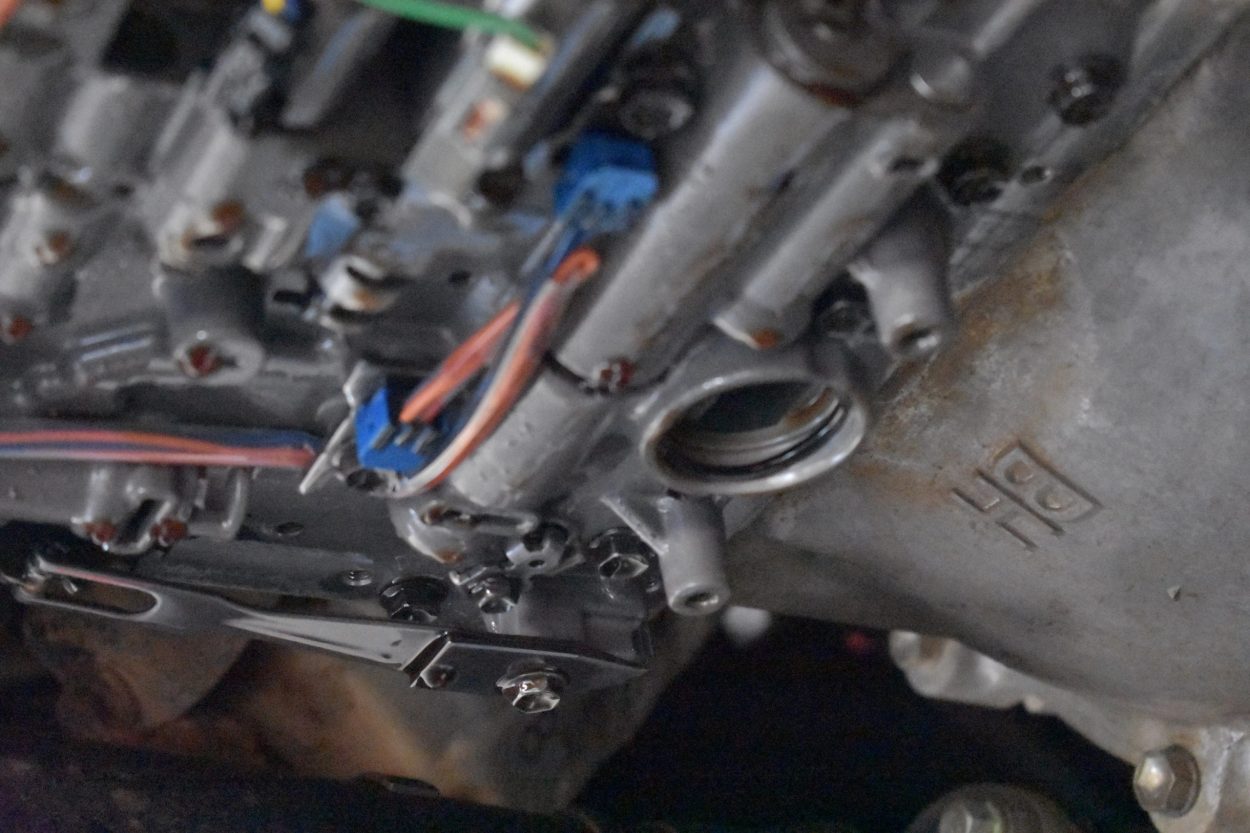
Step 8. Check Valve Body Bolt Torque

This is an added but not necessary step. The older the vehicle, the more I would recommend doing it. There are 19 10mm bolts on the bottom that hold the lower valve body in place. Over time, vibrations can cause the bolts to loosen, especially if you take your 4Runner off-road.
Your valve body has several layers. In between are gaskets that ensure fluid is directed to the right places. If the bolts were actually loose, this could allow fluid transfer into chambers within the valve body where it’s not supposed to.
I checked mine at their factory, and the torque spec is eight ft-lbs; only one budged slightly. When checking, torque in a criss-cross or star pattern.
If you don’t have a torque wrench capable of 8 ft-lbs, ensure that none of the bolts are excessively loose. If you accidentally over-torque, you could damage the gaskets and risk other potential issues.
Step 9. Install Transmission Filter

Before installing the filter, ensure you have your new O-ring ready (PN: 90301-31014). Also, compare the old parts to the new parts.

Install the O-ring and lubricate it with ATF for a smooth installation. The four 10mm bolts get torqued to 7 ft-lbs.
Step 10. Prep Transmission Pan

Notice there are four small magnets located at the bottom of the transmission pan. Remove, inspect, and clean them. A thin layer of fuzz is normal, as the metal components inside will break down over time. This is the material that is heavy enough to sink to the bottom and get caught by the magnets.

The left is a cleaned magnet, and the right is uncleaned.

For cleaning out the pan, I opted not to use any harsh cleaners or any other fluids. I wanted to minimize the chance of contamination, so I just used some ATF and a clean cloth. After cleaning the pan thoroughly, reinstall the magnets. Remove the old gasket and clean the mating surface on the pan and the transmission.
With the pan prepped and ready, it should look like the image above. You can now also get a better look at the overfill plug.
Step 11. Install Transmission Pan

Carefully guide your pan up to the transmission with the gasket (PN: 35168-60010) in between. You want to make sure the gasket sits properly between the pan and your transmission. Once it’s in place, install bolts on all sides to ensure the gasket is aligned correctly. If the gasket is aligned all the way around, proceed to tighten the bolts by hand.
Now it’s time to torque the bolts to spec. In a criss-cross/star pattern, torque the 20 – 10mm bolts to 62 in-lbs. Doing this will ensure the gasket is evenly sandwiched between the two surfaces, preventing leaking or damaging the gasket.
Complete that pattern twice to ensure that the proper torque is applied evenly all around.
Step 12. Install Drain Plug

Install the 14mm drain plug with the gasket (PN: 35178-30010) and torque it to 21 ft-lbs.
Step 13. Fill Transmission With Measured Fluid

Again, I drained about 5 quarts of fluid. This may vary if you don’t pull the pan or don’t pull the filter.
I added 5.5 quarts to be on the safe side, due to some small spills during the pan drop. I would rather slightly over-service than under-service in this circumstance. Use your best judgment.
If you don’t add enough, you’ll have to restart your temp check process. If you overfill, the excess will discharge through the overfill plug. During the final temp check, you want some fluid to come out a little, then reinstall the overfill plug.
Step 14. Soft Install Your Refill Plug And Prep For Temp Check

At this time, prep your refill plug (PN: 90301-15004) and soft-install it. With the transmission fluid refilled, ensure you have all the required tools and parts ready for the final temperature check.
This process moves pretty quickly, so the less time you spend scrambling for parts and tools, the better. The tools needed will be:
- Catch Container
- Ratchet w/ 5mm Allen
- Gasket
- P/N: 35178-30010
- A Way To Read Transmission Temperature
Double-check all your work and ensure everything is put back together properly before starting the engine.
Step 15. Transmission Temperature Check
If you have a tool that can read your temperature and you have a valid temperature of 104°F to 113°F, then you can proceed to the fluid check procedure.
If you are using the vehicle’s maintenance mode/ temperature check mode, then follow the steps below.
For troubleshooting, check out this video (7:40 mark). An indicating light of “D” or “A/T OIL TEMP” is dependent on you having 4WD or 2WD. In Step 6 of this procedure, if you have a 2WD vehicle, your indication should be “A/T OIL TEMP”.
Vehicle Maintenance Mode


- With the vehicle off, install a jumper cable from pins 4 and 13 on your OBDII port. Double-check you are using the correct terminals!
- Start your vehicle and make sure all electrical systems are off.
- If you have connected the correct terminals, many of the dash lights will flash on and off. This means you are in maintenance mode.
- With your foot on the brake, cycle the shift lever from Park to Neutral a couple of times. Once complete, return the transmission to Park.
- From Park, with a foot on the brake, shift to Neutral. Cycle back and forth from Neutral and Drive quickly until your “D” indicator on the dash becomes solid. When you see this, return the shifter to Park and remove the jumper cable that was previously installed.
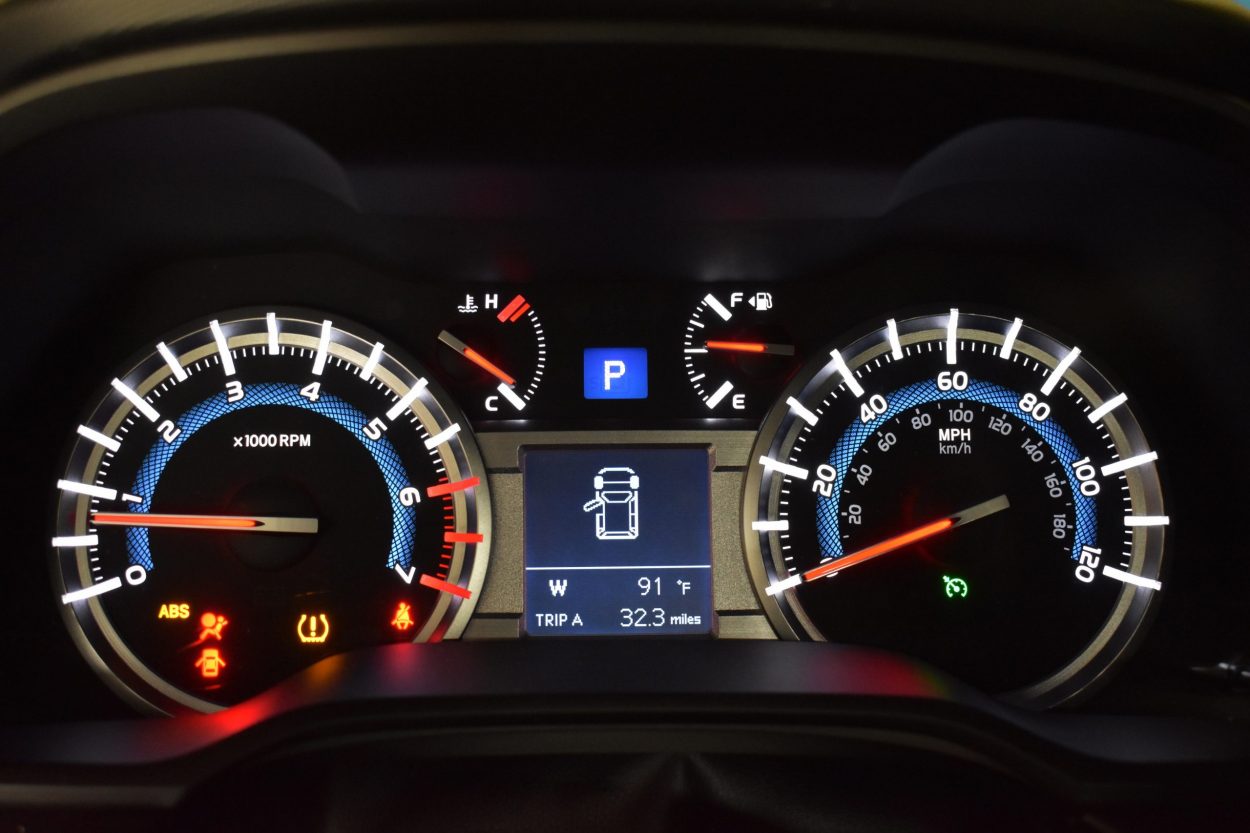
- Now, the vehicle is in fluid check mode, allow it to idle until you reach the desired temp. When the liquid temperature is below 104°F, the “D” light will be off. When the temperature is at 104°F, the “D” light will come on solid. If the temperature exceeds 113°F, the “D” will blink, indicating it’s too hot to check the fluid level.
Step 16. Fluid Level Check

With your temp at the precise range of 104-113°F, it’s time to pull the check plug. Have the gasket ready, along with a catch container.
- If fluid comes out, this means your fluid level is above the desired amount. Allow the excess to drain out of the overfill/ check plug. Once the fluid goes from a stream to a dribble, reinstall the plug with the gasket (PN: 35178-30010). Now your transmission fluid level is at its proper level.
- If you don’t have fluid come out or if you only have a couple of drops, then you would need to turn the vehicle off and restart it after adding fluid (Step 13).
Step 17. Test Drive & Leak Check

If nothing leaks, torque the check plug to 15 ft-lbs and you’re done! Congratulations, you have now successfully serviced your transmission. After you drive a bit, it wouldn’t hurt to do another fluid level check to double-check your work.
Full Flush Notes

A full flush is accomplished by completing multiple drains and fills (without dropping the pan) until the equivalent amount of approximately 11.3 quarts has been replaced in the transmission.
You could also use the transmission cooler outlet/ return line and attach a hose to it. Then, turn the vehicle on and allow the internal pump to push out the fluid. Preferably, use a soft line or hose in the forward area of the vehicle, closer to the transmission cooler. You could follow the top line in the picture above.
If you choose this route, you’ll want to monitor the pump closely and prevent it from cavitation. You would pump out about 2-3 quarts of fluid, turn the vehicle off, and add slightly more fluid through the refill port. Continue until you reach 12 quarts or the liquid has a fresh color.
Final Thoughts

The overall process of changing your transmission fluid isn’t too bad. Ensure you have all the necessary parts, tools, and supplies ready. Also, don’t forget to allow yourself enough time to complete the job.
After completing this, I haven’t really felt anything different, nor should I. Otherwise, I was probably overdue, or something else was wrong. If you haven’t done it for a long time, you probably would notice a difference. Knowing that I introduced a decent amount of healthy ATF to the system gives me peace of mind. Hopefully, staying on top of future maintenance intervals will lead my 4Runner to a long-lasting life with no major component failures.
As I mentioned earlier, whether you drain and refill or flush the entire system is a matter of debate. If you’re considering servicing your transmission, you’re already on the right path. Doing something is better than doing nothing at all. Your transmission is an expensive component that should last a very long time if you take proper care of it.
how do you get a level fluid pan and a level car when the pan as an angle. The pic is kind of confusing. I think I am missing something here.
the article is incorrect, the frame needs to be level, the transmission pan will not be level
Can you just do a drain and fill without coming up to temp and without dropping the pan?
One small correction to a very good article. “As fluid temps increase, they tend to expand and become more viscous depending on their specific properties”, should be “As fluid temps increase, they tend to expand and become LESS viscous depending on their specific properties”.
Got this program work on my 2021 / mx 1.4
TDATA: 07E02182
MTCH: 6182
RPOS: 2808
RCTRL:21
TCTRL:92
X: 0001
/: 0001
+: FFD8
Output format: 00 for C, 10 for F
Left/Right is 31
Are the drain plug and check plug washer PN correct? They appear to be incorrect.
Yep, I just took these as gospel and they are indeed WRONG. If you ask for the drain and fill washers with the numbers posted in this article, you get two rubber O-rings which are not correct. The correct parts are two metal crush washers, part # 35178-30010 for drain plug and overflow plug.
Also, the correct part numbers for the drain plug and overflow are actually correct in the article itself during the steps. The error is in the actual reference part list towards the beginning of the article.
My one problem with this right up: is the vehicle supposed to be level or the bottom of the pan? Because the write up says one thing, but the picture of the level is showing the pan being leveled. What about people with leveling lifts? No more drastic front to back rake. That will affect the level of the pan when the vehicle is sitting on a level surface.
The service manual says to have the car “horizontal,” nothing about making sure the pan is level from what I recall. Good observation on the picture, when I did the drain/fill on my lifted T4R I aligned the level more to the pan/transmission mating surface and frame, not the bottom of the pan. Either way, I doubt it matters all that much.
hear me out, in my opinion only doing 1 drain and fill i feel is kind of pointless tbh and is just mixing in with all that old dirty contaminated fluid. what i have done and a lot of others have done, is drain it fully cold into a measuring container (dirt cheap at HD) refill that back into the transmission. Start the car and go through the gears a few times and letting it run for about 15-30 seconds. shut the car off and repeat these steps until you notice that the fluid that is draining back out is clean. doing it this method will allow it to circulate through the transmission allowing you to keep draining dirty fluid. i did this prob 4 times and at the end the fluid was coming out clean and not dirty anymore. topped it off and proceeded to the check procedure. used id say about 12 qts
Awesome guide!!!! I think the procedure for my D4D Hilux is similar. Can I check the trans temp with an infrarred thermometer?
Is the 90301-15004 part number called out correctly in the parts list?? Should it be 35178-30010 as called out in the write up itself?
Awesome write up! Thank you! I can see recommending Toyota WS fluid just to be on the safe side. But I’m going with Amsoil. It’s a far superior synthetic when the OEM is not. It’s also WS rated.
Another guy you can look up on YouTube is “repairvehicle”. I like him as much as “The Car Care Nut” as you referenced. He not only shows the procedure, but has actual lab data comparing Amsoil vs OEM Toyota WS along with long term feedback using it himself.
Nice! I’m glad you found it helpful! Recommendations are good, but so is lab data!
I recently did the same. Also, replaced 2 transmission solenoids and added an extra trans cooler.
Book marked!
You should mention the vehicle must remain running when you check the overfill plug at temp. If you shut off the engine more will come out than it should and you will have to start all over.
Thanks Mike. I am just curious, how much of a difference of oil excess between running and non running engine, since the transmission is not moving when the engine is running in Neutral or Parked.
Around 1.8 quarts, I’ll explain. The transmission drain and fill procedure in the service manual is a little different from everything I’ve seen online for the 5th gen 4Runner. Before you start, and mentioned by every procedure I’ve seen, make sure you can remove the fill and overflow plugs.
After you drain the transmission oil with the car off and cooled, put the drain plug back in and remove the overflow plug. Next you add atf until it starts to trickle out of the overfill hole and then put the overflow plug back in. Then you add 1.8 quarts of atf and put the fill plug back in. Now you start the fluid check procedure with the car in fluid temperature detection mode.
I’ll add that the service manual says to “slowly move the shift lever from P to S, and then change the gear from 1st to 5th. Then return the shift lever to P.” before you put the car in fluid temperature detection mode. Additionally, the service manual clearly explains how to put the car in fluid temperature detection mode: “Move the shift lever to D, and quickly move it back and forth between N and D (once within 1.5 seconds) for at least 6 seconds. This will activate the fluid temperature detection mode.”
Thank you Ivan. Much appreciated.
From my experience with BMW’s GM transmissions, the difference can be as much as 1.5L. The only way to fill the torque converter and all the oil passages in the transmission is to have the engine running. The torque convertor holds a lot of ATF fluid, and it drains when the engine is not running.
Thank you David, much appreciated.