
For as long as I’ve been into 4Runners, Toyotas, and general vehicle modification, only a handful of aftermarket parts have proven to be timeless, practical, worthwhile investments. Admittedly, I’ve succumbed to hype marketing on social media and invested time and money only to be let down by poor quality. Sometimes the fitment is off, items arrive damaged, or the manufacturer could have made wiser choices on the materials used.
Many of us in the overlanding/off-road space tend to thrash our vehicles in fairly hellish conditions. We put a lot of miles on these vehicles and push the limits of their capabilities. So, if you’re going to spend money on vehicle parts that claim to be of quality and truly use them, they better stand the test of time.
New companies pop up all the time, and everyone claims to make a product that you not only need but is worth the high price tag. What I’ve learned is that long-term reputation is key. It goes without saying that GOBI USA is one of those companies. GOBI has been in business for about 20 years, and some of their earliest customers still have roof racks mounted to this day.
That’s why, for my second 5th Gen 4Runner build, I went back to basics and opted for another GOBI USA Stealth Rack. The traversable platform, adjustable crossbars, and general design keep pulling me back in. With the first build, I went with the Stealth lightbar rack with the standard riser. For this go-around, I opted for the same rack but went with the no-riser option (which I didn’t know was an option until now).
Find It Online:
- Gobi USA Stealth Rack (Ladder Included): Check Price
- Rear Gas Shocks (5th Gen 4Runner): Check Price
- Rear Ladder (Non-TRD Pro Models): Check Price
Table Of Contents
Rear Ladder Installation

Believe it or not, I found that installing the GOBI USA Stealth Rack was much easier than the rear ladder. That’s not to say that installing either of the two is necessarily difficult; the rack, in essence, bolts into existing mounting points, whereas the ladder requires a bit more precision with measurements being a factor. But again, neither was difficult to install.
Tools Needed
GOBI includes all of the necessary hardware and materials to complete the rear ladder installation. All you’ll need to provide for a successful installation is:
- Masking or blue painters tape (something that won’t leave glue residue behind)
- Smaller level (magnetic is ideal)
- Tape measure
- 5/16″ socket wrench
- 12mm socket wrench
- Alcohol wipes or rubbing alcohol and a clean towel
Step 1. Unbox/Unwrap Ladder

Since they ship finished (powder-coated) products, GOBI does a great job at securing and wrapping all of the products in your order. Since they’re so well secured, be careful when removing the padding and wrapping with a utility knife to avoid damaging the paint finish.
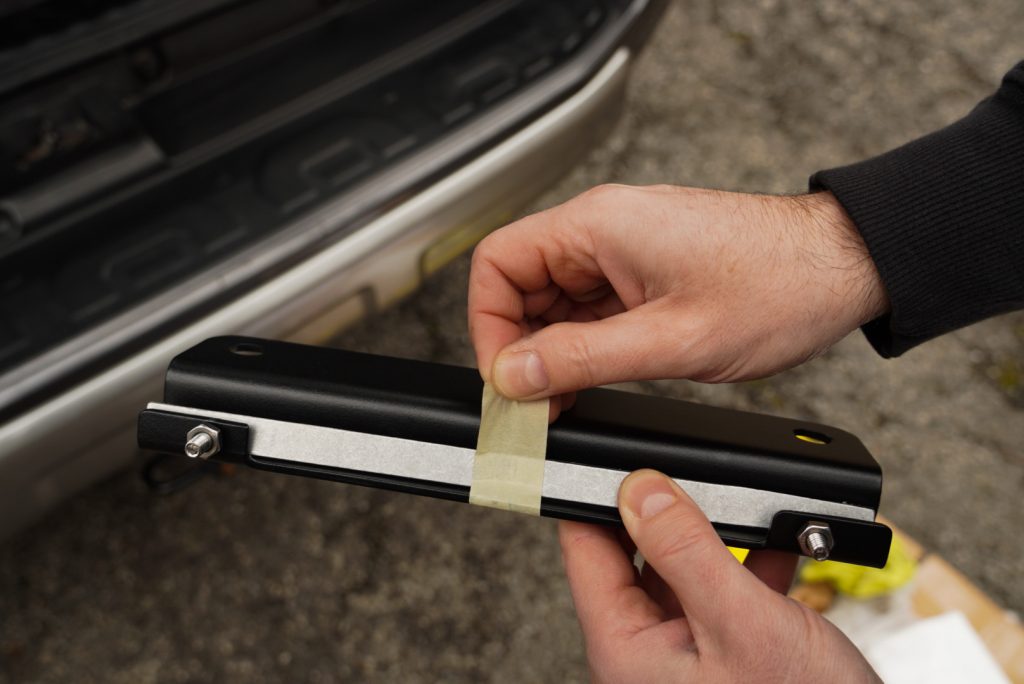
Step 2. Measure & Tape Ladder Hanger Bracket

From the inner rubber roofline gasket, measure over 3-3/8″ along the line between the light gate and the roof of the truck. Apply a strip of tape to mark your line.
Step 3. Rest & Tape Hanger Bracket Into Place

Next, you’ll want to rest the upper hanger bracket in place. Do not remove the adhesive strip backing just yet, as we’re only test-fitting this for now.

With the hanger bracket resting in place, apply another (longer) piece of tape to keep the bracket in place.
Step 4. Test Fit & Level Ladder

Before proceeding, we’ll want to test the fit of the ladder.

With the upper bracket taped in place, slowly drop the ladder onto the bracket and gently let it sit in place.

With the ladder resting in place, use your magnetic (or non-magnetic) level to position the ladder in a vertical level position.
Step 5. Mount Hanger Bracket

With everything tapped out, leveled, and aligned, you can now mount the upper hanger bracket into place. Remove the first piece of tape holding the bracket temporarily in place.

Before you affix the hanger bracket into place, give it a good cleaning with one of your alcohol wipes. Wait for it to dry before placing the hanger bracket in its position.

Remove all three strips of tape from the underside of the hanger bracket.
As I mentioned above, this wasn’t the first time I installed a 5th Gen 4Runner GOBI rear ladder. One of the things I noticed was that GOBI now uses less two-sided tape, which is a good thing. The previous strip of two-sided tape on this hanger bracket covered the whole underside of the bracket. This made removing the ladder down the road not impossible, but challenging.
So, the reduced tape surface area is a plus in my mind, and it does not compromise safety. The ladder essentially clamps onto the rear hatch, so this tape primarily secures the bracket in place during installation.

With the bracket tape now exposed, firmly press the hanger bracket into place, lining it up next to the leftmost edge of the tape. Hold the bracket in place for 30 seconds.
Now, you can remove the final piece of tape on the upper hatch.
Step 6. Prepare & Mount Lower Bracket

First, be sure to clean the lower hatch area with another alcohol wipe. This surface will receive another piece of two-sided tape.
Additionally, clean the exterior facing portion of the hatch to the left of the marker tape ~10″ out. The ladder will sit in this portion with another strip of two-sided tape.
While the surface is drying, remove the aluminum pinch plate, which should be taped to the lower mounting bracket.

Peel off the two-sided tape backing and press the pinch plate into place. Again, hold this firmly in place for 30 seconds.
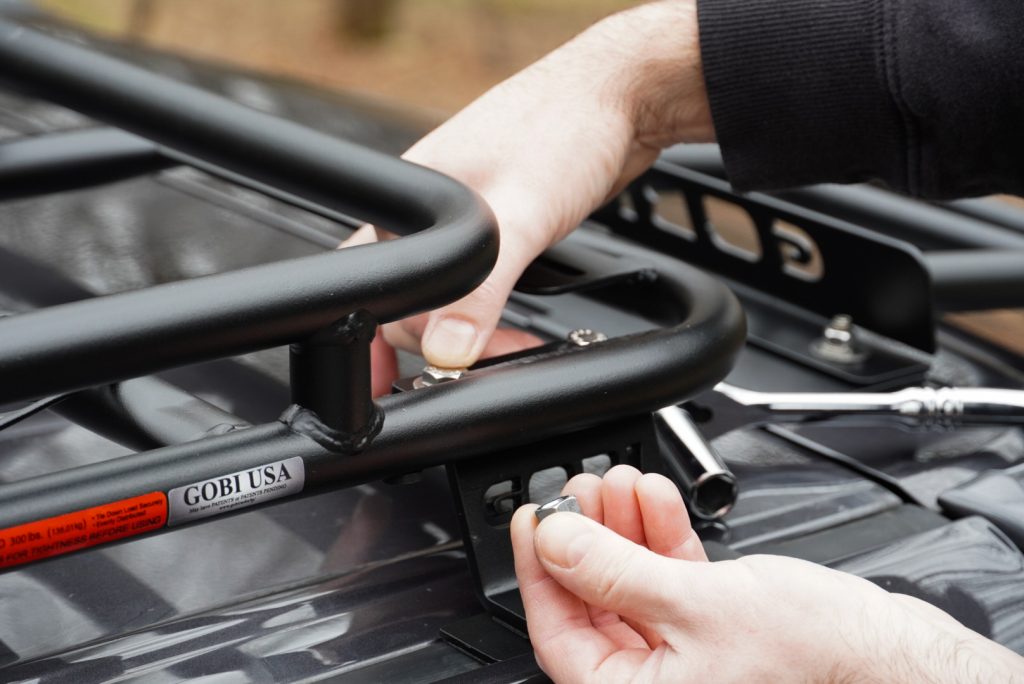
Step 7. Set the Ladder In Place

Remove the two (2) 5/16-18×1 button head screws, two (2) lock washers, and two (2) flat washers with the provided 3/16 Allen wrench. Set them aside as you’ll use them later on in the installation.

Peel off the two-sided tape backing and drop the ladder into place.

Start by setting the top of the ladder onto the upper hanging bracket and slowly lower it into place, lining the bottom rightmost side of the ladder butted up against the marker tape. Again, hold this firmly in place for 30 seconds before proceeding to the next step.
Remove the market tap, as this is no longer needed.
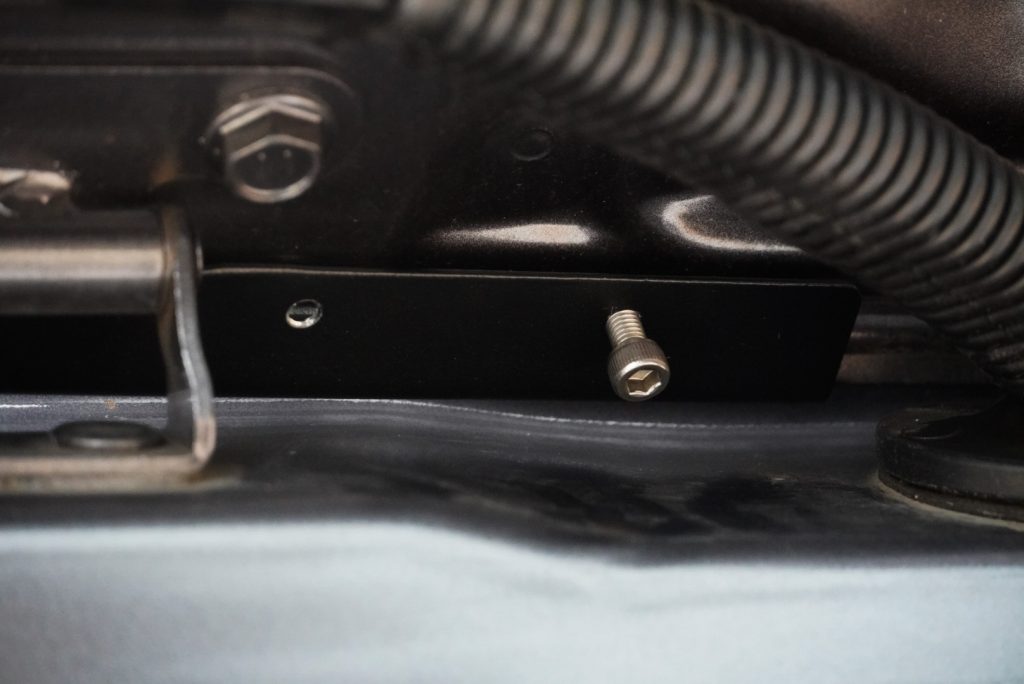
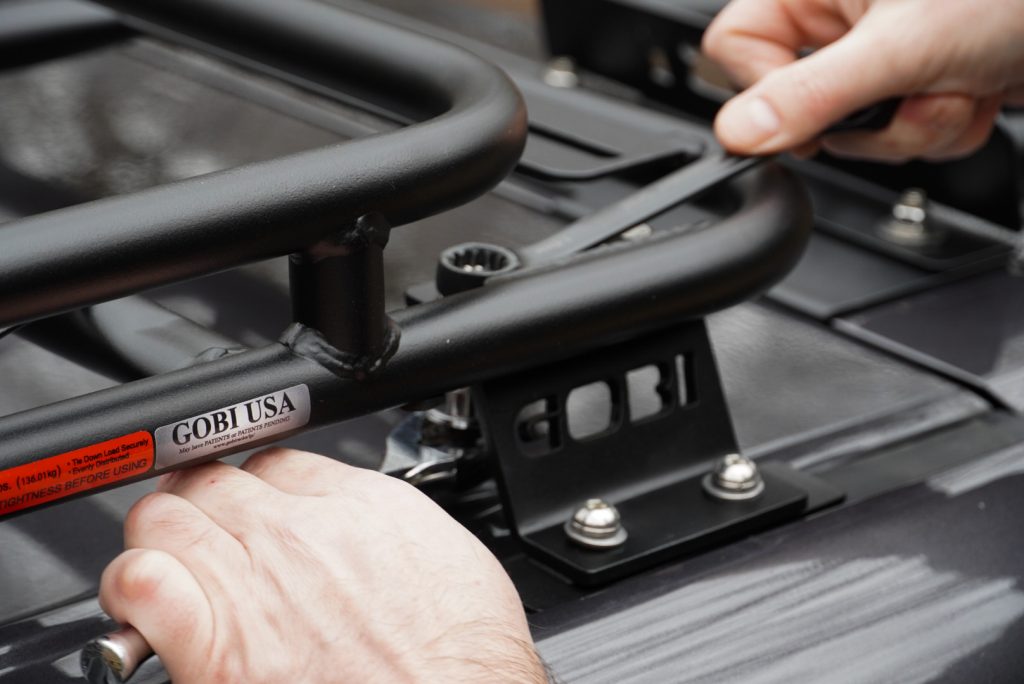
Step 8. Mount Lower Bracket
Next, slowly open the lift to ensure the ladder does not shift. This is where a second set of hands is helpful but not necessary.
Slide the lower hanger bracket into place and mount accordingly with the two (2) 5/16-18×1 button head screws, two (2) lock washers, and two (2) flat washers with the provided 3/16 Allen wrench.

Next, tighten the two 1/8″ screws into place with the provided Allen wrench.
Step 9. Mount Ladder To Hanger Bracket

Last but not least, you’ll need to bolt down the upper portion of the ladder to wrap this portion of the installation. First, start by dropping a 3/8 flat washer, then a 5/16 lock washer.

Finally, tighten down a 5/16 bolt on each side of the ladder.
Test opening your rear hatch to ensure you have upper clearance against the roof/body lines, and that’s it —you’ve got a ladder on your lift gate! Since a bit more weight was just added to your rear hatch, you may notice the “lift” is a bit slower/sluggish. If that’s the case, the link above is to GOBI’s stronger gas struts that can easily be swapped out with your OEM struts.
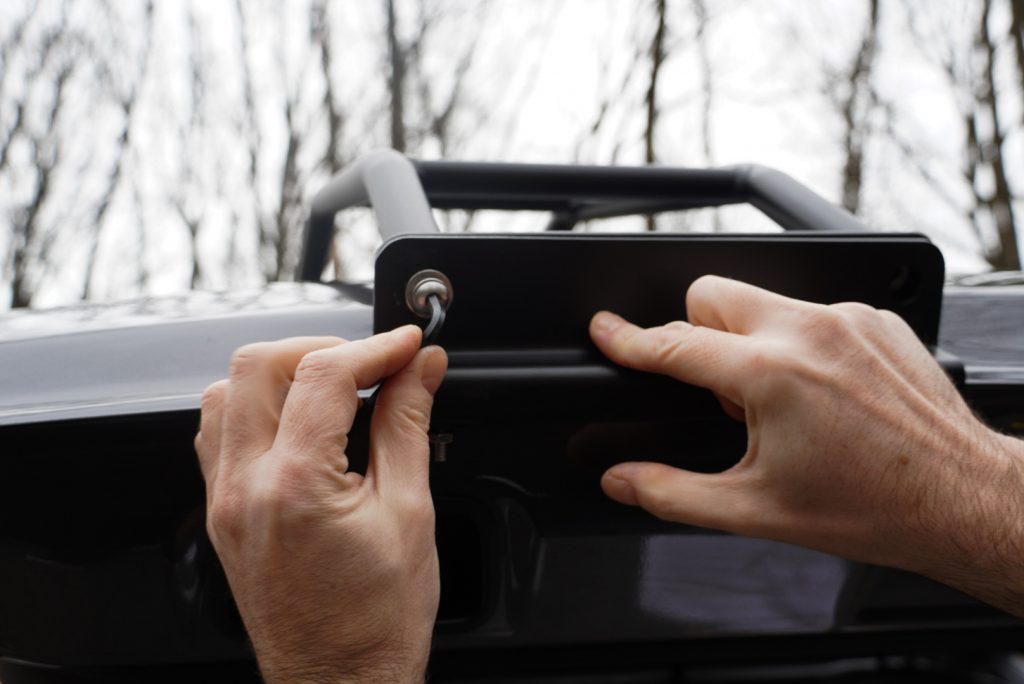
Step 10. (Optional) Upper Hanger Bracket
On the underside of the upper hanger bracket (with the lift gate open), you’ll notice two screw holes on the back “lip”. Having installed this ladder on my previous 5th Gen build (and removed it), I personally felt that this step could be skipped based on these factors:
- I’m not sure it adds a tremendous amount of stability and security to the upper hanger bracket.
- The more you tighten, the more it digs into the body, which can cause damage to the paint finish and result in exposed metal/rust.
But, you can thread in the two (2) 10-32 x 5/8 socket set cap screws if you so choose to.
Stealth Rack Installation

As I mentioned above, I found that installing the GOBI USA Stealth Rack was much easier than the rear ladder. The rack itself bolts into existing mounting points, so this install really is a true “plug-and-play,” whereas the ladder requires more precision with proper measurements. Again, neither is difficult by any means.
Tools Needed
GOBI includes all of the necessary hardware and materials to complete the Stealth rack installation. All you’ll need to provide for a successful installation is:
- 12mm socket wrench
- 9/16″ box end wrench
- 7/16″ box end wrench
- ½” box end wrench
- Plastic panel removal tool
- Rag or small towel
- Alcohol wipes or rubbing alcohol and a clean towel
- Painters tape
Step 1. Remove OEM Rack Plastic Covers

Using a small towel and a plastic prying tool, remove the roof rack caps covering the mounting bolts. This is one of those steps that’s a tad bit annoying to figure out at first, but once you do, the rest will come off easily. Start by wedging a towel towards the edge of the cap and sliding your prying tool between the plastic cap and rubber gasket (the towel is meant to protect your paint finish).

Slowly work your way from the inside of the rack cap toward the back. Don’t be afraid that you’re breaking anything during this process. Snap and cracking sounds are to be expected, but nothing is breaking underneath. What you are doing is lifting the plastic away from the grooved clamps, and plastic prying away from plastic makes for some awful sounds!
Repeat this step on all four sides.
Step 2. Remove OEM Roof Rack Hardware

Using your 12mm socket wrench, remove the two (2) bolts from each side of the roof rack mounts. Repeat this step on all four sides.
Step 3. Remove OEM Rack

With the caps removed and all hardware uninstalled, the rack should pop right out of place. It’s best to complete this step with a second set of hands, but the rack itself is not heavy; one person can reasonably handle this step.
Step 4. Prepare Roof

Just like that, you’re one step closer to throwing your highly coveted GOBI Stealth Rack on the roof of your 4Runner! However, be sure to take the necessary cleaning steps so that the rack sits securely on your roof with no chance of water leakage in the future.
Using an alcohol wipe and a clean towel, clean the surface and remove all gunk and grime from the roof rack mounting points.
Step 5. Loosely Mount Gaskets & Brackets

Next (and this may be the OCD side of me coming out), lay out all the materials needed in order at each mounting point. This part is important because each step in this sequence is intentional and will prevent water from ever leaking into your roof and headliner.
From bottom right to top left, this is how each piece of the assembly will be installed:
- Rubber seal
- Nylon spacers (x2)
- Rubber seal/debris cover (x2 – wider than the first rubber seal)
- Cover plate (with padding facing down)
- Rubber seal
- Roof rack support bracket
- M8 x 50mm mounting screws with lock washers and a neoprene water-tight washer (x2)
- 5mm Allen wrench

Drop the first rubber seal in place.

Add two nylon spacers covering the OEM plastic mounting sleeves.

Gently lay the rubber seal/debris cover on top (be sure not to shift the nylon spacers around).

Add the cover plate with padding/feet facing downwards.

Add the final rubber seal.

Apply anti-seize lubricant to each of the two M8 x 50mm mounting screws (with lock washers and a neoprene water-tight washer added beforehand).

Seat the mounting bracket.

Hand thread the M8 x 50mm mounting screws.

Loosely tighten with the provided Allen wrench. You’ll eventually go back and tighten these down completely once the rack is mounted and aligned.
Repeat this step on all four sides.
Step 6. Set Rack Into Place
With the help of a friend, lift and set the rack into place. Eyeball and, if necessary, measure to ensure the rack is lined up evenly on the rack mounting brackets.

Once you’re satisfied with the position, lift each corner and slide in one of the black rubber pads.
Step 7. Loosely Mount Rack With Hardware
With the rack sitting in its final resting place, add two (2) 3/8-16 bolts with a 3/8″ flat washer on the top and bottom portion of the bolt. Underneath, hand-thread the 3/8″ nylon lock nut with the second washer in place.
Do not tighten just yet, but repeat this step on all four brackets.
Step 8. Mount Front Support Brackets

Since GOBI’s 5th Gen 4Runner racks do not require any drilling, the included front support brackets sit in place on the roof channel but bolt into the front of the rack.

First, grab the front bracket labeled “DRIVER SIDE”, and add two (2) 3/8-16 bolts with a 3/8″ flat washer on the top and bottom portion of the bolt. Underneath, hand-thread the 3/8″ nylon lock nut with the second washer in place. These can be tightened down completely.

To achieve the proper recommended height (3¼”), a second set of hands comes in handy. The photo above is taken from a downward angle, but rest assured, the front of our rack is positioned at 3¼”.

Again, a second set of hands is helpful with this step, but I was able to wedge my right hand into place and keep the height at 3¼” from the 4Runner roof line. With the rack now sitting at 3¼”, use your ½” box end wrench to tighten down the front support.
Repeat this step on the passenger side with the bracket labeled “PASSENGER SIDE”.
Step 9. Tighten Down Remaining Brackets

Next, go back with your 9/16″ box end wrench and 12mm socket wrench to tighten down all remaining hardware.
NOTE: Underneath the second tubed row of your roof rack, you may have to switch up the tools you use to tighten down the hardware. This is where any deep socket will not work. I went with a smaller socket wrench underneath the rack and an open box end wrench on the top.
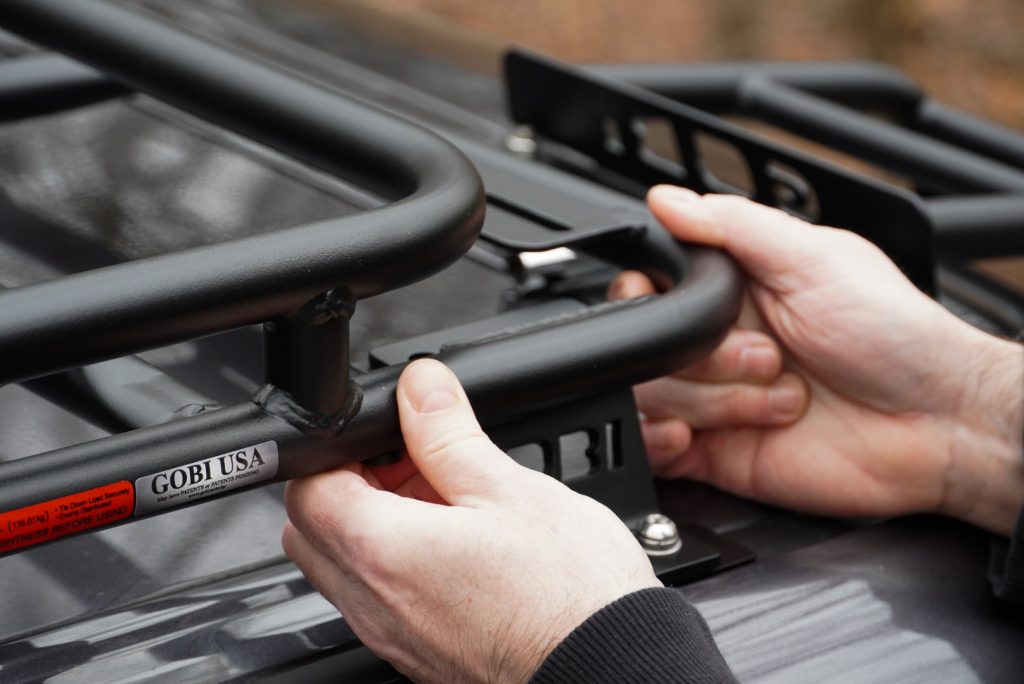
Step 10. Assemble Wind Fairing & Clean Surface

Your wind fairing should have been pre-assembled with the rubber edge guard and the iconic GOBI sticker. The rest is on you!
First, you’ll need to install the three (3) wind fairing support brackets. Using the provided button head screws, nylon black washers (one on each side), nylon lock nuts, and a 5/32″ Allen wrench, loosely tighten the wind fairing support brackets into place.

Each wind fairing bracket should sit ~3/4″ from the top of the bracket to the first “bend” in the bracket, as pictured above.

Once your bracket is sitting in the correct position, tighten down the hardware.

Since the wind fairing will sit on your roof line and protective tape needs to be applied, clean the surface with an alcohol wipe.
Step 11. Attach Center Support Bracket

Before the wind fairing can be officially installed, we need to determine where its final resting place will be so that we can apply the protective paint tape. The included clear tape will protect the paint finish on your roof, where the fairing may shift or vibrate depending on driving speeds or wind/weather conditions. Albeit an annoying step in the overall process, it is one you do not want to skip out on.
Position your wind fairing as close to the center of the roof line, rack, and general center of the 4Runner. Using the provided button head screw, nylon black washer (one on each side), nylon lock nut, and 5/32″ Allen wrench, loosely tighten the first wind fairing support bracket into place.
Be sure to slide the support bracket as far forward as possible.
Step 12. Attach Driver & Passenger Side Brackets

Repeating the same steps performed with mounting the center bracket, you’ll want to do the same here. Using the provided button head screws, nylon black washers (one on each side), nylon lock nuts, and a 5/32″ Allen wrench, loosely tighten each side of the wind fairing support brackets into place.

However, you don’t want to pull the bracket forward. In fact, the fairing sides should sit on each side of the wind fairing closer to the rack. GOBI recommends leaving a ⅛” – ¼” gap between the top of the fairing and the roof rack.
Step 13. Apply Marker Tape

Since we need to apply the clear paint protective tape underneath the wind fairing edge guard, we need to lay down a piece of marker tape to identify the fairing’s final mounting position.
Apply a piece of easily removable ~½” below the wind fairing and carry that line across the entirety of the roof line.
Step 14. Remove Fairing & Apply Tape

Again, an annoying but necessary step is to essentially undo a few steps you just completed, only to do them all over again. Remove the wind fairing from the roof rack by undoing the hardware at the mounting points.

Next, apply the clear tape right against the marked tape line. As you can see, Mother Nature appeared, and we had to expedite this last step.

To ensure you have no air pockets in your tape, go back with a squeegee and/or peel the tape back as many times as needed with each inch that you press down.
Remove your marker tape.
Step 15. Reinstall Wind Fairing

Last but not least, reinstall your wind fairing, repeating the same steps covered above. The center support bracket should be in the forwardmost position, while each fairing side should be pressed and mounted further back, leaving a ⅛” – ¼” gap between the top of the fairing and the roof rack.
That’s it; ladder, rack, and fairing installed!
Final Thoughts

Hot damn… that was a lot of steps, photography, and detail. Needless to say, it’s absolutely worth it. From start to finish, you’re looking at ~2-3 hours to install the rear ladder, the roof rack, and the wind fairing.

If you’re a weekend warrior, an adventure photographer, or a stargazer, the traversable platform is ideal for mounting tools, accessories, and rooftop tents. It’s also perfect for setting up shop with a lawn chair and a tripod for some elevated image capturing.
Depending on the type of rooftop tent you have, some have decided to leverage the rear ladder as their primary point of entry in and out of the tent. So, it’s both functional and pretty rad looking!
So many elements of the GOBI USA Stealth rack make it worth the time and money investment. The rack itself is solid all the way around, and as GOBI says, the look is unmistakable. So, why haven’t you ordered yours yet?
If you can swing it, I HIGHLY recommend getting your roof wrapped in PPF before mounting the rack. It protects your paint from sunlight, damage from installing the rack and/or equipment onto your rack, and it makes cleaning under the rack significantly easier. Also, a good way to protect your rack from fading is to apply several coats of Ever Brite (use the satin version for less shine), it makes cleaning the rack easier and you can reapply Ever Brite easily on top of old coats. Worth every penny!
Excellent tips and advice! A buddy told me people use Swiffer dusters with an extension to clean in between. I remember on my last rack having ice and snow stuck in between the roof and the rack, so I imagine the PPF would only add extra protection when the ice starts to loosen up and bounce around up there.
Hi Ryan,
Great right up and I really appreciate the details that went into this article.
Using the buddy system, it took about 4 hours from setup to complete & about an hour just to remove all of the packaging tape, wraps & pre staging the hardware.
Now that it is up, It is never coming off.
I always have to readjust the ladder from the bottom because every 6 to 8 months of climbing up and down it, I notice that it slides to the right & the thin shim gets bent out of whack. (Any tipps??)
I love my GOBI rack, I just wished that they were MORE mainstream where I could buy a Pelican case mount whereas the BX140R Cargo Case or BX90R Cargo Case mount would secure to it more easily.
having to secure a bolt from underneath & center is a rear challange for me.
I wished that there was a better solution for securing bolts underneath that are in the center of the rack. This is a challenge for me because I too have the stealth version of the multi light step up rack.
It would be nice to read an article on how to secure bolts from underneath center of the GOBI stealth rack. This is one of the only challenges that I have that I struggle with.
I love my GOBI Rack, it is the best.
@in_a_4runner
Once again Ryan, Great article and I am looking forward to your next release.
Glad you’re as much of a fan as I am. Buddy system makes this install much easier. Every 10 minutes or so, I yelled into the house asking for the Mrs. to give me a hand. LOL.
As for the ladder, that’s interesting. I had the GOBI system on my 2011 Trail Edition and my ladder was pretty firmly mounted. Never slid or anything. Wonder if it’s worth swapping out the included 3M double-sided tape for some hardcore Gorilla stuff?
With regards to mounting, I agree, it’s a bit of a challenge but that’s what comes with having a mesh traversable platform. The only solution I see is maybe GOBI developing taller legs for the rack (so your hands fit easier underneath) but it would raise the height of the rack and defeat that sleek style.
Pros and cons. I mounted a WaterPORT Weekender to my former Stealth rack and ran into that challenge, but it was more a matter of just being patient with fastening the hardware underneath.
https://trail4runner.com/2021/03/29/the-waterport-weekender-review/
Thanks Ryan for sharing that link. We are always switching out gear on top of Roof Rack. I am very disappointed with my Pelican Cargo Case Brands that I am switching them out for s pair of Roam 95L with their mounting brackets. The Pelicans kept leaking at Big Bear & when it rains, there was always water inside the case. This was no bueno for my tools & canvas bags. I am hoping that the Roam cases with their weather seals will work for me. That Water Port would be nice if I could mount something like that were the spare tires hangs, because my 315’s are to big for that spot & it is not being used right.
Thanks for you Tips!
Are you on Instagram?
Adios Dude
Yessir! @gibburnz
I love my GOBI stealth rack. I turned my single lightbar version into a no rise version by smashing it into a low hanging rock and bending it back like soft butter. Still performs great.
Ha! That’s one way of going about it.