
Corrosion is inevitable; there is almost no avoiding it in the natural world. Everything is trying to slowly break down and return to its natural state, even if it takes 1,000 years. Unless, there is an outside force (you); who uses techniques, tools, and products to prevent corrosion from taking over your hard-earned rig.
This was something I wanted to do from the very beginning of owning my 4Runner. All of the locations I work near are by the ocean, so I wanted to ensure that I stayed on top of corrosion prevention. From living by the Gulf of Mexico in Florida to the island of Oahu in Hawaii, I have maintained the undercarriage by keeping it clean, protected, and preventing visible rust from taking hold.
The primary purpose of this article is to guide you through the light to medium correction of troubled areas and prevent corrosion. I started working on a brand-new 4Runner from scratch, so it has been easier for me to keep up with preventative maintenance.
The earlier you start, the more effective and beneficial it will be for your rig. Getting a layer of protection everywhere you can reach will help prevent rust from forming on the undercarriage and help keep it clean.
Some basic steps to follow and keep in the back of your mind as you go should be:
- Clean the surface
- Eliminate corrosion
- Coat & protect the surfaces
Table Of Contents
Tools & Supplies

I will list everything required to do this job from start to finish in general. However, I won’t be using all of it thanks to my ongoing preventative maintenance.
The focus here will be on the rear section of the undercarriage. It will take some time if you are doing the entire vehicle. If you can already see several areas that will need some work, do yourself a favor and break the job up. Although it is possible to do the entire undercarriage in one day, the time required depends on the extent of the corrosion that needs to be cleaned up.
The corrosion cleaning will be the most time-consuming, and cleaning the entire undercarriage will be a dirty process that can take some time.
Tools
- Small application brushes
- 3M scuff pad
- Sandpaper
- Scuff and Sand Paper Discs (sander discs optional)
- Scuff and Stripping Disc (grinder discs optional)
- Power drill
- Dremel & attachments
- Wire brush
- Wire wheel/cup drill attachments
- Various cleaning brushes
Helpful Tools (Optional)
- Pressure washer
- Creeper
Supplies
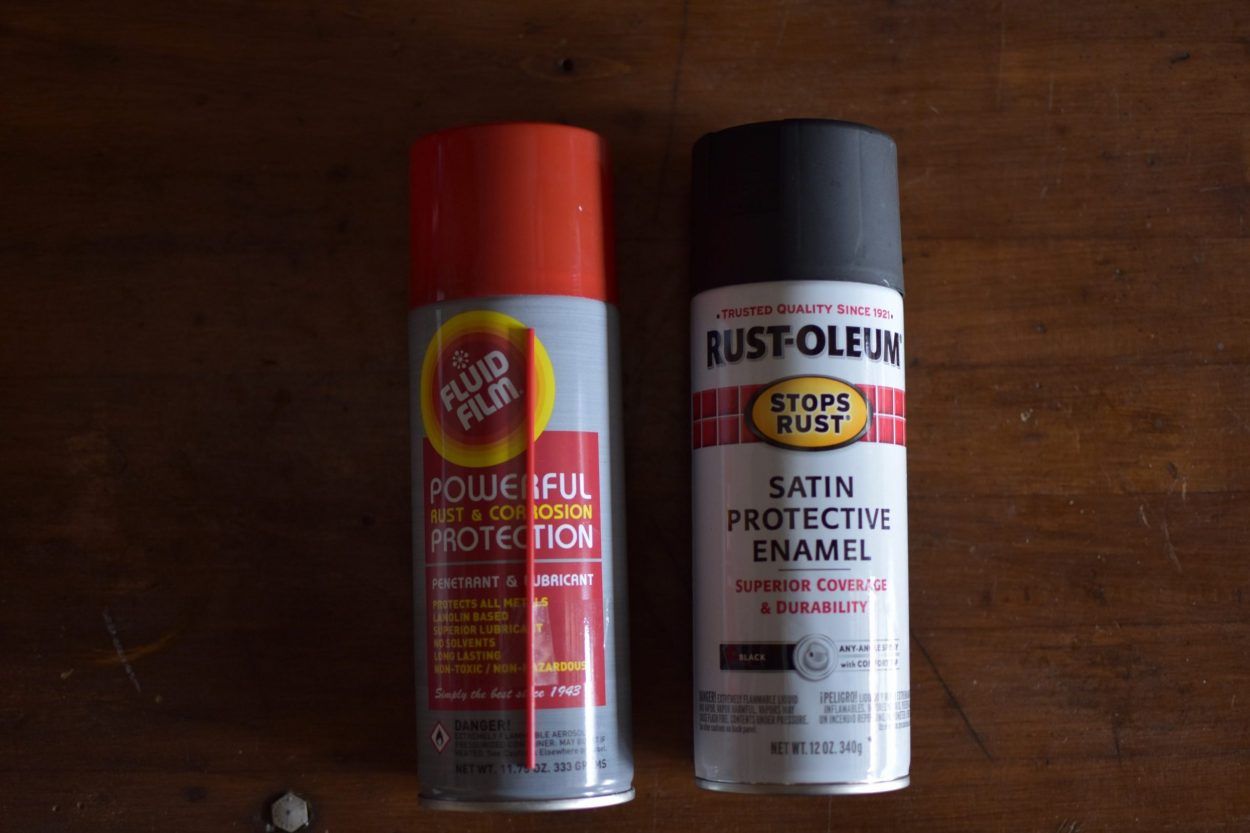
- Fluid Film
- Rustoleum Rust Dissolver or similar
- Simple Green Industrial or similar
- Satin Black Rustoleum Paint or similar paint with corrosion inhibitors
- Gloves
- Eye protection
How Corrosion Forms (Simple Explanation)
Corrosion is an electrochemical or chemical process that causes metal to react with its surroundings. In the case of our rigs, we mainly deal with Oxidation. Oxidation occurs when a metal is exposed to oxygen and moisture. Through this chemical reaction, you will see some of the metal corrode or oxidize in the form of rust.
All metals have distinct properties that determine how quickly or slowly they break down on an atomic level. With the frame of the 4Runner being iron-based, it is highly susceptible to corrosion if the bare metal is exposed to oxygen (air) and moisture.
How Salt Accelerates Corrosion
Salt doesn’t cause corrosion by itself; it just accelerates the chemical reaction.
Without getting into too much science, electrons can flow more easily through saltwater. Saltwater is an electrolyte solution containing more dissolved ions than freshwater. This would allow the reaction between the metal and oxygen to occur at a faster rate.
Tools To Eliminate Corrosion

The following methods are easy to do and don’t cost much money, just your time. There are many other methods available, but these are the ones I found helpful due to their cost and accessibility.
Personally, I prefer to start with the most non-destructive method first, then work my way up to more harsh methods. That way, you do as minor damage to the focus area and expose more metal than you need to. Your frame is already protected by the layer of paint on its surface. The more paint you remove, the more exposed metal area you have to protect.
The process I usually take to achieve my end goal is listed in the following order:
- Rust dissolver
- Scotch pad/sandpaper
- Dremel tool
- Wire brush or wire wheel drill attachment
1. Rust Dissolver

I usually start with a dissolver, especially if the area is smaller. This helps minimize the damage. Using a rust dissolver is easy; simply put on some gloves and apply it with a brush.
This process is just a chemical reaction between the oxidized metal and the dissolver solution. It takes a bit more time, and re-applying the dissolver over the focus area might be required.
Pros
- Good for small to medium areas
- Easy to apply
- Relatively cheap
- Great for smaller components that can be placed in a cup (hardware, brackets, etc.)
Cons
- Takes more time
- Working with chemicals
- Will only remove light to medium corrosion
2. 3M Scuff Pad/Sandpaper

I use this method for quick jobs or touch-ups before applying paint. Using sandpaper in various grits by hand can help remove rust faster than using a dissolver, and is less destructive than a wire wheel or brush. If you are careful enough, it’s also possible to use an orbital sander for even quicker work.
Pros
- Easy to do
- Cheap to get
- Effective for small to medium areas
- Good for quick jobs
Cons
- Can be tiring
- Can take more time(if done by hand)
3. Dremel Tool

This thing has been one of the most helpful tools in my arsenal. With its compact design and various attachments, I can access smaller areas to clean up corrosion more quickly and effectively. If you are willing to invest some money, they offer a wide variety of Dremel tools.
Pros
- Very quick at eliminating corrosion
- Great for small to medium areas
- Can get into tighter locations
Cons
- Tools can be pricey
- Corded, depending on the model you get
- Buying extra attachments or parts can be pricey
4. Wire Brush or Wire Wheel Drill Attachment

I use this as a last resort in most circumstances due to its potential for aggression. Although it is very effective at removing corrosion, it can remove more than you want. Start with a wire brush, and if you need more power, grab a drill and a wire wheel attachment.
Pros
- Cheap to purchase
- Effective for small to large areas
- Less time to cover more area
Cons
- Can take more paint or scuff more metal than desired
- Can’t fit into tight places with a wire wheel and drill
Corrosion Prevention
This section of the article aims to protect what you already have that is not corroded. It’s also for the areas that you have already cleaned up or eliminated corrosion from. Below are some easy and common methods to prevent corrosion. Having a routine cleaning schedule is a great way to stay on top of the process.
Paint
Paint is the primary and first layer of protection for the metals on your 4Runner. Some surfaces underneath do not have paint; instead, they are made of different alloys of metals that are more corrosion-resistant. In areas of your frame that have taken damage and have not yet started to corrode, or in the regions that have been cleaned up, painting should be the next step to help cover the unpainted surface.
Most paints already contain some corrosion inhibitor. This provides an additional layer of protection when applying paint to bare metal areas. Paint will be your first line of defense.
CPCs (Corrosion Preventive Compounds)
If you don’t need to paint anything and you are just trying to protect what you already have, this is the next step. CPCs will save you in the long run and help you maintain your undercarriage. Most CPCs come in an aerosol can, which makes it easy to apply.
I use Fluid Film because it can be found at almost any auto parts store or home improvement store. It is also affordable and comes in an aerosol can. The product has proven to work very effectively. I have been using it since I purchased my 4Runner. There are many other CPC options, but in four years of ownership, I haven’t found a reason to switch yet.
Step 1. Thoroughly Clean Undercarriage
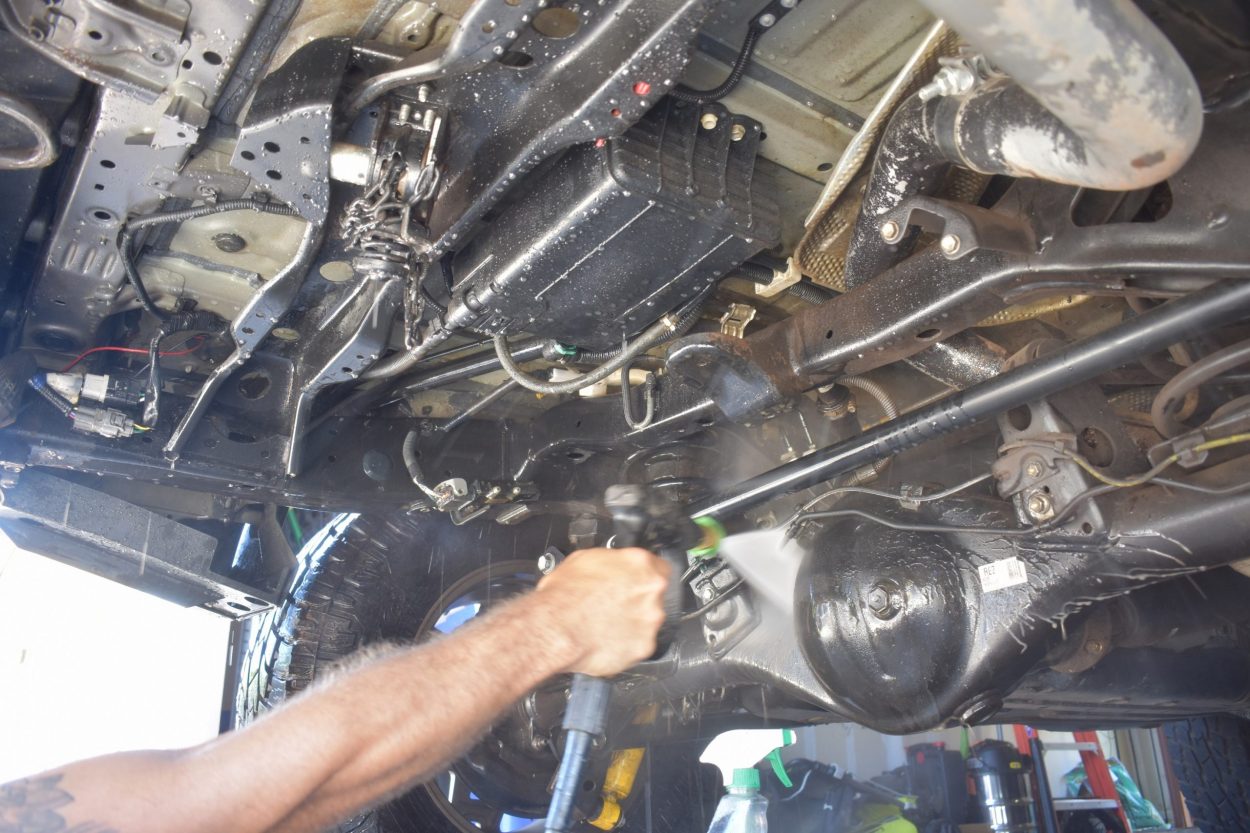
Cleaning the undercarriage is crucial, especially if you plan to paint. Not only that, but you can also identify areas that need correction.
Clumps of dirt or leftover mud can trap moisture, which is one of the factors that contribute to corrosion. Clean out the inside of your frame as much as possible by running water through it and allowing it to drain. It’s a good idea to remove any skids or armor underneath and clean behind. You want to reach everywhere you can.
Step 2. Inspect

After you have cleaned all the surfaces you can reach, inspect the remaining surfaces to identify where your undercarriage needs attention. Take note of all the work that will need to be accomplished. During the inspection, I found a couple of areas that were not too bad and relatively simple to address.
Step 3. Eliminate Corrosion

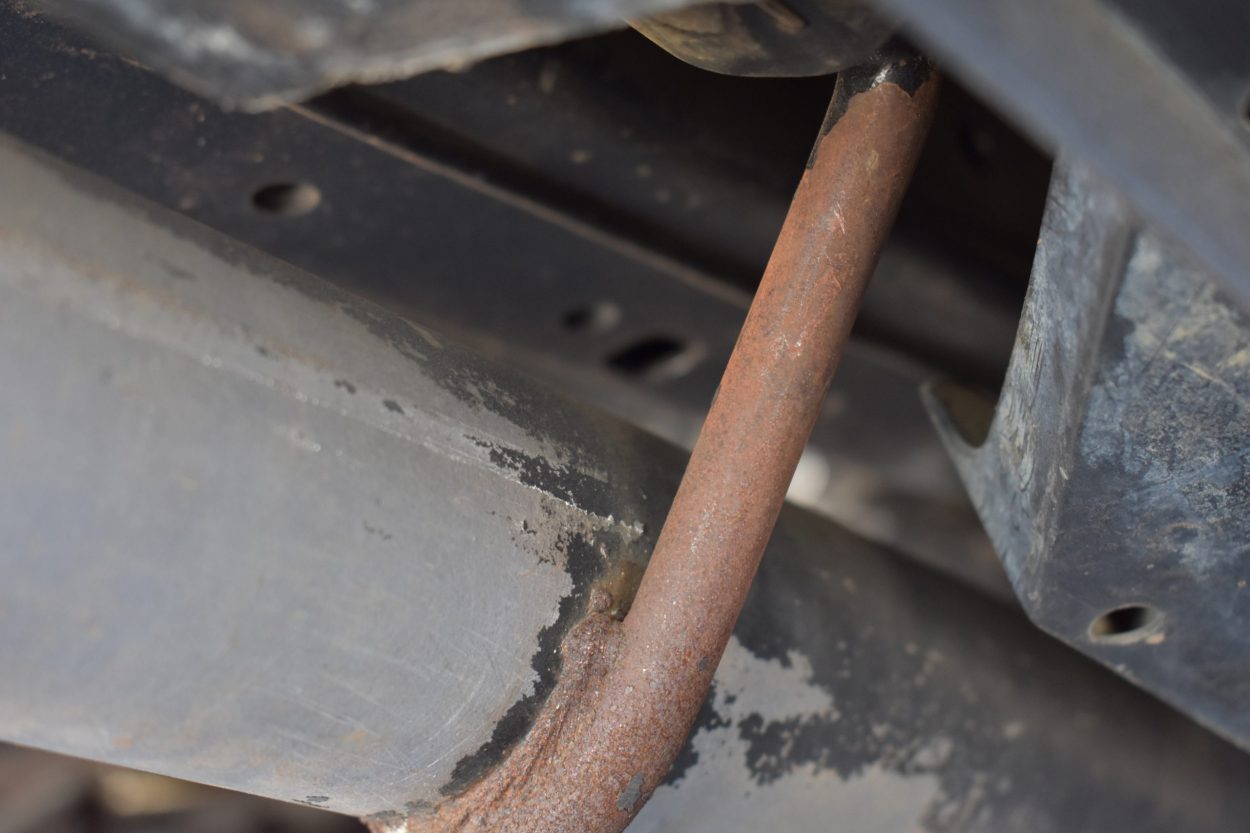
This is where you will work from the least destructive methods up to the most. In my case, I found four to five areas that were similar to the one above, with paint flaking away from the frame. All the locations where corrosion was found were on welds or in crevices. I made sure the flaky paint was gone and no other corrosion was hiding underneath.
Since they were all about this size or smaller, I opted to work with the rust dissolver. Once the dissolver has done its job, I lightly scuffed the area with a 3M pad to prepare it for paint.
If the rust were not able to come off with this method, I would move up to the sandpaper, then the Dremel, and so on. Luckily, these were all simple areas that needed correction.n
Step 4. Protect The Bare Metal Surface

Now it’s time to protect the metal you’ve prepared and prevent corrosion. I will be using satin black Rustoleum paint to coat the bare metal areas.
The method I use to paint small areas like these is to use a spare piece of cardboard as a palette. Spray a bit of paint on the cardboard, then use a brush to dab up the paint. By doing this, you don’t have to worry about taping off such small areas.
Step 5. Protect The Painted Surface

Once all cleaning and painting are complete, it’s time to apply a layer of Fluid Film to protect the finished product. After you have completed all of this, it’s up to you how often you want to inspect and maintain the undercarriage.
Final Thoughts

My undercarriage maintenance schedule involves a full cleaning every six months or after heavy off-roading. This process encompasses a start-to-finish approach, including cleaning, removing rust, painting, and protecting the surface.
The only other time is when I detail/wash the 4Runner. After washing, I will spray CPC and wipe down all wheel wells and components, then spray the main frame both inside and out, running forward and aft as best I can.
This routine also makes it way easier to clean after going off-roading. Once you have set the standard for your rig, you will be able to come back later and spot-check areas that need help on a smaller level rather than go through the whole process every time.
Corrosion will eventually reach a point where it may become unmanageable to handle at home if you don’t stay on top of it.
Overall, it can be challenging and time-consuming. However, this is particularly important if you plan to sell or want to maintain the appearance of your 4Runner. It’s on you to stay on top of the process. Throw on your favorite jams and get to work. You worked hard for your rig and your rig is working hard too, so do her a favor!
Good article but it looks incomplete. It’d be great to see how to correctly spray CPC, and especially how to maintain the inside of the frame. Thank you.
Most CPCs are gonna come with a small spray nozzle, which allows you to put it into crevices or inside the frame. Coating all the surfaces you can reach by either just spraying onto the surface or wiping down (like the photo above). Spraying and letting Fluid Film rest on its own usually lasts longer than wiping it down. As far as maintaining the interior of the frame, I don’t yet have the equipment or tools to spray aerosolized CPCs in a 360 degree manner, which would be far more effective. For the purpose of the article and the ease of everyone being able to do this at home, an aerosol can style CPC is probably the easiest. When using an aerosol can with a short nozzle like the one that comes with Fluid Film, I try and get in majority of the openings of the frame.
wow – really thorough. Living at the beach – I use a product called Salt Away. I usually add the recomended amount to my foam cannon and spray the undercarriage and let it soak. would love to know what people think of this technique.
If you see long term / short term positive effects, then you are doing something right. Also, doing something to help is better than doing nothing at all. Never heard of Salt Away, but it sounds as if it cleans and neutralizes the undercarriage. Probably wouldn’t hurt to through some CPC’s underneath as well.
Web Site Request: Can we get a print friendly button to print the article without the other web page content, like you print a recipe wanting just the ingredients and instructions?
Thanks a bunch!!!
Select what you want, Cut and Paste to Word or Editing program of your choice. You can even pate pictures to it. Super easy Computing101.
This article will be bookmarked, good stuff Lane.
Very logical and great set of references, I will refer to this for my maintenance tasks.
Love the content from this website indeed
Thank you! I tried to keep things in this post simple, straight forward and informative. It can be a hefty thing to keep up with. I hope this article helps you out!