
When I first got a 4Runner, I had an unrestrained imagination about the modifications I wanted to make. Among that growing list, a roof rack was at the top. Whether it be the improved functionality or the aesthetics, it was a must-have and something that I was prepared to spend a pretty penny on.
My considerations (in no particular order) when looking for a roof rack were:
- Reputation & Customer Service
- Price
- Quality/Material
- Design
- Drilling or No Drilling Options
- Roof Rack & Vehicle Accessories
There are a decent number of brands out there, and while it’s exciting to explore the seemingly meteoric rise of 4Runner options, it can be overstimulating at times. Many of them checked most (if not all) of the boxes on my list. While big names like Gobi and Prinsu are considered to be go-to choices, I happened to come across the Gamiviti roof rack.
Table Of Contents
Who Is Gamiviti?

I spoke with a gentleman named Tim, who stated that he and a few friends started this company about a decade ago due to a shared enthusiasm for Land Cruisers and the overlanding lifestyle.
Vehicle Specific Offerings:
- Land Cruiser Series – 40, 55, 60, 70, 80, 100, & 200
- Lexus – GX 460 & 470
- 4Runner – 4th & 5th Gen
- Tacoma – 2nd & 3rd Gen
Gamiviti will experiment with other vehicles, making one-offs as well.
In my conversation with Tim, we reviewed options/customizations and addressed any other questions I had. He sent over a drawing of a basic model to start with and included a nice list of options for complete customizability.
Tim was on top of it, offering advice and constant communication throughout the building process. He even provided pictures during a few stages. Overall, the lead time was approximately 6-8 weeks.
Price
A pretty penny was spent indeed, but the cost will vary based on the individual’s desired customizations. In addition to the roof rack cost, shipping and handling fees should also be considered if you can’t pick it up locally. I wasn’t able to pick it up directly in Denver, CO, where they are based, and it was shipped by air to the East Coast.
If you can pick it up locally, Tim offers free installation assistance, saving you some money.
Overall, it’s comparable to a Gobi roof rack, which implies that it is more expensive than some other options. However, the quality is top-notch and should hold up well over time. You also get personal attention with your order, which can’t be said with larger companies.
As stated on their website, “We make products we use ourselves, and we don’t sell anything we don’t like.” This philosophy directly correlates to how they conduct business.
Construction
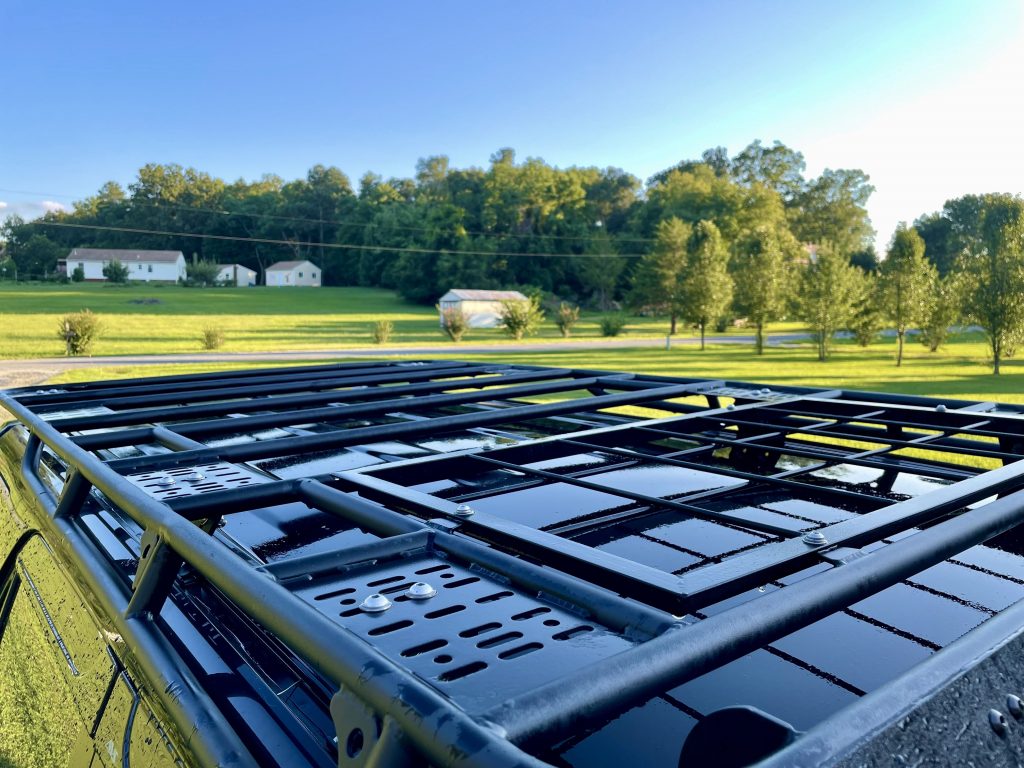
The roof rack is made of 1″ OD x .065″ wall steel tubing and features four slotted mounting plates on each side, allowing for varying tower installation positions and additional mounting locations for accessories. The joints are solid and keep a low profile, without compromising strength.

The towers are made of two angled steel plates assembled with M8 bolts. They install into the channels where the factory rails were. The larger bolts are tightened within vertical slots, while the smaller bolt, located between them, is installed into one of four holes, providing height adjustments.
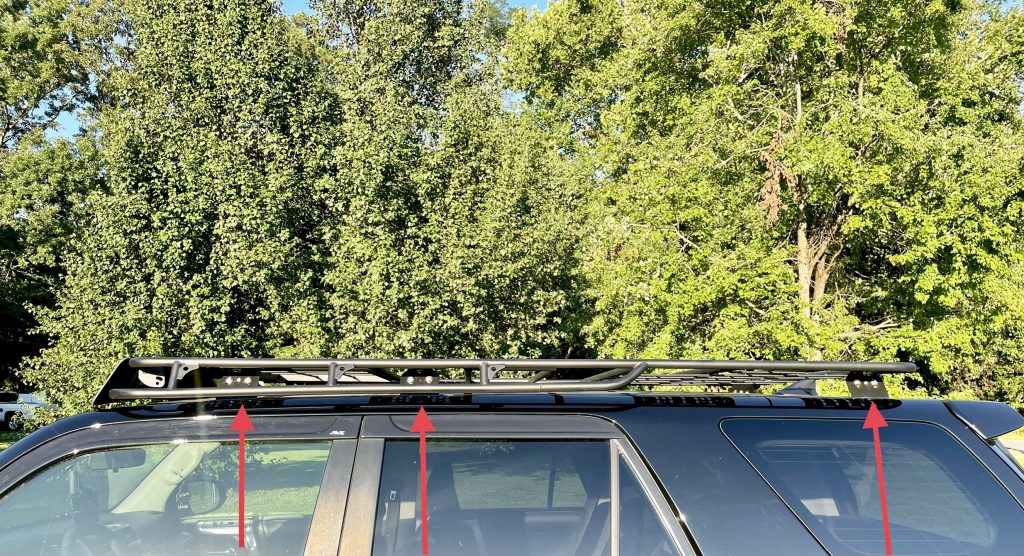
To maintain the integrity of the rack and maximize its weight capacity, it is recommended to have at least three towers.
If you plan to use it only for luggage or tools, two towers can be used. For a rooftop tent application, three towers or more should be used. I will eventually add an RTT and consider adding the 4th tower for peace of mind.
Design

The two main design points to consider are the Expo bar (tapered or parallel) length and grid options.
The Expo bar is the secondary bar that wraps around and follows the main frame bar. You can also customize it to be above or below and tapered or parallel to the main bar. The Expo bar isn’t required, however, and only a flat single main-frame bar can be chosen.
The Expo bar also comes in different lengths, categorized as Expo, Expo+, or Expo++. These lengths stop at the front door, rear door, or rear tire, respectively. There is also an Expo+++ option, which features the second bar wrap completely around for a more basket-like appearance when oriented upright.
As pictured above, I opted for the tapered option, which gradually gets smaller towards the rear, and I think it provides a nice aesthetic flow. I have the Expo+ bar facing down, which has the length of the second bar stop at the rear door.

The grid option is entirely customizable. You can choose from several options, and even select more than one.
- No grid – Made up of only the main frame horizontal bars, allowing for a broad range of accessories to be hooked and loaded to an area of choice without the grid potentially getting in the way.
- Half grid – Positioned either towards the rear or front, it allows for more area for smaller items to be strapped down.
- Full grid – An option that certainly looks cool, and you don’t have to worry about anchor points.
- Drop basket – An area that sits below the grid or main bars, as the name suggests. It has even more grids for smaller items and a wall for support.
The grids and drop basket will add weight to your roof rack. The half grid adds approximately 20 pounds, while the basket and full grid each add approximately 40 pounds. That’s an additional 80lbs if you opt for a full grid and basket.

I chose a half grid positioned in the rear and a grid filler in the sunroof slot. This offers both areas for clamped accessories and tie-down spots. I wanted a drop basket, but was advised that if an RTT or cargo box were ever to be added, access to it would be blocked.
If you’re unsure of future roof accessories, a welded grid filler can be placed in the front.
Other Design Features:
- Light tabs – Typically placed at the front and rear for a light bar and/or reverse lights. More can be added upon request and positioned on the side as well.
- Gussets – Up to four per side (depending on Expo bar length) for extra anchor points.
- Lighting – The front opening is stated to fit just about any light bar available. Gamiviti stocks 40″ light bars that can be added and installed. You can also provide your own light bar for fitting and installation. Both the tapered and parallel style Expo bar options offer light shielding, preventing light from entering the cabin.
- Fairing – Offered as a snap-on or bolt-on option, depending on preference. You can also opt for no fairing if you run a light bar full-time. Both the Expo up and down can accommodate a fairing, with a super-slim option available as well.

Pictured above, you can see where my future light bar will be mounted, directly behind a snap-on fairing.
Installation

Gamiviti provides excellent installation instructions, which can be found on their website.
Drill & No Drill Options
The only con to a drill installation in my book is that I could mess up and need to drill twice. I wasn’t really concerned about that. Drilling and tapping the holes kept the bolts really snug and gave it a nice, clean look. Applying some tough sealer around the bolts gave me confidence that it will also prevent leaks once screwed into the bottom of the tower.
- Drilling Required: Full-length racks require drilling of the front towers. It is also necessary if the 4th tower on each side (which would then be the 3rd tower from the front when installed) is required.
- No Drilling Required: The Short Rack (3/4 length option) for those who want added loading capacity over the factory roof rails. It utilizes the factory holes used from the factory rails. However, if you install a 3rd tower to support the weight of an RTT, it will require drilling.
Accessories

The accessories are extensive, and many options can be included with the roof rack shipment to avoid extra shipping fees. The example above shows a hi-lift jack mounted to the side of the rack using a Rhino Combination mount.
Roof Rack options:
- Rack Receivers – Quick-release option for awnings, etc.
- Multi and G Brackets – Large and small options for many different uses.
- Traction Board brackets
- Tube Clamps
- Plastic Grill Panels – An excellent alternative to metal grids, they are lighter weight yet still strong enough to stand on. These are removable and are a great surface for a solar panel. They vary in size to cover most or the entire rack and are better for smaller items as they won’t fall through.
- Hi-Lift Mounts
Vehicle Accessories:
- Awnings
- ActionTrax
- Rotopax
- Gear Bags
- Spare Tire Receiver Hitch Systems
Final Thoughts

I’ll admit, I was blown away by the amount of information regarding roof racks. Equally so, I was blown away by the assistance and knowledge that Gamiviti provided. Once I decided on my options and received the roof rack, the process had clear steps. It was shipped to me in VA in a very solid box and was assembled with only a little assistance from an extra set of hands.
Overall, Gamiviti did phenomenal work with both my roof rack and their customer service. I will definitely buy from them again (although the rack itself will last a very long time) and recommend them to others!
Hi Kyle, just stumbled across this- thanks so much for the positive review, and so glad you are happy with your rack!
Excellent review! Very detailed and well-written – thanks!
Kyle, where are you living in VA, I’m in Fairfax, always looking for a person to get out with!