
Step-by-Step Stage 1 Big Brake Kit Installation Guide on the 5th Gen Toyota 4Runner with Pads & Rotors
Before we jump into the complete installation guide here, if you have not read about Powerbrake in more detail, you can do so here. We initially wrote a full overview of their big brake kit and why we chose to go with Powerbrake in the first place. If you are curious to know the backstory on how many braking systems we’ve run, Powerbrake in general, or the benefits of a big brake kit, then please read that blog post first.
In this post, you will find everything you need to install this kit on the 5th gen 4Runner. More specifically, we are using the Powerbrake stage one big brake kit with upgraded pads. The rotors we will be using are the stage one rotors. They are a one-piece rotor, not the two-piece rotor that you find in the stage 2 Kit.
Find Powerbrake Online:
- Powerbrake Big Brake Kit 5th Gen 4Runner:Check Price
Quick Tips
- Pads and rotors are marked left (driver) and right (passenger)
- Do not clean the black coating off the rotors
- Do not spill any brake fluid on the black coating of the rotors
- Factory hubs should be cleaned in immaculate detail before installing new rotors
- Follow torque specs carefully on calipers
- Follow up with a 100 MI brake bleed after bedding the brakes
Torque settings
- Caliper mounting bracket to upright (Factory 19mm bolts): 91 ft-lb
- Caliper to mounting bracket (M12 cap screws): 77 ft-lb
- Banjo Bolt-on Caliper (M10 x 1.0mm): 15 ft-lb
- Caliper bleed nipples: 15-18lb.ft
Package Contents
- Xline 6-piston calipers pre-fitted with high-performance brake pads
- Aircraft-grade aluminum mounting brackets
- Directional cooling vane rotor assemblies – marked left (driver) and right (passenger)
- Stainless braided hoses
- Banjo bolts
- Copper washers
- Brake fitting clips
- High-tensile caliper mounting bolts and washers
- Brake bleeder tool
- Rubber end caps
Powerbrakes Big Brake Kit – Install
Tools and Materials

The majority of this installation is plug-and-play, however, you will need to cut your brake dust shield and then clean your wheel hub very well. I would consider prepping this job with an arsenal of aerosol products focused on cleaning rust, stuck on grime, and general degreasers. We used brake cleaner, PB Blaster, and some wire brushes to clean the hubs. The rest of the tools are pretty straightforward. Basic garage tools will get the job done. The only tools that you may consider specialty and they aren’t that special are a set of torque wrenches from 15 ft-lbs up to 100 ft-lbs and some large + small wire brushes. Finally, you need a brake bleeder kit. This can be as simple as an empty water bottle and a 1/4″ ID clear hose.
Tools and Materials CheckList
- Brake Bleeder Kit or (bottle and 1/4″ ID 3/8 OD max – clear tubing)
- Brake line Flare Nut Wrench
- 1/2″ Drive Breaker Bar
- Metric Sockets
- Grinder
- Tin Snips
- Channel Lock Pliers
- Dremel
- LED Shop Light
- 3/8″ 10-100ft-lbs Torque Wrench
- Hammer
- Sledge Hammer
- Mallet
- Allen Heads – up to 10mm
- DOT 4 Brake Fluid
- Parts Degrease
- PB Blaster
- Brake Cleaner
Install Video
Step 1. Prep your installation area

In the preparation of this installation, make sure your surrounding area is protected and will remain as clean as possible. It’s important to set down a piece of cardboard and then a drip pan directly underneath the Hub. Also, you want to have shop towels on hand in case you spill any brake fluid.
Step 2. Top Brake Line Clip

Start by removing both brake line clips that hold the hard line to the bracket to the soft line. You can do this with a set of lineman’s pliers or pliers of choice.
10mm Brake Line Flare Nut Wrench

It’s really important to have a 10mm brake line wrench on hand.
Step 3. Place rubber stopper on Hardline

Once you have the hard line disconnected from the soft line, take the supplied rubber stopper and stop the brake fluid.
Step 4. Bottom Brake Line Clip

Remove the lower brake line bracket. Then finally remove the soft line from the hard line.
Step 5. Remove wheel spacers
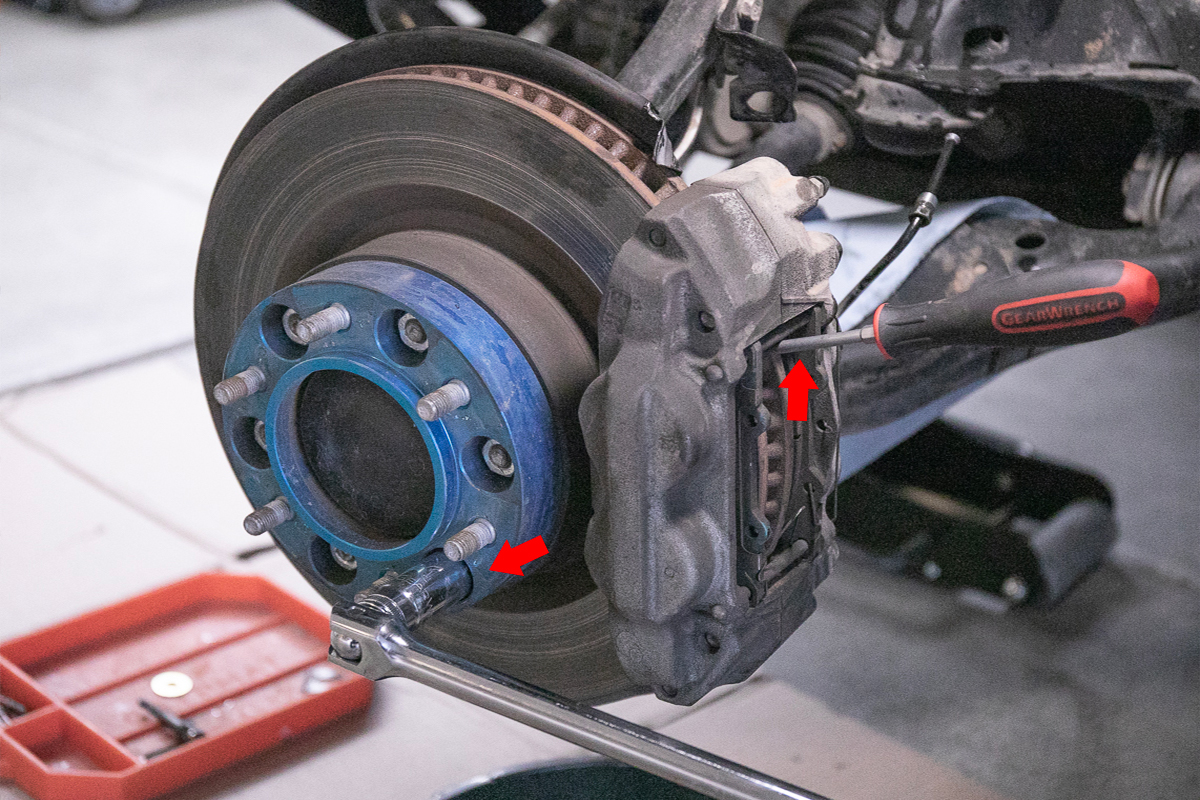
If you’re running wheel spacers, you’re going to want to slot a screwdriver in between your rotor and caliper in order to gain enough torque to remove the nuts from the studs.
Step 6. 19mm Socket & Breaker Bar

Now that your wheel spacers are free, take a 19mm socket with a breaker bar and crack the 19 mm bolts holding the calipers to the hub assembly.
Step 7. Remove brake Calipers
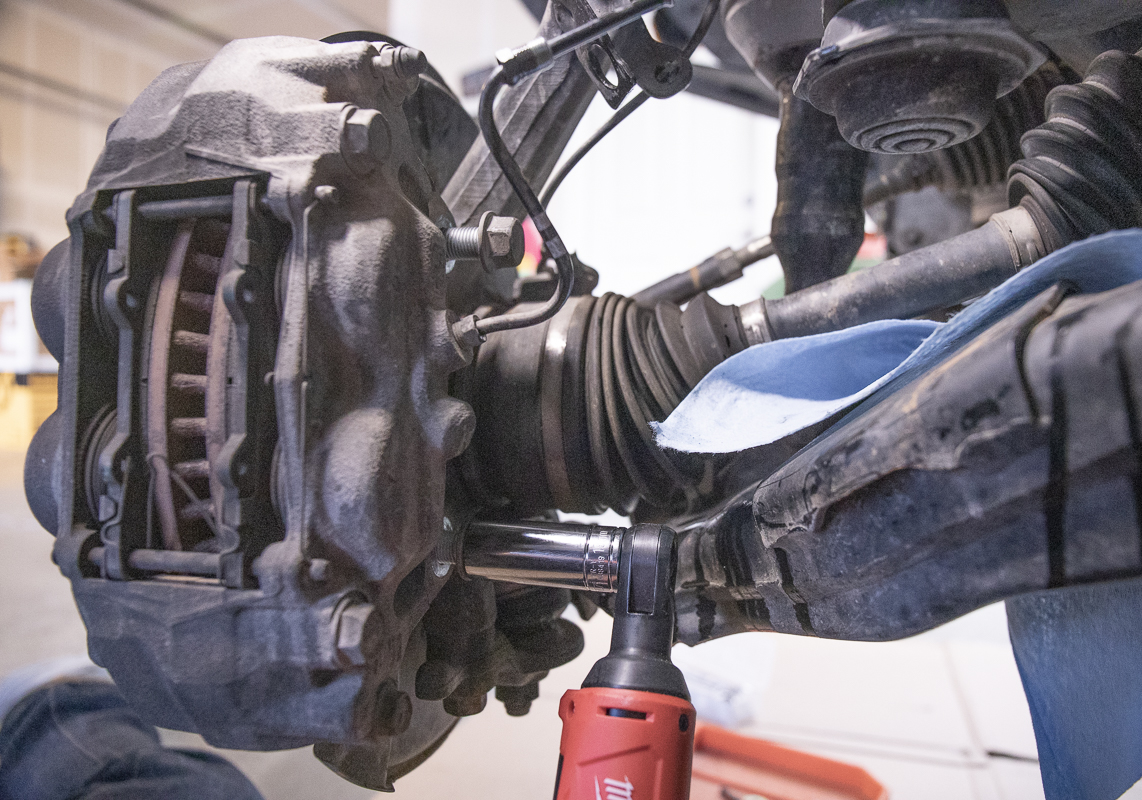
Once the 19mm bolts are loose from the caliper, remove them from the calipers and hub assembly. Now, remove the calipers.
Step 8. Remove brake rotors

In order to remove the rotors from the hub, you’re going to need a rubber mallet or possibly even a 4-lb sledgehammer in order to remove the rotors. If you plan on using your rotors again, do not use a sledgehammer, only use a rubber mallet. If you plan on tossing your rotors, and you’re having a difficult time removing the rotors with a rubber mallet, then you can take a sledgehammer to the backside of the rotors in order to free them from the hub.
Step 9. Clean brake hub assembly

Pictured is carb cleaner because I ran out of brake cleaner. Shortly after this, I went to Autozone for more brake cleaner.
This is where your time and patience will be needed. Cleaning the Hub of rust and accumulated debris is incredibly important. Take your time here and hit it with everything you have in your garage. Grab a can of PB Blaster, brake cleaner, and possibly even some parts degreaser for the hub assembly, wheel spacers, and all studs.
Step 10. Clean Wheel Spacers and Hub

In order to clean the wheel spacers, I used some brake cleaner, PB Blaster, and rust remover. I soaked the wheel spacers and the nuts in a parts degreaser bath. I then took a set of wire brushes and scrubbed the wheel spacers and nuts clean.
Step 11. Wire cleaning brushes
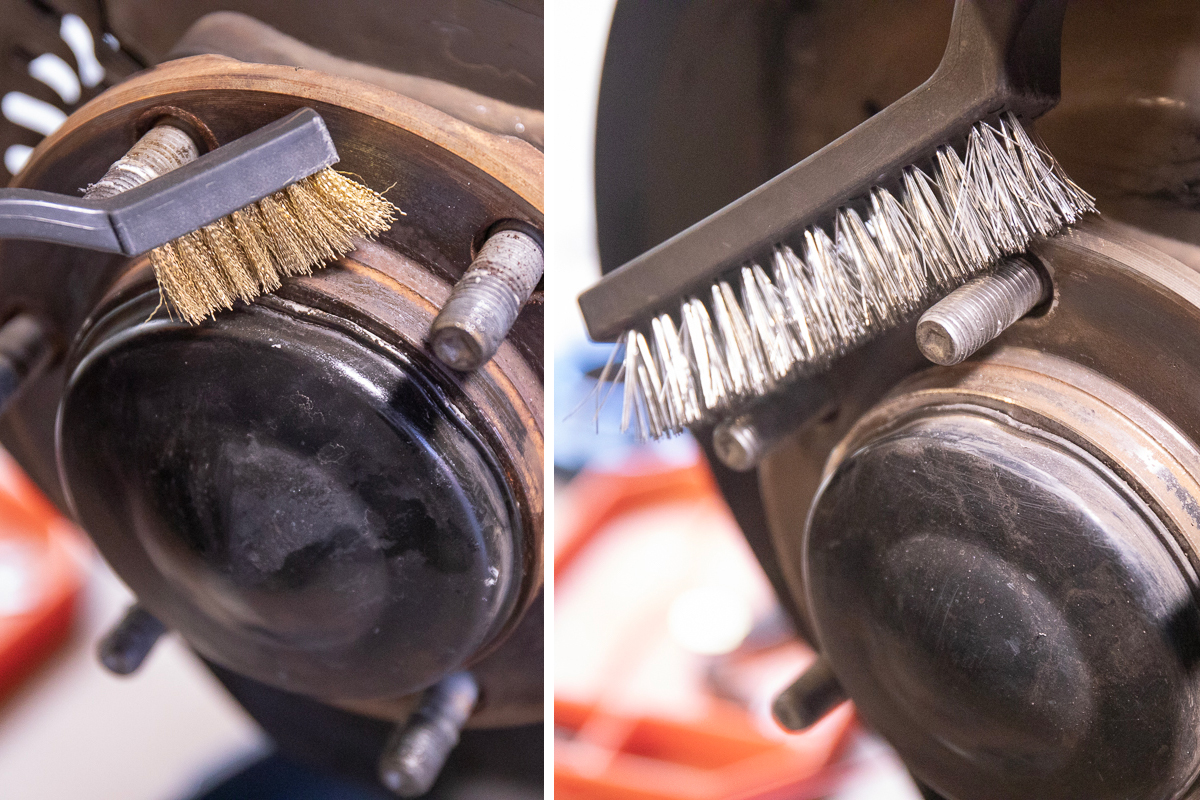
Coarse cleaning brushes
Start by hitting the hubs with the most coarse wire brush you have. You don’t want the wire brush so coarse that it will leave grooves in your hub, but you do want it coarse enough to remove old rust and grime.
Find cleaning brushes
After you finish cleaning the hub and studs with the course brush, continue with using a fine brush.
Step 12. Prepare Wire Brushes

One of the trickiest and most important spots to get is in between the hubs bolt stud. In order for my wire brushes to fully reach the grime left on the backside of the hub I had to reduce the outside diameter of my wire brushes in order to reach in between the studs on the hub.
Final: Clean Wheel Hubs

This is what your wheel hubs should look like once you’re finally done. It really helps to have a type-A personality in situations like this.
Final: Clean Wheel Spacers

After letting the wheel spacers soak in my parts degreaser bath, here is what they look like. The wheel spacers also took some effort with a fine wire brush
Step 13. Trim Brake Dust Shield

You have a couple of options here.
On one side I decided to use a set of tin snips and on the other side I decided to use the grinder out of pure impatience and I finished off all of the cuts with the same tin snips. However you want to approach this is completely up to you.
Final: Brake Dust Shield
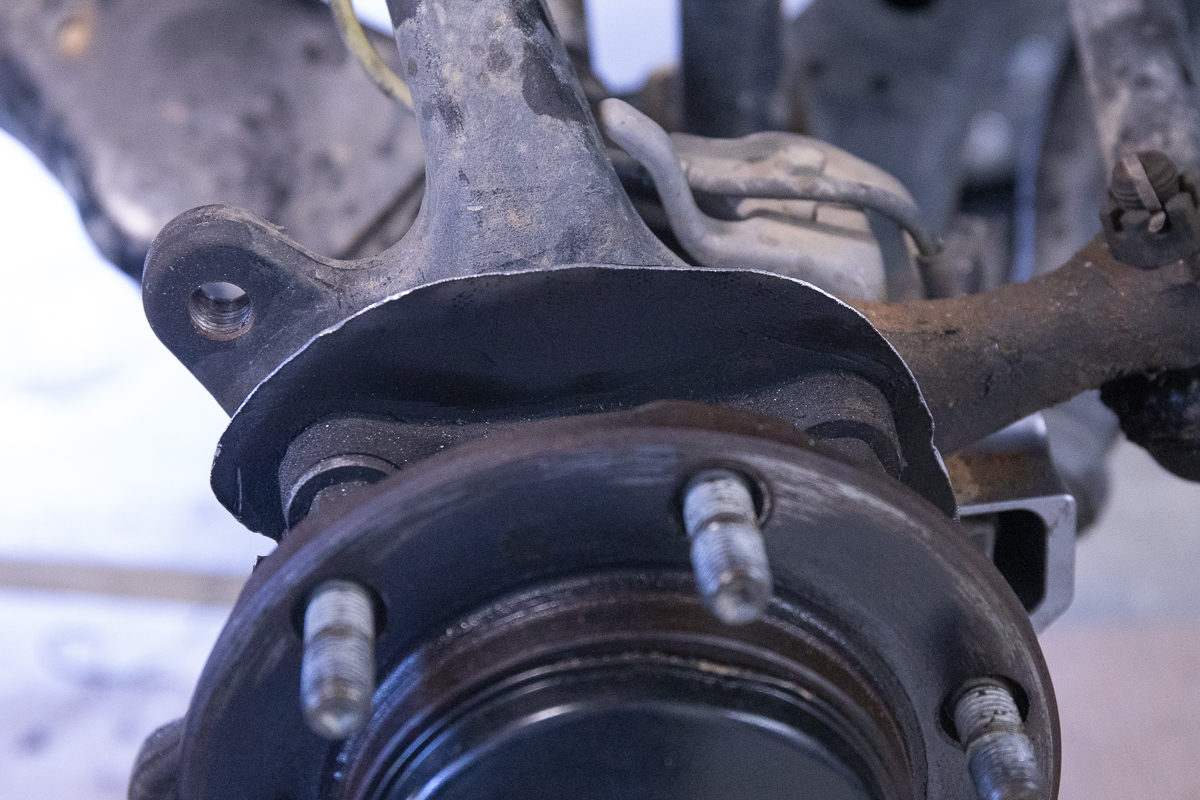
Whatever method you choose to cut off the brake dust shield, just make sure that you cut enough off in order for the new rotors to clear the brake shield and that there are no sharp points sticking out to cut yourself on. I finished off the brake dust shield with a Dremel to remove any sharp points.
Step 14. Install new rotors and wheel spacers
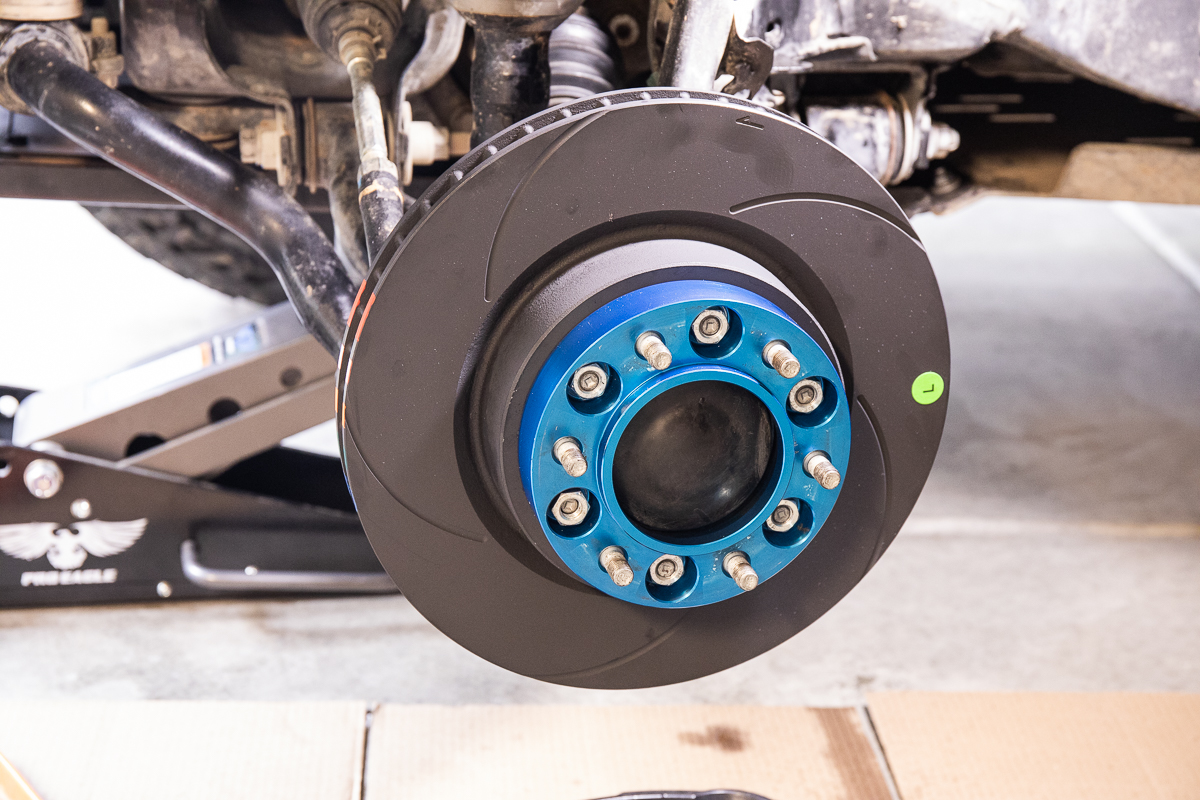
Now that you have absolutely stunning wheel hubs, you can put your rotors on with your wheel spacers. Tighten your wheel spacers in a star pattern and then give your wheel hub a spin just to check that the rotors are spinning absolutely parallel to the wheel hub itself. If you look down directly over the top of the rotors in relation to the wheel hub and you see any wobbling or any signs of a warped rotor, then you know you have a problem. Remove your rotor and reinstall it until it spins straight.
Step 15. Install bracket onto the caliper & Caliper on Rotor

Now you can install the provided bracket onto the calipers using a 10mm allen head socket drive.
Step 16. Prep Brake Lines For Caliper

Set your new brake lines out and get familiar with them.
Step 17. Mark Banjo bolt with Sharpie

This isn’t necessarily a mandatory step although I did feel it was important to make sure that the bolt threading into the banjo fitting was facing the correct direction in relation to the brake line.
Step 18. Run Brake Lines to the caliper

Slide your banjo fitting through the center brake line bracket so that your brake line is in place before it’s installed.
Step 19. Lineup banjo fitting with banjo bolt

Here is the banjo fitting and bolt with our Sharpie marking that lines up with the brake line.
Step 20. Install top and bottom brake line fittings


Once your banjo fitting has been threaded into the calipers, you can connect your top and bottom brake line brackets.
Step 21. Bleeding the Brakes

Now the fun part, let’s bleed the brake lines.
Brake Bleeding Valve Order
- Caliper farthest from the master cylinder (passenger) – outboard bleed screw
- Caliper farthest from the master cylinder (passenger) – inboard bleed screw
- Repeat
- Caliper closest from the master cylinder (driver) – outboard bleed screw
- Caliper closest from the master cylinder (driver) – inboard bleed screw
- Repeat
We’re going to use DOT 4 brake fluid for our Powerbrakes. We are currently running DOT 3 brake fluid in the master cylinder so we want to bleed the brakes and flush the DOT 3 fluid through, then refill with DOT 4 brake fluid. You can mix the two brake fluids as long as they are both synthetic. Please check your fluid beforehand if you’re not sure.
When we open the bleeder valve on the Powerbrakes, fluid and air bubbles will start coming out through the bleed line. What we’re looking for when we bleed the brakes is solid fluid and no air bubbles at all.
Brake Bleeding Process:
- Start on the Passenger side
- Open Master Cylinder cap
- Open bleeder (outboard valve) – > Pump the brakes 3-5 times gently
- Watch the line -> wait until you see solid brake fluid and/or zero air bubbles
- Close bleeder valve
- Open bleeder (inboard valve) – > Pump the brakes 3-5 times gently
- Watch the line -> wait until you see solid brake fluid and/or zero air bubbles
- Close bleeder valve
- Refill Master Cylinder with Preferred DOT4 Brake Fluid
- Clean around bleeder valves with shop towels
- Repeat this step again on the Passenger side
- Now, repeat on the Driver side
Once you bleed the outboard and inboard valves on the Passenger side twice, head over to the driver’s side and repeat that process on the driver side, twice.
Then finally, we’re going to come back in 1-week or about 100 miles and bleed the brakes once more on both bleeder valves on both the passenger and driver sides.
Brake Bleeding Special Tool from Powerbrake

Powerbrake provides you with a really nice brake line bleeder tool. All you need is a stretch of tubing that can slide thru the brake line bleeder tool and onto the brake bleeder valve on the caliper. Just follow the process above on how to bleed your brakes. And you should be just fine.
Final Look: Big Brake Kit Installed

Brake Fluid

Torque settings

Caliper mounting bolts: 77 ft-lbs

Wheel spacers: 80 ft-lbs

Banjo bolt: 15 ft-lbs

1-Week Follow Up

After 1 week, literally the following weekend, we flushed the lines again. We did actually see a few bubbles come through the lines again. Not much but there were some additional lines present. I would not ignore this very important step!
Final Thoughts

It’s been about 5 months since we installed this kit on the 4Runner and in that time, I have taken the truck out a few times while heavily loaded down. I have noticed a huge difference in the braking power that the Powerbrakes provide over the factory brakes or even other aftermarket brakes like Powerstops, for example.
The Powerbrakes are in a league of their own. They are, what feels like, at least 5 times more responsive than the factory brakes. The security and peace of mind you get when running such responsive brakes while loaded or unloaded is unlike any other modification. These brakes might just save your life with how responsive and how accurate they are. That’s not a stretch either, there are some pretty wild testimonials out there on these brakes.
I just finished building a big portion of my Tacoma project and it’s still running factory brakes. Upon jumping into the Tacoma after it being on the rack for about 5-6 months, I was blown away at the difference between factory brakes and Powerbrake. There’s no comparison. Powerbrake has performance unlike the factory brakes and any other brake kit I have run. It’s truly impressive how responsive and sensitive they are.
If you’re looking for a performance braking system that will support the weight of your rig, then there is no better option (in my personal opinion) than Powerbrake. This isn’t just another BBK brand trying to enter the market to make a few bucks, Powerbrake has been in the game for longer than most of us have been wheeling.
Let me know if you guys have any questions.
Cheers,
You don’t have to line up the hole on the banjo bolt with the line, the point of the banjo bolt is that fluid flows all around it and there is no alignment requirement
What is the install time on a job like this?
Does this set of brakes require spacers? Also, the link on check the prices are broken.
Is this brake kit compatible with factory wheels?
As long as you have 17″ it should fit.
Any idea on how they compare to the Remmen pads and rotors?
Does Powerbrake offer a rear braking system or only the front here?
No rear braking system as of yet. Not sure if they plan on releasing them either. I would reach out to them directly on that question.
I talked to them at Expo West this year and they are working on a rear system, but it will only be rotors and pads for now. They said they saw no need for an upgraded caliper.
Is wheel spacer required?
Not at all, no.
Shouldn’t be.