
Propeller Shaft Maintenance For the 5th Gen 4Runner: A Quick How-To Guide
Propeller shaft lubrication is a very simple maintenance procedure to do, but it is often avoided because cleaning the grease off between the spider joints can be a bit tedious. Keeping the propeller shafts properly lubed will ensure the longevity of a critical component in your 4Runner.
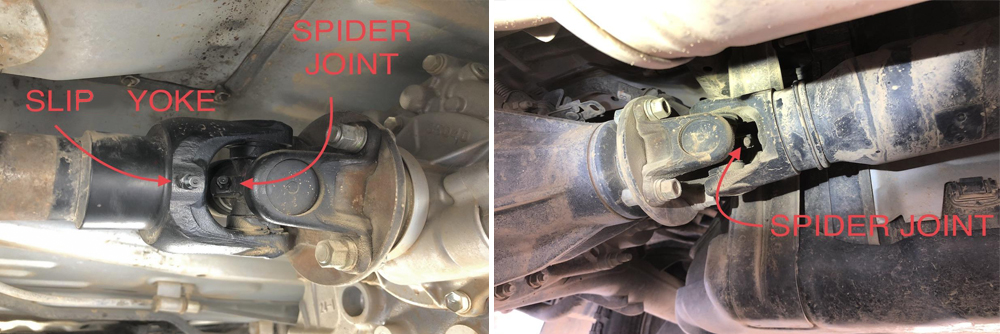
For the 4X4 5th Gen 4Runner driveline, there are two propeller shafts; for reference, these two shafts will be referred to as FWD (forward) and AFT propeller shafts in this write up. Each prop shaft consists of 2 spider joints and a slip yoke. In total there are six zerk fittings that will require greasing.
Intervals For Lubricating Propeller Shafts
Toyota recommends the following intervals for lubricating the propeller shafts:
- Normal conditions: 15,000 miles
- Driving on dirt roads or dusty roads: 5,000 miles
- Driving while towing, using a car-top carrier, or heavy vehicle loading: 5,000 miles
What You’ll Need

GREASE GUN & LOCKNLUBE COUPLER

A grease gun is required to perform this maintenance procedure and can be bought at almost any auto parts store; they will likely have the grease as well.
Another tool that is not required but will make this job easier in magnitude is the LockNLube Grease Gun Coupler (the one I use is GC81011). This coupler will make attaching and detaching the grease gun to the zerk fitting a breeze. Believe it or not, getting a standard grease gun stuck on a zerk fitting is quite common. I have had to unstick one on my FWD propeller shaft and it was not a pleasant experience.
Grease
Toyota recommends two types of grease for the spider joint and slip yoke:
- Spider Joint: Lithium base chassis grease, NLGI No. 2
- Slip Yoke: Molybdenum-disulfide lithium base chassis grease, NLGI No. 2 or Lithium base chassis grease, NLGI No. 2
According to the owner’s manual, it is acceptable to use NLGI No. 2-grade lithium base chassis grease for both spider joints and slip yokes. For the sake of simplicity, I’ve always used a single type of grease: Mobil 1 Synthetic Grease (Red). I choose to go with Mobil 1 because they are an industry leader in automotive lubrication and also the grease is red and easy to see when it seeps out of the spider joints, but that is just my personal preference.
Bottom line: Any NLGI No. 2-grade lithium-based grease should work.
Find it online:
- Mobil 1 Synthetic Grease: Check Price
- LockNLube Grease Gun Coupler (optional): Check Price
- Grease Gun: Check Price
Tools & Materials
- Grease Gun
- Lithium base chassis grease, NLGI No. 2
- Molybdenum-disulfide lithium base chassis grease, NLGI No. 2 (optional)
- Gloves
- Shop Towels
- Small box
Step 1. Lubricate & Clean Spider Joints

Lubricating the spider joint is pretty straightforward.
Clean the zerk fittings to prevent any contaminants from entering the joints during the greasing process. Connect the grease gun coupler to the zerk fitting and pump grease into the spider joint until the new grease seeps out on all four bearings. If the joint hasn’t been lubricated in a while, it could be dry and audible pops can be heard while greasing. Once the new grease has been sufficiently pumped into the joint, grab a roll of shop towels and wipe the excess/old grease away.
Cleaning tips:
- Roll up a sheet of shop towel and use it to floss between the bearings.
- Keep a box nearby as a portable trashcan to keep your workspace clean.
Step 2. Lubricate Slip Yoke

Lubricating the slip yoke is pretty simple as well.
Clean the zerk fittings to prevent any contaminants from entering the joints during the greasing process. Connect the grease gun coupler to the slip yoke zerk fitting and pump. I do 4 full pumps for the AFT slip yoke and 2 full pumps for the FWD slip yoke. Since the slip yoke slides in and out of the propeller shaft, if it is over-packed with grease, it could cause the shaft to not extend/contract properly.
Tips:
- If the slip yoke is over-packed with grease, use a pick and depress the zerk-fitting nipple. Grease should flow out and relieve the pressure. Alternatively, use an extended 7mm socket to remove the slip yoke zerk fitting. Hop on the back of the 4Runner a few times to articulate the AFT shaft. Remove grease and reinstall the zerk fitting.
Step 3. Position 4Runner To Ensure Access to AFT Shaft Zerk Fittings & Chock Wheels

Park the vehicle and check the AFT propeller shaft slide yoke and spider joint positions. Make sure the grease gun coupler can be attached to the three zerk fittings on the AFT propeller shaft. Chock the wheels as a safety precaution.

When working on the AFT propeller shaft, place a jack and a piece of 4×4 under the tow hitch and jack up the rear end. And when working on the FWD propeller shaft, place a jack under the front jack point and jack up the front end.
Note: This is optional and not intended to lift the vehicle off the ground, but to provide additional workspace while under the vehicle, use your best judgment to observe and practice all safety precautions.
Step 4. AFT Propeller Shaft
Lubricating the AFT propeller shaft is straightforward. Connect grease gun coupler to the spider joints and slide yoke zerk fittings and follow instructions laid out in Steps 1 and 2.
AFT Propeller Shaft Tips: Working from the passenger side will provide better access.
Step 5. FWD Propeller Shaft

The FWD propeller shaft is by far the more difficult one of the two, due to the slide yoke and spider joint being in between the exhaust pipe and transfer case. However, the FWD propeller shaft can be rotated by hand to allow easier positioning of the zerk fittings.
I find it easiest to gain access to the slide yoke and spider joint from the driver’s side near the heat shield (mounted to the cab). Once the shaft is in position connect the grease gun coupler to the spider joints and slide yoke zerk fittings and follow instructions laid out in Steps 1 and 2.
FWD Propeller Shaft Tips: There is a shield between the shaft and exhaust pipe that can be removed (12mm) for more access, but it is not necessary.
Final Thoughts
This process should take about 30-45 minutes with the majority of the time spent cleaning the grease off of the four spider joints. By taking the time and doing this maintenance per Toyota’s recommended interval it’ll provide peace of mind for miles to come.
Read this article last night and did my grease today for the first time. Thanks for this!! Great write up and easy to follow. Put my front end up on ramps and made the job easier to work. Rear was a little tight but joints were easy to see and access. I’ll be doing this every 5000-10000 miles.
Great instructions, thank you. A few things I realized while doing this that others might find helpful:
How much movement does the front slip yoke see, I tested it by having someone jump on the back of the 4Runner but I only see the rear slip yoke slide in and out but the front not at all.. so the real question is when does the front slide in and out or under what conditions.?
during acceleration and braking
Excellent guide, thank you very much.
Quick question…says you used 2 pumps on front and 4 pumps on rear, is this total or for example on each zirk fitting? Thanks
that is for lubing the splined shafts fittings only
Thanks, made the job very simple and painless. Lots of crackling when running in the grease on the spider joints, now I am wondering if the dealers pre-paid mantenance was complete. At least it’s done right now, thanks for the help! It also helps to have a 3″ lift, plenty of working room under there…
Never work under a jack! Use a jack stand!!
So the service manual for the 5th gens says moly grease is optional for the slip yoke. Does anyone know if this recommendation is backward compatible for a 3rd gen? I have a ‘99 which has been properly maintained by a mechanic. He did this every oil change but now I’m getting ready to do my own service and not sure if I’m okay using the lithium NLGI No2 for everything, or if Toyota changed the type of driveshaft in the 5th gen to allow the use of a non moly lube. I don’t really mind having two grease guns since they’re not that expensive, but I also don’t like to have unnecessary things.
The lithium based grease with added ‘moly-disulfide’ works better on bearing surfaces which slide upon each other: like slip splines and ball-joints, under pressure. The moly lubricates like little ball bearings.
Not normally recommended for wheel bearings or u-joints which have bearings which are designed and required to roll, rather than slide.
In addition to the NLGI #2 (thickness), you need to be looking for ‘GC’, suited fort wheel bearings, and ‘LB’ for chassis components.
The best advice is to use what the manufacturer specifies.
So I’m going to answer my own question in case someone comes across this thread. After making several calls to several different entities (a couple grease companies, Toyota Corporate, and my local dealership) I found the answer. The chemical engineers at the grease companies (predictably) said “Follow the maintenance guideline from Toyota”. The guy at Toyota Corporate said he wasn’t sure but figured advancements in grease technology would make the 2019 recommendation retroactive.
But then I found someone at a Toyota Service Center who has the technically correct answer. And it’s, “No”, the recommendation on grease is not retroactive. The reason is Toyota uses a different metal compound in the 5th gen 4Runners than the older ones. So the older ones still need Moly on the slip yoke. The newer driveshafts with different metals don’t need it but it’s still recommended. And honestly I don’t know why I’ve been beating myself up trying to find the answer. An extra grease gun with moly in it will cost me maybe $30 and probably last the life of both cars. So I’m going to have two guns and use both greases. Pretty cheap insurance as far as I’m concerned. I honestly don’t know why I spent so long trying to find a reason to only use one grease. Kinda made me feel cheap and lazy. Using both greases will make me feel like a pro. And I kinda like that.
What happens if you over grease the spider joint? Do you just grease it until it comes out on its own?
You cant really over grease it since grease will flow out as more is pumped in. Unless there’s some blockage then it might be time for new joints.
And yes stop once you see the new grease comes out.
Thanks for the information, was very useful! To move the shaft freely to expose the joints, will need to put the transmission in neutral position?
The front shaft you can move it freely by hand. For the main you’ll have to put the trans in N and the rear on jack stands to move them freely. I find it easier just to drive it fwd or backwards till I have it in the right spot.
What do the Forward and Aft drive shaft connect to? Also took my 2018 4runner to toyota to get it service and asked them to grease the drive shaft they told me that its sealed and doesn’t need it. I find it very sad when they don’t know what they are talking about. Also all the you tube videos show only two zerks grease fitting I’m glad you said 6.
Glad the article helped! The FWD and AFT shafts connects between the transfer case and the FWD and AFT differentials. Yea I’ve had the same experience with my dealership as well the first time I greased it it was bone dry. I guess there’s money in replacing spider joint.
This is an awesome overview, great work Jensen! One thing I would add is if you’re an ambitious DIYer you can remove one drive shaft at a time to grease that slip yoke if it looks really dry, or hasn’t been properly maintained in the past, you can remove the driveshaft and pull the slip yoke out (after marking both sides for balance) to clean and regrease it. Then you can just use the zerk to maintain the grease level afterwards.
How easy is it to take those shafts off? Mine looked dry where I could see the movement marks and there’s really no grease throw. But the tech did tell me at 25k service he did all the joints including my JBA UCAs due to me telling them I was getting set to go on a 10k trip. I thought about pumping it full of grease and taking out the zerk and bouncing it some to force out extra grease.
Thanks for the idea Max! The next time I grease I’ll give that a try I’ve always wonder how much is really in there!
if I may make a suggestion, I learned that if you position the AFT slip yoke zirk at the 6 o’clock position pointing straight down, it gives more room to access the spider zirks. Kinda a pain to look under and move the 4Runner to line it up, but makes much easier straight access to the spider zirks.
Great write up! Totally takes the mysteriousness out of the task if one hasn’t done it before.
I just do it every oil change since it’s easier to do it instead of wonder: was I driving on enough dirt roads for it to matter this time?
Good stuff, thank you. I grease these at every oil change, very easy. Toyota also recommends checking the torque of the driveshaft bolts. Anyone know what the correct torque value should be?
Thanks! The Propeller shaft bolt torque are 65 ft-lb or 88 Nm.
Great write-up Jensen Thanks!
Agreed, great write-up! I have been putting this off for a while and this article makes it much clearer how to do the job. Thank you Jensen!
Awesome write up! Thanks
Thank you!