
weBoost Drive Reach – Clean install for Off-Road Cell Signal Booster Antenna with Adjustable Ram Mount on CNC Roof Rack
If you are looking to increase your cell signal when out exploring, look at the weBoost line of cell signal boosters.
The weBoost cell signal booster is only going to work if your cell service provider already has a signal. If you do not have a cell signal, the weBoost drive reach will create one for you. The unit needs at least some portion of a signal in order to boost that signal.
The weBoost drive reach works with all major carriers: Verizon, AT&T, T-Mobile, Sprint and many others.
The weBoost is designed to boost your current signal but that doesn’t mean you’re going to go from one bar to five bars. You may go from one bar to two bars or you may not even notice an increase in bars at all, but if you don’t notice a spike in bars, that doesn’t mean the weBoost isn’t working in some capacity.
Find it online:
- weBoost Drive Reach Booster: Check Price
- 4G Trucker Spring Mount Antenna: Check Price
- weBoost website
Drive Reach Specs:
- Frequencies:
- Band 12/17 700 MHz
- Band 13 700 MHz
- Band 5 850 MHz
- Band 4 1700/2100 MHz
- Band 25*/2 1900 MHz
- Max gain: 50 dB
- Impedance: 50 Ohm
- Power: 5v
- Amp Draw: 4.5a
- Connectors: SMB
- Booster dimensions: 6 x 4.5 x 1.5 in.
- Weight: 1.80 lbs
- Multi-user wireless booster
- Fast network speeds
- Boosts signal on all available network speeds
Does it work?

In order to see the results simply Google the word “speed test” on your phone. Google will display a speed test option where you can test the download and upload speed of the service you’re getting.
weBoost Off:
- Download: 1.91mbps
- Upload: 0.09mbps
weBoost On:
- Download: 15.9mbps
- Upload: 1.81mbps
You can see in the screenshots above, it works!
It will definitely increase your cell signal as long as you already have a signal.
The weBoost worked perfectly for our intended use because for the most part, we have service, it’s just shoddy at best. You can see in our screenshots above, with the weBoost enabled, it took our service from 1 bar of service to 3 bars on LTE!
This accessory is an impressive addition to the 4Runner for sure.
Cell Signal Booster for Distance Learning

Since COVID, we have been on the road a lot traveling from family to family. As one of the primary care providers in our family network, we are responsible for providing care for our immediate family. At the same time, our six-year-old child, Ruby, has to work on online worksheets so she is literally learning from a computer and iPad in the back on the 4Runner, …it’s a trip. The difference between traditional school and COVID is that we rely on the iPad, desktop and email to get everything done and to turn in homework.
That has caused the need for increased cell coverage for remote locations throughout California. We have been traveling from Northern California to the coast and back up to the Central Valley and up into El Dorado, Plumas and Tahoe National Forest where cell coverage is horrible, to say the least. We’re talking one or two bars in great spots and struggling to get one bar in other spots. Throughout these locations, we will hit lower coverage areas where it’s difficult for Ruby to get her work done.
For this whole distance learning and remote learning transition we are going through, we decided to use a weBoost Drive Reach.
So far the weBoost has worked great for bringing those one-to-two bar areas to three-to-four bars and the struggling one bar to a solid bar if not one-two solid bars.
That’s really it for the review; it’s been awesome.
We also wanted to give you an idea of how we installed the weBoost so that maybe you can increase your coverage as well.
Installation Overview

Package contents
- Booster: Check Price
- Outside antenna
- Inside antenna
- Power supply
- Magnetic mount disk
Tools and Materials
- Zip-ties
- Cinch straps
- RAM Mount U-Bolt Kit
- RAM Mount Diamond Plate
- Rail mount kits that RAM mount offers
Step 1. Choose Location To Mount
External Antenna – Roof?
 Pictured: not an actual mount location. You need to identify a better location if you decide on your roof. For demonstration purposes only.
Start by identifying a location on the top of your 4Runner.
Options include:
- On the top of your roof rack;
- On the side rails of your roof rack;
- On top of your rooftop tent;
- Or even on the top of your roof.
You want to mount the antenna near the center of your roof, at least 12″ away from any other antennas, and at least 12″ away from any windows. So for the 4Runner, that means that you should mount the antenna at least 12″ away from the moonroof and at least 12″ away from your shark fin antenna.
External Antenna – Rack?

We decided to mount our antenna on an adjustable RAM Mount on the side of our CNC Rail.
Step 2. Adjustable or Non-Adjustable?

Once you have found a location to mount your antenna, install it accordingly. We are going to install our antenna onto the roof rail of our KC Pro6 M-Rack.
We are going to do this by mounting the antenna to a RAM mount first and then mounting a second RAM mount to the roof rack rail. The RAM mount base that I used was from a RAM Mount U-Bolt Kit that I found in my garage. Although this worked out perfect for what I needed, I wouldn’t spend $16 on a u-bolt kit just for a RAM mount base. There are other RAM mount options out there for cheaper. The RAM Mount Diamond Plate is one example if you are mounting to any CNC roof rack, although it’s not perfectly straight. If you are mounting to a Gobi or Baja for example, you may want to look at the rail mount kits that RAM mount offers. There are lots of RAM mount solutions out there.
Step 3. Assemble Ram Mount

For our external antenna mount, we are using two different RAM mounts:
- RAM Single Socket Arm with Round Swivel Plate
- RAM Diamond Ball Base
weBoost supplies a piece of 3M VHB tape that you can place on the magnetic circular plate; however, we are going to take this a step further and mount the magnetic circular plate directly to the RAM mount socket arm swivel plate. I used a step bit in order to get a flush fit on the magnetic plate without the bolt going through the magnetic plate. I also made sure the bolt that I was using was also magnetic. In order for the bolt to clear the RAM mount tightening bolt, I cut a length of the bolt off.
Step 4. Final Antenna RAM Mount

Here’s a final look at the circular plate and the round swivel plate. I wanted a solution that when mounted could be adjusted to be a lower point than the roof rack.
You will need some hardware to secure the RAM mount to your roof rack. We used #10 nylon lock nuts and bolts to secure the RAM mount to the roof rack rail. I also drilled recessed holes into the RAM mount in order for the bolts to have a cleaner deeper set look.
Step 5. Route Cable into 4Runner

In order to route the cable into your 4Runner, you can run it directly underneath the weatherstripping (this is what weBoost actually recommended). Start by removing one portion of the weather stripping with a plastic pry tool.
Once you have a slight opening, you can start running the cable down the main b-pillar channel. Depending on where you mount the antenna, you can also route the cable through the rear hatch cargo door.
Step 6. Run Cable Down B-Pillar Channel

Here you can see the weather stripping off of the b-pillar and the cable running down the b-pillar sheet metal channel. Just funnel it into this groove and then out the other side.
Step 7. Lower B-Pillar and Kick Panel

Once the cable reaches the carpet, you can run the remaining stretch of cable underneath the carpet and pull it through the opening where the seat mounts to the floor. You don’t need to remove any of the b-pillar plastics to do this. You will need to remove the floor plastics and the seat caps.
Step 8. Add Braided Sleeve To Power Supply & Antenna
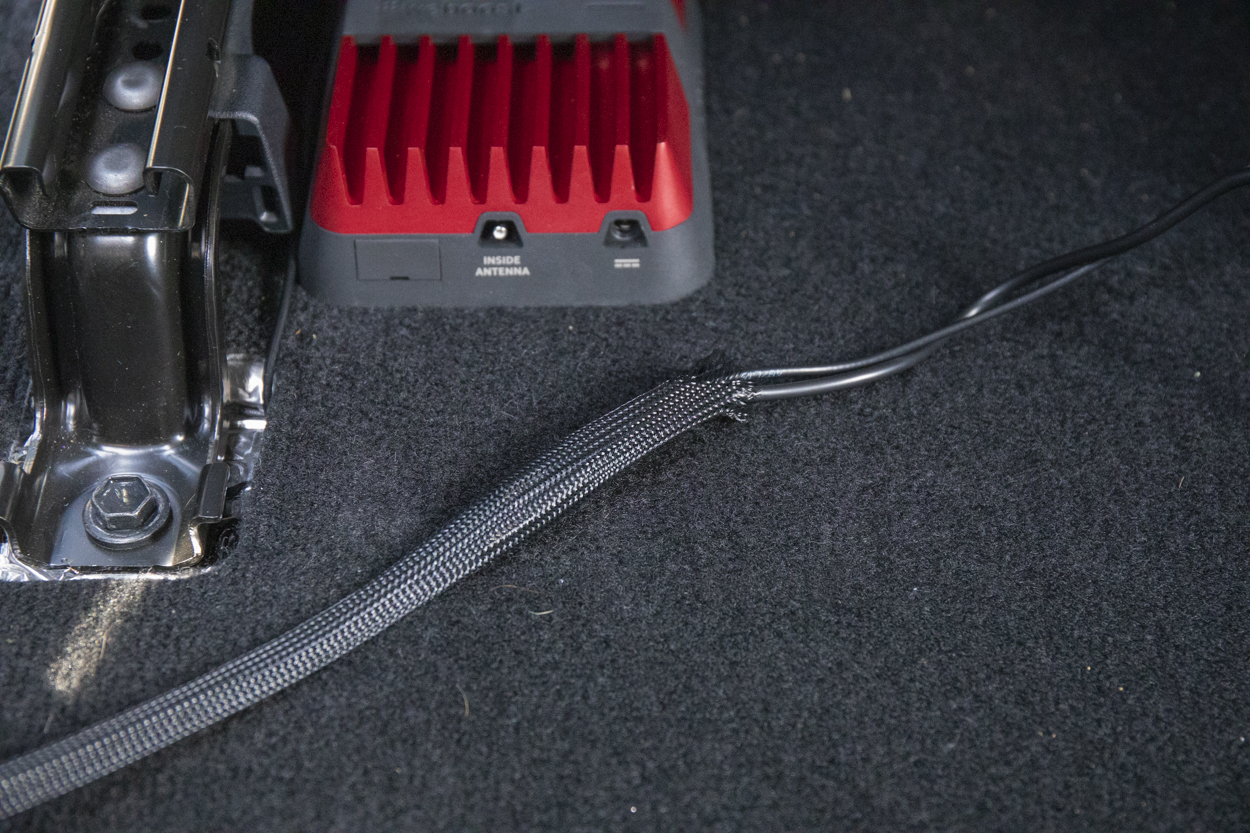
In the photo above, you can see the outside antenna cable coming up through the carpet just next to the seat mount and to the left of the weBoost booster. Once you have the external antenna connected to the unit, you can prepare the internal power supply & antenna.
Next, put some braided sleeve around the power supply & antenna cable in order to keep the two cables together.
Feeding both cables into a braided sleeve will help you feed the whole harness under the carpet from one side of the seat mount to the other much easier. This will keep your install clean.
Step 9. Feed Braided Sleeve

Once you have a full length of the braided sleeve around the power supply cable and the internal antenna cable, you can feed the harness from the right side seat mount to the left side seat mount (over by the power unit). I didn’t need to pull out the fisher tape to do this.
Step 10. Pull Cable Through Seat Mount Opening

The braided sleeve harness should come out the other side just fine.
Step 11. Connect Power Supply & Antenna
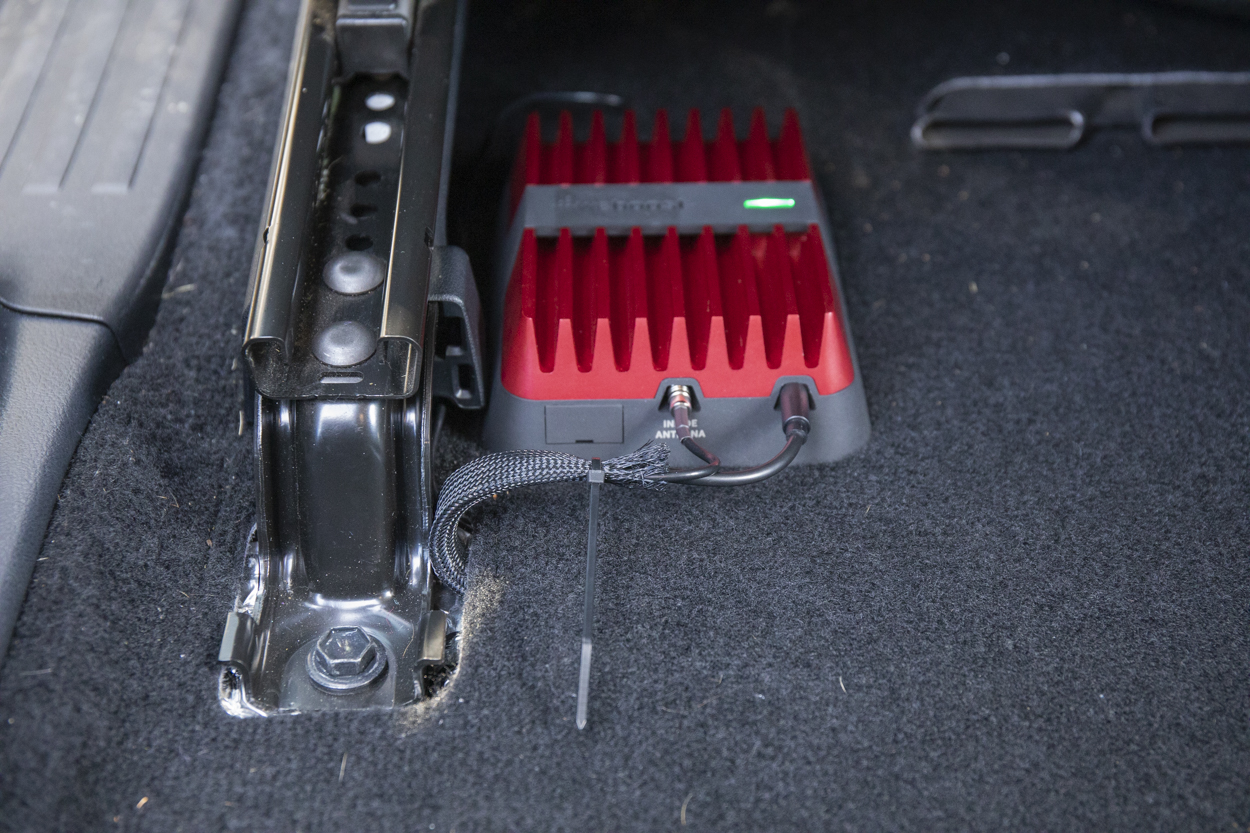
Throw a zip tie around the end of the braided harness and then connect the inside antenna plug and the main power supply to the unit.
Start to get an idea of where you are going to position the booster. We are going to position our booster directly underneath the driver seat but off to the side so that the HVAC system does not affect the unit.
Step 12. Clean Up Excess Wires & Position Booster

To make the install as clean as possible, it helps to have a couple of small hook and loop cinch straps. I bundled most of the wires at the power supply converter/transformer with a couple of reverse cinch straps.
If you reverse cinch straps then the backside essentially acts as the loop and your floor acts as the hook so these cinch straps secure the whole bundle of wires directly to your floor. This prevents the bundle from sliding around while you’re driving.
At this point, you can put some wire loom or clean wire sheathing around your interior antenna cable.
Step 13. Tuck Wires Out of Sight

I positioned this bundle of wires underneath the seat mount just to the outside of the HVAC.
Step 14. Mount In-Vehicle Antenna

Identify a place to mount the in-vehicle antenna, either on the side of the seat or on the dash of your 4Runner. The location should be at least 18″ with no more than 36″ from where the cellular device will be used. Use the velcro adhesive strip or the two-sided adhesive strip provided and attached to the side of the antenna labeled “mounting side”. Then mount to the desired location.
Disclaimer: You should not mount the antenna anywhere where your airbags will deploy.
Step 15. Route Power Supply Cable

We are running our power supply cable directly to the center console 12 volt DC Supply. This is going to run under the seat up to the side of the center console and down into the provided 12-volt DC outlet.
Finally, you can connect your in-vehicle antenna and the power supply to the main booster.
Once you have everything plugged in, the drive reach will automatically power on. If your drive reach is working correctly, the light on the power adapter will be red, and the light on the booster will be green.
Use only the power supply provided in your kit. If the 12-volt cigarette lighter adapter in your 4Runner is always on, then you should turn your power booster off by pushing the LED light when the unit is not being utilized. This will prevent the drive reach from draining the battery in your 4Runner.
Booster Light Patterns
The signal booster will show a few different light patterns. Below are the main light patterns you may experience on your weBoost drive reach:
- Solid green: Indicates that your booster is functioning properly.
- Blinking red then solid green: This indicates that one or more of the booster bands has reduced power to a minor feedback loop condition called oscillation. weBoost calls this a built-in safety feature to prevent harmful interference with the nearby cell tower.
- Solid red: This is due to a major oscillation (feedback loop). If you are having this issue you can try to unplug and replug in your power supply or relocate the inside and outside antenna further from each other. The objective is to increase the separation distance between them so that they will not create this feedback condition.
weBoost provides a 2-year warranty. Their warranty is against defects in workmanship and or materials.
Final Thoughts

It works great for its intended purpose.
The weBoost drive reach has a pretty high price point, but if you are looking to have increased or more stable cell signal coverage, then this unit is definitely something to consider.
It really does provide increased cell coverage where we need it most. We are beyond thankful we are running the weBoost. It’s been a game-changer so far.
I can’t wait to get this thing further out into the mountains to see how it performs when deeper in the woods.
So far, I am a weBoost believer!!
I was thinking about installing a separate 12V outlet under the seat, wiring it to the battery but with an OEM dash switch (and relay) so that I can turn the power on and off. I assume this is possible, but surprised I don’t see anyone setting it up this way.
Hi Brenan,
Great article and setup! What are your thoughts about your configuration and this type of antenna typically requiring a ground plane (which is usually the roof of the vehicle)? Have you seen any degradation of signal as a result of not having a complete ground plane? Thanks!
Hi Brenan,
Could you also have mounted the power supply in the cubby section of the trunk?
Hey Brenan,
Curious where you got the ditch lights?
Thank you,
These are the KC Flex Era 3.
Hey Brenan,
Great post as always. Since COVID has changed the way we live and work, I have been looking to get hotspot connection via WeBoost while I am working on the road. In your review, you mentioned about the 12V cigarette adapter always being on. Do you know how that is possible? Do I have to do some wire tapping or is there a kit? Would love to read any resource if you have them.
Also, any particular reason you went with the car version with the trucker antenna instead of the Drive Reach OTR ?
Thanks,
Francis
IG: @sicrunner
For the constant hot, we are going to re-run the power to a 12v cigarette lighter extension cord. Something heavy-duty like a 14 AWG cable wire with 20amp in-line fuse would be the end goal (I linked two options for reference). You can either run the inline fuse through a fuse block or run an inline fuse on the harness straight to your battery. Wire it how you want but you get the point. Instead of plugging the 12vdc into the center console or dash, we will plug into the 12v cigarette lighter extension cord and run it under the seat, through the firewall, straight to the battery (much cleaner install and you have increased cell service when the truck is off). The Drive Reach draws 4.5 amps so not too much, but it’s definitely something you want to watch. We may install a Blue Sea Systems m-LVD Low Voltage Disconnect once we install the direct power as well.
I choose the Drive Reach over the OTR because I wanted a lower profile antenna. Simple as that. If I feel like I need to add the OTR antenna, I can later.