
KC Pro6 M-Racks Step-By-Step Install + How To Wire Scene Lights On The 5th Gen 4Runner
The KC M-Rack comes in two different options: Pro6 and C-Series.
The rack is also offered for a wide variety of makes and models including Ford, Chevy, Dodge, Jeep, Toyota and more.
The racks are offered in multiple lengths, however, all of them feature their signature four C-Series LED scene lights for side lighting. This is one area that makes the M-Rack stand out from the rest: its integrated cutouts and mounting positions. This makes for a seamless, clean and functional design.
Pro6 Light Bar or C-Series Light Bar?

Due to the way the M-Rack is built, you have these two options.
The M-Rack bends outward on each CNC cut side bracket. KC Lights designs both the Pro6 and the C-Series with this in mind. Both options include a harness for each front lighting option and wire pigtails for the scene lights.
The C-Series light bar is simple in design and packs a powerhouse of a performance. The look is clean and minimal which may be attractive for some, but to me personally, there is nothing about it that screams KC. The C-series 50″ features 27,000 lumens, 3,200 lux, 320,000 candelas and a 1,131m beam distance. Check out this KC video to see what these numbers mean.
The Pro6 light bar offers a signature KC look with some aggressive Baja race heritage. The look of the Pro6 is unlike anything on the market nor can it be replicated. I think this Baja style look with round lights on the top of trucks is freaking rad. It gives the truck an aggressive face, reminiscent of a Baja 1000 trophy truck. The Pro6 50″ features 18,400 lumens, 6,700 lux, 670,000 candelas and a 1,637m beam distance. This is, bar none, one of the closest trophy truck build looks you can get when it comes to a plug and play lighting system.
Find it online:
Extras:
Installation Video
The kit ships in a few different boxes because of all the parts. You will get your M-Rack in one box and then separate boxes for the Pro6 and the scene lights as well. The packaging is impressive, to say the least.
It’s KC — everything is top-of-the-line packed and the build quality is jaw-dropping, especially on the Pro6.
Install Part 1: Rack Install

This is a 2-part install process.
The first part is installing the roof rack, Pro6 and scene lights which be done in a few hours. That process is simple. The second part is wiring the Pro6 light bar and scene lights. This might take you another 2-3 hours depending on your experience. Nonetheless, plan on having a full day for the install.
Step 1. Unpack Rack & Light Bar Parts

Start by unpacking the KC Pro6 light bar and the M-Rack components. Lay everything out, organize all the pieces and make sure you account for all the parts needed for the install.
Step 2. Turn Rack Upside Down & Assemble Side Brackets
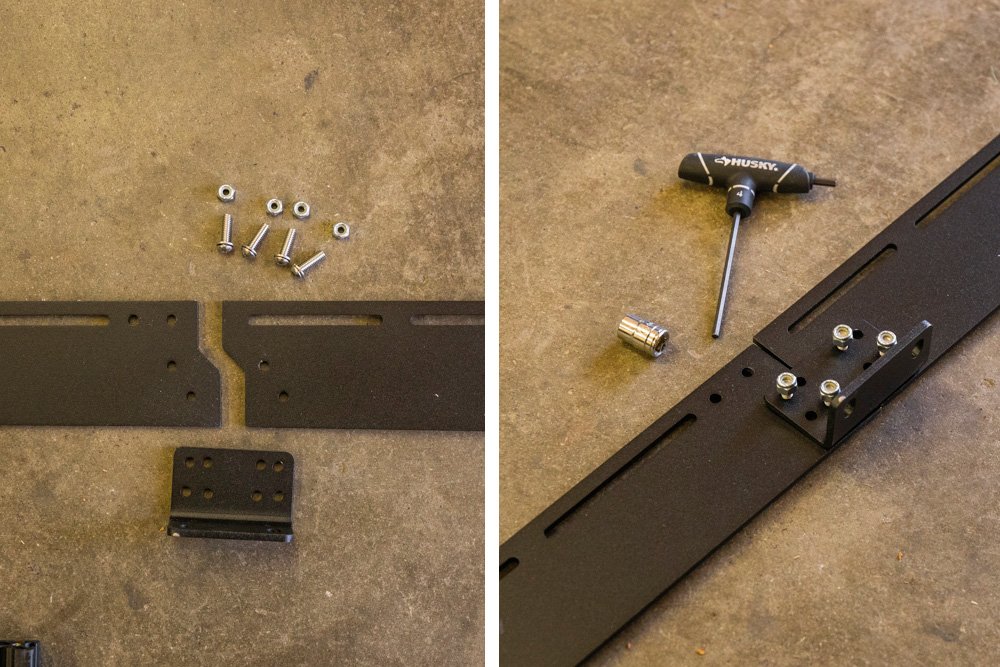
Assembling the M-Rack upside down will give you a little bit more stability when positioning the crossbars and side rails together.
Note: Begin by loosely attaching the crossbars to the side rails.
Step 3. Attach Crossbars and Add Scene Light Brackets

After you loosely attach all the crossbars to the side rails you can proceed with attaching the scene light brackets to the inside of the crossbars.
Step 4. Attach Scene Lights & Brackets

Time to attach the scene lights to the brackets. You may need to practice a little bit of patience with this one as attaching the scene lights to both brackets is very tight.
There is a notch cut out inside both of the brackets that face the side rails. In order for the scene lights to position securely inside both of these notches, it helps to have a loosely assembled bracket along with cross rails.
Once you have positioned the scene light inside the brackets securely, you can proceed with tightening down the brackets and the cross rails.
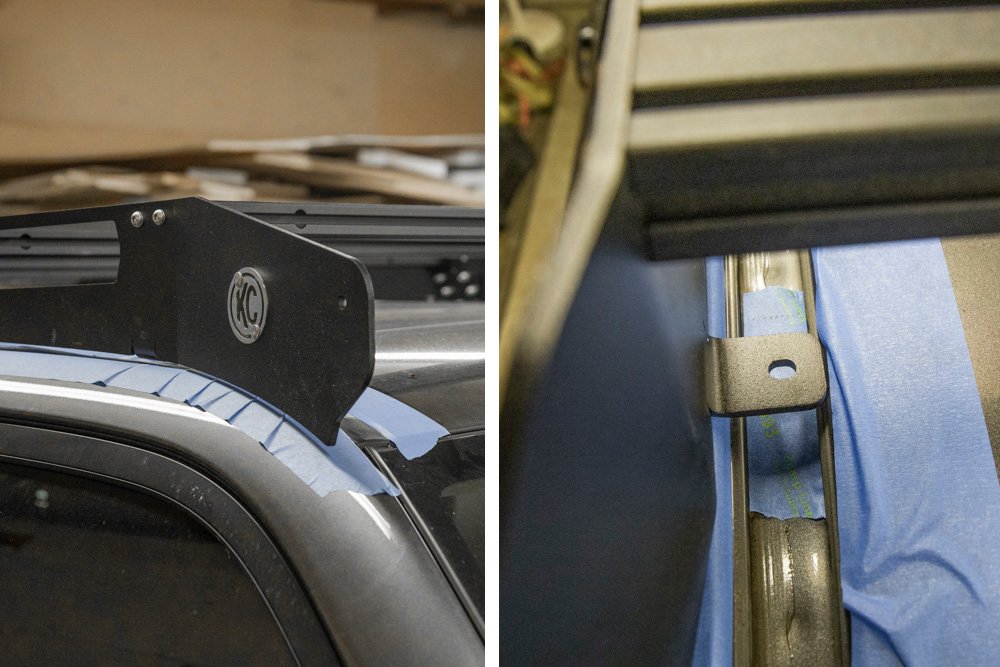
Step 5. Set Rack on Top of Truck & Lay Down Masking Tape
You will need a friend to help you with this one.
Go ahead and lift up the rack and place it on top of the 4Runner. If you want to add an extra layer of precaution in order to prevent it from scratching your roof, you can add some blankets or a strip of masking tape. While you are adding the masking tape, place another section just below the front mounting point on the M-Rack to mark for your hole punch.
Step 6. Punch a Hole

Temporarily position a bolt through the hole of the mounting bracket and mark out your drill location with a punch.
Step 7. Drill Hole in Roof

Start with a small pilot hole and work your way up to the desired width of the provided rivet nuts.
Note: KC calls for a total of four holes to be drilled in order to mount the rack, however, we went with the front mounting points only. With a total of now six (x6) bolted locations on the roof, we thought that was plenty.
Step 8. Set Rivet Nut Into Roof

Using your rivet nut tool, proceed to insert a rivet nut into the hole you’ve just drilled.
Step 9. Add a Dollop of Silicone Sealant & Rack Spacers

This is an incredibly important step. Always, always, always add silicone or sealant to any hole you punch in the roof.
If you fail to add silicone or sealant to a hole in your roof, over time, you will start to accumulate water buildup and that can lead to a serious problem. I know this because we have had water leaks in our roof before and it’s not fun. For an example of what can happen if you fail to add silicone sealant, take a look at this article on our 4Runner going into limp mode.
How To Add Sealant (Pro Tip): There is a slight art to adding sealant. Simply add a single dollop sealant directly over the hole in the roof and then in a circular motion pull the tube away from the hole (think soft serve ice cream). As you pull the dollop tube away from the hole, this may create a little run. That’s ok, just spread the sealant around the hole as much as you can. Grabbing a cotton swab may help to spread the sealant around the hole and the orientation you see best or to even clean up any mess.
As another added layer or an alternative layer of sealant, you should use butyl rubber sealant. This has been known to last a bit longer than silicone sealant.
After you add your sealant, proceeded to add the spacers directly on top of the sealant.
Step 10. Add Rack & More Sealant If Needed

Once you have the roof rack tightened down, the only thing left to do is add the Pro6 light bar and possibly add another dollop of silicone or sealant around the mounting points on the roof. I’ll admit, I go a little bit overboard on the sealant after having a run-in with the enemy we call water.
You should be finished installing your roof rack along with the light bar, and at this point, you can proceed to wire up a harness.
Install Part 2: Wiring Scene Lights
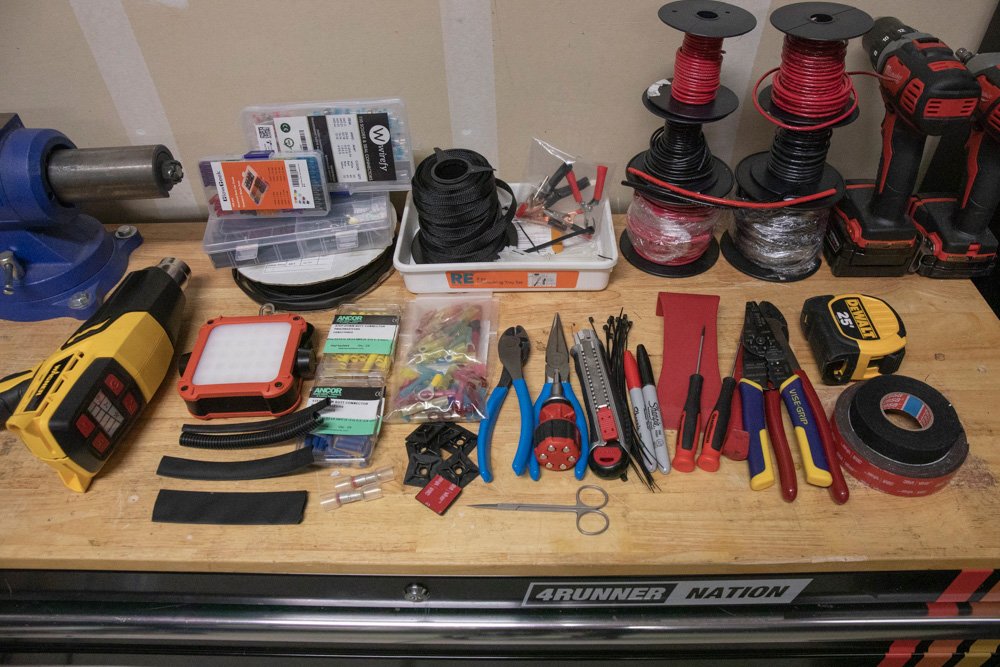
KC Lights now provides a pre-built harness for the Pro6 M-Rack with the C-series scene lights. This step-by-step wiring harness guide below may work for you if you don’t want to use that provided harness or if you are looking to build your own scene light wiring harness for another roof rack set-up.
In our wiring guide below, we separated our lights into two separate switches: the Pro6 light bar and the C-series scene lights. Both of these will operate independently from one another with their own switch that will run to our pre-built DIY switch panel.
Step 1. Strip Wiring Harness of Switch

Since we are not going to use the provided switch, we are cutting off the wires we don’t need. Go ahead and cut off the white and black wires from the rest of the wiring harness. These are going to be your main positive (+ white) and negative (- black) wires that will run to the switch for the Pro6 light bar.
You can toss the rest of the harness or save it for another build.
Step 2. Measure Out Wiring Harness to Battery

Go ahead and connect up this harness to the Pro6 and measure how much remaining wire your harness will need to make it to the battery.
Step 3. Build Power and Inline Fuse Harness
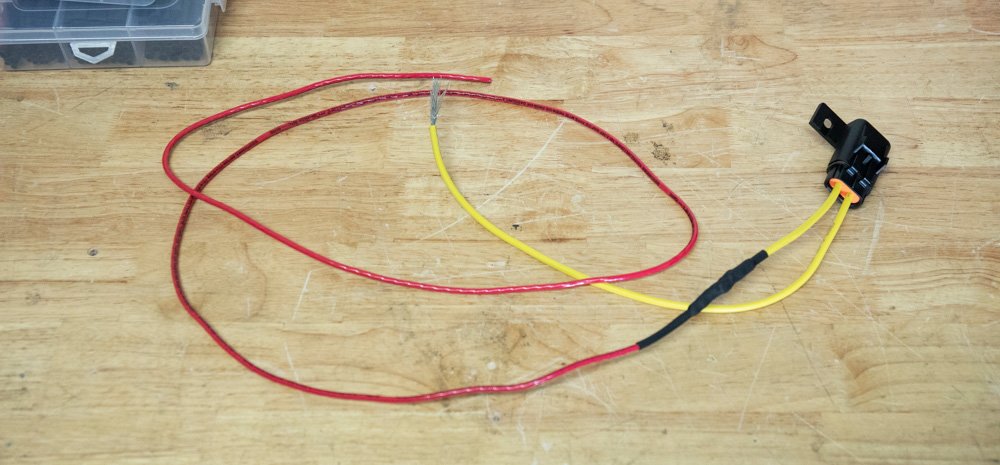
Build and connect up an inline fuse. This will run to the positive (+ white) coming off of the Pro6.
Note: We are running a 20-amp fuse recommended by KC.
Step 4. Test Power for Pro6 Light Bar

Grab some alligator clips, connect up your test run of wire and test the power running to the Pro6 light bar. I always like to leave the test harness connected for at least five to ten minutes in order to check all connections and wires throughout the harness.
Even though we are in the test phase of building a harness, it’s always important to check for hotspots throughout the harness and troubleshoot those areas if necessary.
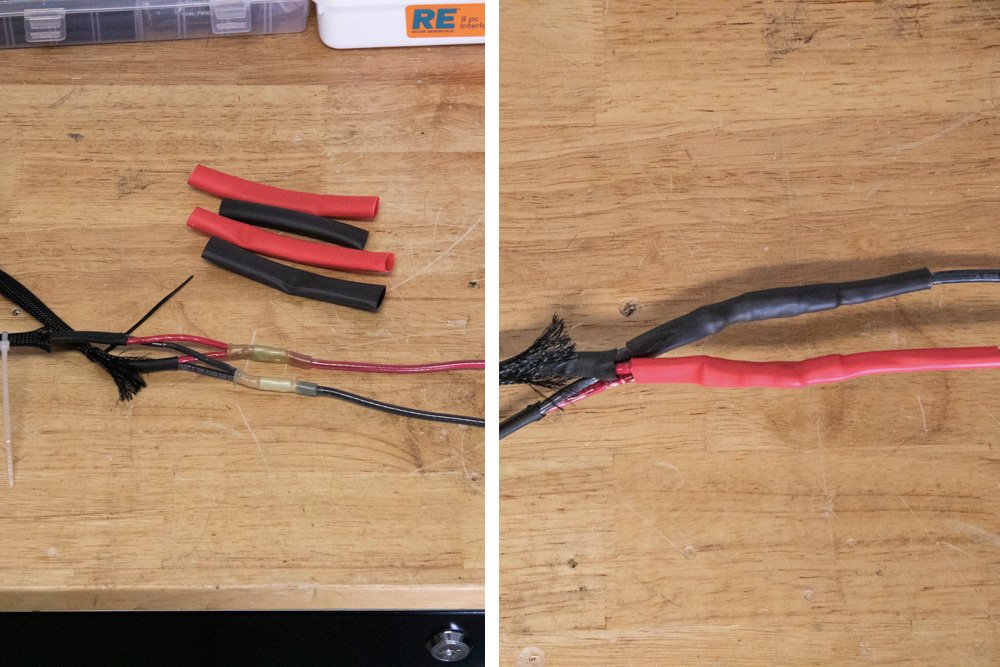
Step 5. Full Wiring Harness for Pro6 Light Bar – Complete

This is what our wiring harness came out looking like.
Note: We use heat shrink throughout the entire harness and underneath are waterproof butt splice connectors. Since this wiring harness is going to live its life outside of the vehicle, it’s important to use only waterproof connectors and high-quality connectors at that. Life’s too short for subpar connectors.
Step 6. Measure C-Series Scene Light for M-Rack

Where to start with wiring the scene lights?
You have had one positive and negative lead coming off of each scene light.
You will need to connect the driver’s side scene lights together on one wiring harness.
Then you will connect the passenger’s side scene lights together on one harness.
Step 7. Build Four Leads for Scene Lights

Once you have measured the correct amount of wiring needed, you can attach some butt splice connectors to each lead.
Since the battery is located on the driver’s side of the 4Runner, our driver’s side wiring harness for the scene lights will be much shorter than the passenger side. The passenger’s side needs to measure almost double the length of the driver’s side as both harnesses will be connected at the driver’s side A-pillar.
The passenger harness will travel down the side of the 4Runner then over the roof connecting to the harness at the driver’s side A-Pillar.
From there, both harnesses will meet and travel down the A-Pillar to the battery.
Step 8. Merge Passenger and Driver Leads


At this point, you should be connecting the passenger scene lights on one harness and then the driver’s side scene lights on a separate harness.
All of these wiring harnesses should connect at one location: on the roof at the A-pillar, as mentioned above.
Step 9. Meet All Wires at A-Pillar on Roof & Test

Here is a photo showing both wire harnesses meeting at the A-pillar.
Now is a good time to test your lights again. Temporarily connect some alligator clips and test your harness running to all four scene lights.
Step 10. Connect All Scene Light Leads
If all your lights turn on, then begin to connect all of this scene light leads. We are going to be wiring this harness using multiple gauge wires.
Now, as long as you don’t exceed the current rating of the smallest wire in the circuit, it will be fine. A 12-gauge wire can run up to 20 amps, 10-gauge can run up to 30 amps, 8-gauge can run up to 40 amps, and 6-gauge beast can run up to 55 amps.
We are 20 amps with the Pro6, so we are good to go. So with that said, let’s continue.
We wired both scene light harnesses (12ga) into a single larger gauge wire (10ga).
Step 11. Single Scene Light Wiring Harness Lead

We then connected both the passenger’s and driver’s side harnesses into a single step-down connector (10ga to 8ga). We connected two 10ga wires into one step down connector into the 8ga side.
Step 12. Merge Leads into Single 8ga Wire

From the 10ga side of the connector, we ran a 10ga wire then stepped down to a 12ga connector into a 12ga wire.
Step 13. Merge Leads Down into Single Wire 12 Gauge

We continued with a 12ga wire for the remainder of the harness.
Step 14. Extend Leads to the Engine Bay with Inline Fuse

We then measured and connected an inline fuse using the provided 12ga wire in the KC Lights kit.
Step 15. Measure Remaining Distance of Wire to Switch

At this point, you should have two built harnesses:
- The Pro6 harness (20-amp inline fuse)
- The scene light harness (4-amp per 10″ section = 20 amp inline fuse)
Both of these wiring harnesses should have inline fuses and a positive and negative lead. As mentioned previously, both of these wiring harnesses will be connected to their own switch on our DIY switch panel.
Step 16. Zip Tie Mounting Brackets for Windshield Wiring

How to wire a light bar on your roof rack?
You have plenty of options when it comes to running wires from roof rack:
- Drill a hole in the roof and run it down the a-pillar (inside the vehicle)
- Run wires through your weather stripping and windshield (see that option here)
- Run wires down the front of your windshield (outside the vehicle)
For this install, we are going with option 3. I actually stole this idea from Max (life to the max). Pictured are a few zip-tie brackets. They come with decent double-sided tape but we removed that and added some VHB 3M tape instead which should last much longer.
Due to the size of our wiring harnesses, this seemed to be the best option for our current situation. I have previously run wires through the weather stripping in the windshield, and although I like that option, our wiring harnesses came out much too large in order for that to work for this install.
When Max and I were walking around his 4Runner, I barely even noticed his wiring harness running down the windshield. The black loom on the black portion of the a-pillar really blends in. You only start to notice it when you are up close or if you are looking at pictures directly of it. If you are standing 10ft back, it’s not that noticeable…if you aren’t looking for it. It’s not perfect though.
KC Lights now makes a better solution for this option. It’s called the KC Wire Hider, you can check that out here.
Regardless of what option you choose, running wires on top of your windshield will be the least intrusive option.
Step 17. Cut A-Pillar Fender Cap and Run Wire into Bay

In order to fit a large wiring harness through the A-pillar fender cap, you may need to cut a section out. This is completely optional and totally depends on how you’re running your wires. I just didn’t want a bunch of exposed wiring harness leads coming off of the windshield through the A-pillar fender cap.
Step 18. Measure Leads Coming Into Engine Bay
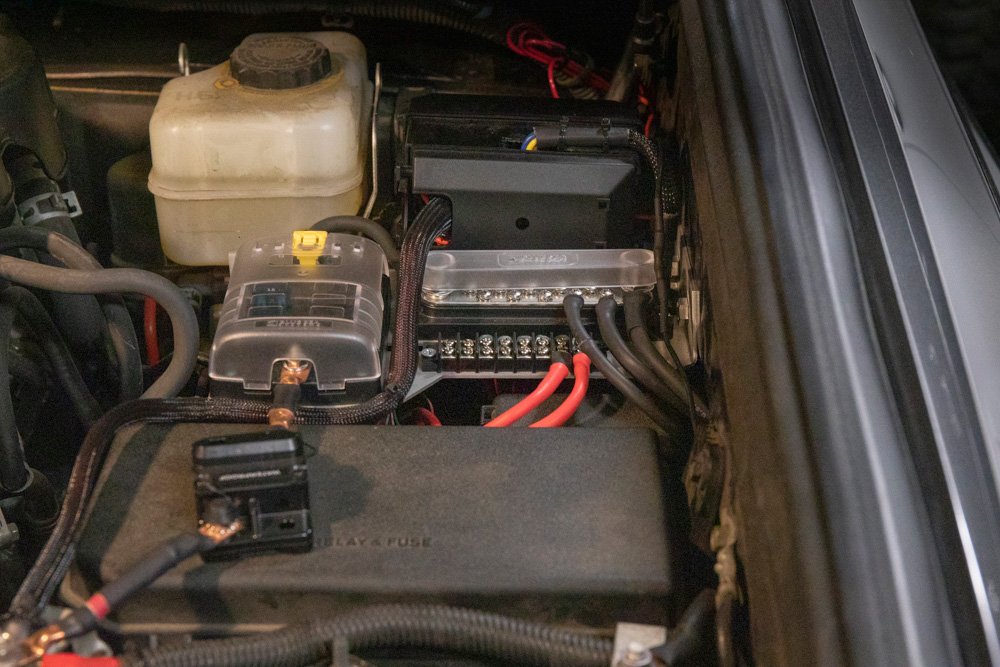
Finally, measure all of the remaining leads coming into the engine bay and connect them to your desired switch. I like to buy red and black heat shrink in order to keep the positive and negative terminals looking clean and consistent.
Final Thoughts
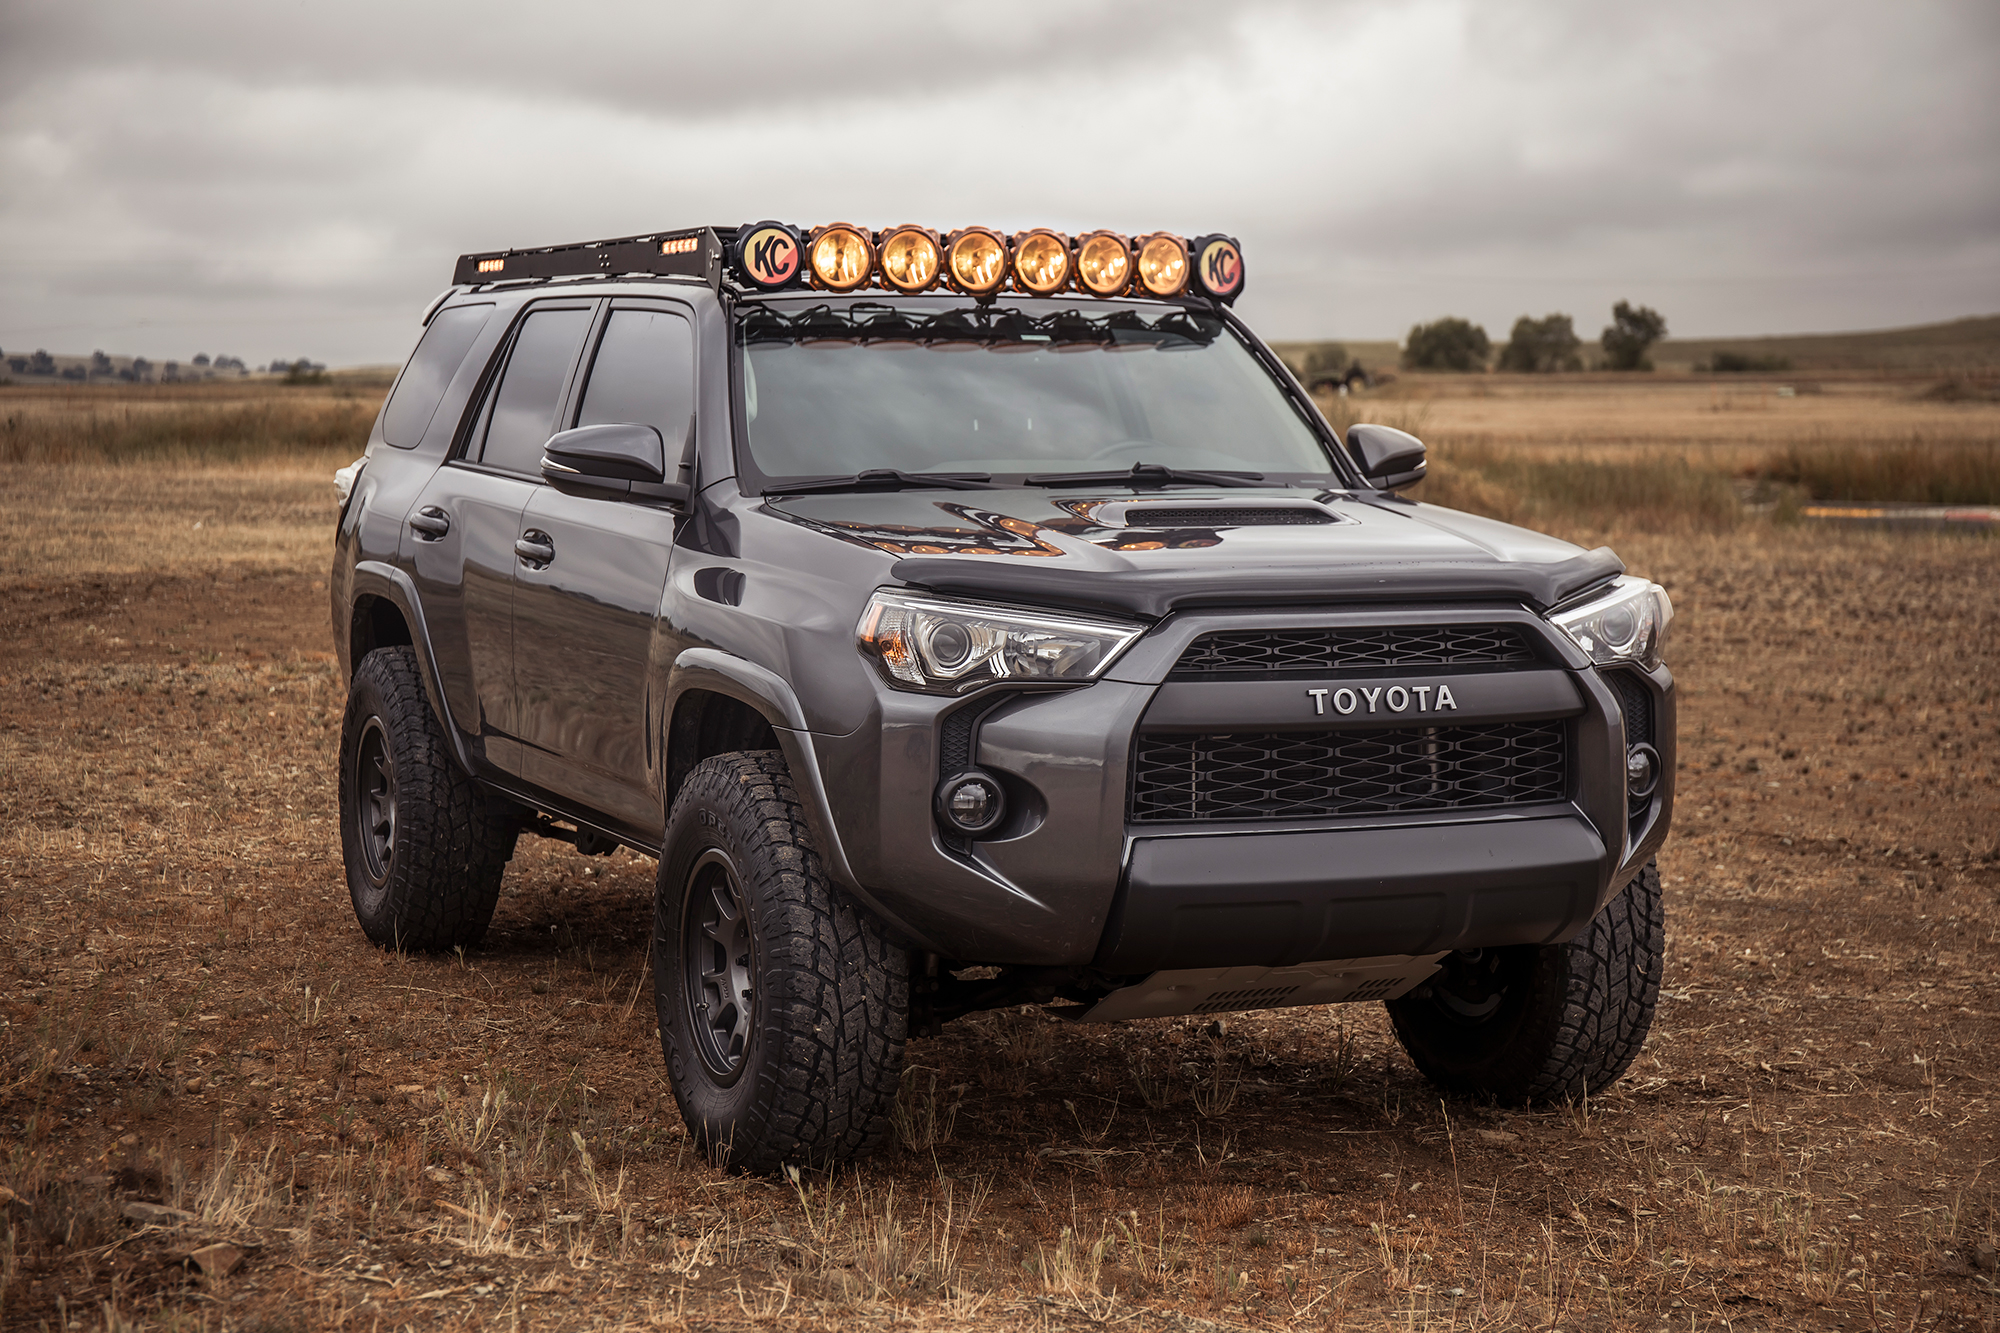
Just look at it! Wait until we slap some 35″ tires and a full-width front bumper on this beast.
Ok, let’s get to the specifics. The cost of the light bar on this roof rack is not necessarily what you would call “affordable”. If you are looking for the cheapest option on the market, this is not it.
Looks and functionality really set this light bar and roof rack apart from the competition. I know the tagline of Gobi is “the unmistakable look” but the KC Pro6 light bar really is the unmistakable look. This is the pinnacle light bar look that almost every offroad build and trophy truck is running. From the Ultra4 to the Baja 1000, you will see hundreds of builds running this style of light bar and no one does it better than KC.
Light Performance:
- Raw Lumens: 50″ = 18,400 lm
- Lux @ 10 Meters: 50″ = 6,700 lx
- Candela: 50″ = 670,000 cd
- Beam Distance (Meters): 50” = 1,637m
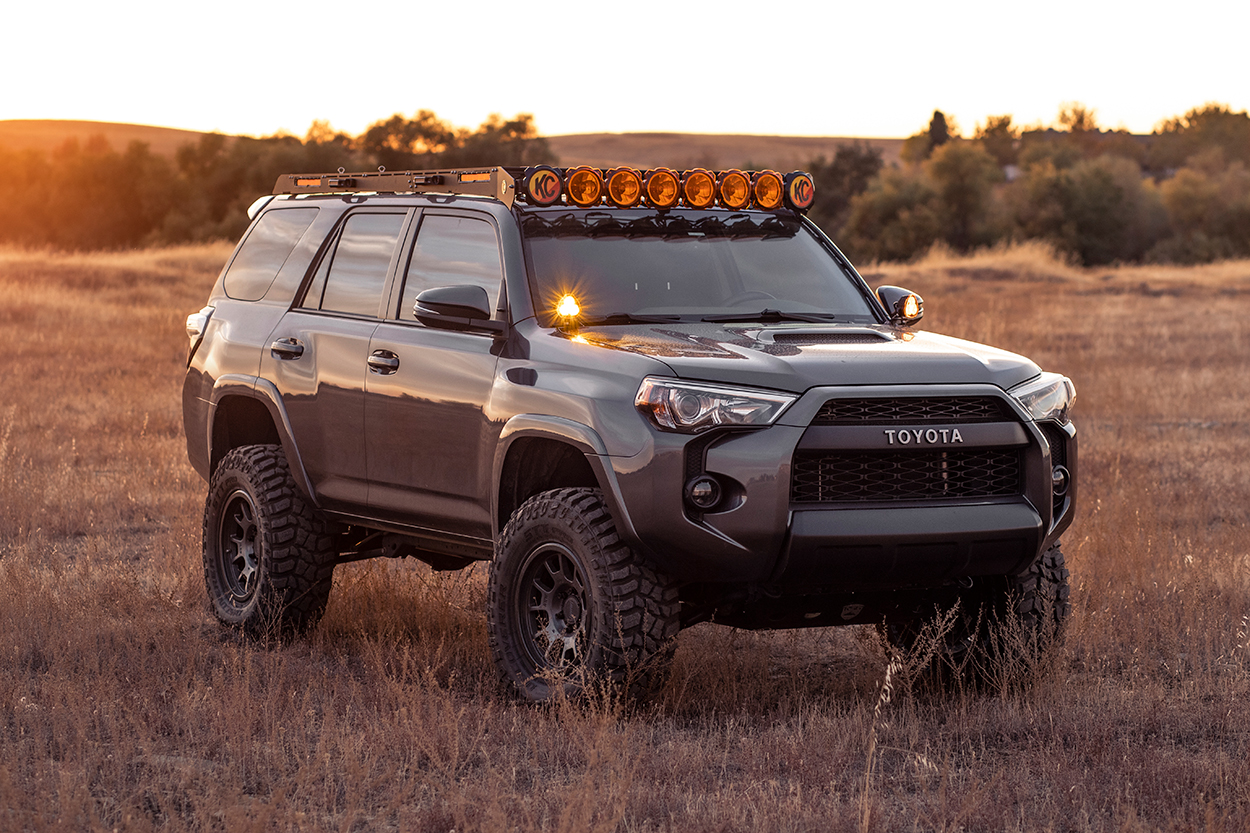
It’s going to come down to looks for a lot of us but the functionality really adds to this entire setup.
The scene lights running flush with the side of the roof rack rails really set this track apart from most. The t-slot channels on the roof rack crossbars are designed to be as customizable as you would like them to be. Anything you can imagine for this roof rack is likely possible. Put your imagination to work and see what you can come up with.
We are going to come out with a follow-up article on how we use the rack, mounting gear, eye bolts, etc.
I’m so stoked for the future of this build!


What is the set up on this particular 4Runner? (lift, wheels, tires etc).
Good day. Will this item fit a toyota 4runner limited 2014.
Can you strap a kayak down on this rack?
I can’t say this enough: DO. NOT. USE. SILICONE. Silicone sealants are not what you need to seal a roof rack mount. Most of them are hard-curing, making it impossible to remove that gunk should you want to change your rack. A lot of them are not UV stable or even weather resistant, and will eventually harden or deteriorate, losing their ability to prevent leaks.
Toyota didn’t seal the roof this way for a reason. Aftermarket rack makers are sloppy and lazy for suggesting its use. There’s going to be a lot of rusty trucks in a few years because Joe Instalander smeared a tube of valve cover gasket goo all over his roof.
SO….. then what do you recommend?
Butyl rubber. It’s a non-curing sealant that stays tacky and pliant for decades. It’s what OEMs use to seal critical joints that must remain dynamic (your roof rattles, vibrates, expands and contracts with heat, is subject to UV light, weather and wind loads, cargo shifting, etc.)
I installed my rack using butyl rubber and weatherproof rubber washers, check it out here: https://www.4runners.com/threads/ecotechne-roof-rack-installation-5th-gen.7090/
Also recommend the Sherpa rack system for the 4Runner, it’s one of the few or only racks that has an OEM quality dynamic seal. Asking a customer to smear their roof with hardware store glop is just sloppy manufacturing.
So jealous of the 8-lights. I picked up an 8-light Pro6 bar by itself from a guy who didn’t want them and kept the rack (since I already have a Gobi stealth). Searched high and wide for a way to get the 8 lights mounted but no fabricators were interested in the custom work.
Eventually I caved and just went with some Gobi custom work to mount 6 up. Not as cool but still damn bright and the look is growing on me
I just really prefer a roof rack with a mesh floor.
Pretty amazing set up – but you really should have more lights 😉 . Love the new KC Wire Channel – thats a pretty ingenious set up. One tip I just learned using caulk and grout – instead of dry towels – use baby wipes to get it off your hands, the tip of the tube, or any tools.
Bobby, nice man. Thanks for sharing. And for the Wire Channel.. are you referring to their wire hider? If so, yeah that’s really nice. We just ran that on our white TEP. Looks really clean.
I’ve got the same lift, how are you going to fit a 35”? All new suspension?
Yeah, we have the OME BP-51 with new OME UCAs going on here shortly. Might add shims on top as well to reduce the need for maxing out the preload.
Nice write-up! What’s the wind noise like with a light setup like that? I had a top-mount lightbar a few years back and it was noisy. Thanks!
For how big it is, not bad at all. Anything under 40mph is almost unnoticeable. From 40-50mph, the noise is present, however mild for sure (on a scale of 1-10 its about a 4). When you hit speeds of 70+ you can hear it but only wind noise, they no whistle or high pitch noises at all – unlike some other setups I have run. Even at 70+ mph, the wind noise can be drowned out with a little bit of music.