
The Ultimate 2-Person Overland Camp Kitchen Storage Box, Built for the 5th Gen 4Runner
Hours of driving behind you, the quest for the perfect campsite is complete.
The only thing left to do is throw together a meal before calling it a day. Having been on many group trips, there is usually a divide amongst campers with what happens next. The first group I will call the ‘mass exodus’ crowd. In order to make their meal, the majority of their vehicle needs to be unpacked because their camp kitchen is scattered across a number of boxes, containers or bins. They’ll spend the first hour of their camping experience sorting through it all to get things going, detracting from time spent enjoying views or sharing cold beverages with friends.
The second group has a system, they’re organized and they’re not messing around. Whether their cooking gear is stashed in drawers or an organized box, they have no problem locating and setting up their camp kitchen fast. They’ll get to that wonderful “ahhhhhhhh” feeling we all love when food is done and you’ve sat back in your favorite camping chair in record time to the envy of those who came unorganized.
Find it online:
The Ultimate 2-Person Camp Kitchen Box

To help improve your camp kitchen game, I’ve put together what I would consider the Ultimate 2-Person Camp Kitchen Box.
We’ll go through what’s in it and how it’s organized to give you inspiration and direction with your own setup making your camp experience that much more enjoyable.
The Storage Box

Zarges K470 Series Cases
How to contain your camping kitchen is the first decision to make.
Drawers are a great option for those who have dedicated camping vehicles, but they come at the cost of weight and configurability. I like to use stand-alone boxes for my camping gear because I can store them securely in my house when I am not using them, I can remove them from the vehicle if needed and I can customize what I bring on a trip to trip basis.

For the camp kitchen, I chose the Zarges K470 Aluminum Case for its durable construction and high-quality finish. These cases are the go-to for travelers crossing the globe, strapped to expedition vehicles in extreme conditions without issue or hesitation.
The K470 case comes in several different sizes to best suit your layout. The Ultimate Camping Box (40678) is shown above with the K470 40810 case securely stacked on top. This ability to stack cases is great for organization, even on the roughest roads.
This article will highlight model number 40678 as the case of choice for the 2-person camp kitchen. It fits well in the back of the 4Runner dimensionally and it’s one of the models that is IGBC Certified Grizzly Bear Resistant, making it suitable for food storage outside the vehicle if needed.
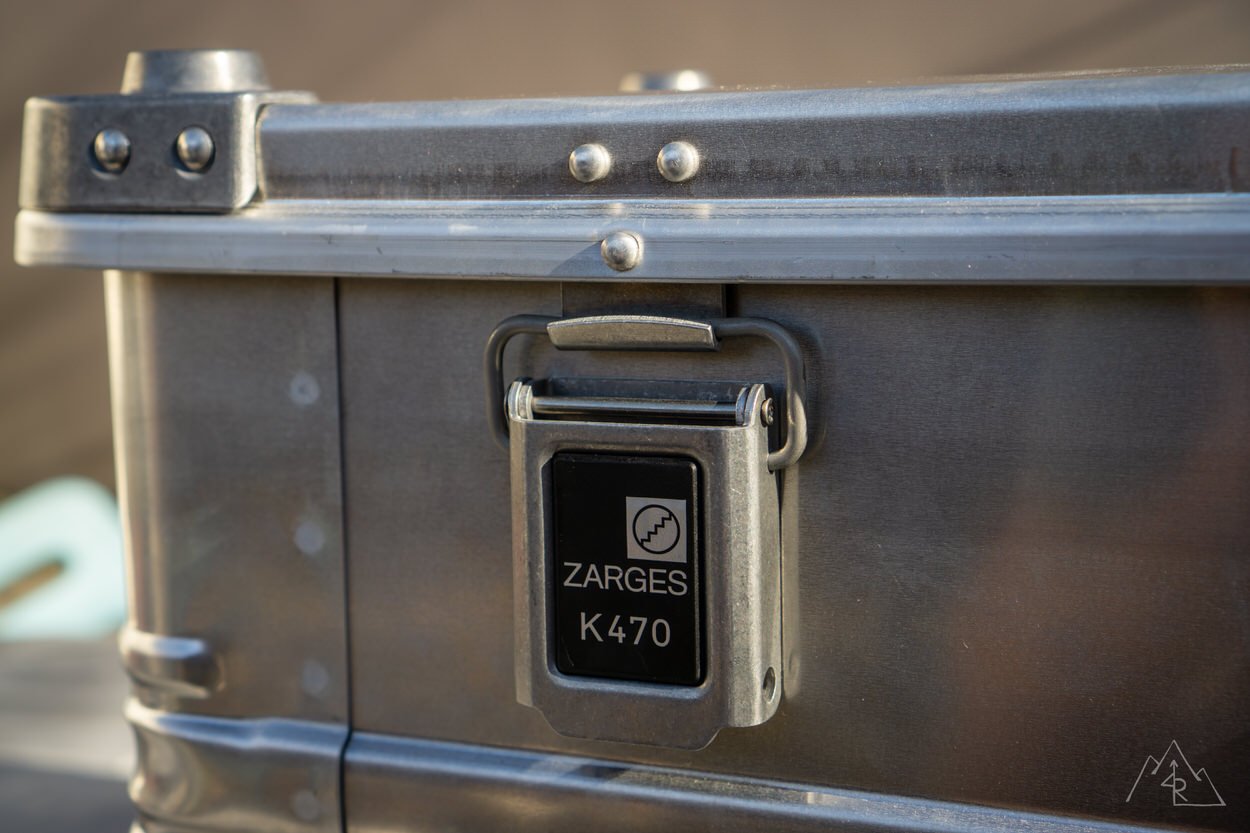
It’s no surprise that this case is bear-resistant with its aluminum construction, riveted seams and hinges, and lockable latches. Not to mention the lid includes a sealed gasket, making the case highly resistant to dust and water intrusion.
Knowing that this camping kitchen would be used for decades, it was a no-brainer to choose the K470 as the starting block.
What Belongs in Your Camp Kitchen?

Creating the best camping box will involve some trial and error as the user to dial in what you need.
The most common problem with many peoples’ kitchen boxes is they become cluttered and unorganized with unnecessary… junk. If you aren’t sure what you need and what you don’t, take two boxes with you next time you go camping. Why two? One will have all of the gear and supplies you think you’ll need and one will be empty. While camping, place items that you use into the empty box, really focusing on what’s important.
At the end of your test trip, you’ll have a clear division of everything you used and what you didn’t really need. Bring these divided boxes on a few more varying trips, and in the end, you’ll have a well-sorted box of the camping essentials that you really need on your trips.
Once your case arrives, you can start organizing and perfecting your camp kitchen!
What’s in the Ultimate 2-Person Camp Kitchen?

I’d been using my existing camp kitchen for a number of years, and have developed a good idea of what I would do differently if I created a new version. Here’s what I have come up with (see above).
Primary Stove: Partner Steel Single Burner Stove
Two or Three Burner Stove
I inherited a three burner Primus stove from my parents when I first started camping more regularly.
It was something they bought way back when I was a kid and had probably been used on a total of one trip. It has accompanied me on a lot of trips and is still at the ready if needed. Figuring out a good place to pack the larger Primus was the only problem I encountered while using it. I stored it in a number of different ways and they usually worked well, but I could never find an elegant solution. This inefficiency bothered me.
When thinking about how I would ideally store a stove, my mind always jumped to “in the box.”
Switching to a Single Burner Stove
Partner Steel isn’t a new name in outdoor recreation. They have a reputation for building some of the toughest and most well-built stoves on the market. The first time I saw their single burner stove, I knew it was exactly what I had been looking for. It fits perfectly in the Zarges case, and will likely last a lifetime with good care and maintenance.
Switching to a single burner stove was a choice I made after realizing I never really used more than one burner at a time for cooking, and it certainly has its drawbacks for some depending on what you like to cook. I have worked on changing my camp menu to suit the stove with great results!
Partner Steel does make other sizes that fit in larger Zarges cases, but I would challenge you to be as minimal and honest as you can with your stove needs.
Find it online:
Secondary Stove: Snow Peak Bi-Pod
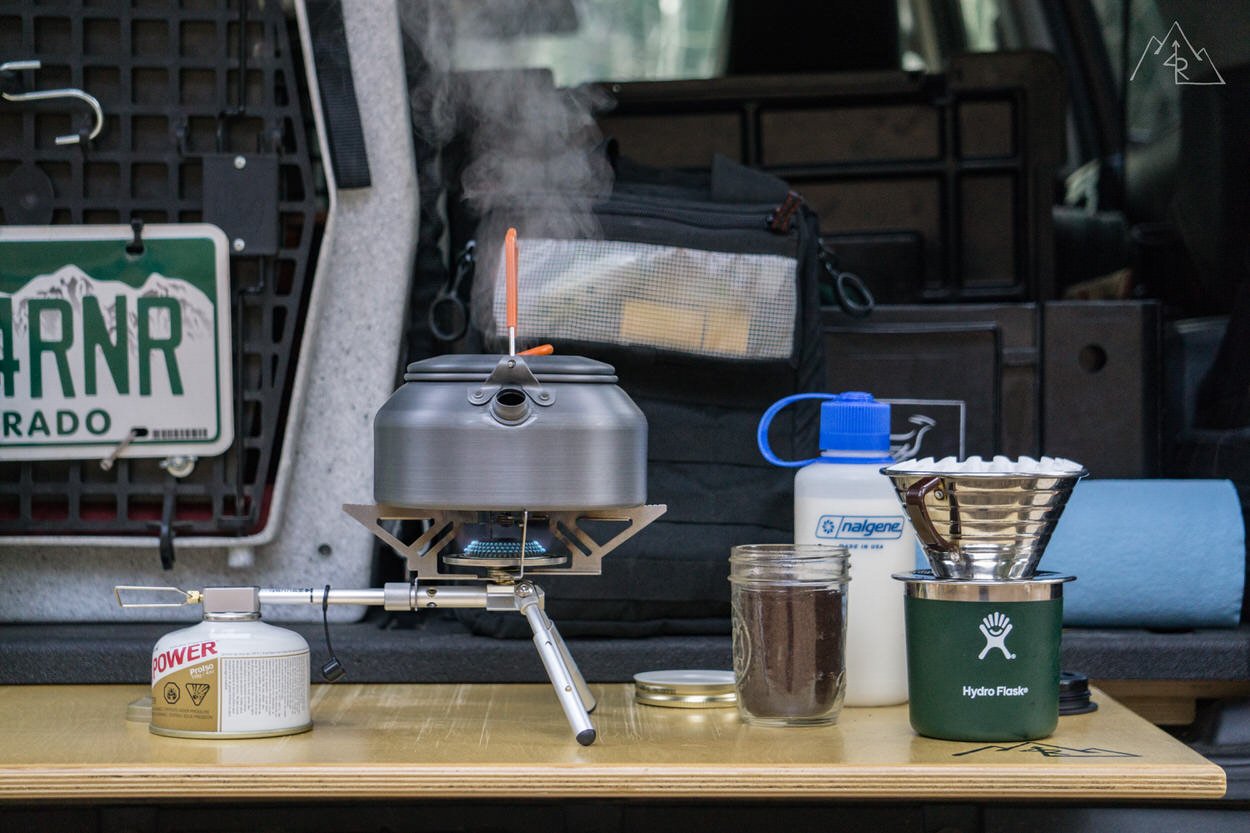
I purchased a Snow Peak Bi-Pod as a lightweight back-up stove to the main Partner Stove.
It’s a very compact, yet capable burner that uses standard IsoButane canisters to heat whatever you need, quickly. It uses the canister itself as a support and gets the Bi-Pod name from its support two legs that keep even a good-sized pot sturdy. This small stove packs away in the kettle (which packs away in the pot) and can be used in concert with the Partner Stove as a side burner if needed.
Having a back-up option for your stove is always a good idea, whether it’s a Jetboil or a trusted single burner, make sure you go prepared.
Find it online:
Fuel: Colman Propane, and IsoButane
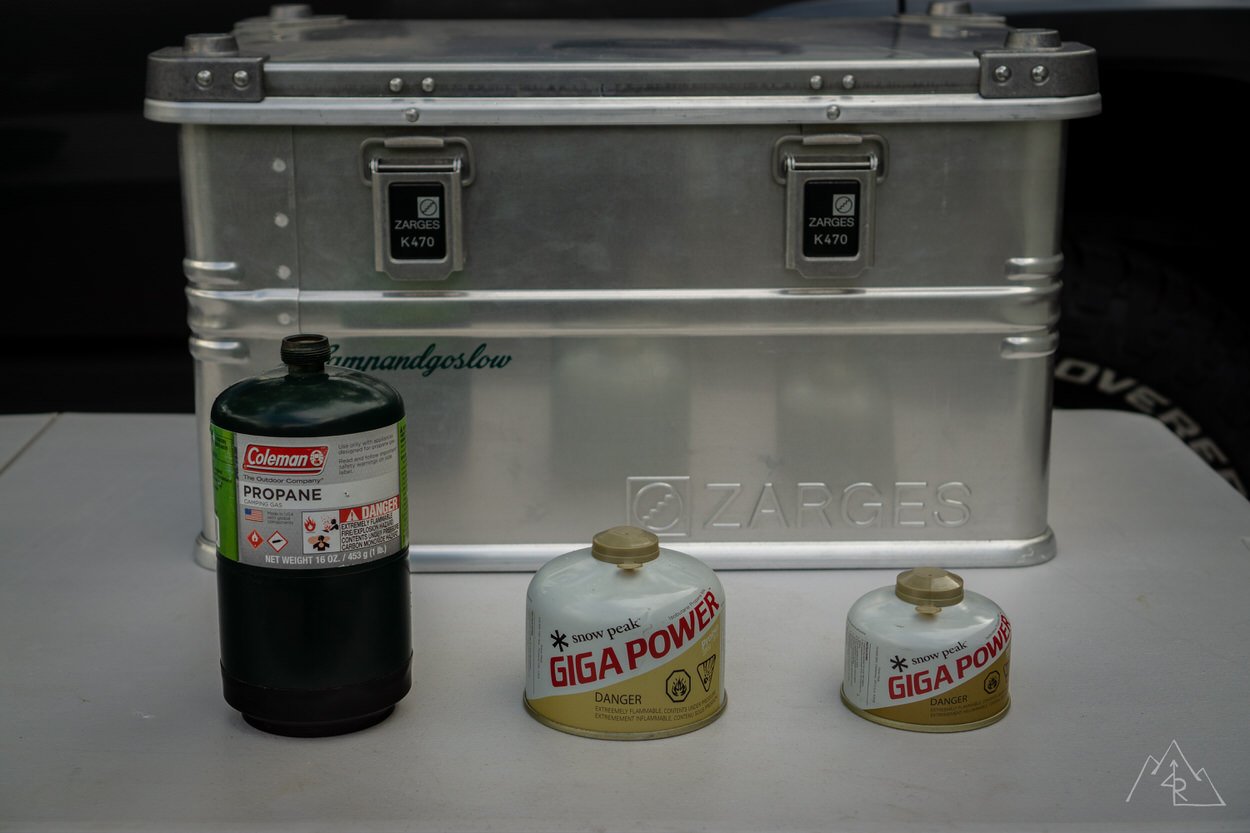
Coleman 1 Pound Propane Canister
It’s a staple for any camper, the “green fuel bottle!” Compact and reliable, these propane pressurized bottles last a good long while and store well in a camping kitchen. Just don’t forget to keep the plastic cap that comes with it as an added safety precaution when storing.
Find it online:
Snow Peak Giga Power 110 and 250 Canisters
Snow Peak’s Giga Power fuel canisters use a blend of propane and IsoButane for use in any condition.
They’ll function down to about 15ºF before any issues arise, not a big problem with vehicle-based travel because they’re likely in a more temperature controlled environment initially. The smaller 110 canister is a back up for the larger primary 250 canister, both are compatible with the Bi-Pod stove and my torch.
Find it online:
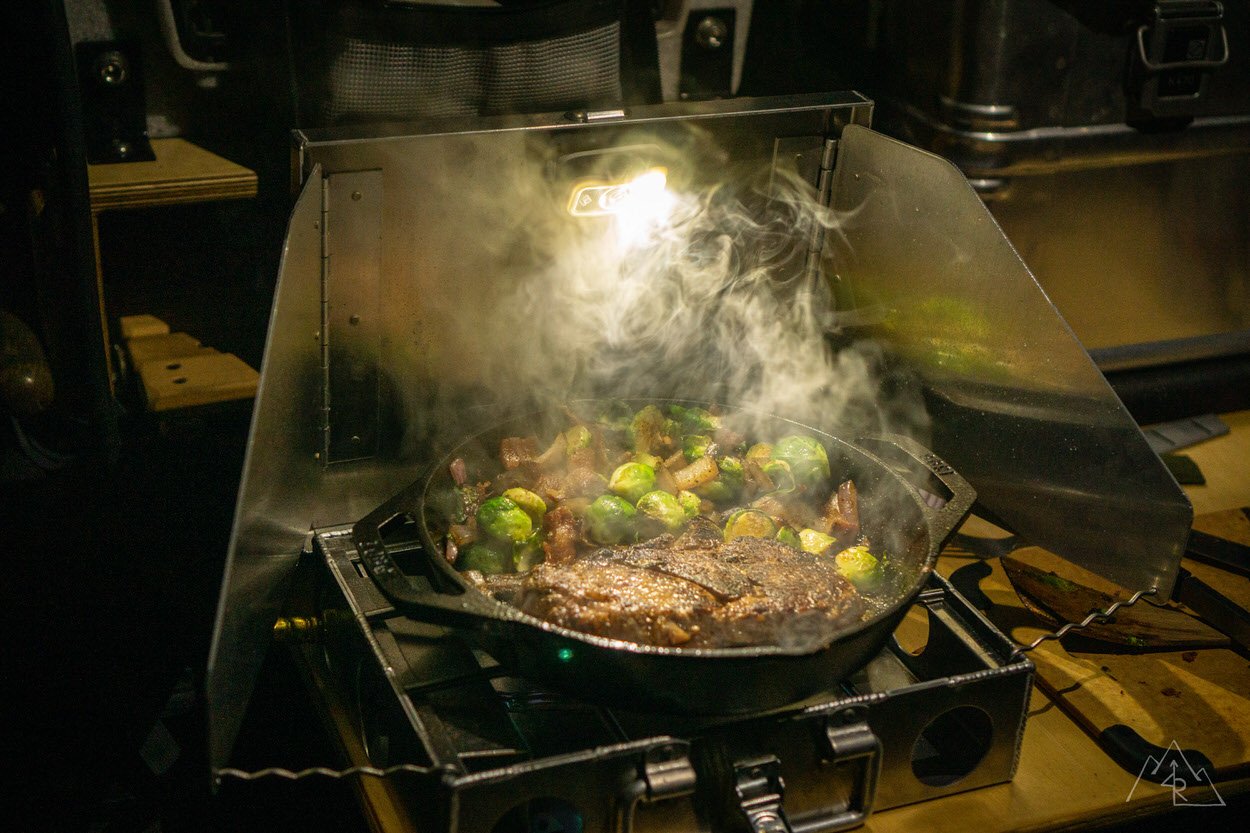
Cookware: Cast Iron
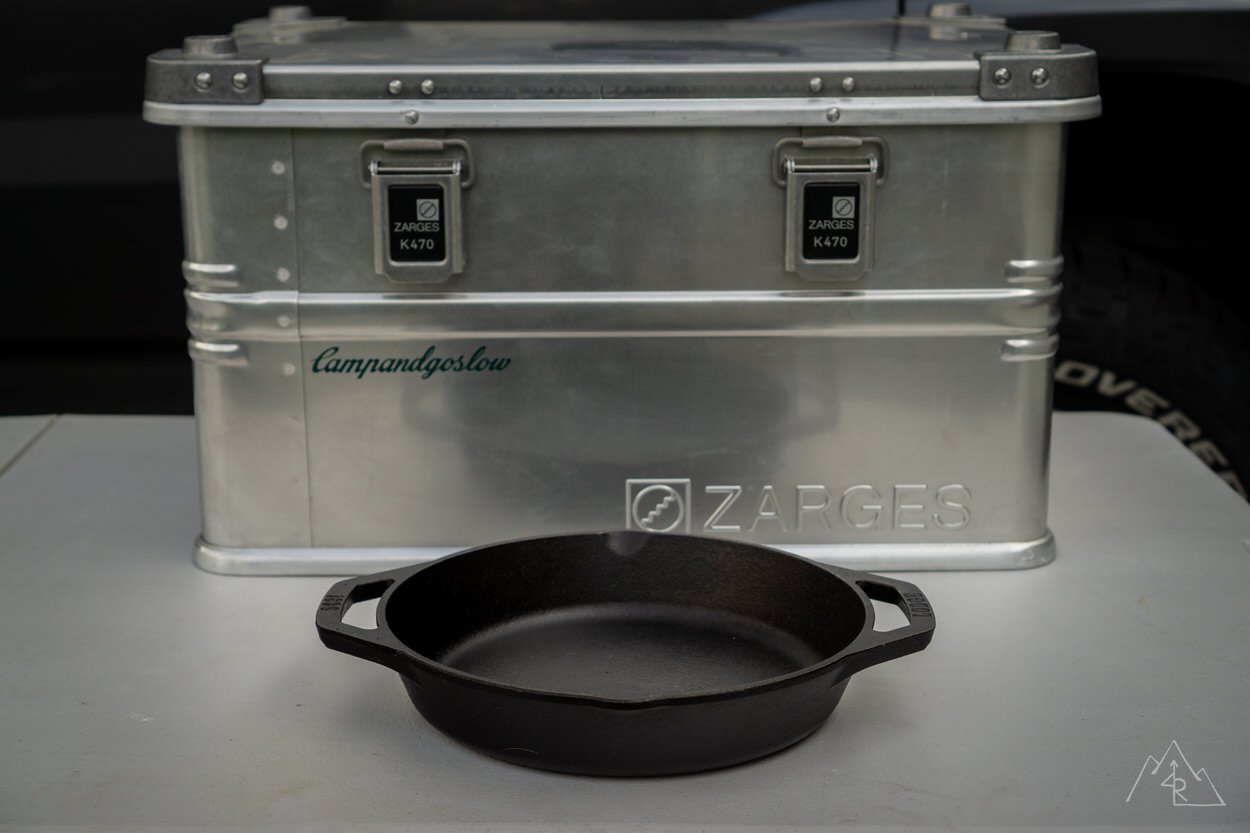
Lodge 10-1/4” Double Handle Cast Iron Skillet
If you love to cook, you’re probably no stranger to a cast-iron skillet.
Why bring a cast iron skillet on a camping trip? They’re sturdy, allow for a wide range of cooking options, are easy to clean and maintain, and can be used on a stove or a campfire. Sure they weigh more than traditional camping skillets, but I’ve never been impressed with the pans I have had in the past.
I’ll take the weight for the flavor and versatility any day. This dual handled version fits well in the case and on the stove.
Find it online:
Cookware: Pot and kettle

Primus 1.8L Pot
I bought this small pot as part of a larger set I used to use.
I found that I used this pot the most, so it was added to the box. Any pot around 2L is a good size for cooking meals for a 2-person dinner, unless you’re into cooking large stews or pasta meals on your trips. If that’s the case you might opt for a larger pot here.
Find it online:
GSI Halulite 1L Tea Kettle
I pack a kettle along on my trips as a fast way to boil water for dehydrated meals and most importantly, coffee! I use a pour over style filter for my morning Joe, and the kettle with its spout allows for a controlled flow. This little kettle has been a great addition to my camp kitchen and conveniently stores the Snow Peak Bi-Pod stove inside. As a bonus it fits perfectly in the Primus pot, saving space in the case using the Russian doll effect! Kettle
Find it online:
Coffee Maker and Coffee Setup
Kalita Wave 185

This pour over coffee maker uses a paper filter and produces a mean cup of coffee.
It’s simple to use (with proper instruction) and thanks to the paper filter, it’s a breeze to clean up with no messy coffee grounds. The durable metal construction means you can be a bit rough on it without the risk of breaking it. You can make an easy 2 cups of coffee with the 185, plus a little extra for a lucky campmate. The Kalita is another kitchen staple that will last for a long time in your camp kitchen.
Find it online:
MSR Mugmate Coffee Filter
This little guy is a backup for my Kalita in the off chance I run out of filters or some other coffee disaster.
The Mugmate uses a stainless steel screen to separate your coffee from the grounds and brews your Joe in the mug itself. You’ll have to wash it when you’re done, but it’s about as simple as it gets and a great “just in case” item to make sure your morning has a kick.
Find it online:
Cooking / Kitchen Organizer Setup

Blue Ridge Overland Gear Cooking Kit – $80
I have my B.R.O.G. Cooking Kit Bag stocked with everything I need for cooking. A sharp knife for cutting, some tongs for flipping steaks on the cast iron, a good wood spatula to toss veggies. Pretty much bring what you’ll need to get your cooking done. Those specific items will vary from person to person, group to group. It includes small inner pouches for organizing spices, utensils, and other goodies, along with slots for all of the larger utensils. It’s a versatile bag that keeps things in order.
Find it online:
Cutting Board: Epicurean 11.25”x 14.5” Non-Slip Cutting Board – $32
This size cutting board works well for camp cooking, and the non-slip grips are handy when it’s being used on a hard surface like a swing-out table. The Richlite material they are made from is dense, non-porous, and offers a very resistant surface for cutting and chopping.
As a bonus, you can label one side for meat and one for veggies to keep contamination down when cooking without having to wash. The rubber bumpers on the corners will keep the dirty side from contacting your cooking area.
Find it online:
Water filtration: MSR Guardian
A water filtration device isn’t something that anyone plans to need, however, water is probably the most essential part of any type of travel.
If you find yourself in a situation where more potable water is needed, having a good water filter on-board will pay off big time. I chose the MSR Guardian for its design and filtration abilities. I can pump nearly any kind of water and remove particulates, bacteria and even common viruses like E. coli. Developed for military use, this filter packs a punch and screws on to any wide-mouth Nalgene or Hydrapak bottles.
Find it online:
Camping Dishware & Cups
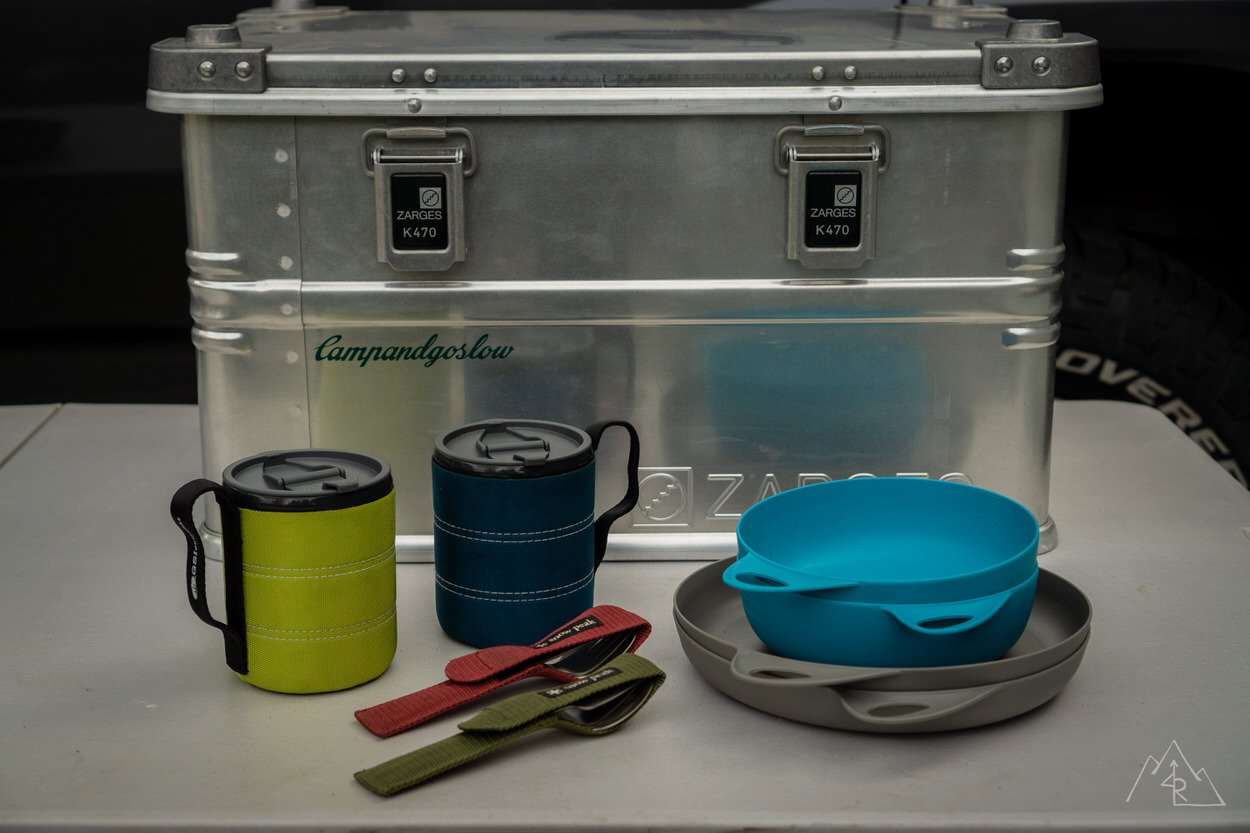
Sea to Summit Delta Plates and Bowls
I chose the Delta plates and bowls to add to our camp kitchen because they are easy to use, easy to clean, and are sturdy enough to handle the beefiest of meals (pun intended). The thumb grip and patterned bottom keep your hands from getting too warm with hotter meals and allows for the coveted “one-handed shovel” method I use for Mac n’ Cheese.
Find it online:
Snow Peak Titanium Utensil Set
Light-weight and to the point, we have had these sets for a number of years. Ours came with a spoon, fork, and knife in the set but the new version from Snow Peak is just a spoon and a fork. Whatever brand you use, a good titanium cutlery set will stand up to decades of use and is a much more eco-friendly way to eat over plastic, disposable utensils.
Find it online:
GSI Infinity Backpacker Mug
I got these for a backpacking trip last year after seeing MAK and Owen (Bound for Nowhere) with them and they have become my favorite camping mugs. They have a closable lid which is great for keeping your drink off of you if you’ve had a few, an insulating sleeve to regulate temperatures and a plastic inner “cup” with measurement markers for quick cocktails or dehydrated meals. Just get a set and thank me later.
Find it online:
Other Miscellaneous Camping Staples:
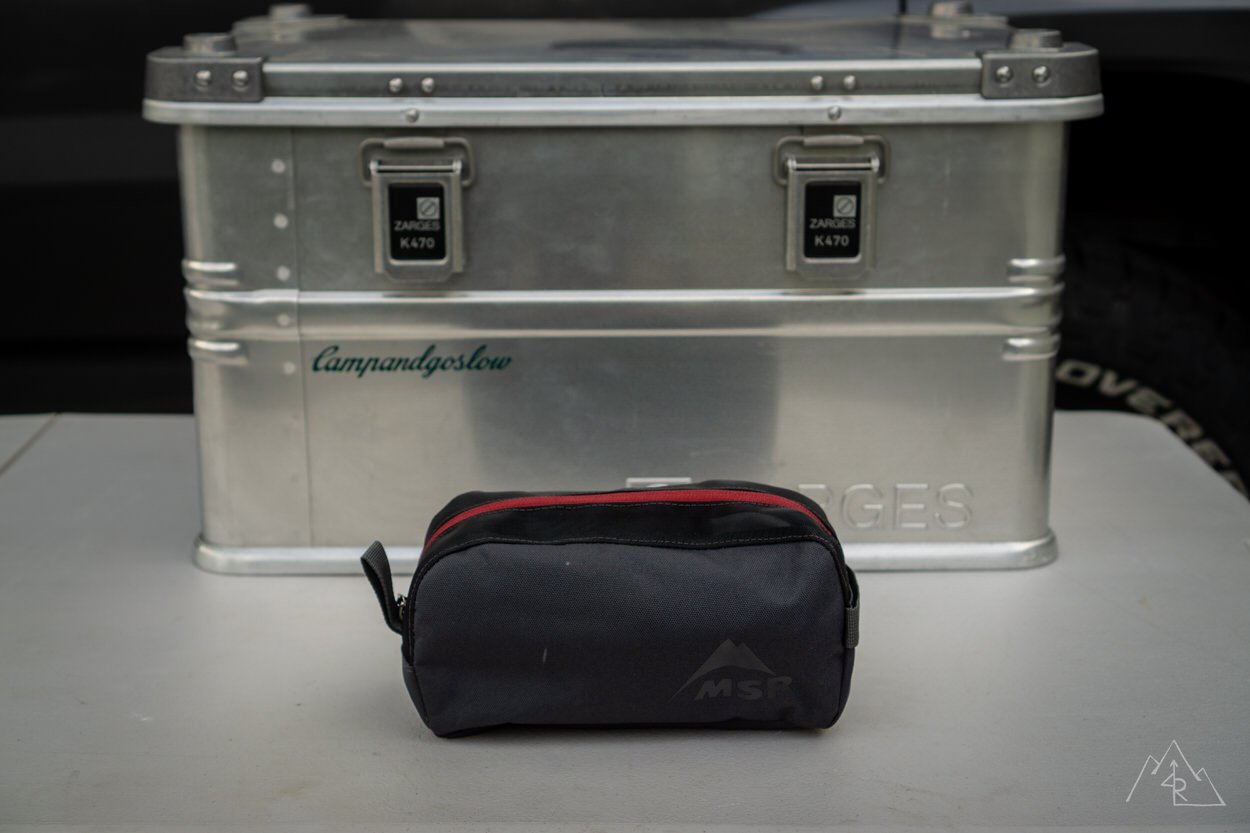
The Fire Bag: Blue Ridge Overland Gear Medium Pouch
I use this small bag to keep all of my fire starting equipment including a common BIC lighter, matches, storm-proof matches, and my personal favorite, the Snow Peak GigaPower Torch ($58). Make sure you’re well equipped to get your all-important campfire started in a number of conditions!
Find it online:
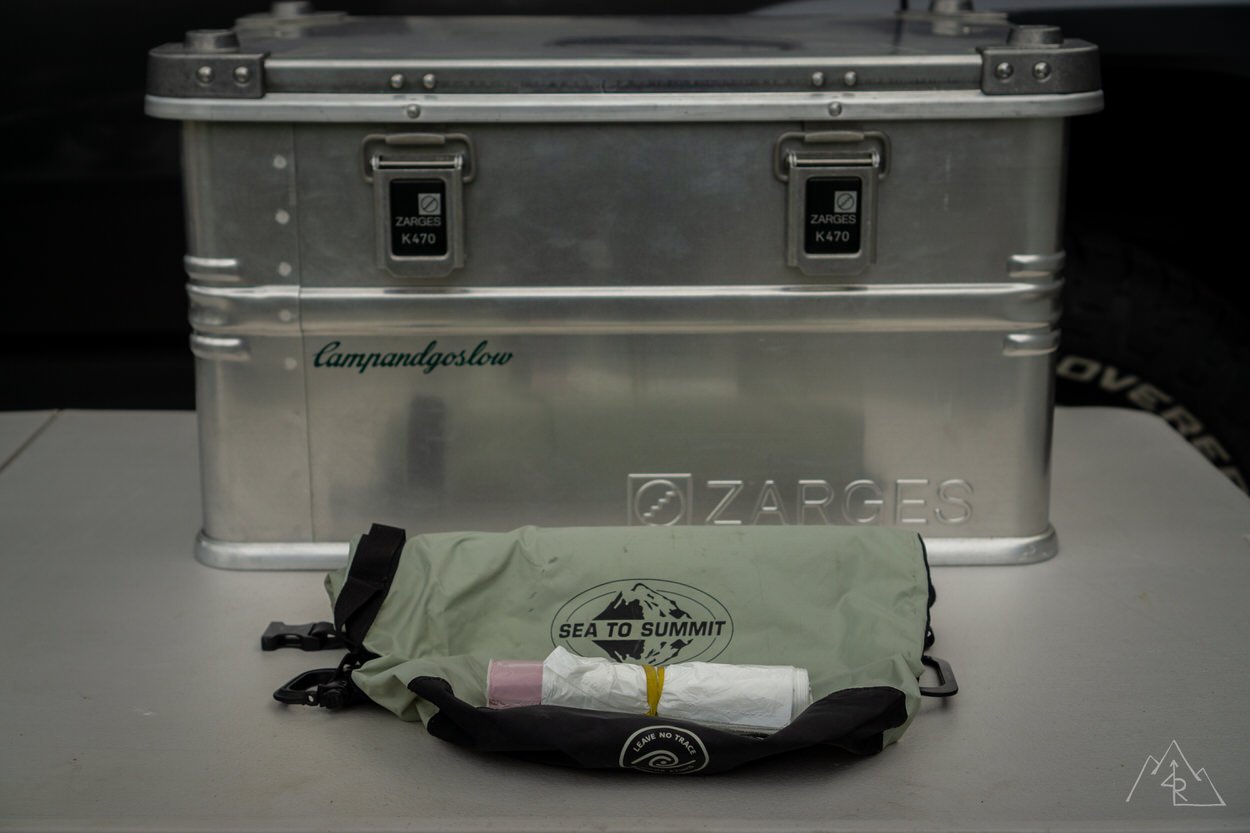
Trash Bag: Sea to Summit Trash Dry Sack
Pack it in, pack it out. The common backpacker’s phrase translates well into vehicle camping too! This small bag is big enough for my wife and me for a 3-day camping trip. We’re mindful of our waste and calculate minimal trash into our purchases when we’re preparing for a trip (canned beer vs. bottled, etc). With no leaks and or smells, this bag holds up just fine in the back of the 4Runner when we’re done camping and looking for a place to dispose of our waste properly.
Find it online:
Camp Lantern: Black Diamond Apollo Lantern
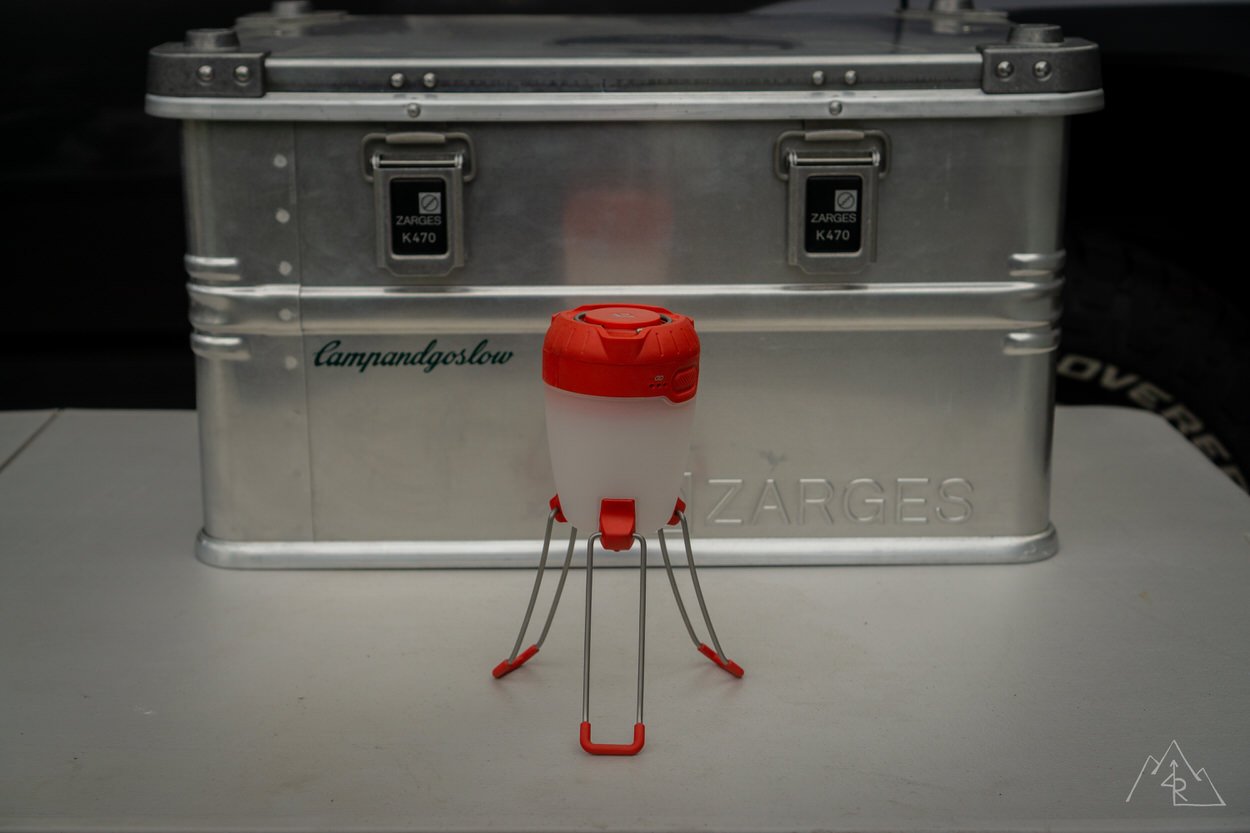
I have a number of camping lights on the 4Runner that I use constantly. Eventually, you will need a good light source away from the vehicle and a free-standing lantern is a great option. With both rechargeable and AA battery sources, the Apollo is a good value for money and can even charge small USB devices!
Find it online:
Other Notable Items
I’ll list a few other important items that I bring with me on my trips, and their uses should be rather obvious. Maybe you will spot something new that you’ve never considered!
Other notable items:
- Bug Spray (I use picaridin-based products)
- Dawn Soap
- Bio-Based Body Shampoo
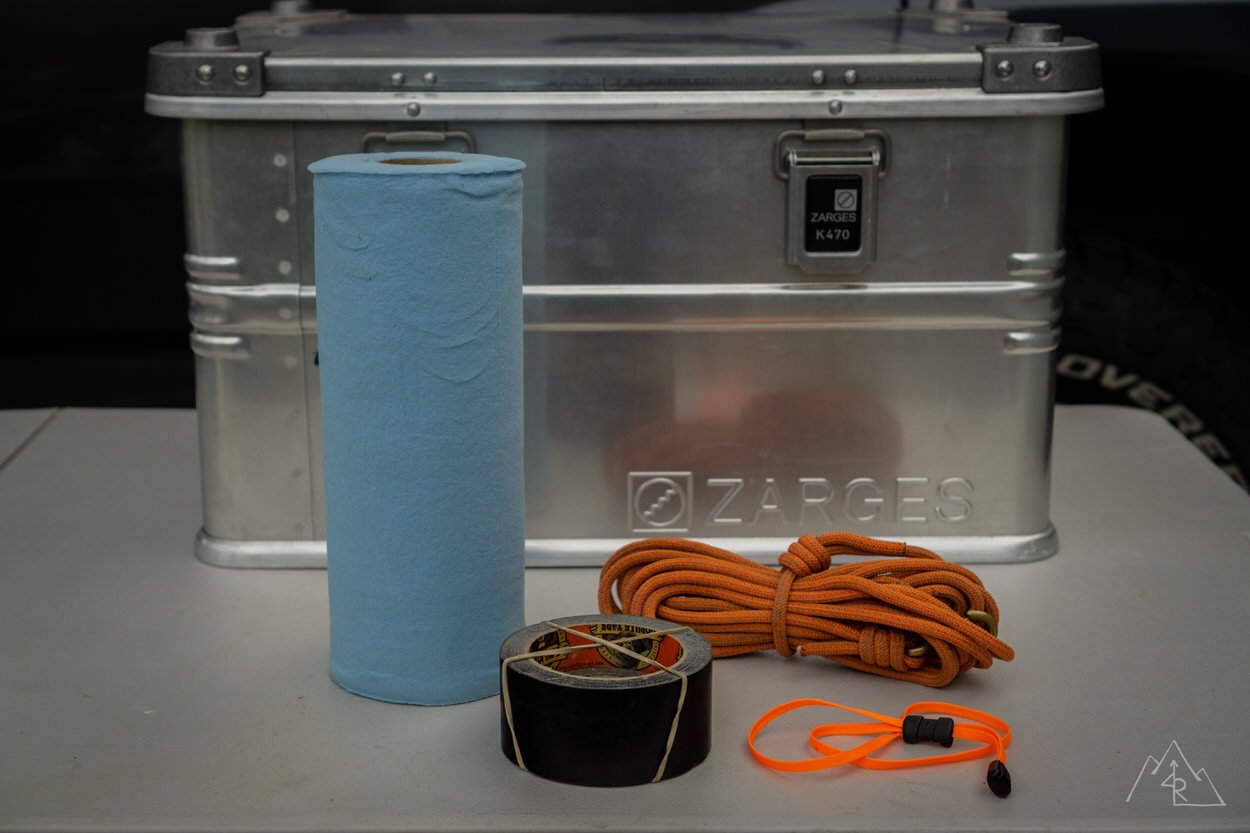
- Scott Shop Towels
- Garbage Bags
- Gorilla Tape (2” & 1/2” Rolls)
- Length of Rope
- Nite Ize Better Band
- Sea to Summit Wilderness Wipes
- Cleanwaste GO Anywhere Toilet Kit
- Misc. Bag of Hand & Body Warmers
Organization

To organize the Ultimate Camping Kitchen, I used two methods.
For all of the smaller items, I used stackable bins as containers. These allow for easy access to two levels of loose and small items and they can be removed to be restocked or used elsewhere around camp.

For the larger items, I used TrekPak dividers to create custom compartments for everything in the Zarges case.
Although TrekPak is expensive, you can make your own stuff on the cheap, check this out.
The key is to make things just tight enough that they don’t shift around and knock things loose, but with enough wiggle room to make things easy to get in and out.
The padded dividers are very helpful to keep things separate and allow you to remove individual items without having everything else in the box fall in to fill the void. That alone was a huge improvement over my previous camping box.

I hope this article helps you develop your own Ultimate 2-Person Camp Kitchen, as your example will truly be your own creation. This box has taken me a long time to figure out with many “how would I make that work” questions I’ve had to answer.
I hope that you can draw some inspiration and maybe a few creative ideas from my setup, ultimately getting you to the all-important step of starting something yourself!

What’s in your camping kitchen?! Comment below!
I Finally got around to completing my camp kitchen and thought I’d share my experience to help others. I decided to splurge on the recommended Zarges box because it was going to be the foundation of my build and i want to stack a box on top for recovery equipment . In hindsight, I might I have chosen a larger size to accommodate the two burner stove I already own. I found cheaper alternatives for many of the products listed in the article. The Camp Steel stove was out of my price range, so i decided on a Gas One- GS-3900p which has similar dimensions and was $60. I also made my own TrekPak, which was easy enough, but isn’t as durable as i would like it to be. Getting everything that was recommended in this article to fit in the box took some creativity. I have included pictures to show folks exactly how i did it. Feel free to ask questions.
http://www.dockoutdoors.com
anyone have a link for the stackable bin containers?
Hey Max, awesome article! i had a question about your tie down’s and specifically how you tied down your Zarges case. Thanks!
Max,
I just found this and was wondering if you have updated your kit or made improvements? I started purchasing the items to replicate it. Wondering if you can post a picture of the top Zarges. thank you
I have been thinking about building out a kitchen box similar to this one for awhile now and folks might benefit from some of my research. The Partner Steel stove is beautifully built, but looks to be discontinued….and is a bit pricey. I have been looking at the Gas One GS 3900p Duel Fuel as an affordable option that takes up a similar foot print. Also, I’d love to be able to build out the Zarges box, but again, it’s a little out of reach. Folks may want to look into Swiss Link Aluminum. The boxes aren’t as robust and the boxes have to be the same size to stack, but they are also half the price with free shipping. Food for thought. Happy Trails.
the stove is still produced. I ordered mine 12/3/21. Good luck
Where did you get the table or space board that sits just above the inside back bumper?
Hey Max – great write up. Question – have you ever actually used the cast iron pan on the Snow Peak stove? I love the idea of a cast iron griddle when camping, but I was wondering if the Snow Peak stove can handle the weight and has enough ability to cook at lower temperatures … I know backpacking stoves sometimes have essentially two settings … off and full blast, as they are designed around boiling water/melting snow.
Hi Dave — Just looking through this article again, sorry I missed this comment earlier. I don’t use the cast iron on the Snow Peak Bi-pod, only on the Partner or the campfire! Best — Max
@life.to.the.max?
Do you have a link to your slide out table build?
I don’t at this time. I built it about 4 years ago now and haven’t made an official build thread for it, however it’s been on my back burner for a while now, and I have been tossing around a v2 of my platform… So we’ll see, something might show up here in a while! // Max
Thanks for the Reply, Max. Is the pull out table on tracks or is it free floating? I read your write up, but didnt notice that detail.
It’s a custom designed pull-out and it fits inside the base structure
That bike rack is slick in the one pic. I like that tilt out option. Do you have any information on that rack?
You know… I just happen to have what you’re looking for 😛
CLICK HERE
//Max
Sweet! Have you seen or reviewed the Thule Helium Platform 2 rack? A bit more pricier than the 1Up. Will have to compare the two at some point and see if the cost is worth it. I like the ruggedness look of the 1Up as I hadn’t seen it yet. As usual, great article. Thanks again!
Great write up Max. In the ever quest of finding the right kitchen chuck box, cookware/utensils, and finding out what works and what doesn’t work I have found that the Yeti Load Out Gobox 30 has been perfect for my use. It’s a tiny little box, probably smaller than the Zarges box but because of the internal dividers, tray, and inner pouches it stores a ton of stuff. Basically everything for the kitchen minus the stove. Once you find the right combo it really does make life a heck of a lot easier!!!
I have seen those in person, and they’re really well built! I like the built in modularity using the dividers and lid pocket, however at nearly half the volume those aren’t big enough for my kitchen needs. But like you said, everyone has the “right combo” that works, and that Yeti box is a great option!
Yes they are on the a tad small size but it’s crazy how much I can stuff in there because of the built in organization tray, compartments, and pouch. Initially when I looked at them I didn’t think it would work but somehow I managed to cram all my stuffs in there. I’m assuming the GoBox 30 means liters (??) but yes if it were a 40 it would be nearly perfect. I think I was able to save some space by going with lightweight camping pots and pans vs a Lodge cast iron. I’ve been carrying the skottle with me anyways which is carbon steel so I don’t necessarily need cast iron. I still love how you you can fit a Partner Steel and deep dish cast iron in the Zarges. That’s really a killer combo.
I think your assumption is correct, that the 30 means 30L of internal storage. I love fitting the stove and pan in there. It was one of my main requirements with the new Camping Case 🙂
I’d love to have the Zarges boxes, but as a cheaper alternative, I bought the Ridgid tool boxes from Home Depot after seeing a Youtube video on them. They are stackable and work fine.
https://www.homedepot.com/p/RIDGID-22-in-Pro-Tool-Box-Black-222570/205440481
https://www.homedepot.com/p/RIDGID-22-in-Pro-Organizer-Black-222571/205440492
https://www.homedepot.com/p/RIDGID-22-in-Pro-Box-Black-226036/206291778
There are definitely some cheaper alternatives that have the same storage capacity as this case. I have been using the Milwaukee line of boxes for years for my work tools without issue. The difference for me was that I want a box that can stand the test of time, and all of the abuse that comes with off-grid camping. I think that in that regard the Zarges is a better product in the long run, but the same philosophy of creating your own kitchen setup works for any box or case that you prefer!
Hi Max. Just bought a couple of Zarges boxes. I see what you mean now. Very nice!
Id love to see the plans for that backend, i love the pull out table. Do you mind making a post about it, or where i can get one or make one like it?
Hi Holden! My Explore4R Platform System is one of my favorite and most asked about mods to the 4Runner. When I built the platform it was designed to do what nothing else on the market could, and to this day it still holds up great! I will have more time on my hands this year than I have previously, and revisiting the platform in the form of a DIY or detailed post has crossed my mind. Keep an eye out for something on it soon. For now, the link above can give you some more information on it. Thanks! Max
There used to be a link for Max’s backend build on here somewhere, but there were no build plans, just photos. I used his photos to build a platform almost identical to his. With all of the engineering, woodwork, routing, l-track installation, etc., it was quite the project. Turned out great though.
Didn’t know we would be going into so much detail on my back-end! Jokes aside, I’m glad you were able to fashion your own version of the platform!
Good article Max. Seeing the back of your truck reminded me that I used your photos of your platform to build my own similar to yours, and it worked out great. The only change I made was using two pullouts underneath instead of the one larger one.
well done. thank you. i like to cook on a slightly larger scale as we are often feeding 4-6 people but this gave me some really good pieces to jump into a better organized system. thank you
That’s great! This whole “system” is pretty easy to expand for more people as the concepts don’t change 🙂 I hope you enjoy building yours as much as I did with mine!
Excellent article with considerable practical and useful information. Thoughtful and well written. Thanks.
So glad you enjoyed it!