
Crutchfield Focal Integration (2-Way) Speaker Upgrade Step-By-Step Install For 5th Gen 4Runner
4Runner Speaker Upgrade: Improving audio quality using aftermarket speakers, adapters, Silicone baffles and sound deadening
Like many of you reading this, I love my 5th Gen 4Runner but find the factory audio system a little lacking.
The speakers that come in the 4Runner are in the dash, front and rear doors and the rear hatch. While these are “not bad” for a factory system, they still leave a lot to be desired. These speakers seem to get overwhelmed, leaving the music sounding muddy and distorted.
Soon after purchasing my 2019 4Runner, I decided I would make an upgrade and I would use products by Focal. Focal is known around the world for its quality audio equipment. Their speakers are used by audiophiles and in high-end vehicles like Icon’s reproduction FJ40s.
Whether you chose Focal or another brand, swapping in aftermarket speakers can be a bit intimidating. The confusion isn’t helped because a lot of company’s fitment guides have errors and misinformation. This article is meant to show you how to install a regular 6.5” speaker in the rear hatch but the information here can be applied to any location in the 4Runner.
Along with this, I’ll show you some interesting products to make the most out of these new speakers. This information can be applied to any speaker location in your 4Runner.
Bolt-in Replacement Speakers
Backing up a bit, when I looked into upgraded speakers, I talked to some other 4Runner owners and found out about the Focal line of Toyota specific speakers. They are Plug & Play and really improve the sound of your system, even when powered by the factory Entune receiver. Before beginning my upgrades I read a lot of different information about speaker resistance (4 ohms, 2 ohms, parallel, series).
I pulled the factory speakers, did some testing and found the following:
- All factory speakers are 4-ohm resistance
- Front (dash and front doors) are wired in parallel
- Rear (rear doors and hatch) are also wired in parallel to give the receiver a 2ohm load
Note: My truck has the standard Entune receiver and is a 2019 model. Models with the JBL audio system may have different resistance. Early models with “party mode” may also differ in the rear wiring setup.
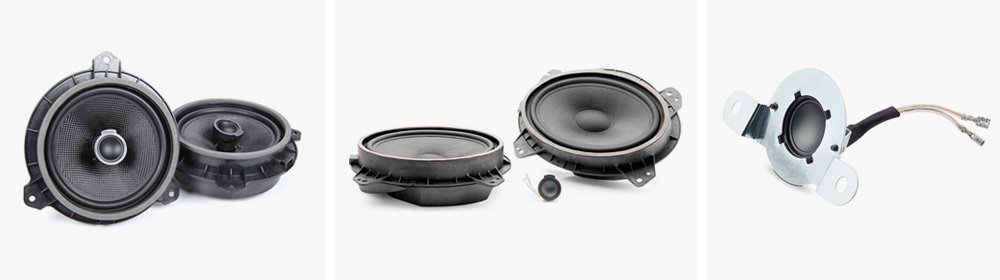
Going with the Focal IS690 TOY + IC165 TOY Speakers…
Having done my research, I purchased a set of Focal IS690 TOY and IC165 TOY speakers. The “S” stands for separate, as in the tweeter is mounted separately. The “C” stands for component, meaning the tweeters are mounted on the mid-woofer.
The IS690 TOY is used in the front, the tweeters come with a custom bracket to mount the tweeter in the place of the dash-mounted speaker in Toyotas. The 6×9” mid-woofer bolts right in the factory location of the front door.
The IC165 TOY is a 6.5” component speaker that bolts in the factory location for the rear doors and hatch.
Installation is very straight forward; the process is the same as the system available from OEM audio+ and a great install was documented by Brenan – check it out.
Plug-N-Play Easy Install
Now I must say, the Focals were a huge improvement and the fact that they bolt in and plug into the factory locations is a huge plus.
The muddy sound from the factory speakers was gone and the clarity from the front with the separate tweeters in the dash created a great sound stage. I received lots of compliments from people riding in my 4Runner about how good the stereo sounded for factory, unknowing that I had made this upgrade.
The only downgrade to the Focal speakers is cost. They list around $300/set. I was fortunate enough to find a good deal on eBay from a vendor in the UK that was able to sell me both sets together for around $300 shipped. If cost isn’t a dealbreaker for you then I certainly can recommend these. Buy them, bolt them up and enjoy a simple and noticeable improvement.
Adapting Speakers Into Your 4Runner
If the direct replacements aren’t in your budget or you prefer a different brand you can put whatever speakers you want into your 4Runner with a little research and the proper parts.
A lot of guys are scared off by upgrading speakers since most speakers won’t bolt into the Toyota mounting bracket, you need adapters and wiring harnesses. I see a lot of misinformation about what fits, and I want to be clear that if you do a little research, swapping your 4Runners speakers is an easy upgrade.
My Focal upgrade did not include the rear hatch and, from the driver’s seat, this wasn’t a big deal. The poor quality of the factory speakers was pretty much drowned out by the Focals. It wasn’t until I was tailgating for a game that I noticed just how bad the factory speakers sounded. I didn’t want to spend $150 – $300 for another set of Toyota specific Focals. They are great speakers, but I wanted to try something different.
Why I Chose Crutchfield Focal Speakers
I found the Focal ISC165 speakers on Crutchfield for $79.99 including shipping. These are a great speaker with specifications similar to the Toyota specific versions. The Crutchfield guide says that these will not fit the 4Runner but don’t let that stop you.
Now, I could have pieced together the speakers, wiring adapters and mounting brackets but this would have cost me over $100. Instead, I ordered these Focal ISC165’s for a 2016 Subaru Legacy, The Legacy is a match for these in Crutchfield’s system and when you order them, Crutchfield throws in the mounting brackets (Metra 82-8148) and the wiring (Metra 72-8104) for free so my total was still just $79.99. Subaru and Toyota share speaker designs to the mounting and wiring are interchangeable.
Find It Online:
- Crutchfield Focal ISC165 (2-Way) Speakers For 5th Gen 4Runner: Check Price
Note: While I am doing this for Focal speakers, the same can be done for pretty much any brands 6.5” speaker. Now you have a speaker that mounts and plugs in just like the factory. The only thing missing is a shroud to protect the speaker from moisture that could get into the rear door or hatch from the window opening. To correct this, I bought a set of 6.5” NVX Silicone speaker baffles.
All in for the rear speakers, I was at just under $100; and as I said, you can do this for any speaker brand and the same could be done for the front 6x9s. So, if you want to go cheaper or go high-end, don’t be limited to “bolt-in” options for your speakers.
Now, for the NVX silicone baffles…
These protect the rear of the speaker, as well as, seal the front side of the speaker to the door panel grill opening to keep the sound waves from getting behind the door panel. Because they are made from silicone, they won’t absorb water or deteriorate like the cheaper foam options you may find online.
As you can see from the picture of the baffles, they have pleats in them to allow you to fold them to various lengths on the front and backside of the speaker. I am impressed with the quality of these and would install them on any aftermarket speaker install.
Just keep in mind, if you buy the Toyota specific replacements they typically include a foam surround to seal against the door panel, as well as, a cover to protect the rear of the speakers so these cannot be used.
Installation Process
Step 1. Remove Brackets for Factory Speakers
So, let’s see how this came together…
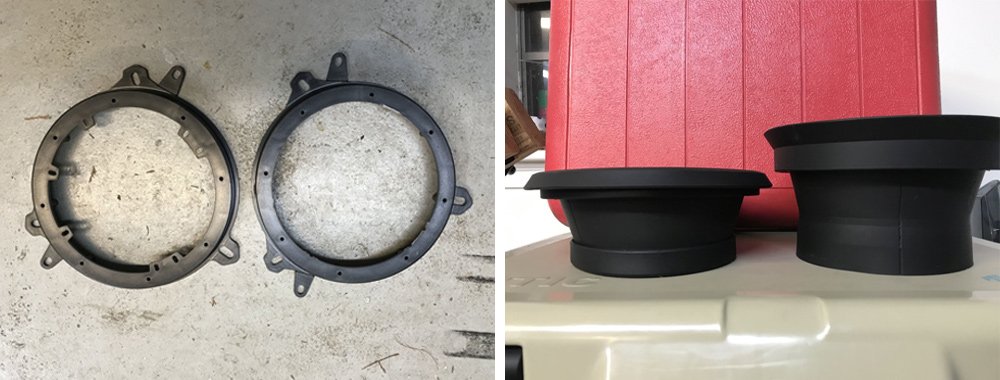
First off, you have the Toyota 6.5” brackets from Metra. You can see the picture on the left shows the brackets have tabs on the inside for smaller speakers. Since we are installing 6.5” speakers, these need to be removed. They can be easily popped off with a set of pliers and you end up with a bracket on the right.
With the top and bottom folder on the first pleat of each side, you can see it’s a good match to the size of our Focals.
Step 2. Bolt Baffle Between Speaker + Adaptor Bracket
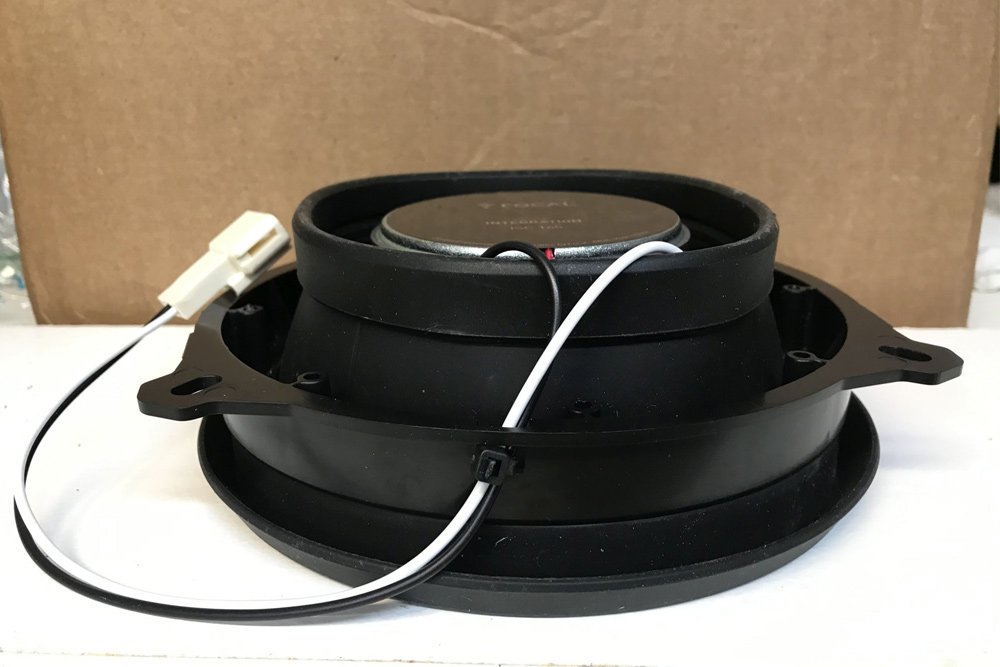
All bolted together, the silicone baffle will be sandwiched between the speaker and adapter bracket.
The Toyota speaker wires plug in on the front side of the speaker so you need to route the wiring to the front side. The Metra brackets have a hole for this purpose.
I used a zip-tie to keep the wiring in place and to keep the wiring from possibly getting caught in the rear power window.
Step 3. Measure Backspacing Distance

With your factory speakers pulled out and the rear window down inside the door, I measured the amount to backspacing I had.
As you can see from the photo, we have just over 2-1/2” of space. The silicone baffles, with all the pleats unfolded, measure at 1-7/8″ so we have ample clearance to completely unfold the rear pleats and be sure our speakers are safe from water intrusion.
Step 4. Bolt On Speakers + Connect Wiring

Now the only thing left to do is to bolt in the speakers and connect the factory wiring.
If your speakers are like these Focals, you can move the tweeter around a bit to direct the sound where you want it. I pointed mine slightly upward so they would fire at the rear headrest. You can see the Butyl sheet I applied around the speakers.
At this point, I was almost out of the Butyl sheet so I made use of the scrap pieces I had from other areas. I also have more on the inside of the outer skin of the door. More info on sound deadening below.
So how does it sound?
Fantastic! I am thoroughly impressed with the Focal speakers.
They sound 10x better than the factory speakers. From others I have spoken to with these speakers, they really shine when you add additional power. That modification is definitely on my to-do list. For now, the factory Entune receiver is doing a great job. I have installed a lot of aftermarket speakers and I am impressed with these Focals. They are hard to beat for the price.
I hope this article has shown you that you can adapt pretty much any 6.5” speaker to the opening in the rear doors and hatch on the 4Runner. The same can be done for the front 6x9s. If you are loyal to a specific brand (Pioneer, Kicker, Hertz, etc.) a little research and careful shopping will allow you to easily bolt in a speaker upgrade you can be proud of.
A Note on Sound Deadening

I, like many people who do speaker upgrades, also added sound deadening to my 4Runner.
This makes a big difference in any vehicle. I’d recommend any owner add sound deadening, even if they plan to keep the factory speakers. It will really tighten up the bass and can block outside noise. The amount of sound deadening you apply and the brand/cost of sound deadening depend on your budget and your goals. I wanted to quiet the interior some and tighten up the sound.
I installed, what I consider, a mild to a mid-level amount of deadening using supplies from lower-cost brands. I won’t go into detail on the process, just check out Brenan’s writeup on sound deadening your 4Runner.
Products I Used For Sound Deadening
I chose to attack the sound deadening using 2 products. I used 50 square ft of 50 mil KilMat Butyl sheets and 37.5 square feet of closed-cell foam.
I chose the 2 products because they are very cost-effective for the benefits you can get. I used the Kilmat Butyl sheets on the inside of the outer door skins and well as the inside of the inner door skins. I then applied a layer of closed-cell foam on the inner door skin, between it and the plastic door panel.
My reason for using the 50-mil was to be sure that the combination of the butyl sheet and closed-cell foam didn’t cause an issue with the door panel being reinstalled. Like many others have done, I could have used a thicker butyl sheet on the outer door skin, but I decided to buy a larger pack of 50-mil would give a nice upgrade for the cost.
Wrapping Up

Beyond the doors and hatch, I also applied butyl and foam under the front passenger carpet and seat to block out noise from the exhaust which runs under the passenger side. I also removed the rear cargo area carpet and installed butyl and foam on the floor to kill road noise from getting into the cargo area.
This was one of my first projects on my 2017 TRD ORP. I bought the fronts from Crutchfield and rear doors and hatch on ebay. They shipped from Italy. The second stage of the project was adding an audison bit ten processor and a JLAudio 5 channel 700 watt amp. The 5th channel was intended for an eventual subwoofer but I found that this is not needed. The mid bass, especially from the 6x9s, is plenty for me. I deadened all four doors but laid off of the hatch with weight concerns on the gas struts. I do want to add deadening in rear fenders and under my cargo plate(3/4”birch). Especially now that I am running MT instead of AT tires. I had a chance to listen to an OEM Audio plus set up and would take the focal set up any day over that. So much cleaner sounding… and more powerful.
Great to hear that the amp added a lot of bass Jeff. I have been considering adding a small 4 channel Alpine mini amp to mine to bump up the power. A lot of people are impressed by how it sounds now so I can’t decide if I want to go through the trouble of wiring one in. Reading your feedback really makes me wonder how much better it could sound. Well, off to shop for an amp LOL!
Im in Baton Rouge. If you want to hear it let me know and we could arrange that. You can message me on t4r forum louisiana overland.
Hey Corey,
the Crutchfield ISC 165 is discontinued and is not sold anymore… just FYI.
Eryck, thanks for the heads up. They were still being sold when I submitted this article. Focal has other options and if you shop around you can get a decent price. Also, Crutchfield has a ton of 6.5″ options from every brand you can think of and the install is the same. The install process is the same and you’d use the same adapters, harnesses and optional silicone baffles.
Hey Corey,
Yeah i thought about mix and matching different brands but decided i rather keep it all within one system. I’ve heard great things about focal too so i might just head that direction. Or, if price difference is less than $100 i might just go with the OEM+ kit for a easy plug-and-play fitment!
Yep. And the replacement is $199.
Corey, can you post up a link to the UK seller you got the Focals from? Great write-up. Thanks!
Michael, The vendor I used was car audio security ltd. They combined shipping on my front 6x9s and rear door 6.5″ speakers to save me money.
Here is a link to the front speakers for GBP 129.99 which is what they were when I bought it, obviously the US$ price fluctuates.
https://www.ebay.com/itm/Focal-ISTOY690-Custom-Fit-6×9-2-Way-Component-Speaker-300W
So strange… I messaged that seller directly and he states that he does not ship to the U.S. I guess it’s back to Crutchfield for full price.
i messaged the seller directly and he said the same thing. Perhaps he got alarmed that so many people asked him to ship to the US within that short period of time!
Or, we just need to add everything together and ebay will automatically calculate the shipping cost for us.
That’s odd, are you an established buyer on eBay? The only reason I can think of is maybe your account is new so they don’t want to ship. I just added the IS690Toys and 2 sets of 165AC speakers from his page into my cart and went to checkout and it gave me all the shipping info. In the top right there is an option for request total. This is what I did when I ordered mine and they came back with a reduced shipping price.
Before I start, are you from Louisiana? Very good write up. Just changed my factory speakers to Harmon Kardon way speakers. Easy install, but putting the door panels on was a real pain in the butt. Was not aware of the silicone baffles. I’ll go ahead and grab some. Thank you!!
Shaun,
Yes, I am in Louisiana, just outside of New Orleans. The issue most people have with the door panels seems to be getting the window seal assembly back into the channel. You have to hook the seal portion into the channel at the top of the door and if it doesn’t fully seat down in the door it won’t line up properly. Some guys have found it easier to take the window seal off the door panel and install it on the door frame, then put on the rest of the panel.
The baffles are a good, inexpensive investment to protect your speakers. If you’re going back into the doors I also recommend throwing some Butyl in the doors. It will really help block out noise and clean up the sound of your speakers.