
Apex Overland’s Recovery Points Step-By-Step Install & Review For 5th Gen 4Runner
I’m new to the 4Runner game. I got mine within the last year and immediately caught the mod bug. I read everything and wanted it all.
I mostly blame Brenan and Trail4R.com, But much of the information I read also cautioned me to be selective and intentional about what to mod. I’m mostly interested in running trails, some moderate rock crawling and off-roading. My family isn’t really into camping so Overlanding is out of the question.
One of the decisions I’ve had to make is regarding recovery points as recovery is critical. The stock front end doesn’t have any official recovery points. The factory tie-down loops are just that: tie-downs for transport to the dealership and shouldn’t be used for recovery.
Front Recovery Point Options
The two options I’ve found so far are to add either:
- A Front Bumper
- Recovery Points
Front Bumper
The front bumper option is super appealing to me and every option I found includes sturdy recovery points. Bumpers are really strong and are an additional level of armor. Also, you can add a winch.
Bonus: They look really cool! I especially like the low profile options available these days. Two very popular low profile bumpers are the SSO slimline and the C4 Lo-Pro. However, the bumper and winch can add significant weight to the front end and unnecessary weight is the enemy. Also, they ain’t cheap.
Adding Recovery Points
I discovered the other option when I ran across William’s ARB recovery point article and it got me thinking, “Do I really need a winch?” Traction recovery boards can help in many situations and a hi-lift jack combined with the appropriate straps and gear can even act as a winch in a pinch. I decided to give it a try, but which one?
The ARB recovery point was a bolt-on option that looked relatively simple and inexpensive to add, but there were a couple of drawbacks. Parts of the installation seemed unnecessarily complicated. Also, the kit only came with one recovery point and I liked the idea of having 2 for versatility.
Adding Recovery Points
I stumbled onto the Apex Overland option on some forums and decided to give them a try. It should be noted that they state that these recovery points do not fit KDSS equipped vehicles so keep that in mind. However, a new design will be released shortly that will accommodate 4Runners with KDSS. This article will focus on the non-KDSS design.
Who Is Apex Overland?

From there website:
Apex Overland is a veteran-owned, family-operated Overland and off-road adventure supply company and install shop based out of Greensboro, North Carolina. Apex Overland not only sells to and supports the Overlanding and off-road community, but we also have a deep-rooted passion about Overlanding and adventure lifestyle.
They regularly post quite a bit about what they’re doing in their shop on Facebook and there are lots of goodies to look through on their website so to give them a look.
What’s in the box?
- The Apex Overland Recovery Points: Check Price
- 13mm (M8) x2 bolts, with crush and flat washers x2
- 17mm (M10) x4 bolts, with crush and flat washers x2
- 19mm (M12) x2 bolts, with crush and flat washers x2
Tools Needed For Install

- Socket wrench with 10mm, 12mm, 13mm, 14mm, 17mm and 19mm sockets
- Torque wrench (18-72 ft-lbs range)
- M8 x2 fender washers (recommended)
- M10 fender washers (not recommended, but pictured anyway)
Step-By-Step Installation
This installation is pretty simple, and can probably be done without raising your 4Runner, but I have long arms and wanted as much room as possible. Also, I learned partway through the install that removing the front skid plate (mine’s the factory one for now) gives you the necessary access to tighten the 17mm sway bar bolts. You could probably remove your front bumper to gain even more access, but it’s not necessary.
I also recommend buying a few larger diameter M8 fender washers to include in that joint. Pictures are included in Step 4 to show how I recommend using them and why.
Step 1. Raise Your 4Runner (Optional)
Safely raise the front end of your 4Runner, either with jack and stands or with ramps. I put mine up on stands.
Step 2. Remove Existing Hardware
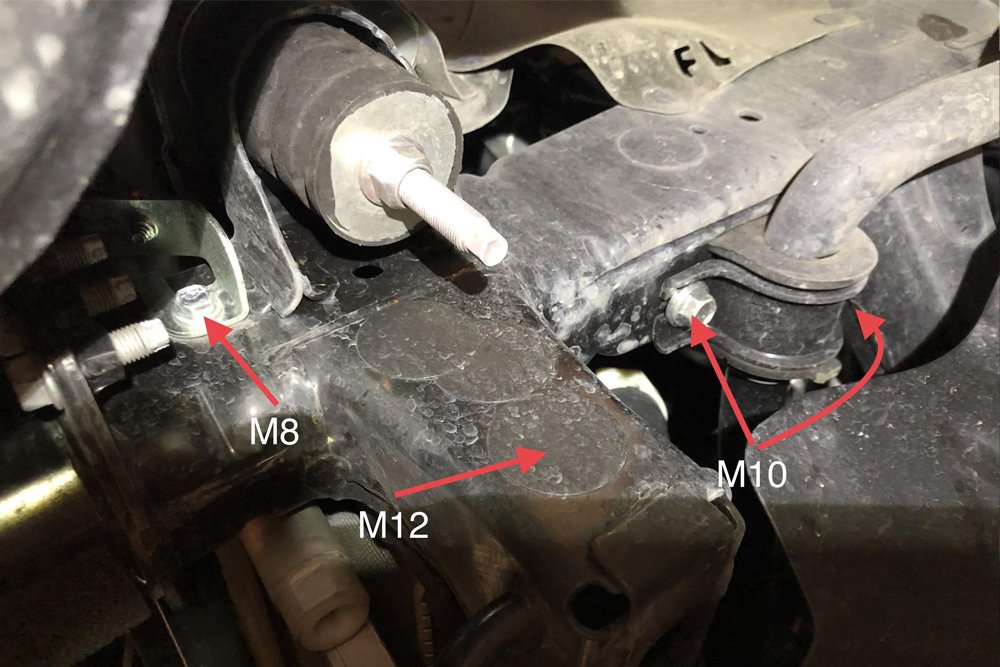
The 12mm and 14mm sockets are for removing the existing M8 and M10 bolts in the upper bracket and the sway bar bracket. Also, the heavy stickers covering the M12 bolt holes on each side need to be removed.
All are highlighted above.
I recommend removing all hardware on both sides as the sway bar won’t move as needed to fit the recovery point if you don’t unbolt both brackets. That said, you could loosen one side to allow it to drop down and do one side at a time. Still, you shouldn’t torque everything down until both recovery points are installed.
Step 3. Put Recovery Point in Position + Install 19mm Bolt

When you slide the recovery point into position, make sure the upper bracket and the sway bar bracket are sufficiently out of the way.
Step 4. Install 13mm Bolt w/ Existing Bracket + Fender Washers

The image on the left shows the M8 bolt installed in the bracket. On the right is the M8 fastener on the other side with the washer configuration I recommend.
You’ll notice that the hole where this M8 bolt passes through is excessively oversized (presumably so that everything will fit). If I could make a recommendation to Apex Overland on their design, I’d have them reduce the size of this hole.
Step 5. Install 17 Mm Bolts + Sway Bar Bracket

Install the front M10 bolt and slide the sway bar bracket over the bolt head as shown. Then, insert the rear M10 bolt and hand tighten both such that they hold the bracket in place.
Step 6. Tighten + Torque
Begin to tighten all hardware. I tightened everything to snug so that it brought the recovery point flush before beginning to torque to spec.
Apex recommends torquing the M12 19mm bolt first to 72 ft-lbs followed by the two (x2) M10 17mm bolts to 40 ft-lbs. Last is the M8 13mm bolt to 18 ft-lbs.
Final Thoughts

The installation took 2.5 hours to do, but I was documenting everything and ran into a few avoidable snags that this how-to will hopefully help you avoid. Knowing what I know now, I’d say 1.5 hours is a reasonable expectation.
Was It Worth It?
Generally speaking, these look to be very solid and well attached. I have no issues using these for recovery, though like other recovery points, individual extreme lateral loading isn’t recommended.
I interacted with Jillian at Apex Overland about the rating for these and she said the product developer claims they’re rated for 20,000 lbs each. I have my reservations about that number, but based on my calculations, I am comfortable assuming that 20k lbs is a good break strength and since the vehicle load is ~¼ of that, there is plenty of safety factor. She also recommended using a bridle system during pulling to share the load between the 2 sides.
Additionally, a snatch block can be used to help in a winch situation.
How Does It Look?
As for the appearance, I’m very happy. I know that’s secondary to function, but let’s be real… it matters. They look nice and match the red TRD accents. I know it’s my fantasy book background coming out, but I’m reminded of a bloody fanged beast.
Thanks for writing this post! Very helpful.
I bought some of these and went to install on my 2008 Limited but realized that the part of the frame that holds the 19mm bolt is not flush with the part of the frame that holds the smaller 13mm bolt above it – that section is almost 1/4″ recessed, in comparison.
When you did your install was it flush?
Limited owner – same exact issue. But was able to get it installed. Apex was great to work with. Now my sway bar conflicts with the top corner of the recovery point so aim trying a relocation kit.
Fitted these yesterday! Followed your tutorial, which was really helpful! Thanks!! 🙂
Thanks for this was very helpful when I installed them today.
I wondered if you found any change in steering after install and if you’d recommend an alignment? Not sure if disconnecting the sway bars have an impact on that at all.
The steering shouldn’t be affected, especially if you have the stock sway bar links. As long as you bolted everything back up correctly, the geometry of everything shouldn’t have changed. You shouldn’t need an alignment from this install.
Glad it helped!
Thanks for the write up and the pictures…They were most helpful. The install went very smoothly. Also some of your technical comments reassured that I had may the right choice. Well done!
Thank you Chris – this was so helpful! Biggest problem I had on my 2019 Limited was figuring out which plastic parts I had to remove (and how) before I could even think about installing the brackets. The additional fender washers really help – tried 5/16 x 1 1/4 – too big . couldn’t find a 1 1/8 which would have been perfect. 3/8 x 1 works pretty well. Of course having the sway bar bracket fall on my face and bounce off my glasses was great fun! Great article- photos were so helpful. Thank you
Anyone know if these will work with an ARB bumper on my 2012 4Runner?
Cheers,
Bugs
I can’t say for sure because I haven’t seen how the ARB bumper is installed. I can say that certain bumpers do not work with these because they use the same attach points. The main fastener used in these (the M12 bolt) is used by man other bumpers. You might check the ARB install instructions to see if that’s used already. Good luck!
Not to bash these things too much, but please don’t believe stuff you read about the factory loops being “tie down loops” not suited for recovery. I’ve been recovered by mine as have many others with no issue. They’re solid rod welded through the front and rear of the frame, are plenty strong for a recovery and stronger than a steel plate bolted on with the bolts in single shear. They’re definitely engineered for more than tying the vehicle down during transport. If you’re damaging one of them in your recovery you did something very wrong.
I looked at the welds you mentioned and you’re right. Depending on the strength of the weld material, these welds should be plenty strong to support the weight of a recovery. The rod stock you mentioned is at least 1/2″ thick and so the surrounding area of the weld (the welds appears to be ~1/8 thick) is a substantial amount of material connecting the rod to the frame. I’ve looked up frame steal strength diagrams for these frames and the steel in these locations appear to be a high-strength steel so that isn’t necessarily a weak spot either.
I also looked in the owners manual for information about these tie-down loops. I think one of the reservations people have is that the only reference for them is that of tying them down during a tow on a trailer or platform. It specifically says that a tie-down should not exceed 45° from vertical. Recovery would be horizontal and outside of that range.
As I mentioned, the welds should be sufficient for this, but the design of the rod through the front and back of the frame is clearly designed to handle the vertical load as it’s primary load path. The welds in this instance would be secondary. The rod would bear into the frame in both front and back when loaded vertically, while a horizontal pull would require all load to be transferred through the weld. Without any information from Toyota that this weld is capable for handling this load, we just don’t know and a failure of the weld would cause catastrophic failure during a recovery.
Contrast that with a bolted joint like that of the recovery points. As you might have already guessed, I’m an aircraft structural analyst in my day job and do joint analysis all the time. Single shear joints are extremely common and reliable and the primary load path all over most planes. You can analyze all elements of a joint to ensure it will take the load. The bolts included in this kit are grade 8.8 bolts. The combined shear capacity for all of them together is >20,000 lbs which is 4x the weight of the vehicle. This is a sufficient factor of safety for most recovery products.
Additionally, I’ve seen multiple pictures of older 4Runners with corroded loops. I don’t know how susceptible the 5th gens are to corrosion in this area, but I don’t want to be surprised by corrosion in the welds at an inopportune time, especially when inspecting all of the welds is onerous.
There’s just enough doubt and uncertainty in my mind with the loops that I wanted to go with these recovery points. Obviously the loops will work (many including yourself have done so), but the cost of these recovery points is relatively small for that peace of mind I get using them.
Thanks for your comment!
Great write-up! I would say that raising the vehicle is more necessary than optional due to the force of the sway bars. I raised my vehicle with a floor jack on each side as I installed the recovery points, and it moved the sway bar out of the way just enough to get it in easily. I also used chock blocks to make sure the vehicle didn’t move at all while on the jack.
As for rock sliders and front bumpers (and back bumpers and skid plates), check out Shrockworks. They are a Houston, Texas local company that does some really amazing work. I’ve got their rock sliders, and I am looking at getting their skid plates and possibly their front bumper as well. They also make rear bumpers that are very nice. The guys are easy to work with and the quality of their work and their designs show their off-roading and fabrication experience.
Shrockworks is actually the company I’ve chosen to go with for my armor! Their new slimline bumper is the one I was thinking about when I mentioned it in the article, though as I said, I’m going to try to avoid a bumper/winch as long as I can. I will eventually be getting their new kick-out sliders and the full skids. Just waiting for the right time (re: group buy/discount). 😉
Thanks for reading!
Think I had the same problem as you when installing them. Washers deformed in the large holes when torquing the bolts down
My issue was that the torques in the installation didn’t have units originally and I assumed ft-lbs and was wrong. Apex Overland corrected the instructions and sent me new hardware as soon as I contacted them. With the new hardware and the extra washers on the M8 bolts, I didn’t have any more issues.
Nice review Chris. I was thinking about doing the same thing so I’m glad you came across these.
Keep up the good work!
Thank you Dave! Glad I could help.