
Diode Dynamics 42″ Stage Series Light Bar Review
If you like off-roading and tend to do night runs or late trail runs, odds are you’ve found yourself needing better lighting or wanting more lighting, especially on those moderate to extreme level trails where seeing is a must. This is where a quality light bar can come in handy.
Everyone has heard of the major companies such as Baja Designs, but there are other companies on the market at the fraction of the cost, that actually goes toe to toe with the bigger companies.
One of those companies happens to be Diode Dynamics who has been in the lighting game for nearly 15 years.
Who is Diode Dynamics?

Diode Dynamics is located in St. Louis, Missouri, and was founded in 2006.
While they have been in the lighting game for quite some time, over the last few years they have been working their way into the off-road community. They stand by their no-hassle warranties and have some of the better customer service on the market.
If you’ve thought you’ve heard of their name before, likely you have. They have been featured on Trail 4Runner quite a few times. They are the original makers of the tail-as-turn module for the 5th Generation 4Runner.
Most recently they have come out with their Stage Series 3 Pods, a new option for plug-n-play fog lights on the 5th Generation 4Runner. These are great alternatives to the popular and expensive Baja Squadrons.
Lumens vs. Candelas

Unlike a lot of companies on the market, who base everything off the number of lumens their product produces, Diode Dynamics focuses on how much light is actually effective.
We’ve all heard the lumens argument with off-roading. Everyone wants the bar with the biggest number of lumens because they assume that’s going to give them the best amount of lighting on the trail.
Unfortunately, that’s not exactly the case, and if that’s what you think, you may be a bit surprised of how much you are paying for and not getting.
Lumens
Lumens are measured by the total amount of light generated. When measuring light, in our cause an LED bulb, the bulb is placed inside a sealed reflective sphere and is measured when the light has bounced all around. This number is then calculated into lumens and then multiplied by how many bulbs are in the set.
Candela
Candelas, on the other hand, work a bit differently. With candela, measurement is done by the total amount of light focused in one particular direction. For example, with a headlight beam, the candela would be measured where the headlight beam is hitting, rather than how much light the bulb is producing in total.
Another way to look at it for you gear heads out there is with horsepower. A Nissan GTR, for example, maybe making 545hp (lumens) from the factory, but once all of that power is actually put down to the tire it makes roughly 480whp (candela).
Do You Need A Light Bar?

We see everyone nowadays with a light bar on their vehicle somewhere. It might be a work vehicle, a van, a car, but it’s hard to miss one in a full day of driving. Odds are the majority of those people don’t need them, and you yourself may not need one.
If you happen to be someone who goes on night runs a lot with friends, or tends to stay out way past the planned time of leaving, a light bar could be something that could come in handy when navigating through the woods, or more importantly those technical trails at night.
However, if you happen to stick to roads that are mostly flat with little obstacles, at night your headlights are likely to be enough to see down the road and anything that could come in your way. Obviously, if you happen to be someone who sets up camp before sunset and rarely if ever sees trails at night, you may be better off spending your money elsewhere.
You of course also need an area to mount a light bar if you decide to go that route. Most aftermarket bumpers have options for cutouts or have remade cutouts already put in, but if you don’t have one, this means you either need to go another route such as the roof or behind the grille.
It’s important to note it’s illegal to run a light bar on the street, and in a lot of states, the light bar must be covered whether if it’s below the headlights or not (some states allow auxiliary lighting to be uncovered if under the headlights). It’s always important to check your local state laws on this.
Light Bar Decision
I’ve had light bars for quite some time in my grille, as well as fog lights that produce a lot of power. Unfortunately, I noticed I still wasn’t getting enough light down the trail that I had wanted.
When running trails at night, lighting is everything. Being able to see how many different line options you have, and where your next move is going to be is a huge confidence booster. Not to mention in areas such as Death Valley National Park, where you can see a flash flood crossing a wash 100 yards or more away keeps you safer. This all ultimately led to me searching for light bars for the roof rack.
I researched and looked at quite a few different brands on the market before coming to the decision with Diode Dynamics. To start, I had already had their Tail-as-Turn module in the rear of the 4Runner, which has been working flawlessly since I put them in over three years ago. Additionally, I have quite a few friends running their products with the same level of confidence.
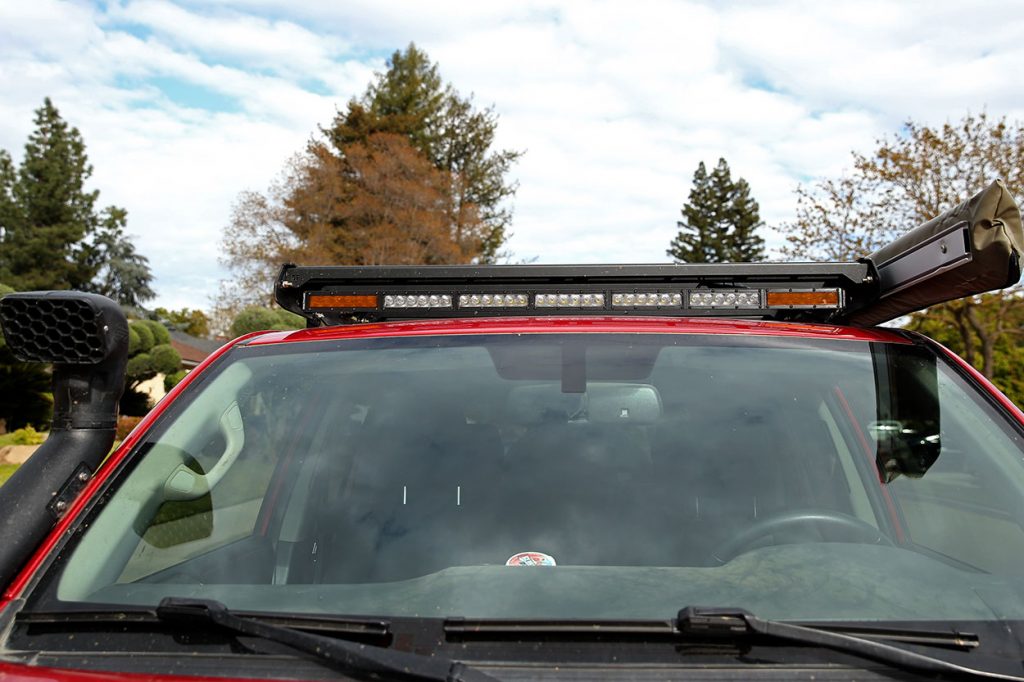
That ultimately led to my decision to choose them. I then realized I needed the correct size for the LFD Off-Road Roof Rack. Diode Dynamics only had a 42”, rather than a 40” like most companies, but ultimately after measuring it would still fit, and be even more flush than a standard 40” light bar.
Install

The very first thing you need to decide when installing your light bar is where you want it to go. The most common places with the 5th Gen 4Runner is behind the grille with the OEM bumper, in a front bumper cutout, or on the roof rack. I have seen a few on the rear of the roof rack, but that is more for people doing construction work.
It’s important to note that on your roof rack, you run into the possibility of glare happening, however, you have the ability to aim your light bar much further down the trail, whereas with a grille or lower bumper cutout, you are limited to how much you can aim your light bar, not to mention being lower means it’s going to cover a smaller area.
Swapping Lenses

With most light bars on the market, you have the ability to swap the lenses.
This is not only for changing the beam pattern but also the color of the lenses. While my Diode Dynamics Stage Series 42” light bar isn’t set up to run different sections of lights on their own, I still chose to go with the outer corners being amber. That way it wouldn’t be as bright on the sides, but also help a little more with vision. Plus it does give it a little more look appeal as well.
Though it is an easy process, keep in mind if you do this, you do void the warranty for a direct replacement if moisture or condensation appears. This doesn’t mean it will not be fixed, it just means you will need to send in the light bar, rather than just swapping it out.
While it may seem intimidating, it’s not hard to do whatsoever and is one of the easier DIY jobs. I personally have been in quite a few rainstorms and snowstorms with mine and have had zero issues.
Aiming the Light Bar

With roof rack light bars it’s important to have the aim of the bar correctly. There technically isn’t a right or wrong way to position it, as this is more for the drivers’ preference. Being I had a lower bar in the bumper grille, I decided to have my roof rack bar shoot further down the trail to light up the area that was beginning to fade from my Baja S8.
One thing to keep in mind while doing this is that you can run into issues with hood glare. If you aren’t running a grille light bar, you may want the roof rack bar aiming down more sharply, which causes it to bounce off the hood, ultimately blinding you.
If you are putting this in a bumper or grille, then odds are you going to want it straight and flat, as it will need to shoot through the cutout provided.
Because I had to make my own style mount to work with the roof rack, there were only two bolts holding my light bar in place. Meaning after awhile with shakes and bouncing, the light bar likely would come loose. To prevent this from happening, and the possibility of the bar coming loose and falling off, I added some blue Loctite the bolt.
If you decide to do this step or find yourself needing to so, your bar won’t come loose (with a four-bolt setup you should be fine). Just be sure to know where you want your bar aimed before doing so, as it can be a pain to break loose. DO NOT use red loctite as that is a permanent solution and getting the bolt out would likely cause damage.
Wiring the Light Bar

Wiring is always an issue with light bars, but it’s not too complicated, one of those reasons is because you have very limited options. You can either run the wires down the weather stripping, and into the channel next to the windshield, all the way back the roof rack, down into the hatch, and all the way back up the vehicle to your battery, or you can drill a hole in the roof rack, use a clamshell from Blue Sea Systems, and run it to the battery.
I went ahead and did the standard wiring of running it through the weather stripping and down into the engine bay. It’s not a hard process, but a key of advice is to use 1/4” heat shrink, as anything larger will be too thick to stuff into the channel, as well as hide under the weather stripping.
Brenan did a nice write-up on wiring his roof rack light bar, so if you are looking for a nice step by step install, go give his article a look!
Lighting Up The Night

One of the very first things I noticed with this light bar is that it’s stupid bright. In fact I realized that it’s likely a lot brighter than my Baja S8 30” light bar that costs nearly $300 more than the 42” Diode Dynamics Stage Series light bar.
This is where the Lumens vs Candela argument comes into play. Baja Designs claims their 30” S8 light bar produces around 19,050 lumens, whereas the 42” Diode Dynamics Stage Series light bar produces 15,960 lumens. Though a roughly 3,000 lumen difference, the equivalent of most HID headlights, it may not be noticeable at all, or at least shouldn’t be. However there’s quite a difference between the two light bars at night.
While the Baja light bar certainly lights up the night as you would expect most light bars to do over your headlights, it doesn’t quite light it up as nicely as the Diode Dynamics Stage Series light bar does. While this may be more of a belief, I feel it’s due to Diode Dynamics focusing more on how the light is being used in the direction it is aimed, rather than just focusing on total of light output.
I made sure to test it out really well during a trip to Death Valley National Park, where there are no lights for days, and the dirt miles are endless. Needless to say anything that could have been blocking the road would have been spotted.
I was able to see everything clearly, helping spot the larger rocks in the road that can cause damaged rims and torn tires, but also where drop-offs and off-camber sections started.
What’s Missing?
When it comes to products we all have our opinions on what could have been better, or what was missing. While there aren’t a lot with the Diode Dynamics Stage Series light bar, there are a few things I wish it either would have come with, or have the option of. These aren’t deal-breakers to me, but they may be for you.
Having a dual control option would be nice, such as Baja and ExtremeLED offer with their dual colored light bars. Depending on how you are using your light bar this could come in handy, such as only running the amber-colored lights so the vehicle in front of you can see you through their rearview mirror. Of course, depending on switch setups you may not have the ability to run each color separately.
A light bar cover would be more than ideal considering just about all states require any auxiliary light to be covered if it is above the headlights. Currently, Diode Dynamics does not offer one, meaning you will either need to come up with your own plan or run some lamin-x film across the lights as a temporary fix. While I haven’t been pulled over for not having one it is illegal to be doing so.
Conclusion
If you are looking for a light bar that won’t break the bank, but will also go head to head with the big companies used in racing applications, the Diode Dynamics Stage Series lightbars are the ones to give a look.
If I could go back and do it over again I would have used their light bar in my bumper cutout as well. The quality of the light bars is superb, and as mentioned numerous times above the beam pattern is flawless.
While off-roading at night I no longer worry about not seeing something on the trail and have more than sufficient light for anything else I may encounter on the trail.
Thanks for the review! I have also been looking at these light bars. Has anyone mounted the 30” diode stage series bar on a low pro bumper? Im interested in that setup.
Low mount lights tend to do better in yellow-amber colors because reflected light and dust from other activities around you (if you slow down even) bounce white light back at you. For this reason, I’d focus on a 6-12” round light that can focus light further out. Or a light bar that’s mounted as close to 4” below, the windshield level as possible. Over head is better because lights point down and reflect below your eye. Near center grill or bottom of hood can aim level or down but you often lose the benefit of a brighter light so level light projection is good because light won’t tweak upwards as often. Below the radiator grill, I generally install brighter, bigger impact resistant lights on lower brush guards but honestly that low to the ground, lights may get pounded with a lot of brush and rocks so make sure you choose lights with replaceable lenses or tend to be easily cleaned.
Couldn’t get my brackets to fit properly. Trying to figure it out with DD right now.
Good afternoon,
I did enjoy both your articles on the Extreme LED light bar and the Diode Dynamics’s. What is your opinion on which one you would rather go with? I currently have ordered an Amber 18″ and a White 18″ Diode Dynamics after hard debate and no real good comparisons. It sounds like the Extreme LED Amber is more of an orange vs Amber.
Any good thoughts on Pro’s and Con’s between the two?