
RCI Off-Road Transmission Skid Plate Installation on 5th Gen Toyota 4Runner
Continuing along with our RCI full skid plate set, we are moving to the transmission skid plate.
I don’t think we need to go into too much detail here, but the transmission skid plate does what the name suggests, it protects your transmission. If you want to read more information about skid plates in general, check out the complete guide to 4Runner skid plates article.
We are installing aluminum skid plates on the 4Runner but if you ordered your skids in bare steel, make sure you spray paint or powder coat before installing to prevent rust.
RCI Transmission Skid Plate Specs
- Full Set: Check Today’s Price
- Transmission Skid: Check Price
- Material Options: 3/16” Steel or 1/4” 5052 Aluminum Alloy
- Powder Coat Options: Black powder coat or bare metal
- 3/16” Steel: 28lbs
- Aluminum: 14lbs
Installation Overview
Step 1: Remove factory skid plates, Jack Truck, and Support

If you already installed the front skid plate, then you may already have the truck off the ground. If not, start by lifting and placing your truck on jack stands or in our case, these jack stand risers.
Proceed to remove the factory transmission skid plate.
Step 2: Using the front skid plate?

If you are using the RCI Off-Road front skid plate, the rear two bolts of the front skid should be loosened approximately a 1/2″ so that there is a gap between the bottom of the skid plate and the surface.
If not then thread the supplied 40mm bolts with washers into cross member behind the front differential.
Step 3: Disconnect frame support tubes

Remove the four bolts connecting the frame support tubes to the transfer case cross member and discard or save for a rainy Toyota day.
We save all our hardware if unused. They usually always come in handy for other installs.
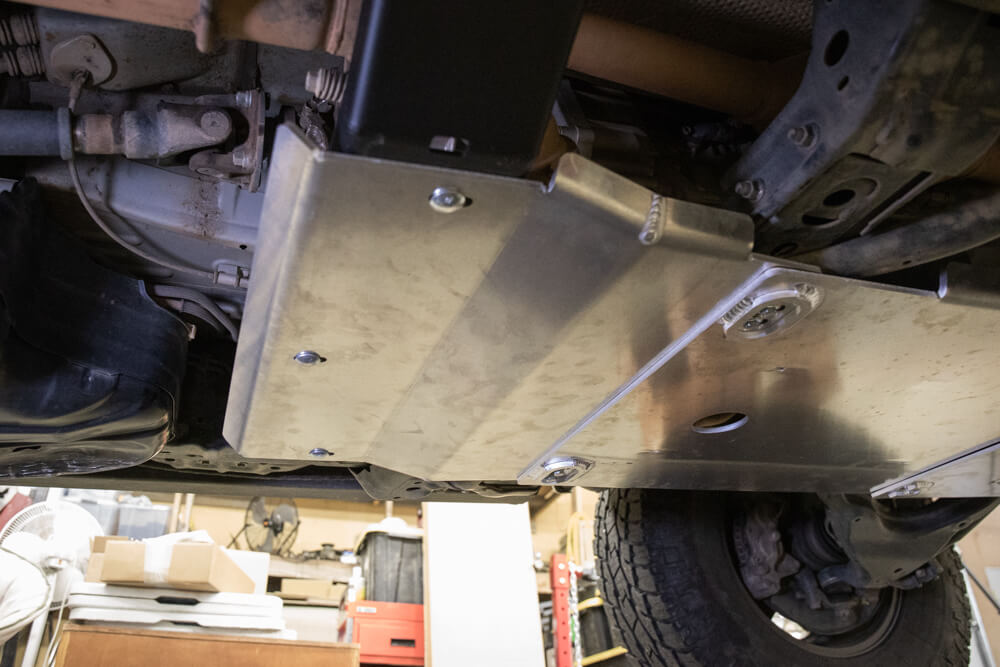
Step 4: Slide skid plate underneath the Front Skid Plate

Lift the front of skid plate first and slide in the transmission skid plate, ensuring notched cutouts align with bolts.
When sliding the skid plate into place, lift the 3/4″ nylon spacers so they are sandwiched between the transmission skid plate and the cross member.
Step 5: Bolt into place and then torque to spec

Install 40mm bolts with washers at the rear skid plate with the frame support tubes sandwiched between the skid plate and the cross member.
Leave bolts semi loose to allow the plate to move for final positioning. Adjust the play so the bolts are as near as possible to the center of the mounting holes.
Proceed to tighten bolts and then torque to 23ft lbs.
Installing with T-Case skid plate?
If you’re installing the transmission skid plate with the transfer case skid plate, leave approximately 1/4″ of the rear bolt threads showing.
This will allow the transfer case plate to slide in between the cross member and the transmission skid plate.
Check fitment and clearance. Fully tighten all bolts to OEM specs (23ft lbs).
If you are installing a full set of RCI skid plates, proceed to the T-Case skid plate installation instructions.
How do you change the ATF and Transmission fluid without removing the skid plates?