
Adam’s Polishes H2O Guard & Gloss: A Quick & Easy Rainproofing Solution for your truck using Adam’s Polishes H2O Guard & Gloss
There’s a lot of science involved when it comes to detailing and protecting your truck’s finish.
Some of the long-term protective options such as ceramic coatings can be tedious, time-consuming, and expensive. Some of the hi-tech options aren’t very DIY friendly either and may even be best applied by a professional with experience as to not damage your truck’s finish. Their benefits are longer-term protection.
Let’s be honest, who doesn’t love the look and feel of water perfectly beading up across your paint finish during or after a rain!
So you’ve just washed your car but don’t want to go through the full process of a high-quality wax or hi-tech sealant. Waxing and sealing every wash isn’t necessary but there is a quick and easy low-cost solution to treating your paint and finish after a wash!
Today we’re going to take a look at a short-term, low cost, easy DIY option for sealing and protecting your truck’s paint: Adam’s Polishes H2O Guard & Gloss with Hybrid Technology.
I have used Adam’s Polishes H2O Guard & Gloss for about 8 months now and have been very pleased with the results!
I apply it about every third or fourth wash… which for me equals to usually about 2 to 3 months apart.
WHAT IS ADAM’S POLISHES H2O GUARD & GLOSS?

In Lehman’s terms, H2O Guard & Gloss is what’s going to make your paint extremely water repellent and a little shiny.
It’ll protect your paint and gives a slight glossy sheen after application. It’s usually used at the end of a car wash.
From Adam’s Polishes: Adam’s H20 Guard & Gloss delivers lasting protection and unmatched gloss in a unique water-activated formula that is fast and easy to apply.
The incredibly effective blend of acrylic polymer resins and water activated nano-polymers leaves your paint slick and protected without the extra effort and hassle of traditionally applied sealants or waxes.
The optical grade polymers won’t stain exterior trim, and even leave rubber and plastic looking darker and protected from the elements.
- Amazing Acrylic Polymer Resin Formula
- Provides Lasting Protection and Incredible Shine
- Safe For All Exterior Surfaces, Including Trim, Paint, & Glass
- The Fastest and Easiest Way to Seal Your Paint
- Made in the USA
LET’S SEAL YOUR CAR’S PAINT AND MAKE IT IT WATER REPELLENT!
What You’ll Need:
60-90 Minutes Start to Finish
- Adam’s Polishes H2O Guard & Gloss: Check Today’s Price
- Adam’s Polishes Borderless Gray Towels x2: Check Today’s Price
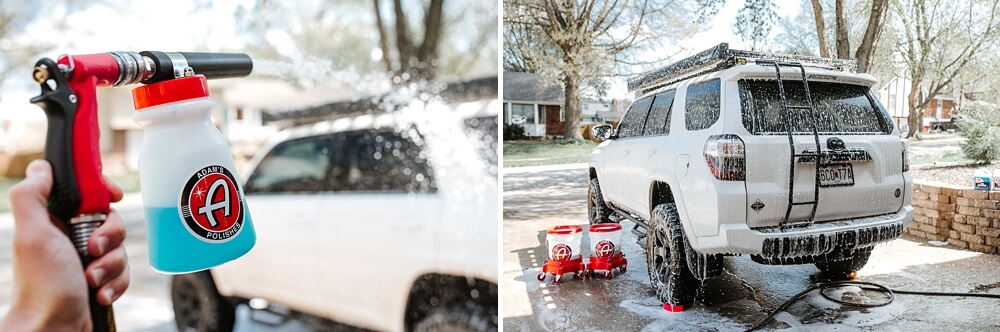
- Adam’s Polishes 32oz Foam Gun: Check Today’s Price
- Adam’s Polishes Ultra Foam Car Shampoo: Check Today’s Price
- Adam’s Polishes VISCO Clay Bar: Check Today’s Price
STEP 1: WASH YOUR CAR
We don’t recommend skipping this step.
Applying H2O Guard & Gloss is really meant to be part of the overall car wash process and is best applied to wet surfaces.
Start with a good car wash to remove all surface dirt and debris from your vehicle. It’s not technically 100% necessary to wash before applying H2O Guard & Gloss, but your results will be better with a clean and WET car.
Use a high-quality car shampoo such as Adam’s Polishes Ultra Foam Car Shampoo with a Foam Gun for best car wash results!
STEP 2 (OPTIONAL): DEEP CLEAN YOUR PAINT WITH A CLAY BAR

If you’re not familiar with what a Clay Bar is and how to use it, we have a great write up on How To Use a Clay Bar.
Now that your vehicle is clean, it’s a great idea to use a Clay Bar to remove any rail dust and any bonded contaminants in your paint.
Using a Clay Bar to deep clean your car isn’t required, but it will greatly benefit your car’s paint and is generally considered an essential step of the full detailing process.
STEP 3: TIME TO SPRAY ON H2O GUARD & GLOSS

The beauty of H2O Guard & Gloss is that it’s intended to be applied to a wet surface.
Shake the bottle well, spray small sections at a time.
Very much like a wax, H2O Guard & Gloss is best applied in small sections. I like to start with the windows and windshield, then move onto the hood and fenders…followed by side panels and lift gate.
Don’t rush the process and don’t spray your whole truck all at once.
Be sure to finish the section you’re working on before moving on to the next section.
STEP 3A: SPREAD AROUND THE H2O GUARD & GLOSS

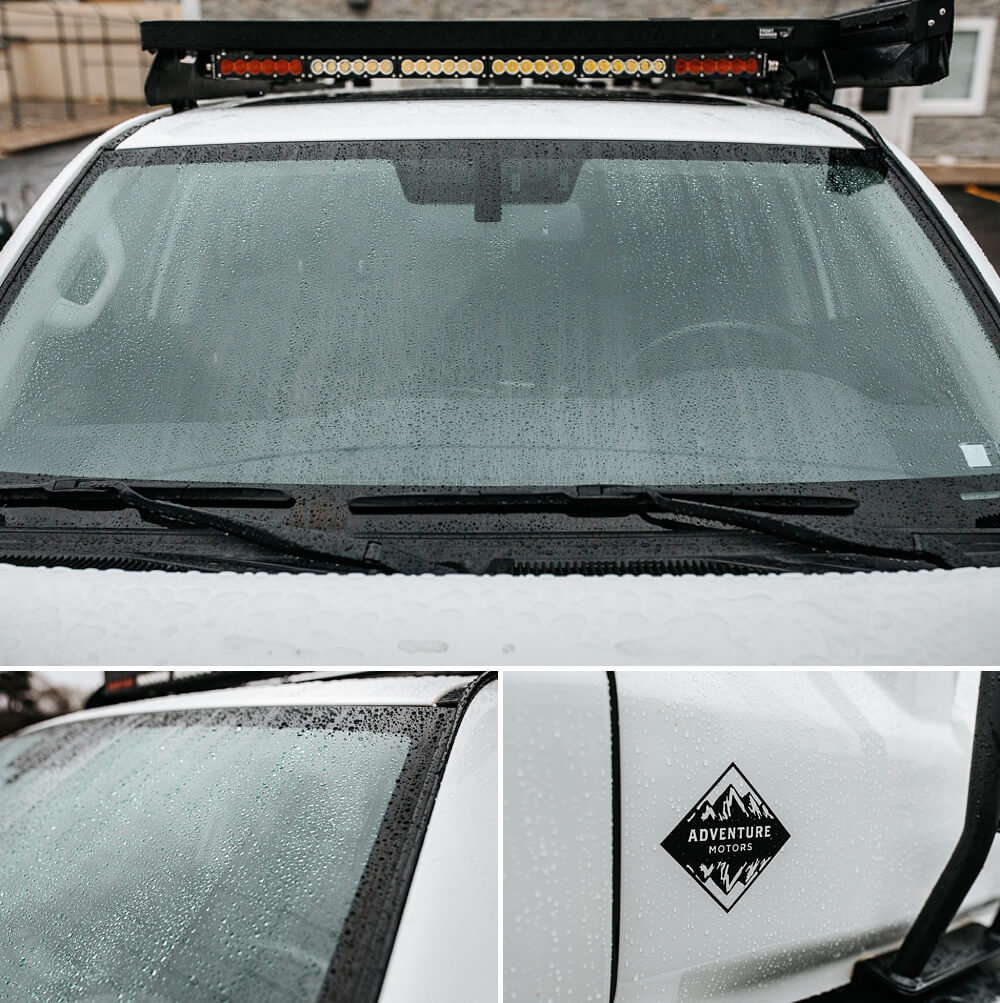
As you spray on the H2O Guard & Gloss, you will see water streak from the surface as it reacts to the chemical!
Using a WET towel, spread the solution around the glass or paint surface being sure to coat the entire surface.
STEP 3B: BUFF OFF H2O GUARD & GLOSS

The surface should appear pretty much dry once you buff off the chemical and solution.
Rubber, vinyl, and trim should appear slightly darker after the process and your paint and glass will be fully water resistant after you’re all done.
Once the H2O Guard & Gloss has been applied and spread around a section with your wet towel, take your DRY towel and buff off the chemical and any remaining water.
The buffing process also serves to dry your car as the last step of your car wash process.
PRO TIP: Although it may be tempting to see how well your truck now sheds water, DO NOT spray your car with water immediately after application. Immediate application of water will not ruin the hard work you just put into sealing your car, however, you will be left with hard water spots and stains instead of a perfect finish! Wait until the first rain to see the H2O Guard & Gloss in its full glory!
AFTER PHOTOS


Final Thoughts and Conclusion

H2O Guard & Gloss works and is super easy to use! I’ve used it for about 8 months and it has never left me disappointed.
I have read that one application should hold up to about 200-300 hours of rain/water exposure.
I have found that I apply it about once every 3 or so months and it keeps up the water repellency just fine!
This produce line is great. I used the H20 guard product and it really was great for water beading on the windows as well as the truck. But what I really had great results on is buying the two-step polishing set from Adams. I have a three-year-old 4runner And it was scratched up and had some deep ones from going out in the woods. But Adams to step polishing got everything out. I did have to use a polisher but it really worked. I did take a fair amount of time, but it was worth it.
I’ve always heard great things about Adam’s product line. I have used several other brands that offer this water beading magic. The days of “wax on-wax off” are fading away! Will order some of this & give it a whirl, thanks for posting.