SDHQ Module Mounts for Switch Pros 9100: A Complete Step-By-Step & Review For the 5th Gen 4Runner
Running various independently controlled lighting can significantly enhance your off-roading and/or camping experience.
From Light Bars, Fog Lights, A-pillars, Side Fills, Scene Lights, Chasers, Spots, Reverse Lights…the possibilities and combinations are endless.
If you are going to be installing a Switch Pro system to help manage all your on/off power switching needs, you need to consider this two SDHQ Off road products that will compliment your install and final set up!
Before we talk about the SDHQ Module Mounts lets talk briefly about the Switch Pro SP9100 system.
In order to independently control your lighting, you need to choose an aftermarket power switching system or go the OEM style analog switch route.
I choose the SwitchPros SP9100 system because it’s compact, low-profile, easily mountable, provides 8 power switches, and the spend is about $200 less than a competing comparable product.
We love the Switch Pros SP9100 here at Trail4R and it should serve most basic-to-moderate lighting systems pretty well.
If you need more than 8 independent power switches, you can double up with a second SP9100 unit for a total of 16 independently wired switches.
That’s a whole lotta switch but isn’t too unrealistic if you plan on running all your lighting as well as other accessories such as radios/comms, refrigerators, air lockers, compressors, or anything else that has an on/off switch and need to run from your battery.
If you are unfamiliar with Switch Pros system, you can check out our Switch Pros 9100 & Power Tray Install to see how it all works and how it’s installed.
OK, now that we have some basic understanding of why I chose the Switch Pros SP9100, let’s take a look at the SDHQ mounting modules.
The Setup
- Switch Pros SP9100 8-Switch System: Check Today’s Price
- SDHQ Under the Hood Power Module Mount: Check Today’s Price
- SDHQ Switch Pros Keypad Mounting System (Interior Trim Piece): Check Today’s Price
Tools Needed
- Plastic Pry Tools: Check Price
- Dremel: Check Price
- 10mm Socket
- 8mm Deep Socket or 8mm Wrench
- 1/8” Hex Bit
- 3/32” Hex Bit
NOTE: This is not an installation guide for the actual Switch Pros 9100 system. If you are in need of a complete install guide and what’s required for a Switch Pros 9100 system check out our Switch Pros 9100 & Power Tray Install
SDHQ Switch Pros Keypad Mounting System
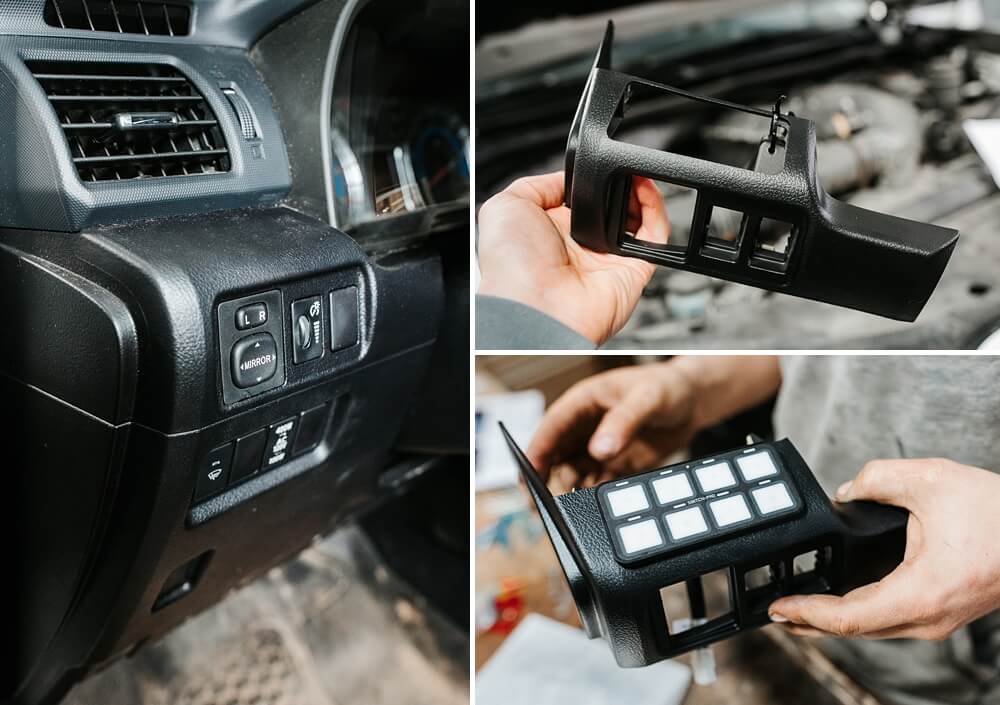
I knew right away that I wanted the Switch Pros keypad mounted on my 5th Gen 4runner just above the side mirror and dash dimmer controls.
Seemed like the best spot for accessibility and visibility while retaining an OEM look.
SDHQ realized this is a great spot to mount the Switch Pros keypad and took it upon themselves to produce a replacement trim piece that helps make Switch Pros install a breeze while keeping the keypad extra secure.
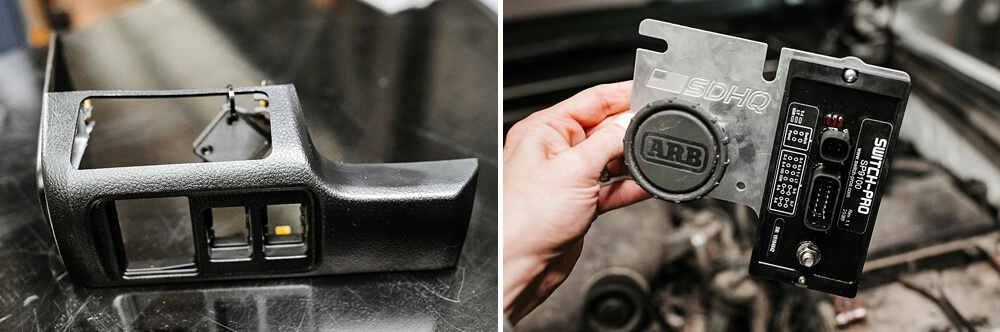
The panel is actually a factory replacement trim piece that is CNC laser cut by SDHQ to perfectly mount the Switch Pros keypad and while naturally re-integrating back into your OEM trim!
From SDHQ Off Road
- CNC Laser Cut and Etched factory Toyota panel
- Designed for a tight fit with Switch Pros Bezel Mount Panels
- Included Reinforcement Backing Plate System
- Increases panel clip holding pressure
- Clamps keypad panel into dash panel making it sturdy and theft resistant
- Eliminates the chance of hardware vibrating loose
- Minimal cutting required
- Match your interior color
Installation is really breezy, takes about 10 minutes and is beginner level so long as you’re comfortable with trimming a small piece of unnecessary plastic from your dash.
Step 1 – Remove OEM Trim & Switches

Remove the OEM plastic trim and switches using plastic pry tools.
Step 2 – Install Switch Pro Keypad

STEP 2: Install and secure the Switch Pro keypad onto the SDHQ replacement trim panel using provided clamps.
This is also a good time to feed the Switch Pro main cable from your engine bay, through your firewall, and up to the mounting position.
Step 3 – Trim Behind Air Vent & OEM Trim Panel

STEP 3: Trim small part of plastic that sits just beneath the air vent and behind the OEM trim panel.
From what we can tell, this plastic piece really doesn’t provide any structural purpose. Trim away!
Step 4 – Transfer Side Mirror w/ SDHQ Panel

STEP 4: Transfer the OEM side mirror and dash dimmer buttons into the SDHQ replacement trim panel.
Connect up the Switch Pros keypad harness to the main line and reconnect factory control harnesses as well.
Clip in the SDHQ replacement trim panel. DONE!
SDHQ Under the Hood Power Module Mount for Switch Pros

On the engine bay side, you will need to securely mount the Switch Pros power module in order to properly complete and install your system.
There are a few different ways to mount the Switch Pros power module and I’ve used SDHQ Under the Hood Module Mount.
Pretty straight forward no-frills application and a great alternative to the common (but more complex) power tray + fuse block systems.
From SDHQ Off Road
- Mounting plate mounts to existing factory mounting point in 2010-Current Toyota 4Runners
- Hardware provided
- Simple and clean solution for mounting the Switch-Pros System
Installation essentially is summarized in one step really… mount the SP9100 power module to the metal panel, then mount the metal panel to one of your factory bolt-on locations in the engine bay near the firewall.
Super simple, takes about 5-10 minutes and is beginner level…basically, pick the right spot that works for your engine bay and mount it up!

IN CONCLUSION: What We Love about the SDHQ Mounts for Switch Pros System
- Install is super fast and easy for both products
- Products were well packaged and included all necessary hardware
- Keypad trim panel looks 100% OEM and color-matched (it is a factory part)
- Switch Pros Keypad fits very snug and secure with SDHQ backing clamps
- SDHQ CNC Laser cut mounting hole is PERFECTLY sized and spaced for the 9100 keypad
- SDHQ customer service and shipping were lightning fast and very responsive!
- SDHQ logo on the interior keypad trim panel is present but very very subtle.
Final Thoughts
SDHQ has made some great products here that help make the Switch Pro installation easy and provide that OEM look/feel.
After 2 weeks of use including a three day off roading trip, I can say the keypad panel still feels as secure and sturdy as it did on install day.
I love the placement of the keypad and having it both accessible and easily visible helps keep eyes on the road and hands-free from fumbling down around the knee area when trying to turn on my lights!