
TacoTunes Plug and Play Subwoofer Audio Upgrade for the 5th Gen 4Runner
The factory Toyota sound system is good, however it leaves people wanting more.
If you ever push the sound system past 35 on the volume knob, you will notice the bass is heavily lacking. Most owners, including myself, did not want to swap out the factory head units for an ugly aftermarket one and lose all the functionality of the stock unit.
I like the look and feel of the stock head unit and built-in controls like the steering wheel functionality.
So here in lies the question, how do you add a subwoofer to the stock sound system while keeping the factory head unit?
Hassle no more! The wizards at TacoTunes developed painless “plug and play” options for us.
Their harness adapts the factory head unit so you can easily add a subwoofer. They have options for Entune and JBL factory systems as well.
Their kits range from full systems that add amplifiers subwoofers and speakers, to install kits for the DIY specialist that want to spec their own system.
This review will focus solely on the plug and play subwoofer wiring harness. I will feature future stereo installs as I upgrade my 2016 4Runner Trail sound system, so stay tuned (aka TacoTunned!).
Taco Tunes Subwoofer Parts

My 4Runner is a 2016 Trail with the Entune sound system.
I used the following parts for the installation:
- Amp: Check Price
- JL Subwoofer: Check Price
- Sub Box: Check Price
- Subwoofer wiring kit: Check Price
- Remote Wire: Check Price
- Signal Source
- Bare wire to RCA adapters: Check Price
- Plastic Pry Tools
You will need two things to add: an amp and a subwoofer.
The first thing you need is a remote wire. A remote wire is a signal to the amp from the head unit to tell it when to turn OFF/ON. You do not want the amp to be on all the time draining your battery as well as having to manually turn the amp on every time.
Second, you need a signal source from the head unit for the subwoofer to play. The amp will need a musical signal to ‘read’ and amplify for the subwoofer to reproduce.
TacoTunes has created a painless plug and play option to tap into the factory wiring harness. There are only two harness you need to get and to pug in. One harness, the blue wire, is your remote signal. The second harness has two purple (speaker +) wires and 2 green (speaker -) wires for the amps source.
Installation
You will need a 10mm socket to remove the factory head unit and some plastic pry tools are a good idea. You will need to remove the factory head unit to get to the plugs behind.
For an overview on removing the dash, refer to the anytime backup camera write-up.
Insert/Connect the TacoTunes Harness
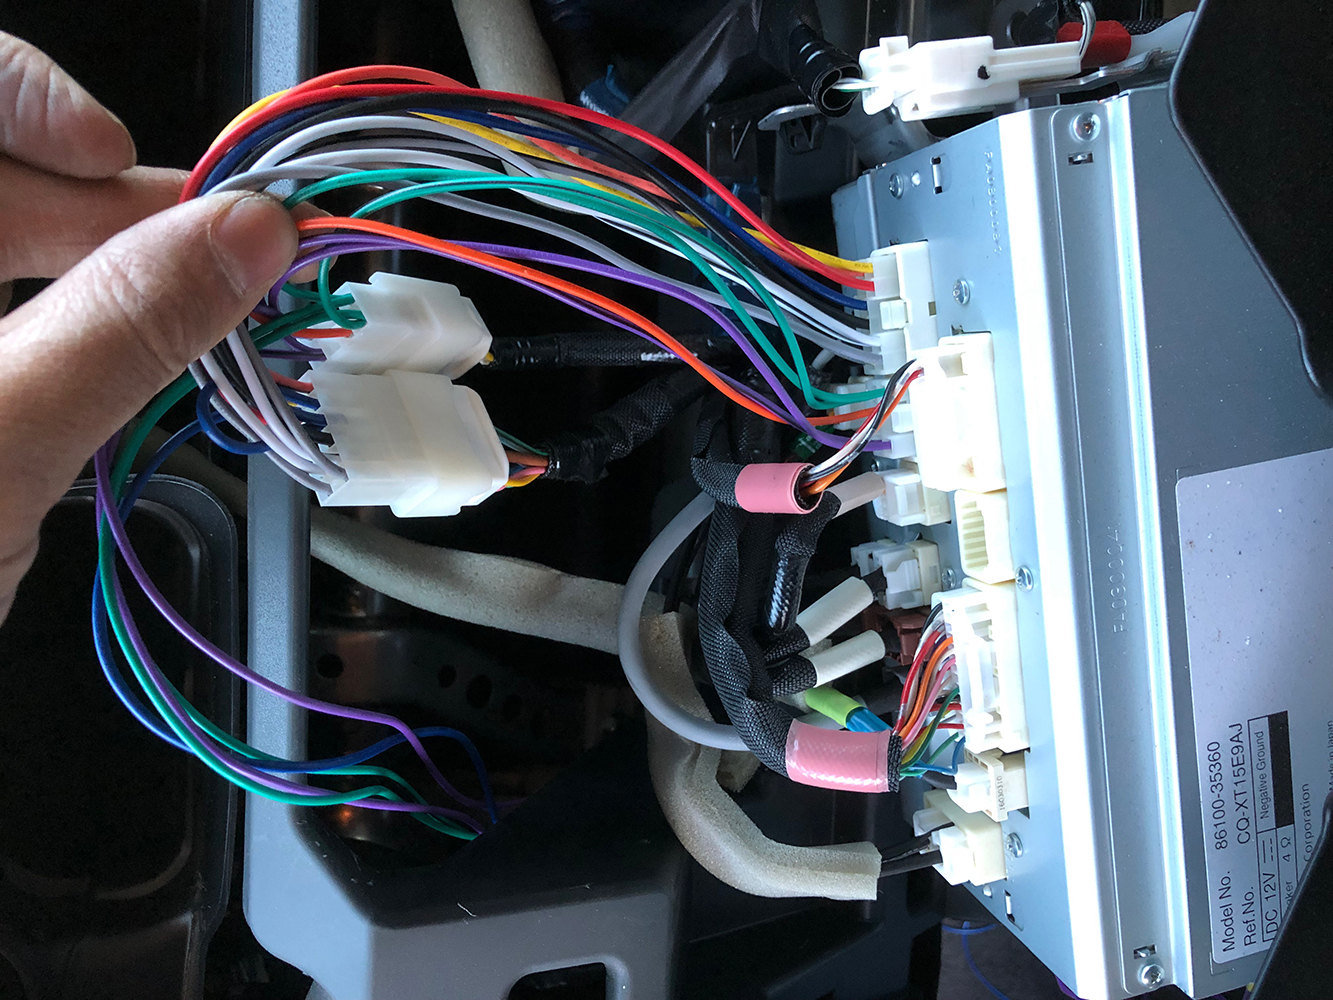
Once you have the dash removed, and head unit free, and access to the rear. Unplug the two connectors on the upper right and insert the TacoTunes harness into the head unit inline of the old. Re-plug the Toyota harness into the other end of the TacoTunes harness. The supplied harnesses use the same style factory plug so the pop right in.
Run the blue, green, and purple wires to the rear
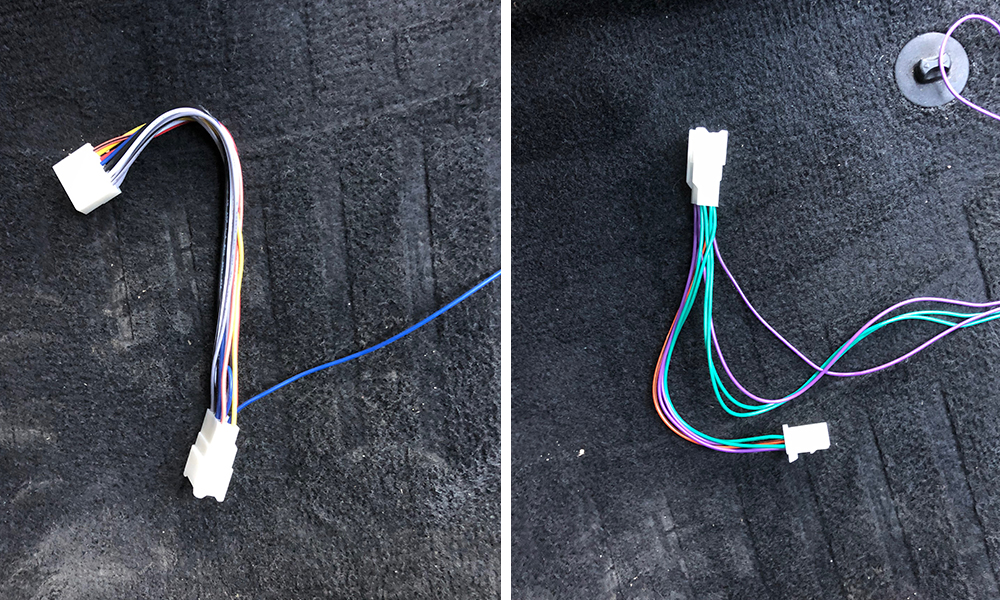
Next, you will need to run the blue, green, and purple wires to the rear.
You will need a subwoofer wiring kit to power the amplifier. I chose a 4guage kit as I wanted the additional capacity to run more accessories later from that same cable. Determine the RMS AMPS of your sub amp combo and that will dictate the minimum power wire size you will need. RMS equals constant amperes the subwoofer/amp can consume. Peak AMP sounds cool but unless your competing does not necessarily mean anything.
Run cables Under Floor Plastics
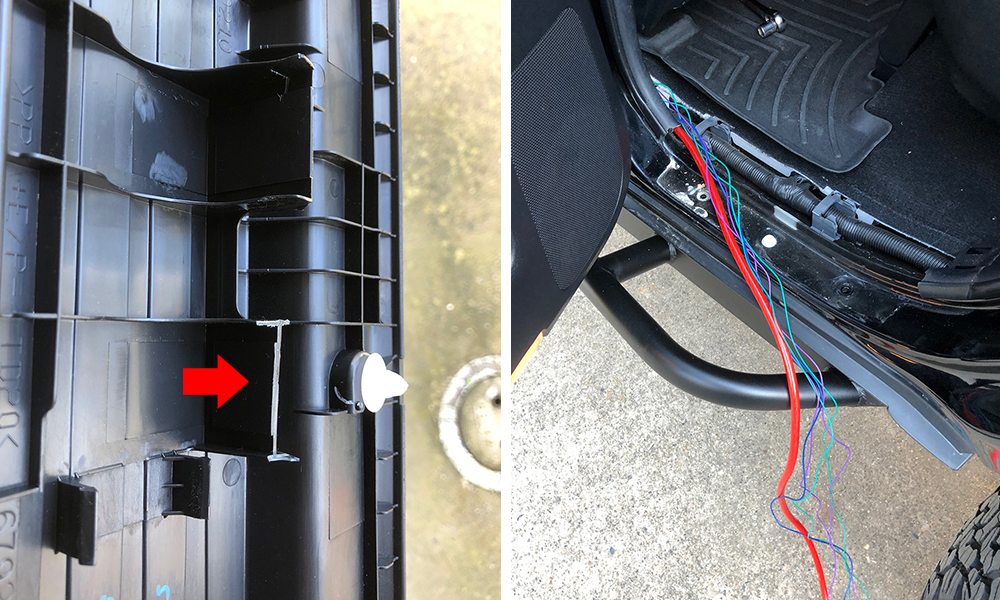
I ran my cables down the driver’s side. I pulled the blue, green, and purple wire neatly over to the lower footwell. If you pry/pop up the factory floor plastics, there is a clean little channel that the cable will lay in nicely.
Put light pressure against the plastic and they should put straight up. Make sure the white clips come out too, as they are critical to getting off and needed to reinstall the panel.
You will need to trim the Floor plastic so it will fit over the new cable (see triummed floor plastic – image left above).
Continue the process of pulling panels and running the cables until you get to you desired amp location.
Making the connection
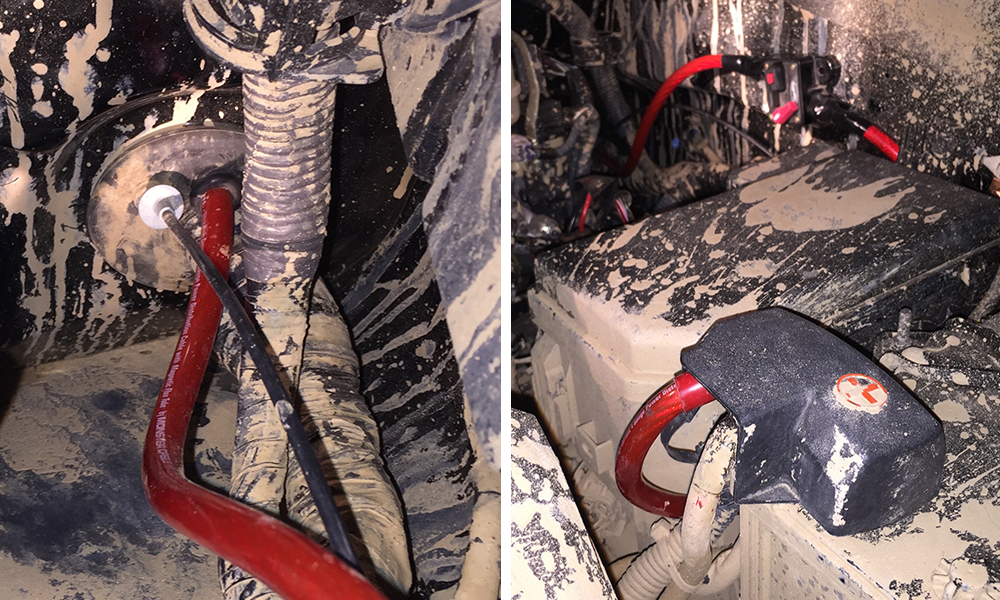
The Factory has a pre-made hole that you can use to run the power cable to the battery. Cut off the round nipple and pull your power cable through to the battery.
Install the fuse close to the battery or +12V distribution block as possible. Toyota left a lot to ‘wiggle’ room for adding accessories, so you don’t have to trim the Pos battery cover or find special routing. Be sure to steer clear of sharp edges, sources of vibration, or high heat. I mounted mine high on the inner fender with a breaker.
Next you will need to find a good ground for the amp. I used the factory ground for the inverter and 12V cigarette lighter. You can use and thing that provided a good connection to the body. Make sure to sand off any paint so the ground touches bare metal. I recommend against using self-tapping screws or seat beat/seat mounting locations for ground connections. There are a ton of article on why. I will just say try to keep the ground cable as short as possible and make sure the electrical connection is good.
Connect TacoTunes Wire to Amp
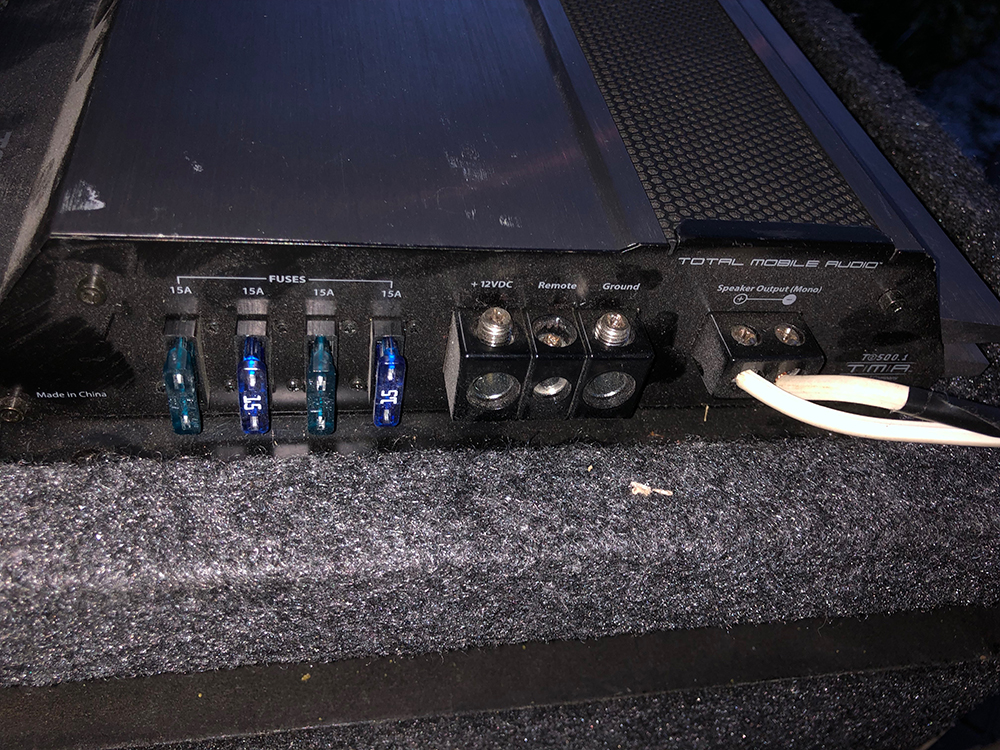
Connect the blue wire from the head unit to the ‘remote’ terminal on the amplifier.
Connecting the RCA Source Cables
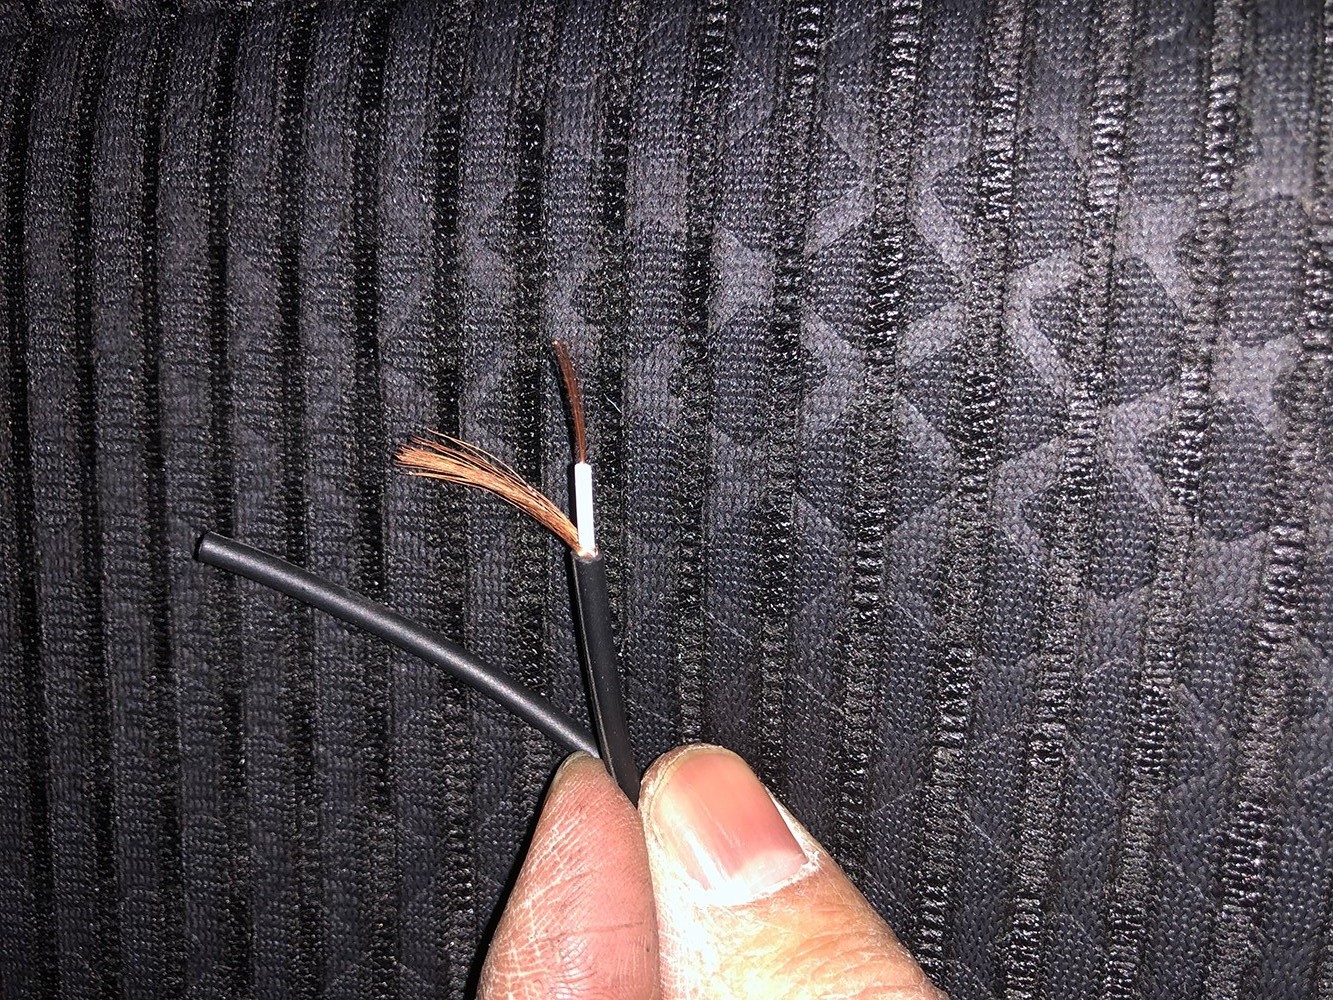
TacoTunes also sells bare wire to RCA adapters to make this easier. A single RCA consists of 2 wires in one. If you are careful you can strip it down to both cables.
The positive signal is in the center and the negative is the outer and runs on the outside of the positive cable.
The outer negative servers as a ‘shield’ for the signal.
You will need to strip 2 RCA cable down and separate the negatives, outer, and the inner positive. The Green wires from the TacoTune Harness will be connected to the negative side to the RCA.
The Purple will be connected to the positive of the RCA’s. Don’t worry about Left and Right signals.
Most subwoofer run in mono configuration and it is combined in the amp anyways.
This is true for dual woofers too. If you want to keep the right and left signals separate mark the harness before installing.
TacoTunes recommends not trimming down their harness, so you can add to the system later and reuse their harness.
All the Sounds!
Once the install is complete and you are ready to start the system up for the first time be sure to double check connections and fuses.
Once the system is ready to be powered insert the main fuse and start the sound system.
Note: the XM may not show up at first but be patient as in need a few to reestablish the connection.
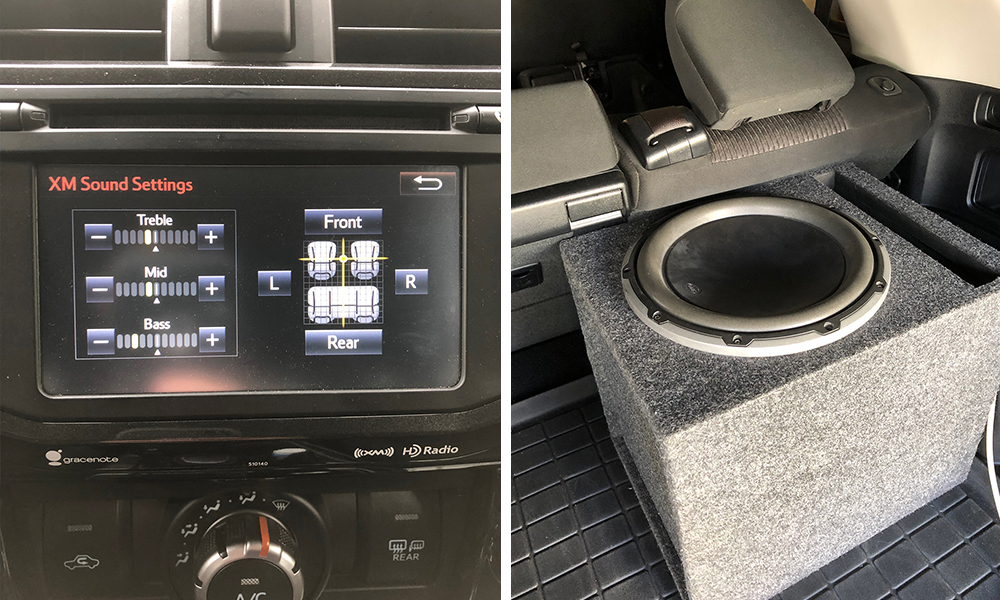
Re-Tune The Headunit?
You will need to retune your headunit’s sound settings as the harness ‘high jacks’ the rear speaker outputs to feed the amplifier signals.
The Stock head unit drives the rear speaker harder with more amps as they are larger and can produce more sound than the front tweeters and 5.5” speakers.
Place the fader all the way the front and them back 3 clicks. This will keep the sound system happy and stop the stock head unit from overdriving the rear speakers, aka clipping, with the amp.
Play with the Treble, Mid, and High until you are happy with the results.
Adjust the subwoofer settings to match the stock head unit levels.
You can use a bass knob or the bass boost on the amp as a gain to make the sub loader or quieter. Different music genres have different ranges so tune to your specific music choice and liking.
The final step is to enjoy your new factory sound system with subwoofer!
What a great article share. A great contribution especially for someone looking forward to buying a car subwoofer, amplifier and enclosure. If anybody wants to install a new one, this is the most effective share, that will be very helpful for best choice. Thanks a lot for the post.
Great post. Thank you. I just got a 2019 limited ( JBL system) and the bass is just not doing it for me. I’m a novice audiophile, just starting to look at options. I’m curious if there is anything smaller, that might fit under a seat? and what are your thoughts on changing out speakers to enhance the bass and overall sound as well?
1st Congrats on the purchase!
Depends on your goal. I went with a 12” because speakers need air space to operate, the more the better, and I plan on a lot of audio upgrades later and need a subwoofer to match.
Most audio companies have universal powered subwoofer options that will fit under the seats. They are call powered because the amp/sub/and box are sold as one complete unit.
For upgrading the interior speakers I’m all for it. For this article I just wanted to show an easy add on subwoofer solution. For upgrading interior speakers, adding sound deading is an easier solution than adding more amps to drive the speakers harder.
To really improve over the stock JBL system, I would recommend a digital signal processor as well to get the most out of your speakers.