
Super Bright Universal Plug & Play VLEDS License Plate Mounted Reverse Lights
There are plenty of reverse light systems but few may compete for the term hidden, sleek and almost factory-looking.
That is what we are looking at with VLEDS new, yes that is right “sleek” reverse light. VLEDS is calling this the LPR (License Plate Reverse) light. This light packs not only an impressive stature but carries the lumens and functionality to boot.
You can run these auxiliary reverse lights to a switch panel like the Switch Pro or an SPOD or to your reverse lighting using a tap. The plug and play option is to run the lights inline to your reverse light wiring. Both are going to be fairly simple but set a day aside, the install does come with some patience.
The LPR housing is made of CNC’d aluminum with a stunningly smooth, high-gloss black finish exterior grade UV resistant polycarbonate lens. To top it off, the fascia presents a very clean engraved VLEDS logo. From a design perspective alone, the LPR is overwhelmingly impressive and screams “install me already”. Really though, this is an impressive piece of lighting that every make and model should consider.
Boasting an impressive 72 high-output 5500K LEDs to light up the world you live in, this may be the new standard in reverse lighting. This reverse light will compete with your favorite off-road lighting companies reverse lights and look classy doing it.
Sitting at almost 2000 lumens, this reverse light is more than enough for a street princess or a truck with weekend trail goals.
Find it online:
- LP Reverse Light: Check Price
Best Plug-n-play Reverse Light?

As always, there is no best but let’s think about this one.
Dare I say, this reverse light system by VLEDS is one of the brightest plug-n-play option available. It won’t go heads up with FLEX from KC sitting at 2000 lumens per light or other full-size off-road lights. But, it sure will go up against the Diode Dynamics tail as turn + reverse light mod and many other common plug-in-play reverse light options.
The point I am making here is to look at the clean lines and how it fits in with the license plate. Sometimes OCD kicks in and the fact that the LPR offers an OE look is really nice. This is a mod that will be accepted by nearly anyone buying your truck in the future.
It’s one of those ‘tasteful’ additions, not obnoxious add-ons, and all for around $100 makes it a no-brainer.
Features and Specs

- 1800lm measured output (5X brighter than a standard reverse light)
- 72X 0.5W 5500K (perfect match to all VLEDS products)
- IP68 waterproof sealed
- UV resistant polycarbonate
- CNC machined aluminum
- Gloss black surface finish
NOTE: For newer trucks like ours with CAN (controller area network) bus or BCM’s (Body Control Module) VLEDS recommends pairing LED reverse light bulbs to lower the current draw in the factory reverse light housing or remove the factory incandescent bulbs completely to prevent overloading the circuit. Keep in mind you will be adding 2A to the circuit and some systems will fault from the additional load.
It’s simple. It’s clean. It’s bright.
VLEDS guarantees that you’ll love it, and honestly so do I!
Options for installation
- Tap into your back up light bulb wiring (on in reverse)
- Wire to switch panel (on any time)
- Wire the LPR into the back of the trailer harness
Tapping into your reverse light wiring or your switch will require wiring from the rear hatch up and into the cab.
From there, wire down the rear D pillar and either tap into your reverse light wiring, tap into your trailer harness or continue your mission towards the front and ultimately your switch panel.
Installation – Tools and Materials

VLEDs:
- LPR Reverse Light: Check Price
- 921 Reverse Light Bulbs: Check Price
Amazon:
- LPR Reverse Light: Check Price
- 921 Reverse Light Bulbs: Check Price
Tools
- 10mm Socket
- Pliers
- Lineman’s Pliers
- Needle Nose Pliers
- Plastic PRY Tools: Check Price
- Mini Pliers
- Wire Cutters
- Utility Knife/Exacto Knife
- Surgical Scissors
- Tap or Stepdown Connectors
- Screwdriver
- Wire Cutters
- Wire Crimps
- Fisher Tape or Hanger
- Electrical Tape
- Frog/Blue/Masking Tape
- LED Headlamp
- Magnet LED light
- Any support lights for tight areas
You don’t NEED all of this stuff but this is just a list of the items I used for the installation.
On a side note, I have really started to depend on my Milwaukee headlamp more and more. I originally was rocking the AAA battery version but then I moved to the rechargeable battery version. I use that headlamp for just about every install now. It’s pretty damn nice, and it will double as a pretty powerful light when camping as well.
Step 1. Remove Cargo Hatch Cover

Step 2. Remove Cargo Door Cover
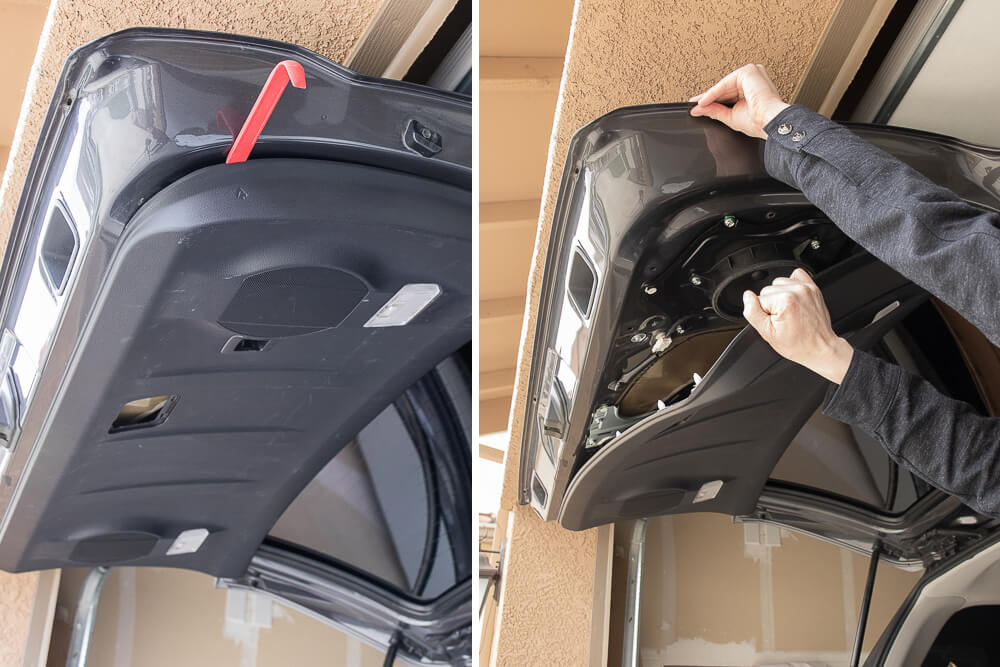
Step 3. Pop All Clips
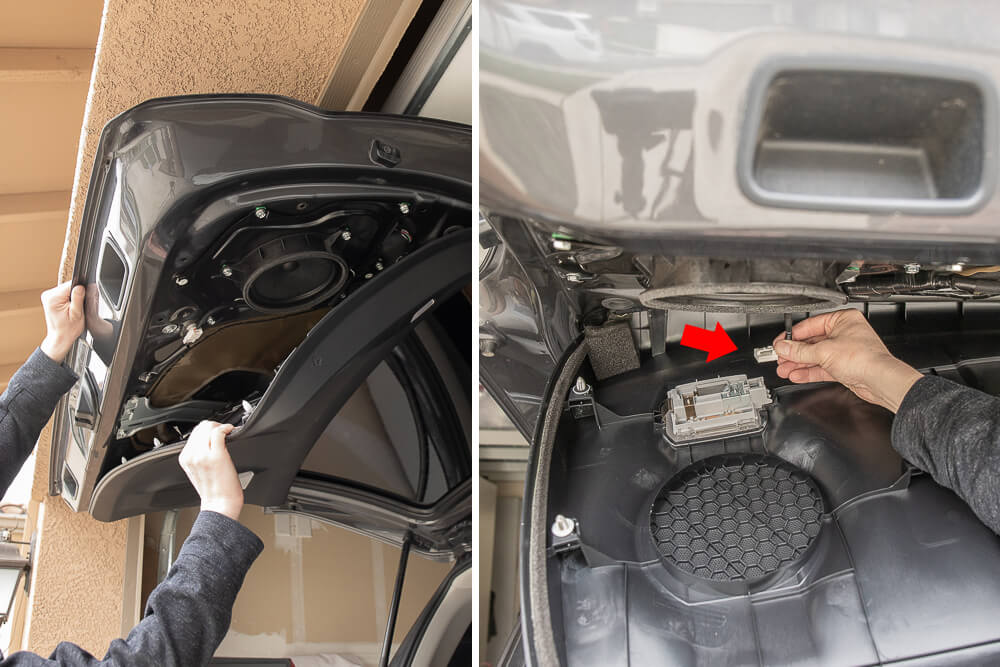
Step 4. Remove Screws, Tabs & Connectors
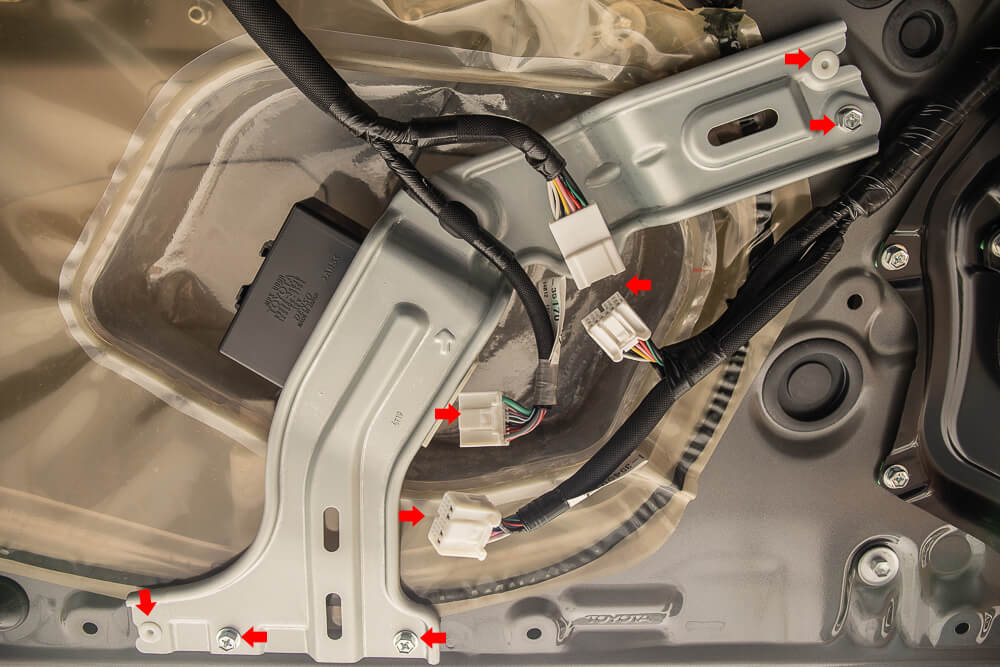
Step 5. Remove Metal Bracket

Step 6. Remove Adhesive

Step 7. Cargo Hatch Wiring Housing Cover

Step 8. Run Fisher Wire Tape

After countless posts on fishing wire, I finally ordered a Kline Tools fisher tape roll.
Step 9. Pull Fisher Through Opening
You have a few options here. You can run your wiring over the grommet as seen in the top left image. Or, you can take the route I did, and go through the grommet.
I wanted to go straight down the middle but the side of the provided wire connectors diameter was larger than the four wires coming up through the grommet.
In order to get the connector through the firewalls tight rubber grommet, I used a pair of mini-pliers to spread the hole apart. I eventually got the wire through but it’s tight.
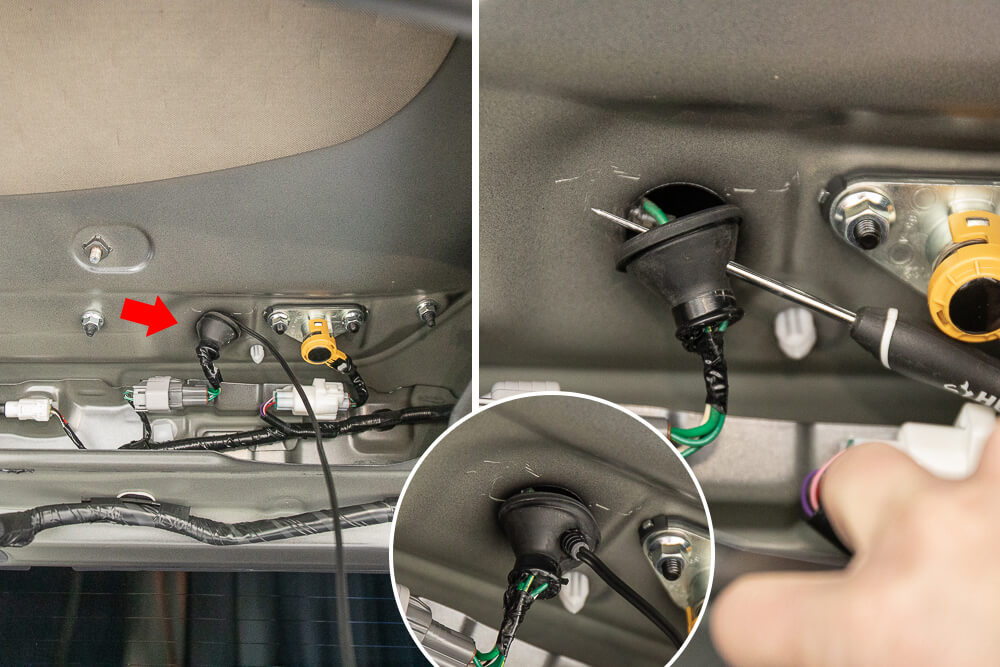
Step 10. Pull Wire Through Grommet

After you pull the wire through, you can connect up your plate and neatly fold your wires up into the empty location above the grommet.
Step 11. Plug It In
Step 12. Pull Tape through Cargo Hatch

This is a tight one. Pull your fisher wire with VLEDS reverse light harness through this rubber section.
Step 13. Headliner and D-Pillar

Once you have the wire and harness free again, port the wire down into the headliner.
NOTE: There are two routes you can go. You can go above the sheet metal or below the sheet metal and directly on top of the headliner.
Feed the wire almost directly on top of headliner without cutting into the headliner. You can pull down on the headliner to see your fisher wire, just don’t pull down too hard, headliner can crack and take new shape easily.
Run the wire over to the D Pillar, then down and out you go!
Step 14. D-Pillar and Reverse Light Opening

As you pull your wire down through the D-Pillar, zip-tie as you come down.
You don’t need to cut any access wire off the provided wire harness. VLEDS provides an almost exact amount of wire for this exact install.
VERY IMPORTANT: TESTING YOUR REAR WINDOW
Pull the wire back through the top and bottom to cinch down your slack.
If you have too much slack in the line, your rear window may catch on the loose wire preventing the window from closing. This happened to me. I had about 4-5″ of slack in the wire that ran from the top of the hatch to the LED. This extra slack was enough for the rear window to catch and stop.
You need to run the wire completely out of the way from the rear window.
You want to stick your head up into the rear door while it is open and ensure that the wire at the far edge of the rear door will clear the window.
Step 15. Cut Plastic Coating On Harness
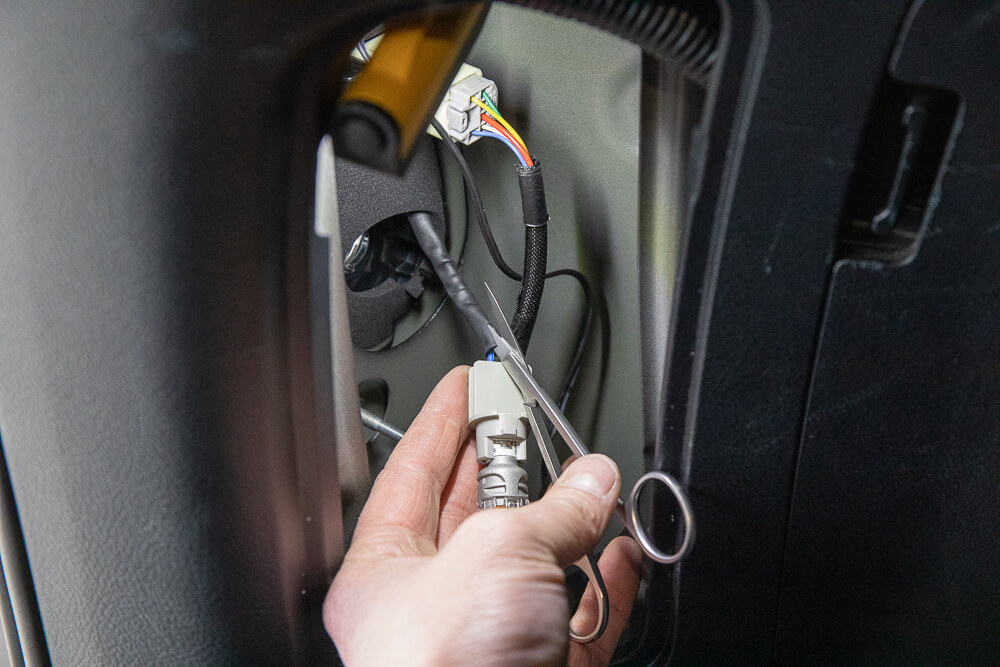
Step 16. Tap Installation Overview

Step 17. Crimp T-Taps
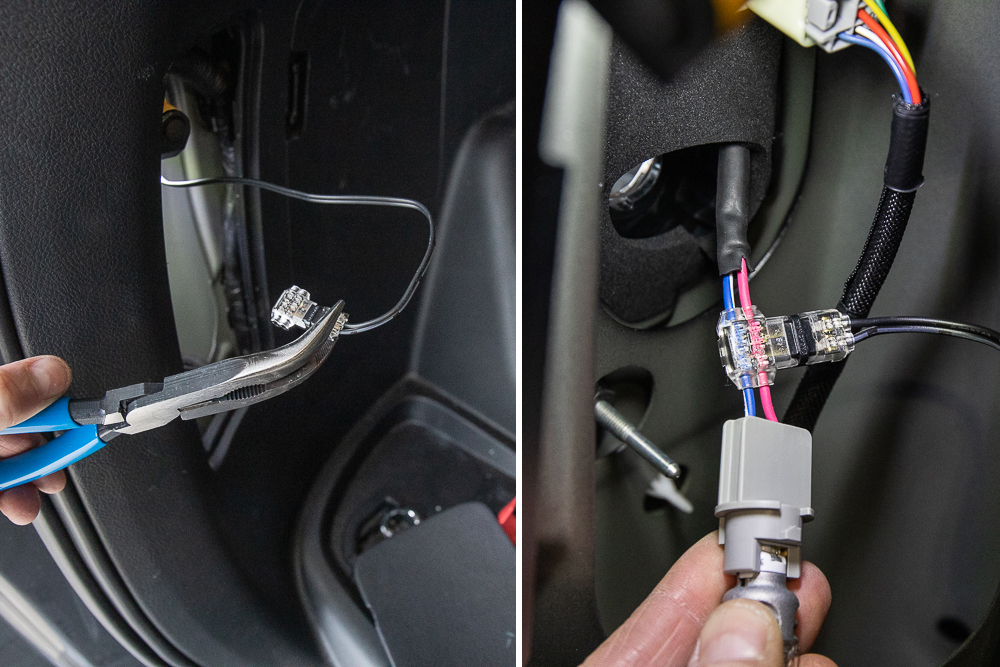
Here is where I experienced the rather common tapping into your factory wiring headache. The provided wire-tap from VLEDS is designed for around what I believe to be 20-22 AWG while our factory reverse-light wiring is around 16-18 AWG. This causes the tap to more or less smash our wires as opposed to actually tapping (connecting the end of one wire to another wire) our wires. It would be nice to have a universal kit with two T-Taps instead of the one designed for 20-22 AWG. I ended up using these stepdown connectors to connect the wires instead of the provided T-Taps.
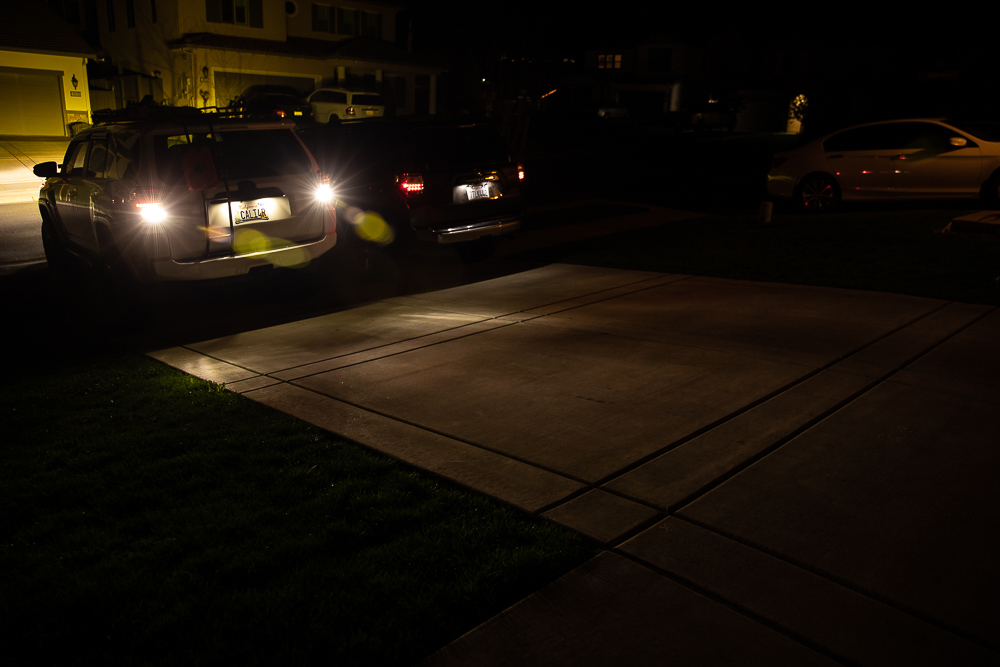
Regardless of the connection, this light exceeded all of my expectations. VLEDS really put on a show with their new reverse light system. The light output was strong, wide and robust.
The color (5500k) was perfect pure white. All in all, this is a reverse light that deserves your attention. I know some guys have spent over $500 on their reverse light systems, but this kit does hands down perform for the cost.
To top it off, it flows with the license plate and keeps everything at a factory appearance.
Pretty impressive really. Quality work VLEDS. Quality work.
VLEDS LPR Reverse Light (OFF) Vs. 921 VLEDS Bulb
VLEDS LPR Reverse Light (ON) Vs. 921 VLEDS Bulb

Reverse Light Before (921 Bulbs Right)

Reverse Light After (LPR Left & 921 Bulbs Right)

Reverse Lights (921 Bulbs)


Brenan, Tks for step by step.. sorry of questions on basics.. Can you give more info on tapping wire into tail light with step-down connecter/, or a final photo? Im thinking the inline step down connecters route would be;
1) cutting each strand (+/-) of tail light wire placing connecter in-line with striped ends
2) then inserting striped ends of VLEDS wire strand into side of step down connection.
3) crimp and heat shrink
Can you confirm polarity of tail light wire colors (red and blue)?
How did the LPR light affect vision from on-screen backup camera? I swapped out my factory 921’s and license plate lights for some Xenon Depot/Phillips LED’s, and there is a slight glare in backup camera at times.
It does affect the corner of the screen. You can see in the last photo that a portion of the screen has a glare. The light is so bright that one corner is hard to see. I have never had any problem or irritation with it being there as the distance of light output it throws far outweighs the glare.
Brenan, great and thorough write up as usual. Dumb question, does this light have to be SAE compliant?
Tom, not a dumb question at all. I am not sure that it much matters as its a reverse light but I would have to say it’s probably not.