
ARB Flat Rack – Overview & Install on 5th Gen 4Runner
Here is the installation, and a complete review on why I choose the Flat ARB Mesh Roof Rack – The ultimate Low Profile Overland Roof Rack!
There are a multitude of options for roof racks and roof rack attachments for a 5th Gen 4Runner. People invest in racks for their 4Runner due to a variety of reasons, but the main reason revolves around adding additional storage/transportation capabilities.
Some companies provide small basket style racks or cargo bars that utilize the 4Runner’s factory cargo bar supports and or cargo bars themselves. These products do have a place for some people, but the downside of most of these options is that they don’t give you any increase in weight carrying capacity. In fact, they may decrease it since they are only adding weight to the factory roof rack system.
Some smaller crossbar and basket-style systems are limited in storage capability, and more often than not these products are not designed specifically for a 4Runner. Most of these basket style systems are universal and ultimately, a less tailored product for the 4Runner.
Find It Online:
- ARB Flat Mesh Roof Rack: Check Price
Baskets, Cargo Bars or Full Length?
Full-length and 3/4 roof racks are mounted through factory mounting points offer many more benefits. They are typically more versatile but can come at a higher cost, increase in weight, and potentially decrease in ride quality (decreased MPG, increased wind noise, etc).
Full-length and 3/4 roof racks increase carrying capacity, offer more surface area to store gear, and increase locations for mounting accessories and lights.
Most of these racks just offer a better platform for hauling gear around.
For some people such as myself, Full-length and 3/4 roof racks can provide increased visual aesthetics as well.
The Factory Roof Rack Cargo Bars

I have utilized my factory roof rack and cargo bars for approximately a year and a half. They have worked well, but they are limited in capability.
The factory setup is very low profile and provides hardly any wind noise. The factory roof rack is also very lightweight. Carrying capacity is limited to 150 pounds of cargo and due to their only being two cargo bars, your gear can’t be very small in footprint.
The benefit of the factory rack is most people get this option when they purchase a 4Runner so it comes from the factory ready to go. There is no need to install a rack, and if anything has to be installed, it’s crossbars which are optional on the 4Runner.
In consideration of this, the factory roof rack is a good foundation for many people and I have utilized it for approximately a year and a half to transport kayaks and paddleboards all over Texas.
It has done its job and I believe for some people the factory roof rack may be all you need.
I wanted/needed a little more capability though.
Why I Chose to Upgrade my Roof Rack

The more I begin to venture off the beaten path with kayak fishing, mountain biking and camping, it became more and more evident that transporting all the gear I bring with me was a little difficult and I was limited in my capabilities.
As I previously mentioned, the factory roof rack has worked well for my kayaks, but due to the limited carrying capacity (150 lbs) and small footprint, I could only store one kayak on top and didn’t have a good system to store additional gear, such as my paddles, fishing poles, tent, etc.
Lighting
I also do a lot of night driving and although I have upgraded nearly every factory light on my 4Runner to LED technology and also added aftermarket LED lighting, I still would like some additional lighting capabilities.
After all, I go to some remote places and having proper lighting at night time is a huge benefit for safety. The factory roof rack doesn’t provide me with great options to mount additional lighting, such as forward facing light bars, side scene lighting, or rearward facing lighting. Aftermarket roof racks do.
Roof Top Tent
Since I am beginning to camp more, I eventually would like to get a roof top tent (RTT). It would be impossible to utilize a RTT with the factory roof rack and cargo bars.
This made it even more evident that I needed to upgrade my roof rack.
Recovery Boards
I don’t want to install a winch on my 4Runner, but I do want to have some recovery boards one day, such as the ARB TRED or Maxtrax Recovery Boards. Although I could utilize the factory roof rack to store these, there are much better options with aftermarket roof racks.
Looks
Lastly, I think a good aftermarket roof rack can increase your 4Runner’s visual aesthetics. Although this reason was closer to the bottom of my priorities when researching a rack, it was something that I kept in mind.
Not that the factory roof rack looks bad, it is just generic and nothing special. I wanting something to make my vehicle different from all the other 5th Gen 4Runners on the street.
What I Was Looking For In An Aftermarket Roof Rack

I have briefly discussed some of the aspects I was looking for in an aftermarket roof rack, but to make it a little more straightforward I will list out the key things I wanted:
No Drilling Required:
I didn’t want to drill any holes, so this means utilizing the factory roof rack mounting locations. Depending on the rack, this might mean you can only get a 3/4 or 7/8 length rack, but I was fine with this.
Increased Load:
I eventually want to get a RTT and also be able to store more / heavier gear on top of my 4Runner. In consideration of this, I needed more carrying capacity.
Low Profile:
I wanted something sleek and simple. Nothing too fancy, but something that looked like it was made for the 4Runner and wasn’t too tall.
Low Weight:
Lots of roof racks can add significant weight…at the highest point on your vehicle – not a good place to add weight. I wanted to minimize the amount of weight I was adding so I wanted to find an aluminum rack if possible.
Minimal Parts:
Some roof racks, particularity aluminum racks, can have lots of components to put the rack together. I wanted something solid, simple and sturdy…right out of the box.
My Requirements for a Rack
Here is a list of what I am planning to use an aftermarket roof rack for:
- Transporting my kayaks and paddleboards
- Mounting an RTT
- Storing/transporting gear
- Recovery equipment
- Additional gear for long/extended trips
- Mounting additional lighting
- Light bars
- Scene lighting
- Rearward facing lighting
- Shooting platform
- An elevated platform to shoot from
- Mounting an awning
As you can see, I want to use an aftermarket roof rack for quite a few things, but all very reasonable things. There are many different options for roof racks on the market, but one, in particular, was the one I decided upon.
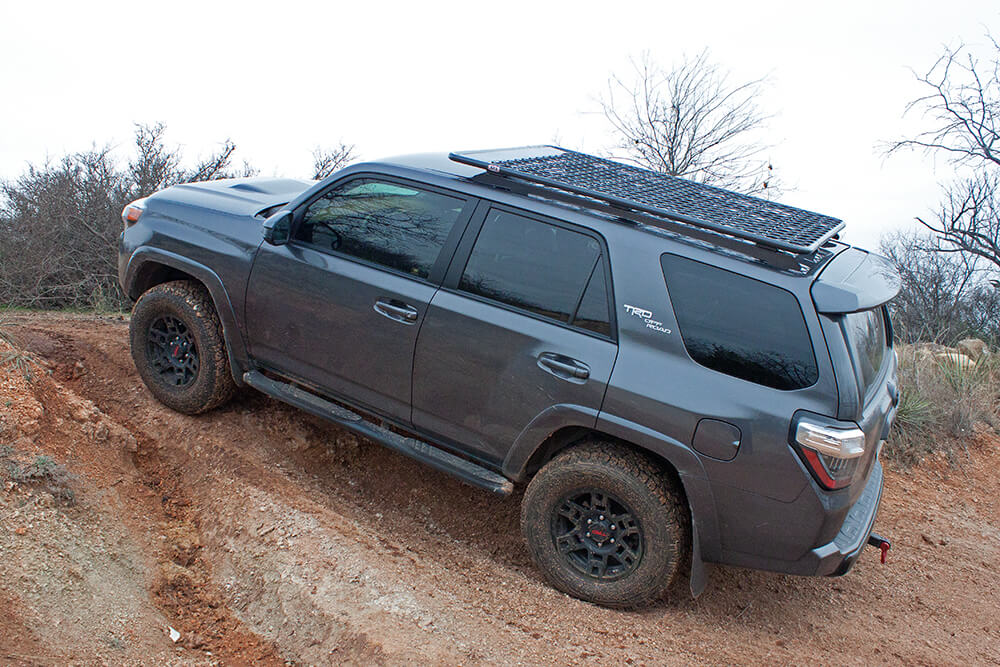
The ARB Flat Alloy Roof Rack

For those of you less familiar with the off-roading world, ARB is legendary, producing a wide range of products such as air lockers, air compressors, fridges, awnings, RTTs, roof racks, bumpers, sliders, and much more.
They are considered by many to be the industry standard and this is for good reason, they simply make an amazing product and have been doing so for a long time.
When I was in the process of researching roof racks, I vetted through several different options, both flat racks and basket style. Although I liked the basket style racks, I thought a flat rack would better suit my needs and style since my 4Runner serves as my daily vehicle. I eventually found the ARB Flat Alloy Roof Rack (ARB Rack).
The ARB Rack had several different aspects that immediately won me over.
- Utilizes factory roof rack mounting locations (no drilling required)
- Made of aluminum so it is relatively lightweight
- Designed as a flat, low profile rack
- Good sized platform (70” x 44”)
- Mesh is distributed on the roof rack for ample storage capabilities
- Simple and sturdy design
- Very competitive price in comparison to other racks on the market with similar features.
After researching the ARB Rack I made the decision to get the rack and fitting kit and install it on my 2017 Toyota 4Runner TRD Off-Road. For those of you interested in the ARB Rack, it is important to realize you will also need to purchase the fitting kit for a 4Runner as well.
Rack and Fitting Kit Part Numbers:
- ARB Flat Alloy 70” x 44” Mesh Roof Rack: 4913020M
- Fitting Kit for 5th Gen 4Runner: 3722020
Initial Unboxing and First Impression (Uninstalled)

The ARB Rack came via freight truck in a well-packed box along with the fitting kit required for a 5th Gen 4Runner. There were no blemishes and the overall quality was extremely impressive. I haven’t seen a roof rack with such good quality as this ARB Rack.
All of the welds were very impressive and having a one-piece rack is very nice. The fitting kit was also very well made.
I couldn’t have been more impressed with the rack as I unboxed it and went ahead and installed the ARB Rack on my 4Runner.
The Installation Process
ARB provides rather straightforward and simple instructions for the installation of this rack, so I will move quickly through the installation process and finish with the overall conclusion section. It is important to mention that this install is much easier / safer with a second person assisting you, so if possible I recommend having a second set of hands for this install.
Step 1 – Remove the factory roof rail caps
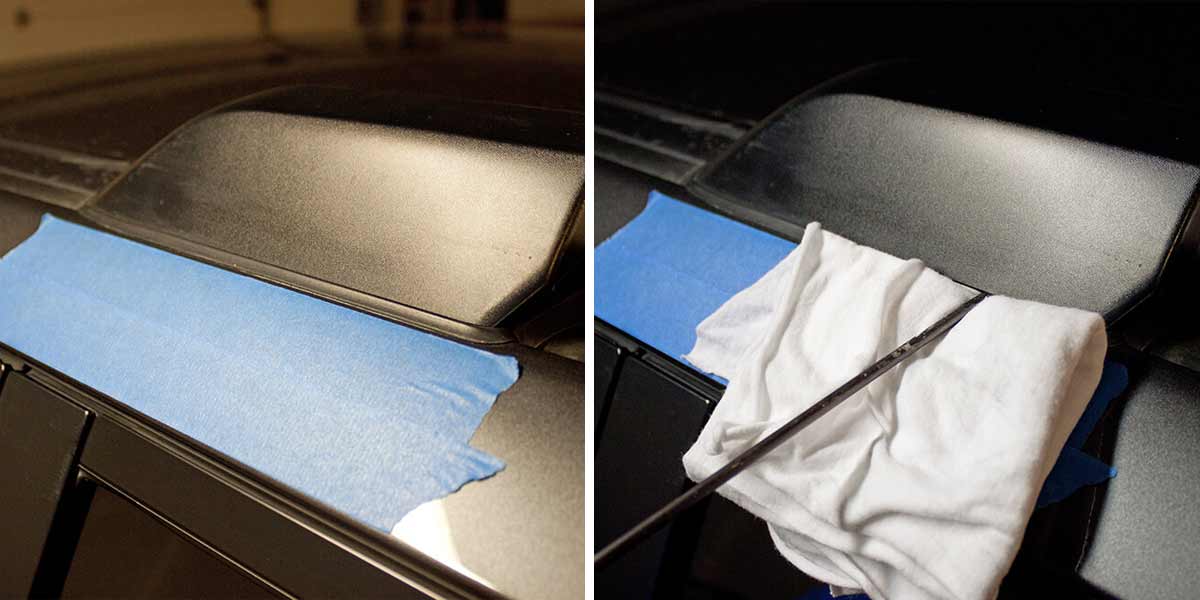
The first step is to remove the factory roof rack. This is pretty straightforward. Begin to remove all of the factory roof bar covers that protect/cover the bolts and bolt location for the factory roof rack.
The way you remove these is by utilize a small pry tool and popping two tabs from their location. You can use a dedicated pry tool, or you can utilize a small flathead screwdriver. ARB recommends placing some masking tape in front of the factory roof bar covers to protect your vehicle’s paint.
I did this and agree it is wise to take the extra time for placing the masking tape for protection purposes. I used a folded rag as a fulcrum point and then pried off the plastic cover in two locations with my flathead screwdriver.
After doing so I could remove the plastic covers by gently pushing them towards the centerline of the vehicle for the two tabs on the backside to pop off. Repeat this process for the remaining three covers.
Step 2 – Unbolt the factory roof rails
Unbolt the factory roof rack bolts. Using a 12 MM socket remove eight bolts that hold the factory roof rack in place. There are two in each of the four corners of the rack.
Make sure to loosen the bolts concurrently, meaning do not fully remove one. Alternate between loosening the bolts so that they come out of the vehicle somewhat simultaneously.
Step 2A – Remove the Factory Roof Rack
After all the factory roof rack bolts have been removed, grab an assistant and get on both sides of the vehicle. Carefully grab onto the middle structure of the roof rack and lift the rack up.
Walk towards the back of your 4Runner taking caution to make sure you are holding the rack above your vehicle to avoid hitting the top of your 4Runner, but also remember if you are doing this inside of a garage not to lift too high and hit a light bulb or something else.
Set your factory roof rack, bolts, cargo bars, etc. to the side for now. If you wish to keep the factory rack, put it in a safe location. If not, I’d recommend trying to sell it online. The cargo bars in particular are pretty easy to sell as not all 4Runners come with the cargo bars, but all 5th Gen 4Runners do come with the factory roof rack structure (all of the roof rack equipment excluding the cargo bars).
Step 3 – Install the supplied rubber seals

Clean around the four factory roof rack mounting locations on your 4Runner.
Try to clear away any dirt, debris, and moisture. Install the supplied rubber seals into the location where the factory brackets where removed from. This will help to keep out moisture, minimize rubbing and noise.
The holes on the rubber seals are slightly smaller than the factory “studs” so you have to push them on with a small amount of force. Repeat this process for the remaining three mounting locations.
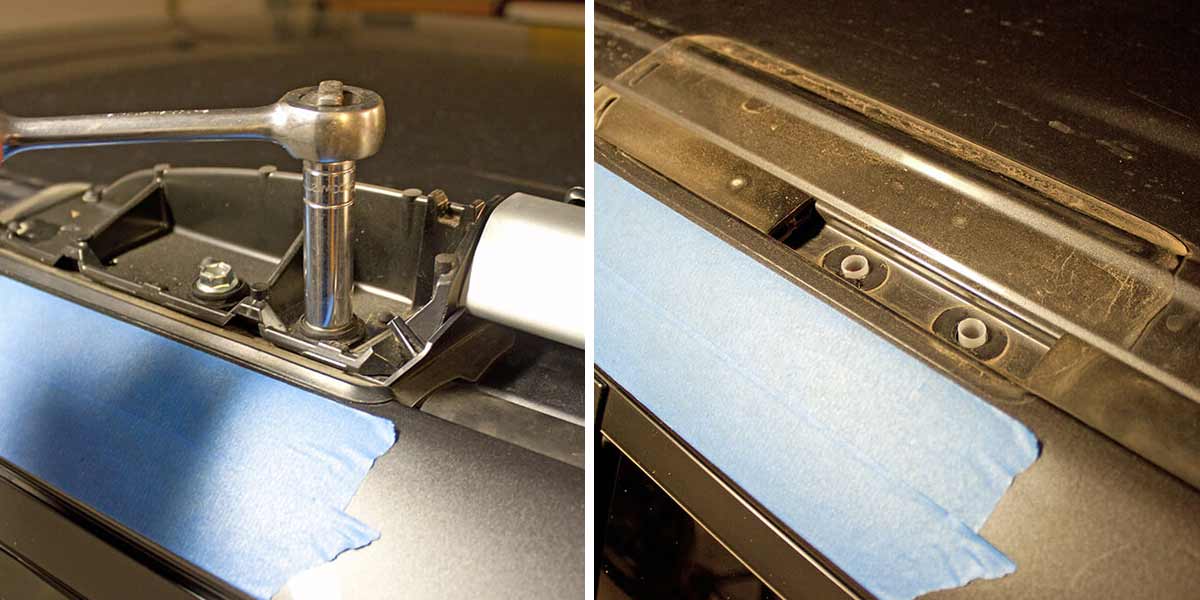
Step 5 – Install the specified 4Runner fitting kit
Now you need to install the rails to support the ARB Rack. Find the two rails that are a part of the fitting kit for your 4Runner. The rails are dependent on location (one is for the left, one is for the right – there is also a front and back). An easy way to tell is by looking at the mounting feet. The front of the rail has the foot that faces outwards.
Using an assistant, carefully place the rails onto the rubber seals and holes on the roof rack mounting locations for your 4Runner. Use the supplied M8 x 30mm bolts to secure the rails. There are two bolts for each corner just like the factory roof rack. Tighten the bolts with the supplied 6mm allen key wrench (do not use a star wrench or you could strip the socket).
One thing to keep in mind is that the bolts become pretty difficult to tighten when the threads with anti-seize on them come in contact. Take your time and alternate tightening the bolts.
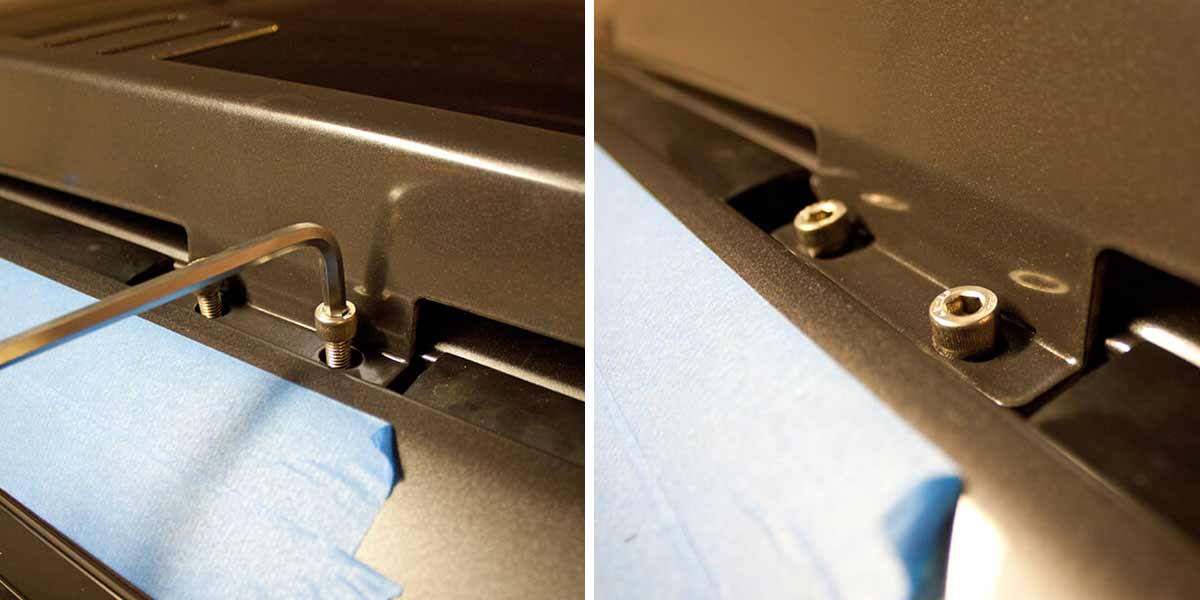
Step 6 – Place roof rack on top of mounting rails

After ensuring all bolts for the mounting rails have been tightened adequately, use an assistant to place the ARB Rack on top of the mounting rails.
Place the support plate on top of the brackets coming from the ARB rack and the bolt plate underneath the mounting rails bracket.

In order from highest to lowest height (top to bottom) this is the order of the hardware to secure the roof rack:
- M8 x 30mm bolts
- Support plate
- Roof rack bracket
- Mounting rails bracket
- Bolt plate
There are twelve bolts in total you will need to tighten (six on each side). Tighten each side loosely, as you will need to align the roof rack before securely tightening the bolts.
Step 6A – Equalling Both Sides of the Roof Rack
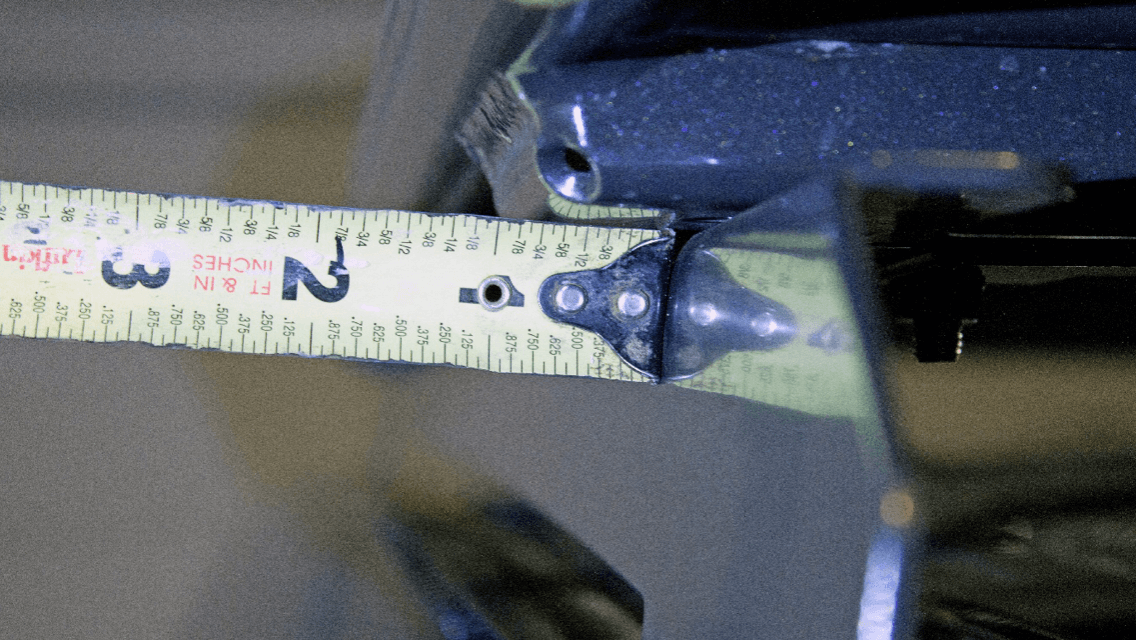
Use a tape measure to measure the distance on each side the roof rack sticks out from the mounting rails and try to make the distance on each side equal. After doing so, fully tighten all of the bolts to secure your new ARB Rack!
Overall Driving Impressions
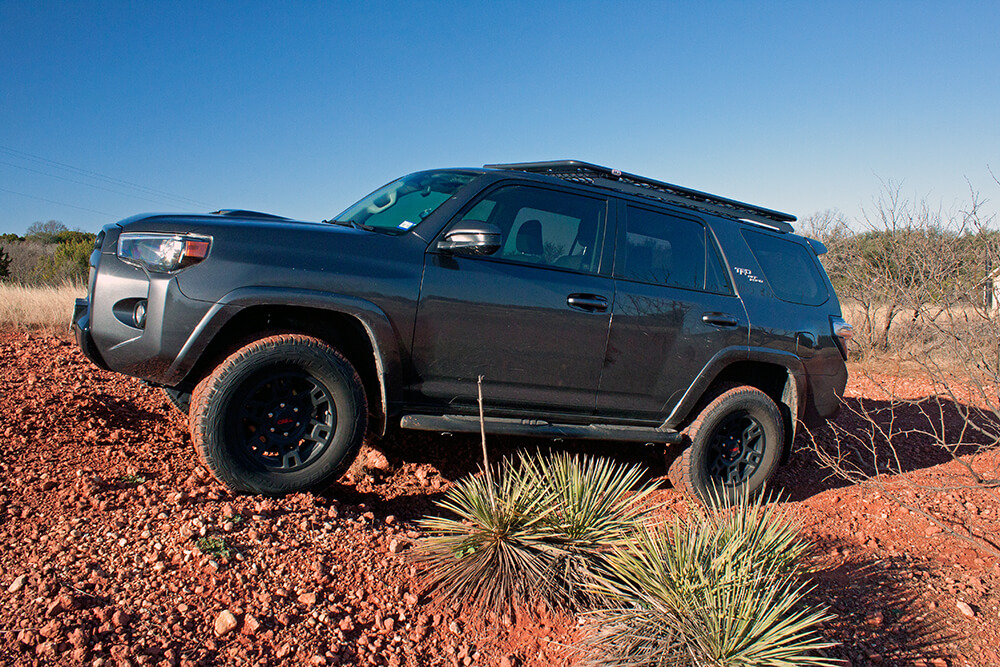
I have put about 800 miles (both highway and city) on the ARB Rack and overall I am very impressed. In my opinion, one of the most noticeable differences is just how good the roof rack looks.
It is all black and adds a very nice visual appeal in my opinion. I’ve had several people ask me about the rack and tell me how impressed they were with the way it looks.
I really like how low profile this rack is!
The rack has just enough clearance above the rear roof antenna to clear it, but just a small amount of clearance so that the rack is low profile as can be. This is nice if you park your vehicle in a garage, as basket style roof racks add a significant amount of height, whereas this flat ARB Rack minimizes the height increase.
Wind Noise and MPG?
As far as drivability goes, I have noticed a slight increase in road noise and a decrease in MPG from the installation of the ARB Rack. This is expected though, as I added more weight to my vehicle and a larger rack which therefore increases drag.
It is important to remember that any aftermarket roof rack will increase road noise and decrease MPG though, it is just the nature of these types of racks. You are adding a lot of versatility from what all the rack can do, but at the cost of a little more noise and decrease in fuel economy.
I think noise and MPG could be improved if ARB designed a wind deflector for the flat rack, but when and if this product might be produced is unknown.
No sign of weakness here!

Overall, I have been very impressed with the rack and have completed some minor testing with the rack, such as putting a kayak on top and also standing on top of the rack. The rack showed no sign of weakness and did a very good job.
I think what makes this rack worth the money is that it doesn’t require drilling, it increases your carrying capacity drastically, the quality is top notch, it is very low profile, and it is built by an extremely reputable company – ARB.
I will be publishing a second article on this rack in the future to follow up on the different ways you can utilize the rack and a follow up on my thoughts of the ARB Rack after more mileage has been put on it.
I’d highly recommend this rack, especially if you are in the market for a flat roof rack for your 5th Gen 4Runner.
It is strong, sturdy, high quality and just looks very impressive.
Just checking to see if you are still running this rack. Any updates on pros and cons over the years?
Hey there! Question.. how do i ground this roof rack or antennae that i place on this rack?
TIA!
I know this is intended to be for 4Runners but I’m considering buying just the platform with mesh and installing it to the top of a Tacoma Topper (Canopy). I have a HD canopy with 550lb rated cross bars. Would it be possible to attach this platform to my existing crossbars using u-bolts? Thanks
Has anyone purchased and installed the new ARB base rack (61×51)?
does the 3722020 mount/fitting kit work on a 49″x87″? i have a smittybilt RTT XL im hoping to mount to my 2021 4runner
hi Clint,
will the ARB3813030 fit the 4runner 5th gen? with the fitting kit 3722020?
I was looking at the steel one without the mesh. How much would you say this rack, weighs?
about 80lbs for the 49″x87″
Tha you for the very informative article. What can I expect to pay for this roof rack?
Thanks for the ARB Flat Alloy 70” x 44” Mesh Roof Rack: 4913020M installation instructions. I have a new 2021 4Runner and am interested in this roof rack, but cannot find part number 4913020M on the ARBusa.com website. Any hints?
hi the articile is great, but may i ask where did you get the fitting kit?
Hello,
Is the arb mounting kit essential for installation? It doesn’t come with installation brackets?
Yes…the mounting kit allows the actual rack to mount to your specific vehicle.
Clint, where did you order the mounting rail system from… I can’t seem to find it anywhere.
Hi, I’m concerned about the ability to mount a ski rack on the mesh during winter months. Is this possible?
Alex, I can’t confirm that a ski rack would be able to mount…but I’m sure there is a way. I’ve mounted all sorts of things to my rack – roof top tent, luggage, kayaks, paddleboards, recovery boards, etc.
What was the overall height of this rack from bottom of roof to the top of the rack?
Tom, measuring from the back of the rack by the antenna, the top of the rack is approximately 4.25” above the roof.
Thanks so much for this article
I am having a heck of a time finding this item for my 2020 4Runner… In the San Antonio Area… Any ideas?
Dean, you might try 4WheelParts of Summit Racing. They usually can get these types of items.
I see that a universal fit wind deflector for all ARB racks is available now. Wondering if it is actually universal, and would work with the flat rack you installed. Amazing clarity in your write-up! Thank you so much for the great detail!
Morgan, any chance you could post a comment with a link to this wind deflector? I’d like to take a look at it.
Not sure if the ARB utility rack is the same as your ARB. Here is a pick I’m looking for a way to run a light bar in place of the wind fairing instead of mounting it between the A pillars
What’s the view through the sunroof with it on?
I really like having my sunroof and while I want rooftop storage and a flat storage option, I don’t want to miss views/sun through the sunroof.
a pic would be amazing, but description is also great
thanks!
The rack overhangs about 40-50%, but does not interfere with sunroof. See pic. You can still see out well.
Thanks very much for the fast reply and pic! Very helpful!
now I just have to save up the $ to buy, after the cost of a new veh, I may have to exercise patience for a year or so… 🙁
Just did my install. Looks great. Thanks for the help!
Michael, that looks awesome! Congratulations on your install!
Great write up! Looks great. I’m installing this roof rack this weekend. While unpacking the rack I found two “rods” the same length as the rack. They are one inch wide and U-shaped as though they are to cover a long edge. No pieces like this appeared in your install instructions. Neither in the included directions. Do you know what these might be?
Dina,
Thanks! That is exciting, I think you’ll really like it. I couldn’t ever figure out why those were included in the kit. As you mentioned, it wasn’t in the install instructions. Perhaps it is for a different vehicle.
They came with mine too, but I cannot figure out what they are for!
Does this rack allow space for a Gobi or Baja ladder?
Yes, I believe those both will work. I personally use a C4 Summit Ladder and it works great with the rack!
Thanks for the reply, Clint. I was wondering if you were using a ladder since one of the uses of the flat rack mentioned in your article was a shooting platform. I didn’t see one mounted in your article photos.
I do a lot of photography and made the decision (based on your article) to purchase the ARB flat rack to use as a photo platform.
I have one more question, if you don’t mind. I purchased the 3722020 fitting kit as you recommended. Does the kit come with the two side rails that that the rack mounts on top of? All the photos of the kit, on every site offering it for sale do not show any rails.
Thanks again for your help!
I use the rack for photography all the time, hence the main reason for my C4 ladder.
Yes, that fitting kit does come with the two side rails. For some reason none of the pictures show it included.
Let me know if you have any other questions, I’d be happy to help!
Hi Clint,
Excellent write up! Have you successfully mounted a RTT to this setup?
This roof rack is a nightmare to own. First of all attaching anything to it do to its low clearance and chain link style mesh on top makes getting a tool under it at the right angle to hold a nut or bolt impossible. I have to get my 5′ tall 100lb girlfriend to stick her tiny hand (which barely fits between the brackets and tubing to even try to install things. You cannot install a rooftop tent without buying a 2″ diameter tube bracket, and even then you must modify it with a Dremel so that it fits between the mesh on the inside. Also good luck finding a tool at the right angle to hold, much less turn the nut to secure the tent. I use zip ties through the tube and tent brackets to hold the tent down and ratchet straps to prevent the tent from sliding off to the left and right while driving. Also with a roof top tent you are left with a little more than a foot of useable rack in the front for other items. Lastly, finding accessories made for the rack is impossible and every attachment requires drilling and modifications. Do yourself a favor and spent a little more money on a Prinsu or other rack that comes with accessories and pre made attachments, you will save yourself hours of frustration, modifications and wishing you had a rack that would do more than fit in parking garages.
Could you use j bolts or u bolts or square u bolts? Maybe a drilled and tapped flat bar underneath and bolt from the top? Maybe you could do without your skinny armed GF?
Matthew, thanks for the feedback. While I do see the point of view your coming from, I’d just like to mention that the beauty of this flat alloy roof rack from ARB is the low profile design, but also the abundance of tie-down / mounting points. The “mesh” top has been awesome for me because I have so many points to tie down my gear. It’s pretty simple to mount a RTT as well, I think it just depends on how you are going about mounting it. If for some reason you didn’t want the mesh, ARB also offers this same roof rack just without the mesh (which would allow for better access). I will say, if you are running a RTT all the time, or carrying gear on top of your 4Runner 24/7, there are probably other racks that would be better suited. However, for the majority of us, there is nothing on top of our rack most of the time – so the low profile lightweight rack is a huge benefit when we aren’t hauling gear, and when we are carrying a kayak, RTT, or other gear, the rack works great! I hope this helps out.
Hey Clint, how are you attaching your kayaks to the flat rack? I saw you were using the Dakine pads on your factory crossbars, are you using anything between the kayak and the mesh floor with your new setup?
Kevin, sorry for the late response. I simply place four (4) Dakine pads on the rack and use some ratchet straps to hold it down. The Dakine pads work great for providing a little cushion and ensuring everything stays put. I hope this helps out!
Kevin, I am essentially using the same method that I used with my factory cargo bars. I place four Dakine pads on top of the ARB rack and then set my kayak and or paddleboard on these pads. If you want some more information on this please send me an email – Clintkayaks@gmail.com. Thanks!
Thanks for the write up! This helped me make my decision on this rack. The directions I have said to use a non-acidic silicon sealant under the rubber pads and on the bolts that go into the roof. I only used the sealant under the rubber pads, but was curious if you used any sealant and if not have you had any leaks? Also, tightening the rails to the roof was pretty scary as they are so hard to tighten that you feel as though you are going to strip them. This resistance also makes it impossible to use a torque spec so you have to go as tight as you are comfortable and make sure you don’t strip them.
Nick, I do not recall installing any silicon sealant being applied under the rubber pads. I only installed the rubber pads (which were quite tight and fit well). I haven’t had any leaks to date. If for some reason I do, I imagine a little RTV silicon would work well. Tightening the bolts was quite hard and I also ran into the same problem you had. It was very difficult to tighten the bolts, but I eventually got them to a “safe” torque as best as I could.
Thanks for the response. I’m curious, what did you torque yours to?
Due to how tight the bolts were, I couldn’t utilize a torque wrench. This said, I hand tightened the bolts as much as I thought I could without stripping them. I know this isn’t ideal, but I couldn’t figure out a better way.
Ok, thanks. This is what I did as well. I was able to get them pretty dang tight without stripping so I think I’m ok with the install as it sounds you did the same with good results. I really appreciate the help and all the good articles on this site!
You’re welcome! I haven’t had any issues yet and I’ve had it installed for several months now. Glad the site has been of good use for you!
Hi Clint,
I’ve read through this article more times than I’d like to admit while I mull over buying one myself. Now ARB offers larger options, an 87”x44” and 87”x49”. I’m looking to get this length so I can put a 2500 x 2500 arb awning with a bit less overhang.
My question to you is, how has the width of the rack been? I’m trying to figure out if the extra 5” width is worth it, or if the 44”. Would the extra width look silly, especially when an awning is attached?
Thanks!
Dillon, I’d double check to make sure ARB offers a size larger than 70″ x 44″, I didn’t see these sizes as an option under the 4Runner vehicle application guide from ARB. If ARB does make a larger platform, I’d be cautious of going too much wider. The rack is pretty wide at 44″, but I guess this all comes down to personal preference. Extra length might be beneficial so you have more of a full length rack…however, I imagine you would need a different mounting kit to support the extra 17″ of length. Once again, please verify that ARB has a larger rack and mounting kit available for a 5th Gen 4Runner. I hope this helps out. Thanks!
Thanks Clint,
I reached out and they did confirm the mounting kit does not work with the 87” rack.
You mention mounting an awning to your rack, what size do you have? How’d it work out attaching it?
Dillon, I do not currently have an awning mounted to my rack, but I am going to be installing one soon. As far as the size I will be installing, I am not sure. I am sure that I might have to do some minor modifications / fabrication in order to mount the awning, but I don’t foresee this being too big of a problem. Once I install an awning I will try to remember to let you know how I did it.
I have had the Original model ARB Roof Basket rack ( With side wall rails) for 5 years now living in sunny san diego.
Professionally installed by a Toyota Dealership along with my ICON Lift, wheels\Tire sizing and install.
Ok, to the ARB rack review..
PROS: – An absolute stellar rack in terms of load bearing weight, I’ve had 400 lbs up there.
CONS: – – The mounting rails began rusting out at the front tips almost after 6 months.!
– They appear to be Powder Coated STEEL never having had any rust inhibitor treated .
– After 5 years, the front mounting rail area is now compromised as to the degree of rust erosion.
– There is tremendous amount of WIND NOISE
– I saw my MPG decline IMMEDIATELY due to its loud profile.
Overall, it is a great rack, I can simply toss stuff up there as it wont make contact with the vehicle roof due to the fence like basket bottom. It can handle amazing amount of weight
ARB….. PLEASE CHANGE THE MOUNTING RAILS, OR A BETTER RUST INHIBITOR RAIL MATERIAL.
Roland, I agree with the payload capacity…pretty impressive. I haven’t had any issues with rust on the mounting rails (which are steel) or the actual rack (which is aluminum). I have had some experience with the ARB basket style racks and can say that the wind noise this low profile alloy flat rack produces is much less than the basket style. There is some wind noise and loss in fuel economy, but not as significant as a basket rack. Check back soon for a follow up article on the roof rack! Thanks!
I’m seriously considering this rack…looks like a good option for those who want something more DIY with regard to attachment points and brackets. I’m not really interested in a basket on top of my rig and might still be considering a tent or awning at one point. Am I correct in thinking there are crossbars under the mesh? If so are they t-slotted? All I can see in any pictures I’ve found is the mesh. I am looking forward to a follow-up article.
This rack would work great for someone that ones to have attachment points and a good platform to work off of. A tent and or awning would work great as well. Yes, there are several crossbars under the mesh for support. I do not believe they are t-slotted. A follow up article will be published soon!
Is there a way to mount a lightbar on the front, what looks like a metal section, of the rack? And does the steel version come with the amplimesh? I’ve seen some sites saying it does. Thanks!
Yes, you could mount a light bar pretty easily using this rack. It would need to be a single row light bar though to fit within the space. The front part of the rack contains a flat piece of aluminum that you could mount all sorts of things to. I believe only the alloy version comes with the mesh, I think the steel version only comes with cross bars.
great write up info. My question is there a cover supplied for where the fitting kit is mounted? Or is it just bare? Concern for water, leading to leaks.
Marc, there is not a cover like the factory roof rack plastic covers. The materials are designed for the elements and there is a rubber gasket between the roof and roof rack fitting kit.
Yes, that set up is great. Gives you the option to sack out on the roof! I have the extended offgrid on my gen5 & it is just way too high now that a 3” lift has came into the scene.
May upgrade! Thanks for the intel/info.
Nice rack ,what’s the difference between part number 3722020 and 4913020M, besides price? Thanks
Maicco, the actual roof rack itself is part number 4913020M. The fitting kit is part number 3722020. Just to clarify a little more, the rack (4913020M) needs brackets, nuts, bolts, washers, etc. to attach to the factory roof rack hole locations. All of this additional hardware to attach your rack to your 4Runner comes in something called a fitting kit (3722020). In consideration of this, you need the rack (4913020M) and the fitting kit (3722020) to install the ARB Flat Alloy Roof Rack. I hope this helps out.
Great article. What is the added height over stock rack? I park in a garage with limited height. Thanks!
Michael, measuring from the back of the rack by the antenna, the top of the rack is approximately 4.25” above the roof.
Thanks!
Thanks!
What’s the max weight on this rack???
Brian, it can hold 300 pounds dynamic (driving) and 600 pounds static (vehicle parked).
Ok great nice rack…how the hell do you attach rotopax, maxtrax, hilift, RTT onto a basket? The new LFD rack with slotted crossbars looks way more compelling. Baskets are very restricted regarding attachment options.
Ty, there a lot of different ways to mount the items you discussed. There will be a second article published later discussing some of these options. Also, this rack isn’t a basket style, it is flat. You can also get this rack without the mesh that is in top and only have the cargo bars.
Hey Clint did the 2nd post about this rack ever come out? I’m very curious about the RTT mounting. I’m considering getting the nom-mesh version but mounting a RTT and awning are the key functions I’m looking to address.
Hey Clint, off subject, but what kind of step bars do you have?
Mike, they are just the factory Toyota tubular side steps.
Ha, I feel dumb. Thanks for your reply!
Clint, thank you for sharing. Looks like a great option for our platform. Is there an easy to add basket option for this rack. I see other ARB roof racks that look similar as a base platform but curious to see if there is a specific part number for the basket add on? Or, is that a separate roof rack all together? Thank you again!
Dylan,
There are no add-on basket options offered by ARB. In order to get a basket style roof rack from ARB you would have to get a different roof rack than the one discussed in this article. ARB does offer a basket style roof rack for the 4Runner though so I’d recommend looking into that. Thanks!
Joe, the side rails come with the fitting kit (3722020).
Hope this helps you out!
This rack looks great. Did the side rails come with the 4Runner fitting kit (part no. 3722020) or the rack? I’m looking at another ARB rack with the same fitting kit and would like these side rails. The pictures online look to be a different style fitting kit. Thanks.
Does the rack interfere with the sunroof?
Tim, no it doesn’t. According to ARB, this rack is completely compatible with a sunroof.
Nice rack. Does it provide enough clearance to clean the roof underneath? Thanks.
Jeff, cleaning the roof underneath the rack is difficult. You can clean from the back and the front of the rack to reach underneath, but there is a large area of roof that you can’t access (the portion of roof in the middle of the rack. You can’t access the roof from the sides because of the way the support brackets are designed. The method I am using to clean underneath the rack is by using an extension pole and reaching in from the front and the back.
Beautiful, love ARB stuff.
William, they make a great product!