
KC HiLiTES 2″ C-Series C2 LED Backup Area Flood Light System – #519
For those of you who know me, you will know that I really enjoy lighting upgrades. Having proper lighting can be extremely beneficial and make things go much smoother.
To begin with lighting upgrades, I would always recommend your main lights: low beams, fogs, turn signals, brake lights, and your reverse lights.
These will enhance your vehicle aesthetics, give you better vision at night and allow other vehicles and people to see you easier, which in hand makes you and others around you safer.
These installs are just swapping out the existing and replacing with new, so they are pretty easy. After these lighting installs you could upgrade your interior lights to LED, but what should you do next?
There are a lot of different options but the three main options, in my opinion, are a forward-facing light bar, ditch lights of some sort, or scene lighting. I already have a behind the grill light bar installed and I wanted to have some sort of lighting in the back of my car for when my vehicle is not in reverse.
After researching several different options, I decided to purchase the KC HiLiTES 2″ C-Series C2 LED Backup Area Flood Light System – #519 (which we will refer to as KC reverse lights).
Why I Chose the KC Reverse Lights
There were a few things I wanted to have in a reverse scene lighting kit:
- Complete kit – Check Today’s Price
- Included wiring harness, lights, switch, etc
- Small profile lights
- Minimum 1,500 lumens output per light
- Flood/scene lighting pattern (at least a 90-degree light spread)
- Low energy usage
From the requirements I was wanting I found a few options for reverse lighting. The two I narrowed it down to was Baja Designs S2 lighting and KC Hilites reverse lights.
When it came down to deciding I went with KC Hilites. The reasons are pretty simple: I have a KC Hilites light bar installed on my 4Runner and it has worked great and the KC Hilites reverse lighting kit was cheaper.
Here are some of the specifications on the KC reverse lights:
- 2,200 lumens per light
- 104-meter beam distance
- 20 Watts per light
- 120-degree flood pattern
- 6000k color
- 1.6 amp draw
- IP69K rating
- 2.85” (W) x 1.91” (H) x 2.17” (D)
In consideration of all this and the specifications of the KC reverse lights, I ordered the reverse lighting kit and began to work on the installation.
Where I Chose to Mount my Lights
As previously discussed, I wanted some lights in the rear of my car to serve as scene/work lights when my car was on or off. I have some great reverse lighting from my Diode Dynamics Tail as Turn kit and LED bulbs; however, this is only useful if my car is in reverse.
I wanted some reverse lighting that I could use regardless if my 4Runner was running or not. Although I knew I was going to mount them in the back of my car…I didn’t have an exact location of where.
There were three different options I looked into: on the bottom of the rear “wing” that has the third brake light, to the left and right of my rear license plate, and to the left and right on my receiver hitch.
Left and right of the license plate?
I really liked the option of installing the lights to the left and right of my license plate; however, I didn’t know for sure if there would be any complications mounting my lights here and if I wanted to drill holes at this location.
On the rear wing/spoiler?
The same thought process crossed my mind with mounting the lights on the rear “wing”. Basically, I didn’t want to drill holes into my vehicle, especially where the holes would easily be seen if I ever decided to remove these lights in the future. One last consideration I had for mounting my lights to the left and right of the rear license plate, as well as the rear “wing”, was that these locations would be useless if I had the rear liftgate open (unless I wanted an airplane to land on my car).
Left and right or receiver hitch?
I went with a mounting location to the left and right of my receiver hitch in order to always have light regardless of my rear lift gate is open or not.
I don’t think this is the optimal location for best lighting output, as I think a little higher would have been slightly better, but I do think this is a great spot. Due to the location of the spare tire and receiver hitch, I was able to choose a location that gave my KC reverse lights good protection as well.
Now that I had my mounting location, I decided to start the installation process.
Backup Flood Light Installation
I want to start with a disclaimer that there are many different options for installing these lights and this is only my opinion of how I wanted to install them.
I also tried my best to get as many photos for anyone who wants to do this installation as I did; however, since running the wiring harness involves tight and compact spaces I was not able to portray everything as good as I would like to.
I will try to explain how to do everything you need to the best I can so let’s get started!
Step 1: Tentatively mount your lights

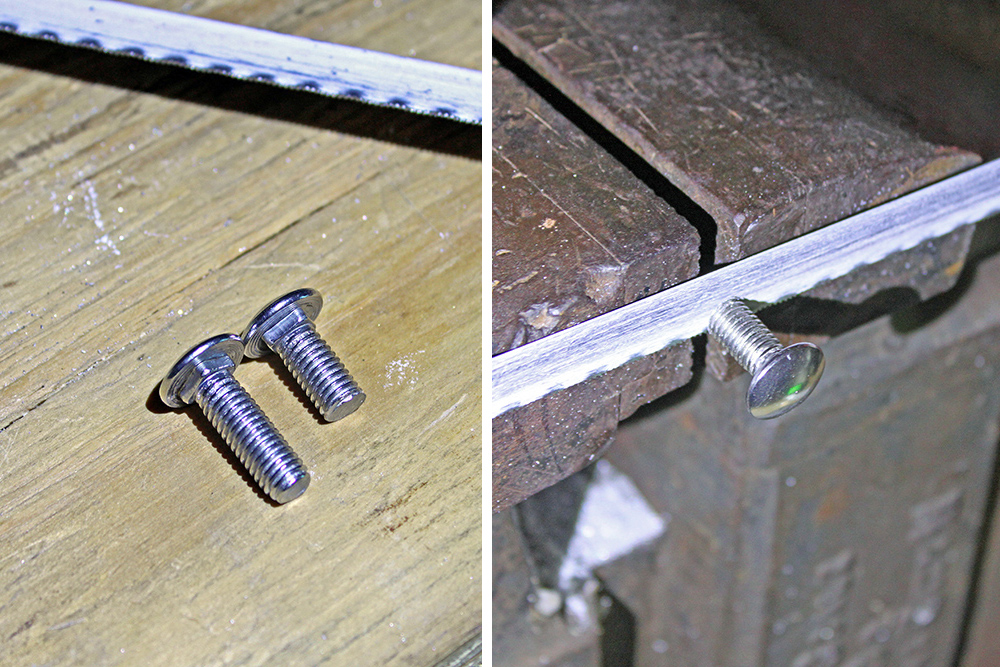
To me, I thought the best way to do this installation was to tentatively mount your lights. As previously discussed, I decided to mount my lights to the left and right of the receiver hitch. I was able to find two screws that went into the rear bumper.
Fortunately, I could utilize these screws to mount the brackets for my KC reverse lights. I removed both the screws to the left and right of the receiver hitch and loosely mounted my brackets provided in the KC kit.
After doing so I noticed that the bolt provided for attaching the light to the bracket would be too long and the bracket needed to be bent downward…so that is exactly what I did.
Step 2: Cut bolts to size
You will need to cut the provided bolts for attaching the lights to the bracket about ¼ of an inch. To do this, clamp the very end of the bolt in a vise and then use a hacksaw to cut off 1/4 of an inch on the bolts.
If you use a hacksaw, this will take some time so go slowly and don’t rush it. After cutting your bolts, you might want to sand/file off some of the burrs on the end of the bolt that might have developed from the cutting process.
Step 3: Bend the provided KC brackets
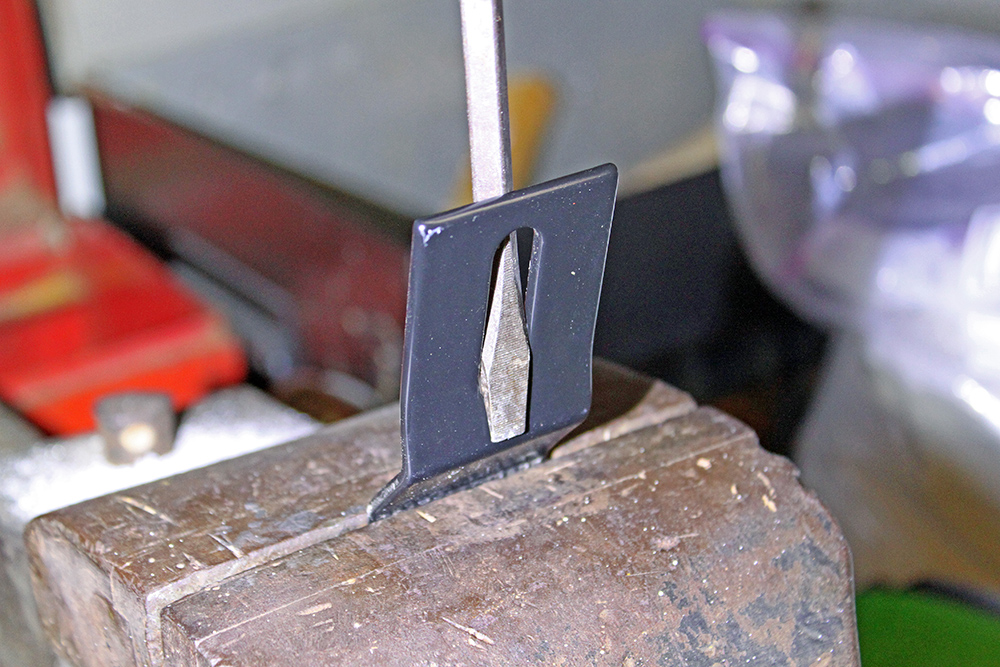
If you use the mounting locations I did you will need to bend the provided brackets a little bit to provide enough clearance for the bolt and nut to attach the light to the bracket.
Place the bracket in a vise and use a screwdriver to bend the bracket so that gives you more clearance. After bending one bracket, place both in the vise and bend the other bracket the same amount of distance as you did the first one.
Step 4: loosely mount your lights

After bending your brackets and cutting the bolts, try to loosely mount your lights again. You might have to bend your brackets more or less, so do so accordingly.
Once you get everything roughly aligned where you want it, go ahead and tighten everything down so it is secure and in place. Don’t tighten too tight though. Leave just enough play so that you can move your lights around in the aiming process that I will discuss later.
Step 5: Wire lights to the front of your 4Runner

Now you need to run your wiring harness from the back of your car to the front. In order to do so, I suggest removing your spare tire, so you can find a good route. Here is where I need to make a major disclaimer. There are many ways to run your wiring. I am only going to give a rough idea of how to do it as it would be hard to portray an accurate route by photograph since I don’t have a vehicle lift.
The best way to run your wiring in my opinion is to connect your lights to the wiring harness and then work your way to the front of the vehicle. For mounting locations to tie your wiring to, look for brackets with other wiring on them. This is a good indication of a spot to zip tie your wiring harness to. MAKE SURE NOT TO MOUNT YOUR WIRING TO ANYTHING THAT WILL MOVE. Do not mount anything to the axle or other moving components as this will not end good for you and your newly installed lights.
Something else to consider is that you will have your switch installed on the driver’s side of your 4Runner and the battery is also on the driver’s side, so make sure to run your wiring to an end location that is located in the driver side of the car.
A tip that I will suggest is to buy additional zip ties (KC includes quite a few, but I would use more). When mounting your wiring with zip ties, only loosely close the zip ties so that your wiring can move if needed. You can go back after finalizing your wiring route and tighten all the zip ties up.
Another thing to watch out for is the exhaust system. When you get towards the front part of your 4Runner you will have to run your wiring up into the engine bay. I did this on the driver side… but please be cautious of the exhaust piping. Try to mount your wiring away from the exhaust system as this will produce quite a bit of heat, especially close to the headers of the exhaust.
After you make your wiring route into the engine bay you can start to do some final steps to installing your lights.
Step 6: Run wiring into cab & drilling through the firewall
Now that you have your wiring in the engine bay, you need to run wiring into the cab. The way you will do this is through the firewall. You do need to drill a hole through the firewall.
I used a 5/8” sized drill bit, but I first started off with smaller drill bits and worked my way up in size. This will give you much more control. Do not press hard and let the drill do the work. If you press too hard your drill will suddenly surge into the cabin, potentially too far, which may damage some things.
Take your time and go slow. After you reach the final 5/8” sized drill bit, use a file to remove any burrs around the hole. I would suggest using some paint to coat the now bare metal that is exposed from the drilling process. You can do this by getting some black spray paint and just giving the newly drilled hole a quick spray of paint.
Step 7: Rubber grommet
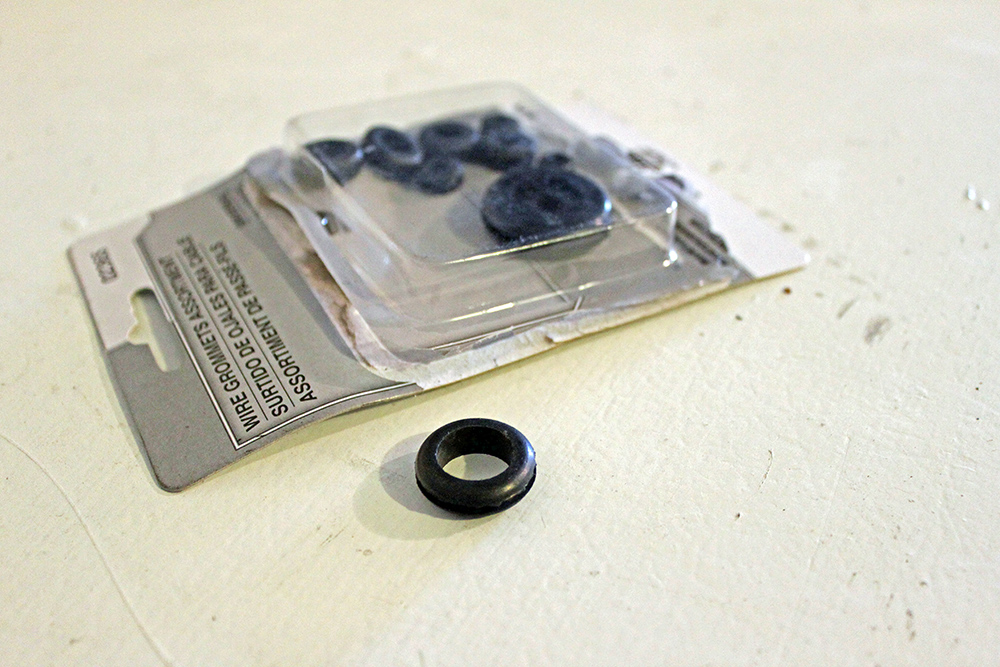
You will now want to get an appropriately sized rubber grommet to fit in the newly drilled hole for your wiring to run through. I purchased an assortment of rubber grommets at my local auto parts store and utilized the size I needed. Disconnect the wiring from your KC Hilites switch and place the rubber grommet over the three wires that connect to the switch.
Step 8: Run your switch wiring into the cab
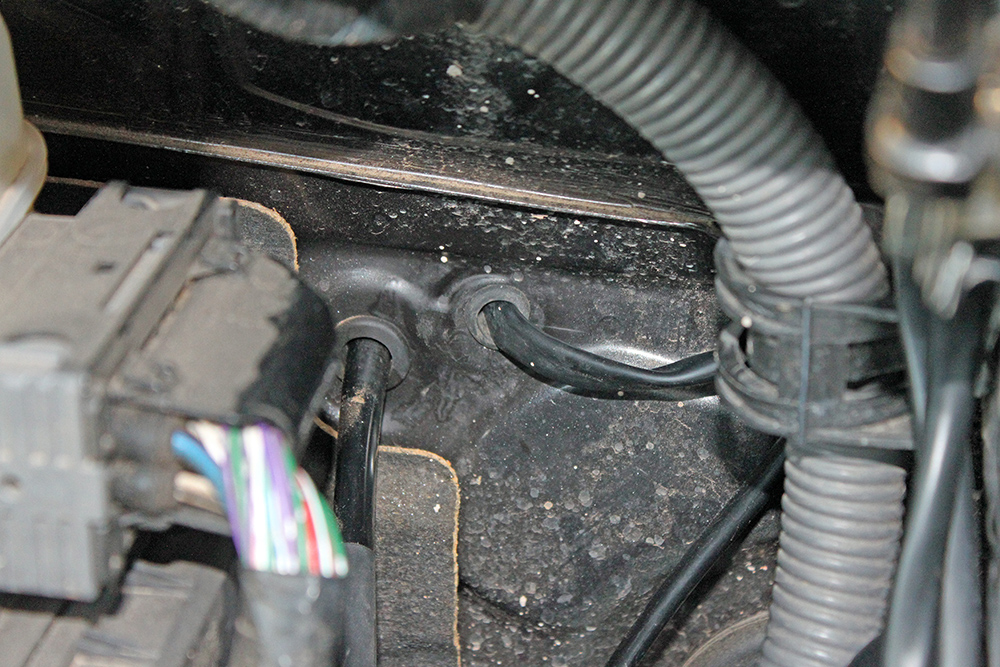
Run your switch wiring into the cabin by utilizing the hole you drilled and after you run the three wires for your switch into the cabin, place the rubber grommet over the hole.
Step 9: The switch
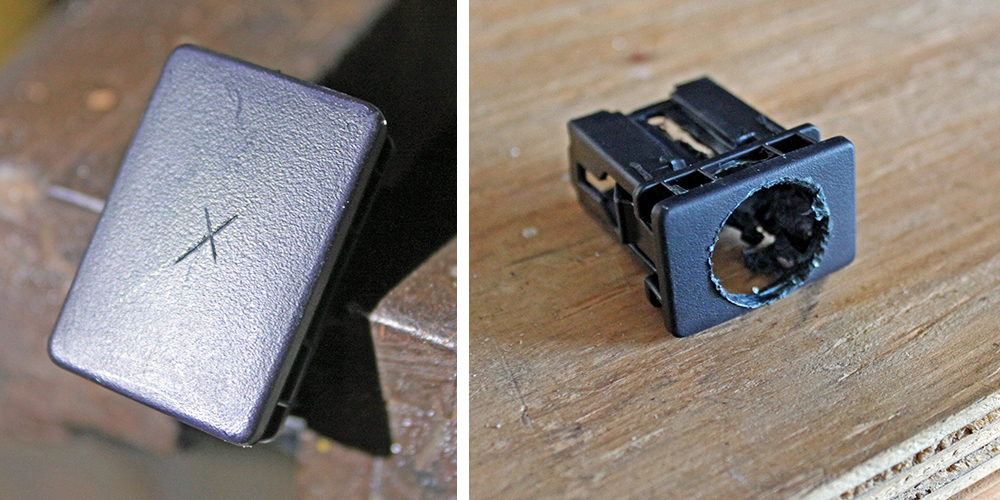
Once you get your wiring into the cabin area, you need to decide what you are going to do regarding the switch. You can simply drill a ¾” hole where you’d like to mount your switch and call it a day, or you can fabricate a blank switch like I did for a little more of a factory look. This does take quite a bit of work though. In order to fabricate a factory switch you will need a ¾” drill bit along with some smaller sized bits so that you can gradually work your way up in size.
Reach behind the lower dash (to the left and bottom of the steering wheel) and push out one of the blank switches that you would like to utilize. All you have to do is slightly compress two small tabs and then push the switch towards you (the rear of the vehicle).
Place the switch in a vise and score the center of the switch by using a straight edge. The way I would recommend finding the center is to place your straight edge diagonally on the switch from one corner to the other and use a razor blade. Only score the center portion as best as you can. Then go from the other corners and do the same.
After scoring center, using a drill with a 1/8” bit and drill a hole centered in the switch. You do not have much room for error, so make sure you are drilling center, or this will not work. After drilling your 1/8” hole, continue increasing your drill bit size in 1/8” increments until you reach a ¾” hole.
Try to clean up your hole that you drilled onto the blank switch with a file, like a fingernail file.
Step 10: Connect KC switch to the factory switch

Run the wiring for the lights through the location that your switch will push into and then run the wiring through the hole you drilled in the factory blank switch. Connect the switch to the wiring and then push the switch flush with the Toyota factory blank switch. Now you can put the fabricated switch back on the dash.
Step 11: Connect to Power and Ground
Now you need to connect your wiring to the battery. This is straightforward. Attach the power to the positive battery terminal and ground to either the negative battery terminal or a grounding location on the vehicle.
Step 12: Zip tie everything up
Now that you have everything in its location you need to go back and tighten all the zip ties you used and cut the ends of them off. Make sure not to miss any zip ties and put on more zip ties if it will make your wiring more secure.
Step 13: Aim and adjust the reverse lights

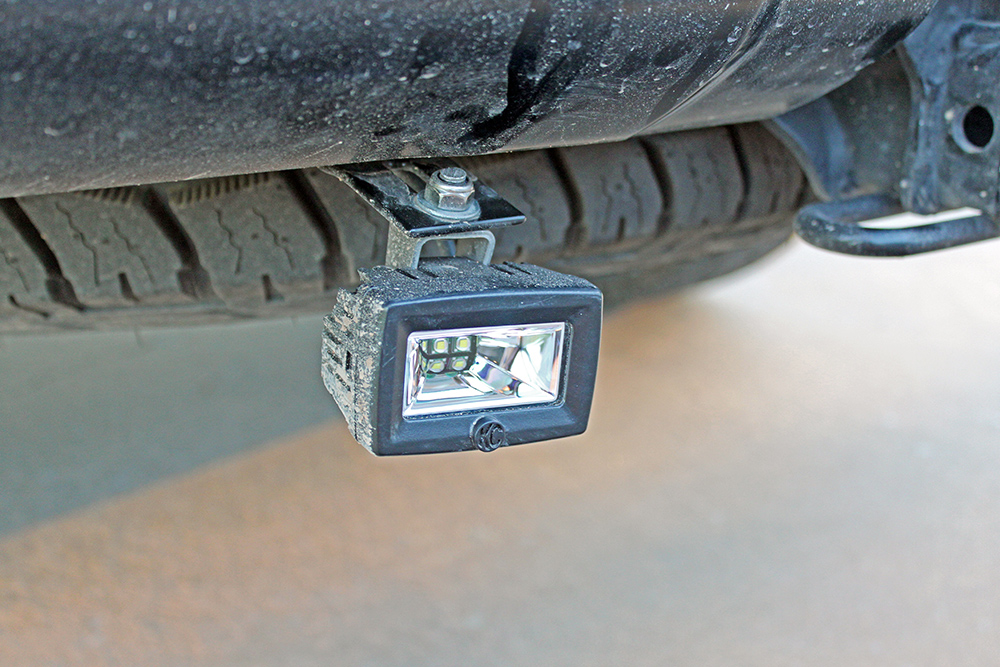
Now you need to aim your lights where you want them and tighten them snug. The way I aimed my lights was slightly outwards with the face of the light perpendicular to the ground. After you get your lights aimed where you want, go ahead and tighten the locking nuts.
Test out your lights and enjoy some great scene lighting behind your Toyota 4Runner!
Review and Thoughts
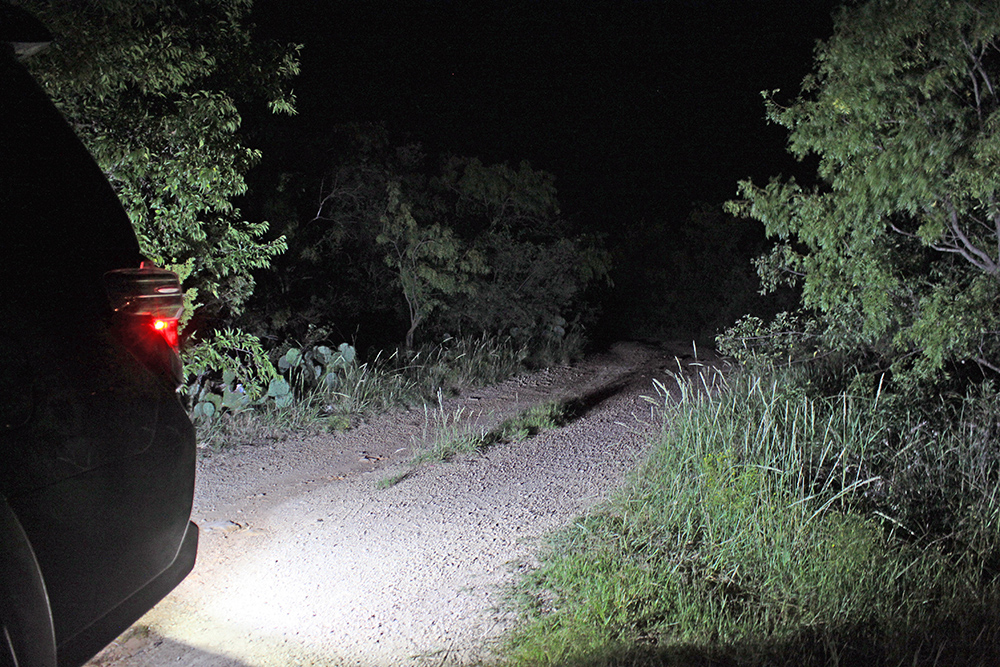
So, what do I think of these lights? I think they are a great upgrade for anyone with a 4Runner. They really do a great job of giving you lots of light up close. I don’t have any complaints about them and overall, I think they are a great value.
One thing to keep in mind is these are not spot lights, but 120-degree flood lights. These lights do not shine very far away from your vehicle, but more so all around. These are great lights for camping, emergency situations, and when you are reversing and could use some additional lighting behind you.
The one thing I would like for KC Hilites to do is provide a switch that matches the factory 4Runner blank switch locations. I know this would probably mean that KC would have to produce many types of factory switches to fit in this car and many other cars; however, it would really make this kit much easier to install…plus it would look very nice.
Conclusion
If you are wanting some lighting facing the rear of your 4Runner that you can use whether your car is in reverse or not, turned on or off, if your liftgate is open or shut, then I would recommend taking a look at these reverse scene lights from KC Hilites. They are reasonably affordable for such a high-quality light and produce a lot of light around you.
I’m planning on doing something similar. Going to mount KC Cyclones in same position on rear bumper. Have SPOD Bantamx they will be wired to. Only think I still need to get is the wire to run from Bantamx to the cyclones. Any recommendations for where/from whom to buy the wire? I’m thinking 12 feet of 16 gauge will work but interested if you have any suggestions on where to buy wire that would be waterproof etc for this purpose.
Stu, I typically get my wire from a local auto parts store…they typically carry wire ranging in size from 10 gauge to 18 gauge and in a variety of colors. It looks like one (1) Cyclone draws about 0.42 Amps (and I’m assuming you’d be using 2), so in total, your circuit will draw approximately 0.84 Amps. Doing some quick calculations, I think 16 gauge would be more than enough. You should be able to get away with 18 gauge if you wanted, but I always like to have a bit of cushion, so I’d just use the 16 gauge wire. Learn from my mistakes and know that you will probably need more wire than you initially think…so buy some extra. As for waterproofing, the wire should be insulated (which more often than not is waterproofing). The area you have to watch out for is connection points. If you solder two wires together, make sure to use heat shrink, and I also suggest some dielectric grease to form a waterproof connection. Hope this helps!
Very helpful. Appreciate the insight very much. Thank you.
@Clntkayaks, did you remove our other install of the reverse lights that were in the stock housing? I like these but this does not work with the reverse gear like the other ones correct? This is a manual reverse, right?
Shaf, assuming you are referring to the Diode Dynamics Tail as Turn Module I installed, they are still in place. You are correct, these KC lights are wired independently of the reverse lights so I can turn the KCs on at any time. I will try to get some photos of the KCs with the Diode Dynamics Reverse lights on all at the same time. Thanks.