
6-Light Universal Rock Light Kit on – Full Overview and Review For the 5th Gen 4Runner
With all the choices out there for rock lights, it might be hard to decide.
The main choices for me were the KC HILITES Jeep JK Cyclone rock light kit, the KC HILITES RGB (Red Green Blue) rock light kit or a basic brand name RGB kit from Amazon.
After our experience with the Cyclone underhood lights that we installed, we decided to move forward with the KC Cyclones again. For KC in general, they make a stunning product, they treat you like family and the installation for the Cyclones was pretty simple.
Cyclones Vs. RGB Kit
It really depends on how you want to use your set-up. Both the Cyclones and the RGB kit are both great options. It was a tough call to move forward with either one but I am glad we decided on the Cyclones.
Cyclones Light Kit:
- Updated (universal rock light kit): Check Price
- Jeep JK Kit: Check Price
Install Guides
We opted for the Cyclones over the RGB kit because we wanted quality, and we didn’t need anything too fancy. We decided on the Cyclones for their durability off-road, general road-use, beam pattern, and clarity. The Cyclones pack a pretty serious output and are built to withstand the elements.
We don’t use our rock lights often, but when we do, we want them to work and work well. At the end of the day, we wanted a wider beam pattern and brighter light than the RGB kit.
RGB Light Kit:
- The RGB Kit: Check Price
The RGB kit is pretty badass, though. You can control the lights and change colors on the fly via the Bluetooth mobile app KC created which is pretty awesome. You can adjust LED flash speeds and sequences as well, anything from strobe to fade and mono to multi-color jump, the RGB kit can do it.
You can also sync up music and voice along with controlling the brightness of the lights. This is really an awesome option for anyone out there looking for every color rock light on the fly with complete control.
4Runner Battery Location, Wheelbase, and Switch

While the 6-light Cyclone kit is designed for a Jeep JK, the only difference between both vehicles in this application is the battery location and wheelbase. Battery location on 4Runner is on the driver side, while Jeep in on the passenger side. Wheelbase on Jeep JK is 95.4″, while the wheelbase on 5th Gen 4Runner: 112″.
These are the only real differences that you need to consider if you are going to install the KC HILITES Jeep JK 4-light or 6-light Cyclone rock light kit on your 4Runner.
Depending on if you have a switch panel or not, will decide your switch options. The KC kit comes with a provided switch and wires but we ran ours to our Switch Pro (that step by step install here).
Running the wires to a switch panel makes wires in the engine bay and cab cleaner and organized.
If you are looking for how we ran the wires to our switch panel, check out our rock light install on the KC website.
Rock Light Install on 4Runner to Switch Pro

It was simple.
If you have a Switch Pro or sPOD, you can follow our step by step install on kchilites.com.
The install was pretty straightforward. We did pull apart the provided KC wiring harness to connect everything to the switch pro. We discarded a few wires and the switch in order for our switch to work. We still used the provided busbar as that was the point that distributed power to both provided harnesses. Also, down the road, we might add two more rock lights in the rear, so that busbar will come in handy.
Running the harness and mounting the lights on the 5th Gen was a question mark at first but I think I got what I wanted. I knew I didn’t want a set of SEMA lights sitting up inside my wheel well that provided next to no light outside of the well.
I wanted my front driver and passenger lights to project a smooth pattern just outside my tires so that I could see what is in front of my tires at night. I think we have steered away from purposefully placed rock lights as more and more F350s start to install them and have no intention of using them other than lighting up the red carpet.
The problem with most lights, in my opinion, is that they project most of their light on top of their tire and inside their wheel well. This provides a decent look but little to no purpose off the road.
In any case, I wanted lights with a purpose.
Where exactly did we put the lights?
Driver front wheel well
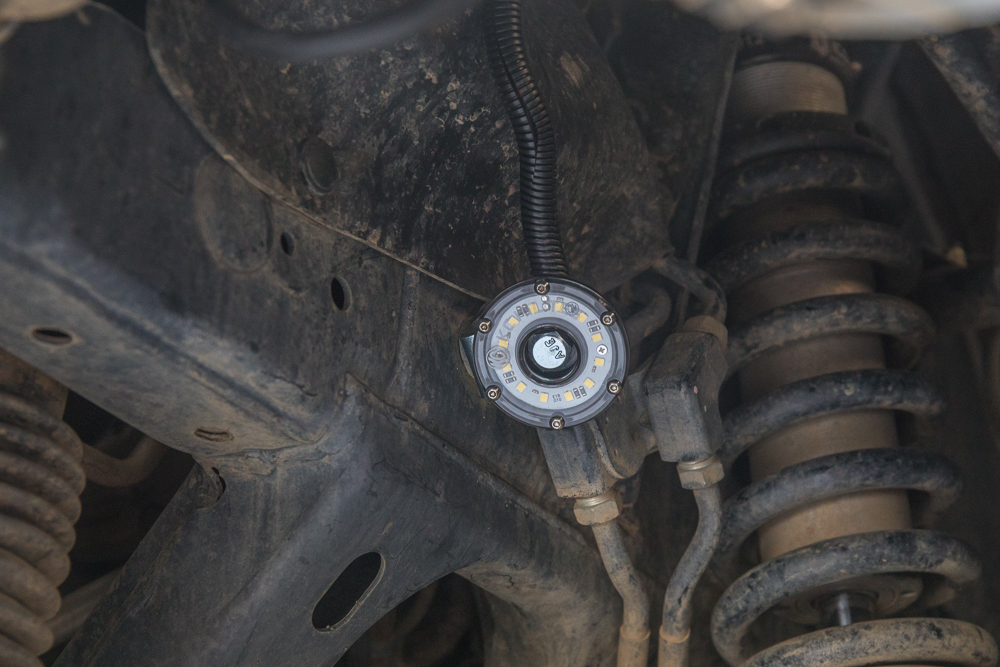
I mounted the first bracket in driver front wheel well just in front of my coilovers so the light projected past my front tires and did not light up the entire wheel well. If you have KDSS, you can mount the driver side to the existing bracket/line. For the passenger side, you need to run a bolt through the frame. For an SR5, you need to run a bolt through the frame on both sides.
Driver front rock slider

The second bracket got mounted to the actual rock slider. This was a perfect spot for me in regards to bracket placement, light output, beam pattern. If you have sliders, this should work great. If you have nerf bars or factory steps, you may need additional hardware.
Driver rear rock slider/ fender
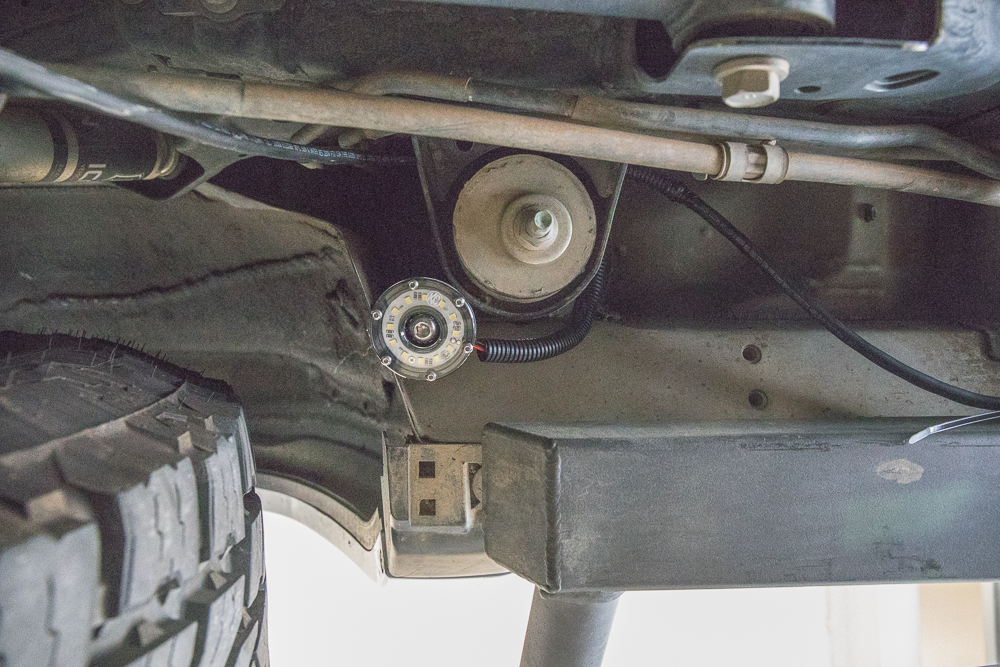
The last bracket got mounted on the outside/front of the rear fender liner. The bracket is closer to the rock slider than it is to the tire.
I repeated these steps on the passenger side of the 4Runner.
The choice of where to install the Cyclones/brackets is entirely up to you but again, I personally wanted something that was more functional than show.
Extending the Harness
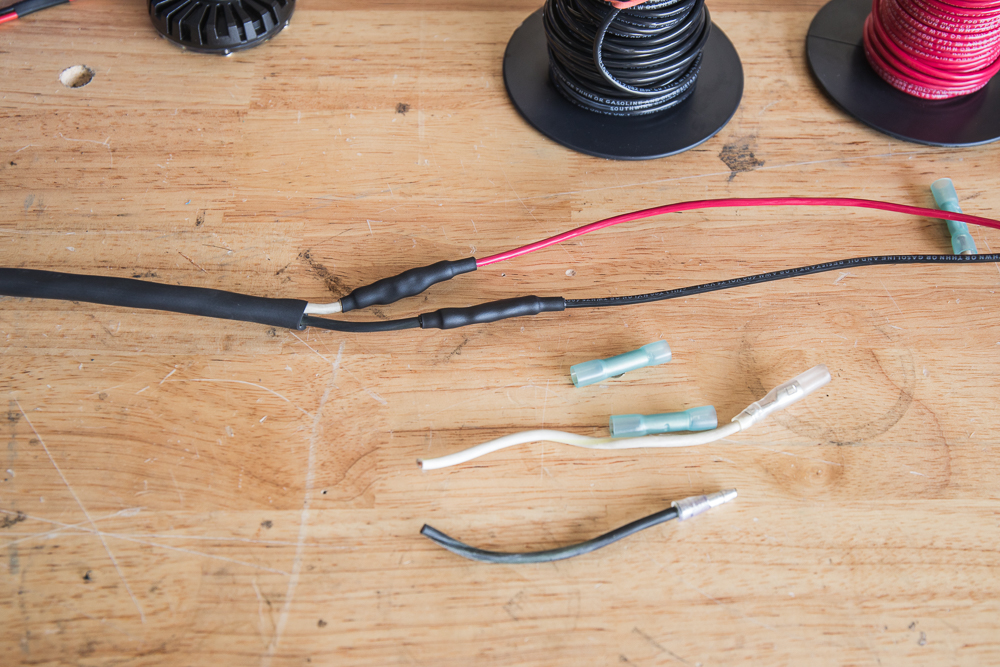
If you are looking to install the 6-light kit, you will possibly need to extend the harness.
We extended our harness by about 9′ but we only needed about 7′. You may even get away with 6′ depending on how you run the wiring harness under the truck. I ran the harness along the frame rail and then continued along with a cross member while zip tieing along the way.
Extending the harness was pretty simple. I just peeled back the wiring sleeve and cut the power/ground cables off.
I then connected butt-splice connectors on each wire and then ran another 9′ of wire. Finally, I reconnected the wire connectors that I cut off in order to connect the last light up to the harness.
After I tested the last Cyclone, I ran some wiring loom around the extended wiring harness for a cleaner/ easier feed from frame rail to frame rail.
Beam Pattern/ Light Output

I wanted the beam pattern to project beyond the front bumper/front tire. I knew the Cyclones were capable of lighting up enough of the ground area, it was really just a question of where to mount the actual lights to get the proper beam pattern. From the images, you can see, we ended up with a pretty good spread for now, until we mount a new front bumper. Also, our passenger side shoots about 1′ past the driver side in the front here. I have since adjusted and corrected that. They are about 3″ off now.
The Cyclones are rated at 516 raw lumens each.
We wanted to take it a step future and take our own measurements.
Cyclone Light Output
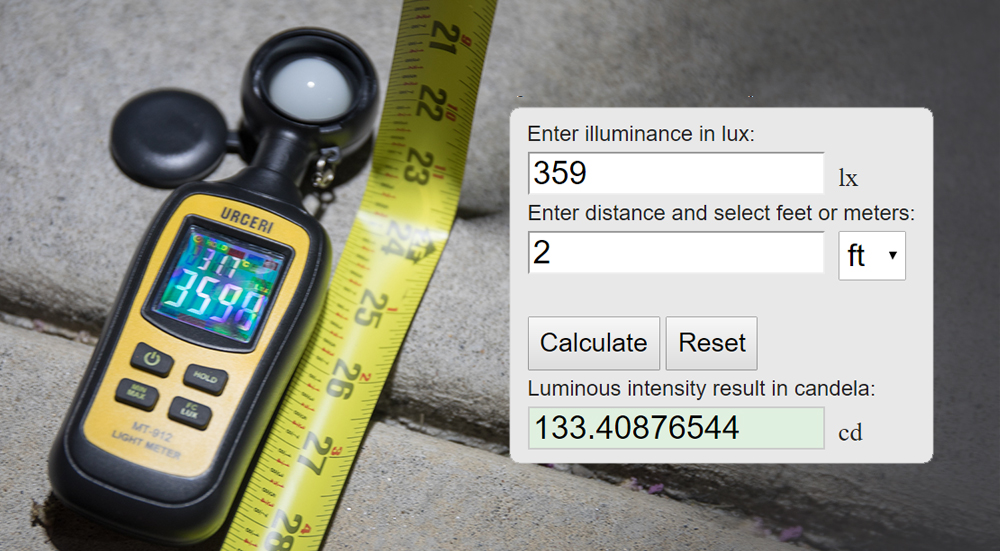
We pulled out the Lux meter and measured the intensity. We took the Lux directly underneath the front rock slider light to the ground. Then we converted it to Candela, using this tool.
We probably didn’t need to go this far but it will give you an idea of the light volume and intensity. Eventually, we will grab the RGB lights and compare them back to back.
LUX is typically measured at 10 Meters and within a square meter of space at the 10M target. We didn’t have 10 Meters to work with, so measuring the distance to the light and taking a Lux reading was the best we could do.
If anyone else out there has a better way to measure the intensity, please let me know.
Brenan
Do you have any information on your cable management in picture 3?
It looks very neat and clean, is there an article or page for that on here?
Mike, yeah I wrote the original article on KC HiLiTES website…
EDIT: Updated link here.
Hey Brenan,
Seems like KC took down your write up.
Are you still running the same wiring as written above?
I’m debating if i should follow the same path or run them parallel.
Thanks,
Ok, this is live. Here is the step-by-step install for the rock lights. https://trail4runner.com/2018/08/30/kc-hilites-cyclone-led-rock-light-install-on-5th-gen-4runner/
Yeah, we noticed that. They rebuilt their site and lost years of blog posts. We are working on restoring that over here. Should be up soon. Same wiring, yes.
Hey, man great write up! Quick question instead of running a busbar why didn’t you just run both wires the same switch on the busbar for the switch pro. I understand the use of a busbar on a non-switchpro vehicle but the with it shouldn’t need to. unless I’m missing something.
Mike, yeah I was going to run everything inline at first, but I didn’t want to come back and rewire or tap for the 7th and 8th light, or even a 9th and 10th light somewhere else, maybe even a different color which all syncs to that one switch. In any case, we didn’t “need” the bar, no. I just wanted to make future additions to the rock lights super simple.
Did you use the diffused or clear led version of the cyclones?
Clear LED Cyclones.
Thanks!
Not to get off topic of this article of the rock lights, but what is the suspension set up of the 4runner at the beginning? It looks awseome.
Shawn, you can find a final version of that suspension here. Icon stage 2 with 2 Ekstrom shims on each side, Icon overland springs in the rear.
Is that front end wrapped/painted/or plasti dipped? Looks great! Trying to decide between that or the TRD front end conversion.
Chase, wrapped. Someone else wrote that article overview here.