
How to Change the Oil and Oil Filter on the 5th Generation Toyota 4Runner
There are many different types of maintenance you can do on a vehicle, but quite possibly the most important is changing your vehicle’s oil. If you are wanting to have a reliable and long-lasting vehicle, I would suggest changing your oil every 5,000 miles. You might not need to change it quite so often with synthetic oil, but it is well worth the money. You really should only use synthetic oil as well, such as Mobil 1. Although a 4Runner is pretty bulletproof, changing the oil is necessary and will only aid in a smoother, longer lasting vehicle.
WHAT YOU NEED
There are some key components you will need for changing the oil on your 5th Gen 4Runner. Here is a list of everything you will need:
- 6.6 Quarts of 0W-20 oil (I recommend Mobil 1)
- Factory Oil Filter or the TRD Oil Filter
- Funnel
- Oil drain plug gaskets
- Rags for cleanup and to wipe away any oil
- 10, 12, and 14 mm sockets
- Ratchet drive for sockets (3/8-inch)
- 64mm oil filter wrench
- Oil catch pan
- Latex gloves
- Owners manual might help
HOW TO CHANGE YOUR OIL – STEP BY STEP
Step 1 – Good Location
The first step is to find a location to change the oil on your car. I can fit under my 4Runner without any ramps or a lift; however, if you need and or prefer to raise your car up, do so accordingly.
Step 2 – Grab some Latex Gloves
Prepare to change your 4Runner’s oil by putting on some latex gloves. Although this isn’t necessary, I believe it is best to try and keep your hands as clean as possible from oils and grease. Using gloves also helps to have a quick clean up, because sometimes grease can be really hard to get off your hands.
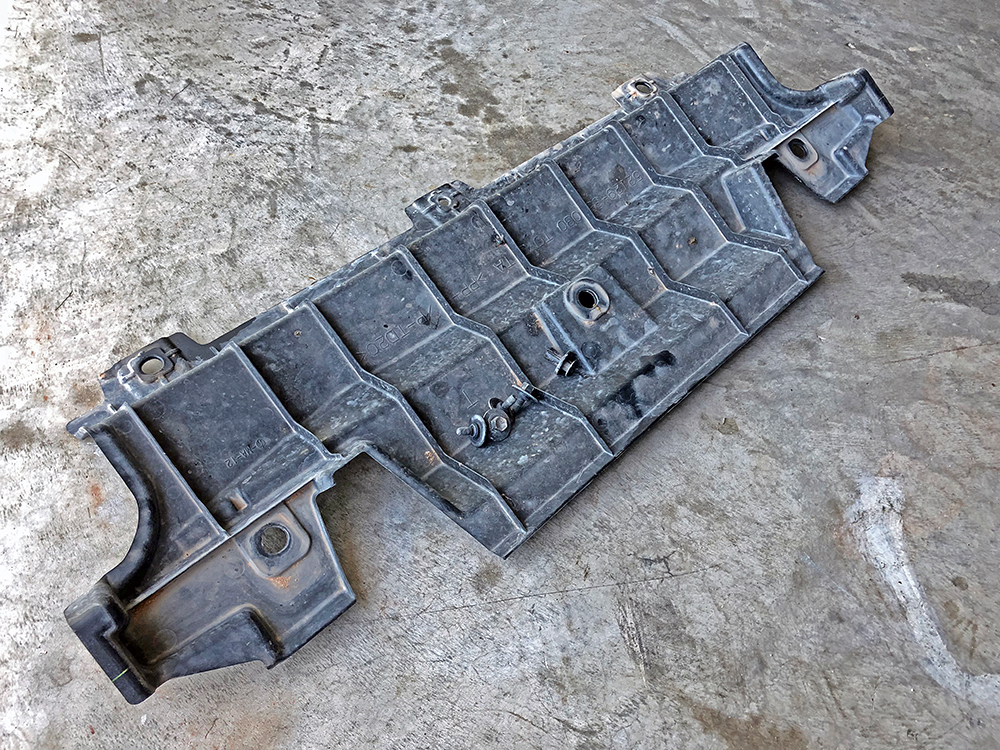
Step 3 – Remove Skid Plate Cover

If your 4Runner comes equipped with a front skid plate, you will need to remove the small cover located on the skid plate that will give you access to the oil drain plug.
You will need to remove this cover by using a 12mm socket and ratchet. After removing the bolts, set the small skid plate that covers the oil drain plug to the side. I suggest placing the bolts on top of this small skid plate, so you can easily locate them once it is time to put this cover back on.

Step 4 – Remove the oil drain plug

Prepare to remove the oil drain plug and drain the oil from your 4Runner. In order to do so, you will need to have a container to catch the oil that spills below. Although, some oil is lost from the vehicle operation, plan for at least 6.6 quarts to come out (as this is how much you put in).
After placing a container to catch the oil underneath the drain plug, use a 14mm socket and ratchet to unbolt the drain plug. After the drain plug becomes loose enough, unscrew it by hand.
Make sure to hold on to the drain plug and try not to drop it in the oil catch container. After you remove the drain plug, oil will come out quickly so be prepared to move your hand out of the way and let the oil drain into the container.
In the meantime, you can go ahead and wipe any contaminants from the drain plug with a clean microfiber cloth. After doing so, set the drain plug aside until later.

Step 5 – Remove the Front Skid Plate & Cover

While your oil is draining, go ahead and remove the front skid plate and skid plate cover. You might ask why you have to do this, and the simple reason is to change the oil filter. You don’t have access to the oil filter unless you remove the front skid plate and skid plate cover.
To remove the cover, you will need a 10mm socket and ratchet to remove five (5) bolts. There is also one (1) push pin that you will need to remove. Once you remove the cover you will then have access to remove all four (4) bolts that hold on the skid plate.
To remove these bolts, use a 12mm socket and ratchet. Word of advice that is very important: Remove the front bolts first on the skid plate. After doing so you will need to hold up the skid plate while removing the back two. If you don’t hold the skid plate when removing the last bolt, the skid plate will fall and hit you. Although it doesn’t weigh too much, it probably won’t feel good. The front of the skid plate is on a hinge that unhooks.

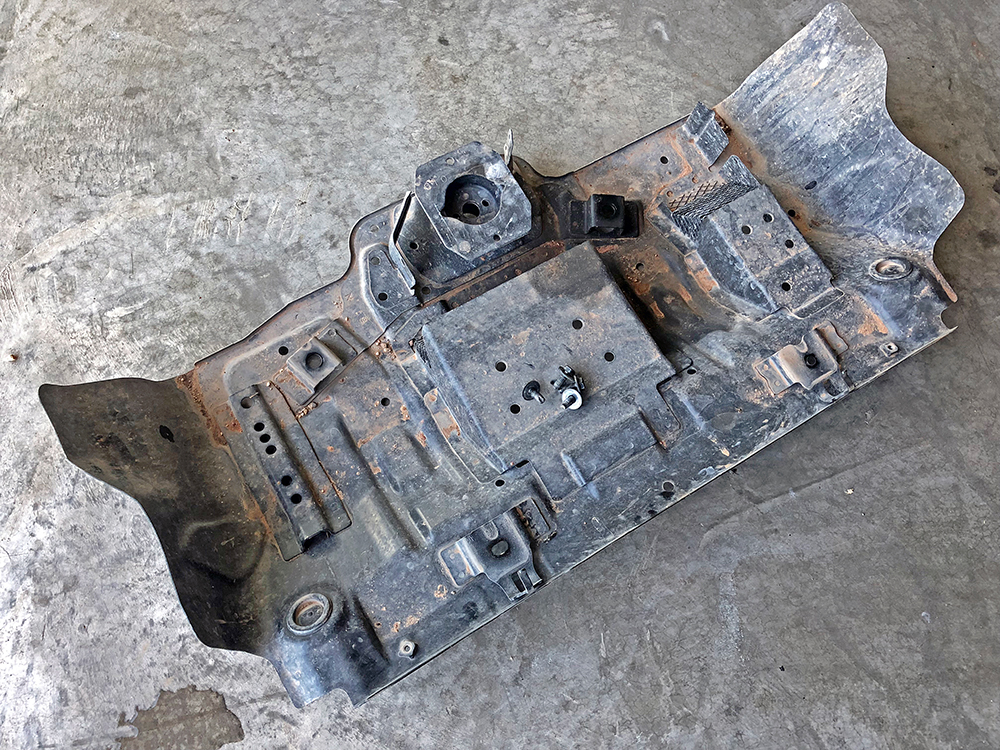
Take your time and rotate the back of the skid plate towards the ground to remove the skid plate from the hinge. After you remove the skid plate, set it to the side with the bolts on or nearby.
Step 6 – Remove the Oil Filter
At this point in time you will want to remove the oil filter – which I think is the most complex part of the entire process, but still pretty straightforward. Before you remove the filter go ahead and reinstall your drain plug and the small skid plate that covers the drain plug. After doing so, move the container you are using to catch your oil so that it is underneath the oil filter.

Using a ratchet with a 3/8-inch extension remove the metal plug to the oil filter. Some oil will drip out so make sure you have a container to catch it. Your new oil filter should come with a plastic tool to further drain out some oil. All you have to do is push it into the base of the filter. Oil should drain out after doing so. Wait until the oil has finished draining and then remove the plastic drain tool. Along with removing the plastic drain tool, a small O-ring should also come out. This is trash, so go ahead and throw away the drain tool and the small O-ring.

Now you can remove the actual filter. Use your 64 mm filter wrench and take off the filter housing. Make sure to note a small metal tab on the side of the housing. This tab should align to the same location when putting the filter back on. After unscrewing the filter all the way, remove the old filter from the housing and throw it away.
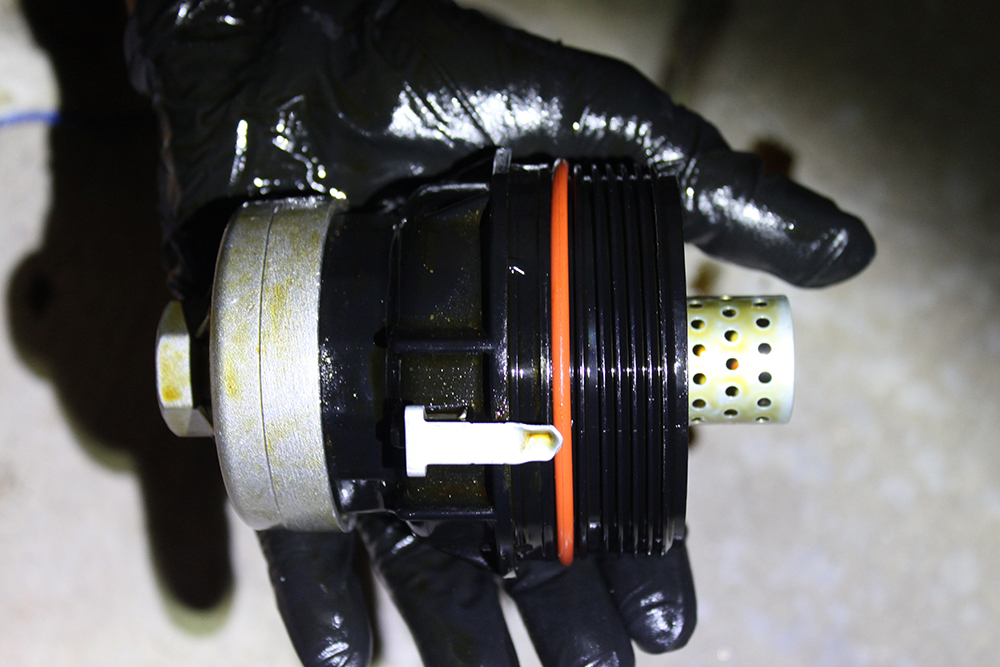
There is also an O-ring on the housing that needs to be removed. You do not need any pry tools and should be able to remove this O-ring by hand with ease. I’d recommend doing this by hand as you don’t want to damage the plastic threads.
Step 7 – New O-ring from the filter box
Grab your new O-ring from the filter box and coat it with a small amount of oil. After doing so place it on the filter housing. Make sure it is seated all the way around. Next, place your new filter into the housing. You don’t have to worry about orientation as there is no right way up.
Step 8 – Screw the filter assembly back in
Make sure to keep tightening until the metal indicator tab is back to its position like it was before removing the filter housing. Now install the small O-ring into the filter housing by first coating it in a small amount of oil and then placing the O-ring in place on the drain area of the filter housing. After doing so, you can reinstall the metal drain plug into the filter housing. You don’t need to overtighten this, so just make sure it is snug.
Step 9 – Oil Change

After verifying that your drain plug and oil filter are back in place install 6.6 quarts of 0W-20 oil into your 4Runner. Use a funnel for this as you do not want to spill oil on your engine.
Step 10 – Check for Leaks
When you finish installing all 6.6 quarts of oil check around the drain plug and filter housing, make sure there are no leaks. If you can’t spot any you can go ahead and install the skid plate and skid plate cover.
Step 11 – Reset your maintenance light
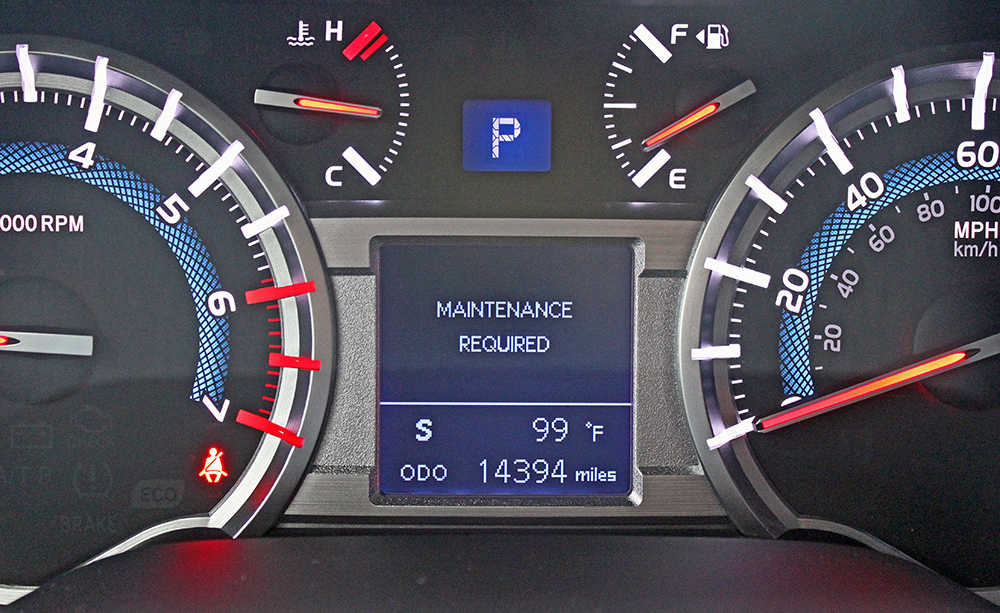
Now that you’ve completed the actual oil change procedure you need to reset your maintenance light so that you know when to change it again. To do so you will need the key to your vehicle.
Turn your key to accessory mode (far as the key will go without actually starting the vehicle).
Verify your odometer is showing Trip A. If it isn’t, press the knob to the right of the speedometer to go to Trip A.
After verifying it says trip A, turn the key to the off position. Press and hold down the odometer button and then turn the key back to accessory mode. The screen should show the maintenance resetting.
Continue to hold the odometer button until the maintenance light has been reset. After doing this, you are good to go for another 5,000 miles.
CONCLUSION
Although there are some cars out there that make it a little easier to change the oil, the 4Runner’s oil can be changed relatively easily and in a short amount of time.
Since the 4Runner is capable of going in some pretty rugged areas, you need to take the time to maintain your vehicle as best as possible and prevent any potential damage from occurring.
Taking the time to change your oil every 5,000 miles with a quality synthetic, such as Mobil 1, will only benefit your vehicles performance, longevity, and reliability out on the trail and on the open road.
I own a 2005 Toyota 4runner from new
currently 261,437 km on odometer
I’m in Nassau, Bahamas.
no super HWY driving,
Currently 261,437 km on odometer,
changing the oil tomorrow in
my two-car garage in a gated community!
i.e. driveway!
4Runner still runs great after 21 years.
No rust anywhere
6 cylinder
oil gets changed about every 12 months,
but usually at 5000 miles.
242 327 7359
It’s a good idea to drain your oil while it is hot. That way you remove more nasty suspended particles that would otherwise be resting on engine part surfaces. I also remove oil filler cap and dipstick to further aid the draining process.
No torque specs !!! The must important step of any oil change. I guess that’s not important to you ?
good point , essential information missing. But if your using oem filter it usually give you the torque specs right there on the packaging
Thank you
Great article! I changed the factory skid plate out for the TRD Pro version, It looks better and is easier to remove for oil changes than the stock one.
My ’04 gen4 was delight when it was time to change oil and filter. I got lazy and chose to take my ’16 gen5 to a local oil change place, and now it is leaking oil. Karma I suppose.
I have found that my 2018 4Runner SR5 can be quite tricky to get the correct oil level. Most cars, you add the oil and run the engine for a few moments and turn off, then check the dipstick shortly thereafter. I have overfilled my ride a couple of times and had to go back and drain fresh oil out, because I did not give the oil enough time to settle. I did a little research and found out that after turning off your engine, you need to let the oil settle for no less than ten minutes. This gives the thin 0W-20 time to settle throughout the engine giving you an accurate reading. Having too much motor oil is worse than having too little, and as long as your oil level stays between both dots on the dipstick, your engine is good.
I add no more than six quarts of motor oil, then run for a few minutes and check for leaks. After turning off the engine, I let it sit for ten minutes which gives me time to reinstall the covers underneath. After at least ten minutes have passed, then I will go and check the dipstick, adding a little bit of oil until it is just shy of the top dot on the dipstick.
Great write up. Wasn’t sure where everything was on my wife’s new 2021 4Runner and a quick google search brought me here. I appreciate your effort, literally nothing was missed. Thanks a lot! If you can follow instructions.. they’re all here.
Thanks for the great detailed instructions! I recently bought a 2019 SR5. Any ideas in how to get a stripped bolt out? One of the bolts that holds the small skid plate covering the drain plug was stripped by the prior owner, or more likely, an aggressive user of an air tool. I had to bend the plate to drain the oil. I tried a couple different tools, one of those hardened sockets that bites into a bolt: the bolt was too small. Then I tried a tool with pins to grab the bolt head. The bolt wasn’t deep enough into the tool. That lip around the plate prevented vice grips from being an option. Help!
Also, the head of one of the bolts that holds that plastic plate on broke off when I started to loosen it. Not sure what to do about that. The other four seem to be holding it ok though.
I was shocked how rusted on these bolts were given it’s a 2019. Even the dipstick was stuck on.
Lastly, I couldn’t get the oil filter spun back on tight enough to match the metal pins.it’s on real tight. I even backed it off so get the alignment, but when I replaced the small disc it tighten the filter so I just left as tight as I could get it. Thoughts on this?
It’s shocking how difficult it was to change the oil! My Hondas were always like 20 minutes.
thanks for any advice you might have!
Am I able to use AMSOIL Signature Series 0W-20 Synthetic Motor Oil(ASMQT-EA) on the 5th gen? If so, I’d like to start this habit. Got it with 16k miles.
I’ve been using amsoil full synthetic on my 2014 every 6500 miles and it has 270k trouble free miles thus far – it’s expensive but worth it
No need to remove skid plate. Remove the two read bolts to let it drop down to access the filter. Easy!
Question, the Mobil 1 Extended Performance full synthetic says the oil can last 20k miles. What’s the suggestion for oil changes based on that? Also what’s the filters life?
Awesome write up and thanks for the guide. Here are some tips for a 21 4runner (TRD ORP) that I learned during my first oil change this weekend:
Everything else works the same. I did notice that when torquing the filter assembly to 18lbs the metal tab went slightly past where it was originally (maybe 1cm) but I’m not too concerned.
thanks for the great write ups!
I always add a Fumoto valve instead of a plug to anything I buy. https://www.fumotousa.com/
Nope. Gold ol simple drain plug for me. If you actually wheel your rig moderately I’ve seen fumoto valves on others find their way open during rough trails… just another potential failure point to add on for mere convenience.
I just wonder why Toyota changed location oil filter location.
Oil filter change on previous generation was much easier.
The current generation has an oil cooler in form of heat exchanger (coolant cools the oil). Its right on top of the filter. Thats why they move it down there.
I like women
I love lamp
Brick?
I have a 2020 4Runner Limited. The oil drain plug on this model is 14mm.
Nice guide and pictures! Here’s a list of all the nitty gritty fluid info:
https://www.toyota-4runner.org/5th-gen-t4rs/285126-beginner-fluid-maintenance.html
Oil is a pain. Transmission is a friggin’ nightmare. No dip stick and a Rube Goldburg process to get the temperature to a certain range so overflow happens and then… Oh forget it. It’s too frustrating to detail it out here.
What size is that oil pan plug? M12*1.25? Wanting to get a magnetic one but don’t know the size.
Just got my 2019 in December after having an FJ for 12 years. Great vehicle but a pain to change the oil. Removing the whole skid plate to get at the filter? Why couldn’t they have put a hatch there like they did for the drain plug? And the push pin on the plastic piece? Why. Anyway I still love the truck and it will be less painful next time now I know the tricks.
Clint’s articles are the BEST to help me fully understand the capabilities of my 5th gen 4Runner Trail, especially the deep dive on 4WD systems. Thanks Clint!
Thanks Eric! I really appreciate it!
It’s some work and you have to torque the filter canister to 25lbs ,the little plug under that 10lbs .I love my truck so I will put in the effort.
It is 18 lbs or 25 nm.. NOT 25 lbs.
Agree this is the most complex oil change process of any car I have owned.
total bullshit that Toyota when back in time to change oil filter from spin on to canister type from the 1950’s . for those that change there own oil I recommend baxter performance filter adapter!
I would be extremely careful using any aftermarket products for critical components. It is a bummer that it’s a pain to do a simple oil change, but to be fair, taking off the skid plates and the front plastic cover is way more time consuming. Lastly, virtually all oil filter assemblies have what’s called a Bypass-Relief-Valve (BPRF). If your filter gets clogged or you’re towing heavy loads all the time and the BPRF isn’t made well enough, you could deprive your engine of oil and severely damage your engine.
Just something to think about.
This is actually forward thinking, to reduce waste. Permanently bonded paper/gauze/metal filters are detrimental to the environment.
It’s still bullshit. I have been changing my own oil since I was 16 and I’m now 62. This is the most difficult oil change I have ever done. Piss poor engineering in my opinion and I am an engineer. Multiple o rings just create additional places to leak.