
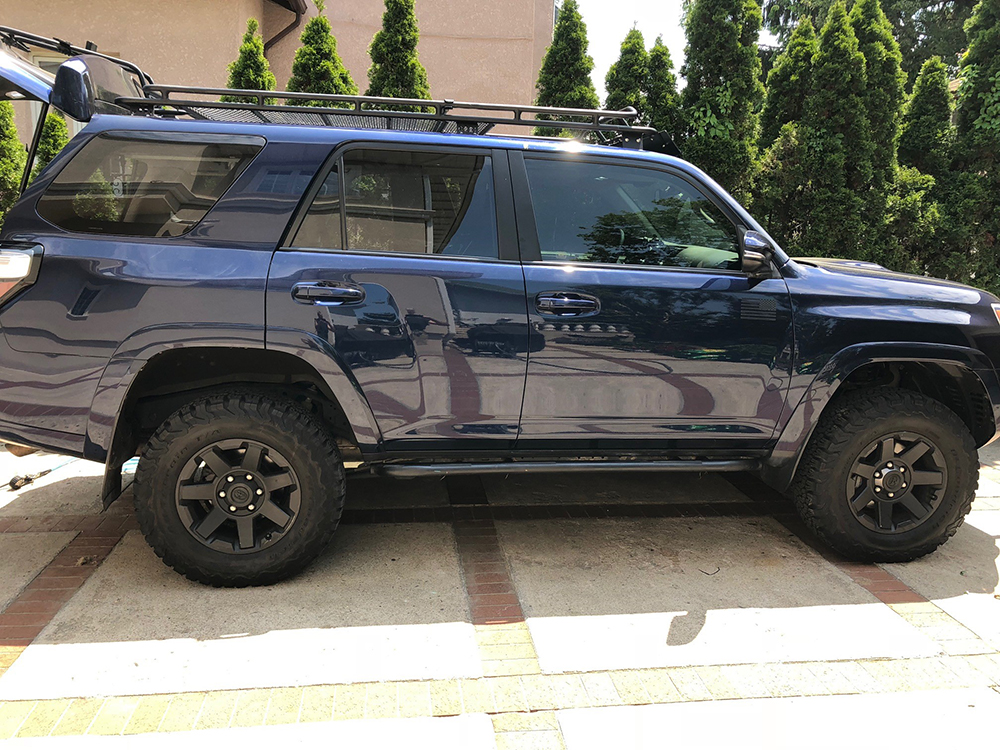
5th Gen 4Runner Rear Air Bag Suspension Lift Installation and Overview
I think we all enjoy working on our 4Runners and as we keep adding stuff to our favorite rigs, things start to get heavy. It may start with new bumpers, drawer systems, winch, dual battery systems and we wind up with a rooftop tent, spare fuel storage containers, water – and I can’t forget all the recovery gear. See a recent article on all the recovery gear I use from time to time. All that weight starts to add up in the 4Runner.
Air lifts are great for owners who want to level their truck, maintain a comfortable ride, and take less stress off the suspension when towing or when carrying additional weight in the 4Runner.
The added weight into two categories
- Always on the truck
- Only on board when wanted or needed
For the first category, the only real fix is an upgraded suspension with heavier springs. I am very happy with the suspension I have installed given I have a new front bumper, winch and dual battery system in my 4Runner.
The 2nd category has been a challenge for me. When off-road or camping, I’d like to carry a lot of extras with a recent addition of a rooftop tent all that can add up to over 400 pounds (probably a lot more). I didn’t want to upgrade the springs and found another option.
Introducing the Air Bag Suspension Kit
Although new to me, air lifts and air bag suspension kits have been around for a long time. They are typically used to help adjust the rear ride height when towing but can also help with the 2nd type of added weight that I’m concerned about.
There are many articles on how to install them and folks who have installed them swear by them. One other common consensus in the forums and around the Internet was after installing the Air Lift system and it performed. Many people say it was the best $100 upgrade they’ve done.
An air lift is relatively inexpensive and also easy to install on your own. I agree it was inexpensive and fairly easy to do since I had help from my sons and a car lift.
Air Lift 60809 1000 Series Rear Air Spring Kit
Here is what I used to install the kit on my 2015 T4R Trail Edition
- Air Lift 1000 Series: Check Price
- Anderson Metals 57001 Brass Hose Fitting: Check Price
- Kingston Brass Mini Ball Valve Lever: Check Price
- Wire Loom 3/8 inch: Check Price
- Wire Loom ¼ Inch: Check Price
The air lift kit is pretty complete with bags, enough tubing, spacers, Schrader valves and all the required extras to put it together (clamps, zip ties). You can add wiring loom to help protect the tubing, but it’s not mandatory.
You can benefit from a soapy water solution in a spray bottle and a reciprocating saw with a long flexible blade (more on that later).
If you don’t have access to a lift you will need a jack, jack stands, and wheel chocks to lift both rear wheels up.
Air Bag Suspension Kit Installation
The first step is to read the installation manual that came with the Air Lift kit. It’s a great kit if you have a 3rd or 4th Gen 4Runner but Air lift does not have specific instructions for the 5th Gen. After reading through a few posts, I was able to find the right kit and understand the one modification I had to do in order to make it work in the 5th Gen. I’ll explain the difference down below.
Next, Lift the car so that both rear wheels hang with suspension and springs extended. With the wheels off the ground, I had more than enough clearance to perform the next steps.
The image below is from the Air Lift Installation manual and here is the main difference when installing in a 5th Gen. As I mentioned earlier the manual is geared towards older 4Runners and they have a set up with an internal spring bumper with 5 sections and they recommend to cut the bottom 4 sections leaving just one on top of the spring:

On my 5th Gen, the Bumper looks like the image below with only 4 sections. I found mixed reviews on how much to cut so I took a middle ground and cut off the bottom 2 sections.
I used a reciprocating saw with a long flexible blade and cut the sections between the extended spring coils. I then pulled out the cut section.
Here too, I found different opinions online. Some folks found it very easy to cut, just like I did, while others found it too difficult and wound up taking the coil out altogether.
If you do go that route, the Installation guide has specific instructions on what to do to remove the spring.

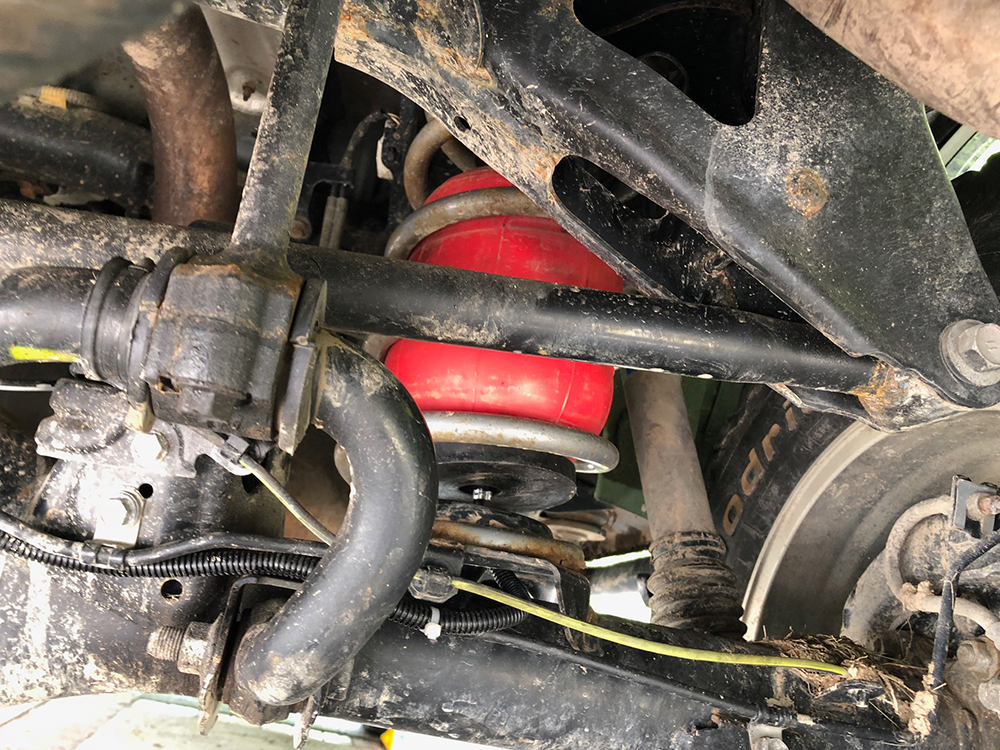
Once the bumpers are cut and with the spring still extended I was able to squeeze the bag in between the coils. A little spray of soapy water helped, but I found it a lot easier than I thought to get the bag installed. It’s up to you how you orient the Bag, but I found it easier to install the bag with the barb pointed down. There is an existing hole in the base of the spring housing so threading the air tube was much easier from the bottom.

After the Bag is installed, slip the provided spacer between the bag and spring base. It may help if you use some double-sided tape to keep the spacer on the base or Bag. Here too I found mixed suggestions on whether to tape it or whether it was needed at all. I opted to install it and tape it to the bag.
With the spacer and bag installed, thread the tube up through the bottom, place a clamp on the tube and attach to the barb on the bottom of the bag. Here too a little spray of soapy water helps. Make sure to attach and secure the clamp close to the bottom of the bag. I was surprised at how much room I had to play with to get the tube positioned.
Please note: I started on the Driver’s side since I wanted the Schrader valves positioned closer to that side. Once you attach the tube, try to find the best route to your desired position. Here too, the installation guide is very specific about leaving enough slack and zip tied to a suitable spot (I followed the brake lines).
Once you’ve found a route that suitable for you, you can cut the tube. Once cut, you can add the wire loom up through the spring base – your option. Repeat on the other side
Finished on One Side
Once done, you should have the two sides looking like the graphical representation below from Air Lift’s Installation Guide. This shows how the bag and spring fit using the provided spacer. Here’s what it looks like on my 5th Gen. And one more look, a little further out.

Here are some photos of how I routed the tubes and where I zipped tied using what looked like suitable tie points for me. I basically went up and across on both sides until the tubes came together.

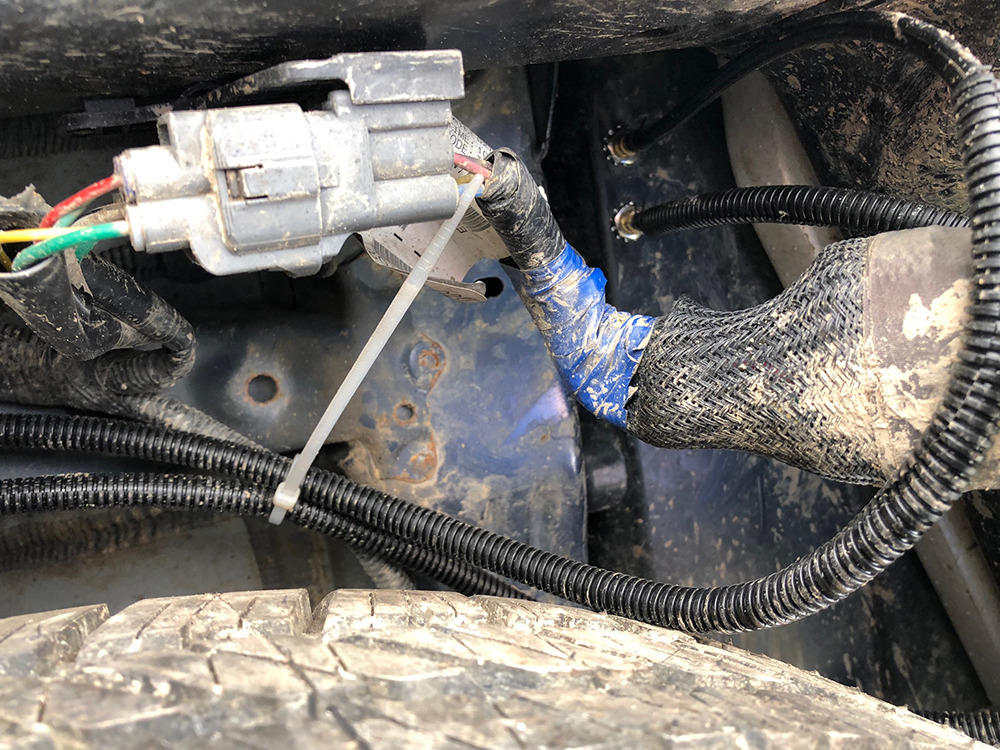
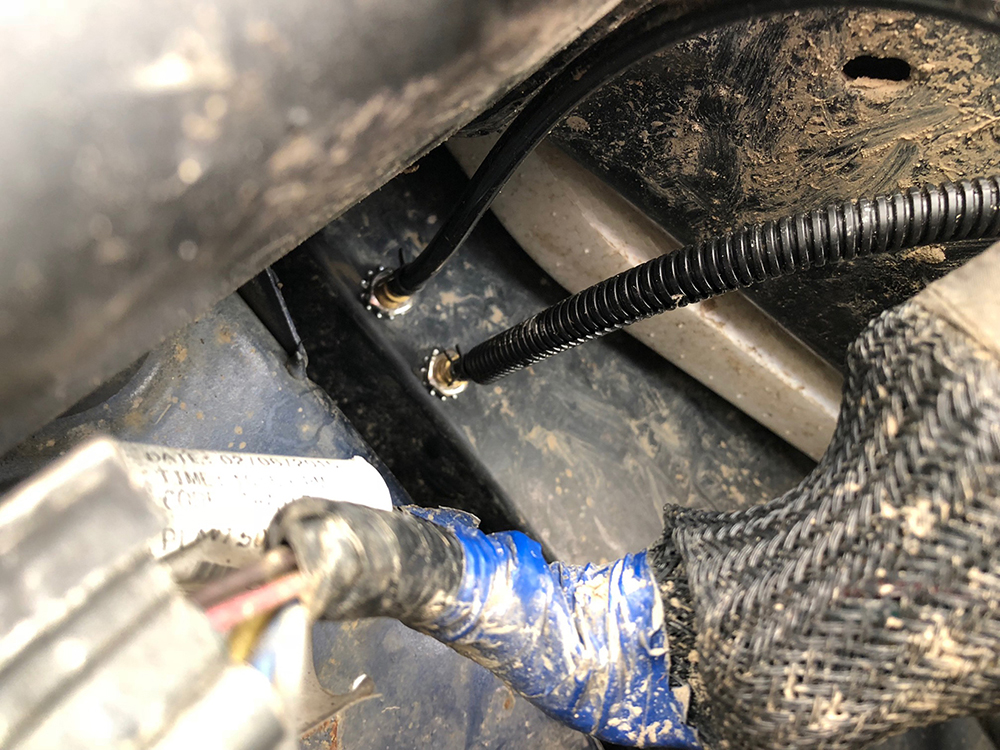
I attached the Schrader valves through the lip behind the bumper. The material is sturdy enough to hold the valves with the supplied hardware and instructions provided in the installation guide.

And that’s it. It was not a difficult modification but there is one more option I’m debating. You will notice I kept the bags, tubes and Schrader valves separated. The main benefit of this set up is that I can adjust each side at different PSI in case I have an uneven load.
The other option is to have both bags and tubes connected by the provided “Y” Barb adapter so that you can just have one Schrader valve and keep the pressure even. From what I found on the web, there are pros and cons to both setups.
The separate configuration will not interfere with the action of the anti-sway bars minimizing any body roll while on the pavement (along with the added benefit I mentioned above). The combined setup will provide better articulation when off road by allowing air to move between the bags and providing slightly better articulation between wheels.
I went with the separated version (two valves), but if I find any issues I will add the set up below that will give me the option to change the set up with the flip of a valve. Close the valve and you keep the bags separate; open the valve and you link the two.
- Anderson Metals 57001 Brass Hose Fitting Adapter, 1/8 inch Barb x ¼ inch NPT Male
- Kingston KMBVM Series Brass Mini Ball Valve, Lever, ¼ inch NPT Male & Female
Plus plumbers tape and two “ T “ connectors from Home Depot.

I’ve been using this mod now for about a week off road and on the pavement at highway speeds with no issues. I have not added the Roof Top Tent yet, but I can see a benefit when fully loaded with all my other “stuff”.
Additional notes:
- Do not over inflate the bags – limited to 35 PSI.
- Keep at least 5 PSI at all times. Any lower pressure and you risk damaging the bags.
- Check pressure regularly and make sure you check for any leaks before you go on the road.
- I have not found much of a difference in ride between 5 and 15 PSI. Over 20 PSI, I start to feel a little harder ride, but not so much that I have to dial it back.
- My ride height did not change, but there is less sag under heavy load.
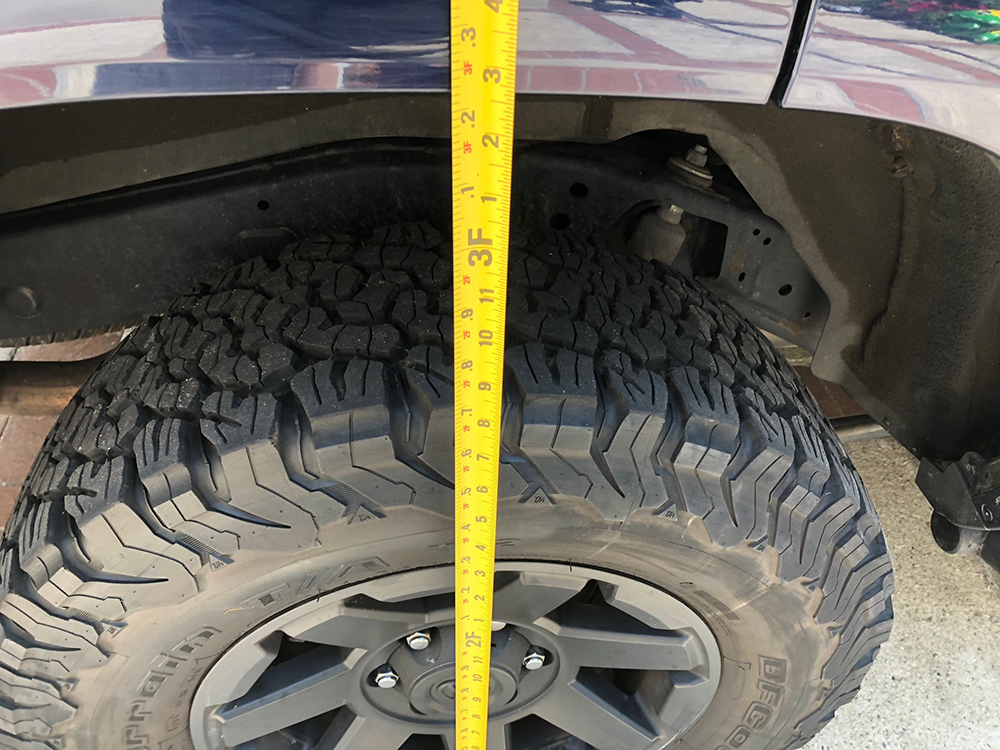
The First photo set at 5psi 2nd set at 35psi. I can’t see the difference but much stiffer ride at 35.

I just finished installing my Air Lift 60804 kit. I also installed Bilstein 5100 rear shocks to match my front. I highly recommend removing the coil for this install. It isn’t difficult. Probably easier than stuffing the bag through the coil. The main difference is that you can route the air line through the top of the coil as intended which reduces the risk of pinching/cutting the line while on the road or in the shop. I’m slow and I did it in under 3 hours including clean up. I did have my wife help run the jack up while I realigned the coil on the install end.
Test drove it at 20psi and it didn’t feel incredibly harsh (empty/no tongue weight) but I could tell a difference in my headlight beam being lower. I’ll probably run it at 10psi and adjust headlights accordingly. 10/10 would do again. If you carry any extra weight…do this mod.
Any idea if this mod will work on a KDSS enabled 5th Gen?
Yes, I have kdss and blue bags works
for me because I have ToyTec 2.5 kit so the bags a lil taller than the red.
Definitely need this suspension support mod on my 2003 2WD stock height 4Runner for towing my new RV of 3000lbs/500lbs tongue weight
Hi. I did your install to the letter on 2016 4Runner. I didn’t like how stiff / rough the ride. Even lower bags till basically 0 it still rode rough. A fellow 4Runner owner told me I used the wrong part # from air lift for stock 5th gen 4Runner. Today I removed the 60809 kit bags and replaced with the 60804 kit bags. Definitely big difference in height and diameter. The 60804 figment is MUCH better. And air lift confirmed this is the correct kit for 5th gen. I am glad yours sounds like it worked but there are a few others who shared in my challenges. May be worth making a comment in your write up?
thank you again for great write up. Regardless If me changing my bags I still think this was awesome!
Hi!
I’m thinking of installing these on my 2018 TRDPro. I’m worried that I’ll lose unloaded Offroad articulation since they require constant 5-10ps. Did you notice articulation limitations? Thanks!
Completed yesterday on my 2020 4runner TRD offroad, cut 3 of 4 sections off my bumpstop as I have 1″ longer rear springs. Took me a bit longer than expected; springs left in place and bumpstops were a challenge to access and cut.Testing is now in progress, small noticeable difference on daily drive, slightly plusher ride, no tow/haul ing done yet. Airlift 1000 -not a bad little system. I drive with 8 PSI in the bags, thats about .5″ lift added to my daily ride height.
Nice write up. Very helpful. Thanks for taking the time to share this
Will this work on a 3″ suspension lift in the back ??? I have dobinson 749v and I was thinking of purchasing a set of bag just incase. The springs aren’t enough… but now I’m worried that the bags aren’t going to be tall enough.
Did you ever find out if the bags would work with a 3” lift? Just bout a camper and have a feeling I will need support but don’t know if bags will work due to 3” difference from stock hight.
No they do not … I ended up orde Air Lift # 60920 but that was to my measurements of the inner diameter of my Dobinson 749 speings. You will need to measure the inner diameter of your spring and the hieght you’ll need for the bag. Theres instructions on the Air Lift website on what to do. Good luck
Im not familiar with that suspension kit. You would have to do a little more research and find the dimensions of the springs and compare them to the bags.
Dobinson 749v are 800 to 1000lbs constant weight 3″ springs. My rig is 6240lbs by itself. And with my family of 6 and out camping gear. I’m closer to 7300 to 7500lbs…
Hi. I was thinking of buy a Range Roover and I wanted to know if you have Lowering air bags for the SUV and if it could also handle off roading since the car is made for off roading too? LMK
Sorry – I don’t have any airbags. I just reviewed the ones I have for my truck. You can check with air bag vendors to see if they have a fit for your SUV. i used Air Lift but Firestone makes some as well. Check out their sites.
I installed last night in stock height 2016 Trail. I cut two out of four bump stops as you did but the rear is significantly raised compared to front. 3 inch difference where normally would be 1-1.5”. I am guessing I need to cut off three out of four bump stop but wanted your opinion before I do. Thank you!
Are these airlift fits the stock 2018 TRD O/R 4runner?
sorry Ann – I don’t know but your best best is get the specs and compare on the air bag site.
Hello! After installing the airbags my rear sits quite a bit higher than my front… what direction would you suggest going with leveling? And how will raining the front affect towing?
I would drop the air pressure a bit but not less than 5 psi. so the bags stay in place. I keep mine at around 10 psi all the time and then raise the pressure when I’m carrying a heavier load. Remember, they are adjustable and are made to take different loads/pressure.
hope that helps…..
Hi Sensei Dad,
I purchased a used 2015 4Runner Trail Premium over a year ago, and the previous owner put some work into the suspension. He put a Toytec Lift (I believe 3 inch) front and back, and also installed the (what I believe is) Air Lift 1000 kit. I am writing to you to ask two questions…
1. The front suspension seems to make the wheels toe in a decent amount. My understanding is that I probably am still running OEM UCA’s and the casters are at full extension outwards. My question for this is what would you recommend I do to even out the wheels for a more even toe and caster adjustment?
2. I noticed my rear lift is significantly higher than my front (about 2.5 inches) and I’m trying to level out the truck a bit more so it stands even. If I were to remove the 2 inch TOYTEC bump stops from the rear, would that even it out correctly?
Thank you for your help! And I’m happy to be a part of this community driving such great trucks!!
Best,
Bobby
Hey Bobby! Congrats on the truck. I have the same truck, but I ‘mnot an expert on how to properly set up the suspension. You should find a tech locally that can take and look, make the required mods and then do the proper alignment on the new set up.
Saying that, I am surprised you still have the OEM UCA. I thought with a 3 inch lift, changing the UCA was the way to go and I would try that. You will need an alignment after you replace the UCA.
Also, I don’t know much about the Toytec set up nor their bump stop. From what I know, the bump stop is just that – a way to stop full compression on the suspension in a controlled manner. I don’t think it adds to the lift. If your shocks are adjustable, I would find out how to adjust them down.
Sorry, i didn’t have specifics, but I really think you should find a shop to help with it all – espceially the alignment once you have it set at the hight you want.
best regards!
Thanks for the quick response! I was planning on seeing a tech this week, just figured I reach out to you after reading your blog. I am also surprised on the UCA’s, but I’m not 100% sure they’re OEM. I will take a look at the rear shocks and see if they are adjustable.
Thanks again!
awesome, wondering if the photo links could be fixed?
great tutorial!!
Took about 2 hours to do this even with dropping the springs out. I’m not sure why you wouldn’t just do that since it’s pretty darn easy too. Regarding the T fitting;; I’ve ready that you run the risk of load shift if you don’t have some sort of check valve between the sides.
Thanks, I’ve kept them separate since installation with no issues. I plan to leave them as is – good so far!
Hello Anliko
Great write up –
Will there have to be any modifications or will this set up interfere if I have a leveling kit installed in the rear –
Currently running a Daystar kit which lifts the rear 1.5 inches –Thanks
Sorry, just saw your note, I don’t know much about the leveling kit you mention. I would think since the bags just stiffen the springs with out any active component there wouldn’t be any interference but again, I don’t know much abut the kit you mention.
Good luck!
Bought these for my 2018 TRD off-road. Frickin awesome. Took about 2 hrs to install. Too easy, squish them down add soapy water and good to go. You will wrestle it though. Great addition. Much better than a lift unless you’re hardcore these are great.
Was wondering if the same part number, 60809, worked for your 2018 4Runner TRD off road. I also have the 2018 and wanted to check before I made the purchase.
Ended up purchasing the 60809 for the 2018 TRD off road. My bump stop had the 5 sections; but I only removed 3 of them. Didn’t remove the springs, so the 4th stop piece was too difficult to get in and cut, so it was left in. Air bags were tough to squeeze in between the springs, but got them in with soapy water. The air bags are working well after the install.
This is a GREAT write up! I wish I would have found this site sooner! Maybe I missed it, did you install the air bags rear only? Or do some do all four?
Hey Forrest!
Only the rear springs for these kind of kits.
Regards
Gus
Hi Anliko!
I am not familiar with the ICON kit (wish I was, but that may be for another mod in the future ;)…) I do know that the Air Lift website lists all the diameters of the bags they provide in the various kits. I believe they offer suggestions on how to determine which kit will work for your particular springs. With the springs I have (Sway-a-way 1.5 inch lift), I was able to squeeze the bag in between the extended coils with the help of a soapy water solution but you may have to remove the spring to get the bag installed if there is not enough space between the coils.
I had the stock coil bumper installed and had to guess on how much to cut based on various posts on the web, I wound up cutting only two sections off and it seems to work fine – the instructions called for cutting 4 sections off but that was for older 4Runners. I can only suggest to try cutting a section off at a time to see if there any issues.
hope that helps and good luck with the addition!
Gus
I can always count on you guys to be doing a mod just before I start! I have a 2016 T4R TEP that I want to install the Air Lift 1000 Kit on for towing a 4000lbs trailer. I have an Icon Stage 3 kit installed and wondered if you knew if this kit would still fit? Heard some issues with fitting the bag inside the spring and with the bumpstop. Do you have any insight/tips/tricks? Appreciate all the hard work to you do to document these mods!