Rear Dual Battery Set-Up on 5th Gen 4Runner

I have a 2015 Toyota 4Runner Trail and I have done a few modifications that include adding a 2nd battery to power my compressor, lights, a water pump and a fridge in the near future.
It all started when I finished installing a draw system in the back of the 4Runner and I found that when I took out the original slide and other components behind the 2nd-row seats, I was able to fit a Group 34 battery between the 2nd-row seats and my new draw system.
Part list and Materials for This Dual Battery Set-Up
- Blue Sea ML ACR 7622 – Price
- Ctek Dual 250s – Price
- Odyssey Extreme AGM Group 34 Battery
- Blue Sea Systems Mini OLED DC voltmeter – Price
- Blue Sea Systems m-Series On/Off Switch – Price
- Blue Sea Systems e-Series On/Off Switch- Price
- Blue Sea Systems lower switch panel – Check Price
- With Fused Switch, USB ports, 12v Socket rand mini OLED voltmeter
- 2x Blue Sea Systems ANL Fuse – Check Price
- 2x Blue Sea Systems ANL Fuse Block – Check Price
- Blue Sea Systems 2723 Dual Bus Plus – Price
- Cables and terminations
- 2 AWG, 10 AWG, and 14 AWG
- 10 Ton Crimper from Harbor Freight
- Shrink wrap tubing and a heat gun
- Vertamax Pure Sine Wave 1500-Watt Inverter – Check Price
I have to start off by saying that I would do a lot of things differently if I had to do it all over again. As I go over the installation, I will explain what I would change and the reasons for the changes.
When I started to plan out the dual battery system, I researched all that I could across the internet and found a ton of great sites using the following Google search:
Dual Battery setup
I found forums, web pages, youtube videos and product sites. The good news is that there is a ton of information out there. There were some conflicting points but with enough consensus, I was able to determine a few things I wanted.
From the start, I wanted a high capacity, deep cycle battery, not a clone of the starter battery in the 4Runner. The Odyssey Extreme AGM group 34 was pretty much a favorite and available at my local AutoZone.
As discussed in other articles, the battery offered a good compromise between weight and performance. Next, I knew I wanted a way to separate the batteries so that the starter battery would not drain under the load of the additional stuff I was installing. I wanted to keep the starter battery ready to do its primary job – start the 4Runner!
I also thought it would be great to combine the batteries and have the ability to offer a jump from the 2nd battery in case the main battery did get drained. Several forum posts also suggested combining the batteries during heavy winching – I’ve not tried that, but it sounds good.
Blue Sea Magnetic Latch – Automatic Charging Relay (ML-ACR)
At this point, I decided to purchase a Blue Sea Magnetic Latch – Automatic Charging Relay (ML-ACR for short). The model I chose came with a remote switch as well as a manual switch on the device itself. As the name implies, Blue Sea Systems makes products for marine applications and they have a great reputation. The switch looks solid and can survive under the hood if you had no other place to install it. Along with the switch I also purchased 300-amp fuses and a bus bar to help with the installation.
AGM Batteries and Charging
When I did my research on AGM batteries, several sources talked about how to keep AGM batteries charged as well as issues folks were having using just the standard alternator to charge two batteries. I reached out to Odyssey technical support and they pointed out that when using an Odyssey battery by itself as an upgrade to the Panasonic starter battery, the standard alternator should be sufficient to keep the Odyssey charged. Although, they also said having a charger to “top-off’ the battery was a good idea.
From what I found, AGM batteries work best and last longer when they charged using chargers that know about AGM batteries. These specialized charges take the battery through several stages and provide a higher charging voltage (14.4-14.7 depending on outside temperature) than what is provided by our standard alternators. There are several products out there and Ctek popped up as a reputable company offering different charges.
I looked at two different types of charges:
- AC-to-DC Charges – standard charges (that use 110 volts AC in the US, 220v in other parts of the world) from a wall outlet and convert the voltage to DC.
- DC-to-DC Charges – in-vehicle charges that take DC voltage provided by the alternator and provide a suitable charging voltage to the 2nd battery.
Ctek Dual 250s DC-to-DC charger
I decided to purchase a Ctek Dual 250s DC-to-DC charger for a couple of reasons. It offered the specialized AGM charging capability and had a built in Solar regulator in case I decide to add solar panels in the future.
It also has the capability to isolate the batteries and here is one place I would do things differently in the future. I already purchased the ML-ACR – not cheap – and although the ML-ACR is a great product, I could have done without it since the Ctek Dual 250s also isolates the batteries. The only downside to the Ctek Dual 250s is that it only pushes about 20 amps of current.
You cannot use the Ctek Dual 250s to combine the batteries on its own. Ctek sells a companion product called the Smartpass that boosts the current capacity to 100 amps. I did wind up keeping the ML-ACR and Ctek and will explain the reasoning and set up below.
Ctek Dual 250S and Smartpass
Note: If you are thinking about the Ctek Dual 250s and Smartpass you should consider Ctek’s latest products which are called the Dual 250SA and Smartpass 120. These newer products are just now coming to the US and offer “smart alternator” support as well as the capability to combine the batteries for 10 secs for a possible jump assist at 350 amps.
Dual Battery Cabling and Connectors
The next major purchase was cabling. I decided to use 2 AWG cabling throughout and bought it in bulk using my own connectors. I had to keep buying more cable since I underestimated the required lengths a few times. I also decided to crimp all the connectors. If I do this again I would plan out the lengths more precisely and use pre-cut and pre-crimped cable. They may cost more, but I believe it would save a lot of time and possibly offer better connectivity with better-crimped connectors.
5th Gen Toyota 4Runner Dual Battery setup Install
From the starter battery to the rear battery

The installation began at the starter battery with a switch and 300-amp fuse:
The switch isolates the starter battery from the back as well as the Light Bar I installed on my front bumper (the extra red cable shown in the photo above). I ran 2 AWG cable for both Positive and Negative connections through the firewall – a real painful process given’ the size of the cable. Here too I was able to find several sources online to help with how to pass the cables. I continued to run the cabling through the rocker panels and was able to pass them behind the 2nd-row seats.
Center console cables to the rear battery
At this time, I also ran 10 AWG cable for positive and negative connections from the center console back to the 2nd Battery. I added 14 AWG cable for the remote switch connections to control the ML-ACR remotely, I use the remote switch every time I get in the 4Runner.
Final setup of the front console right under the main screen
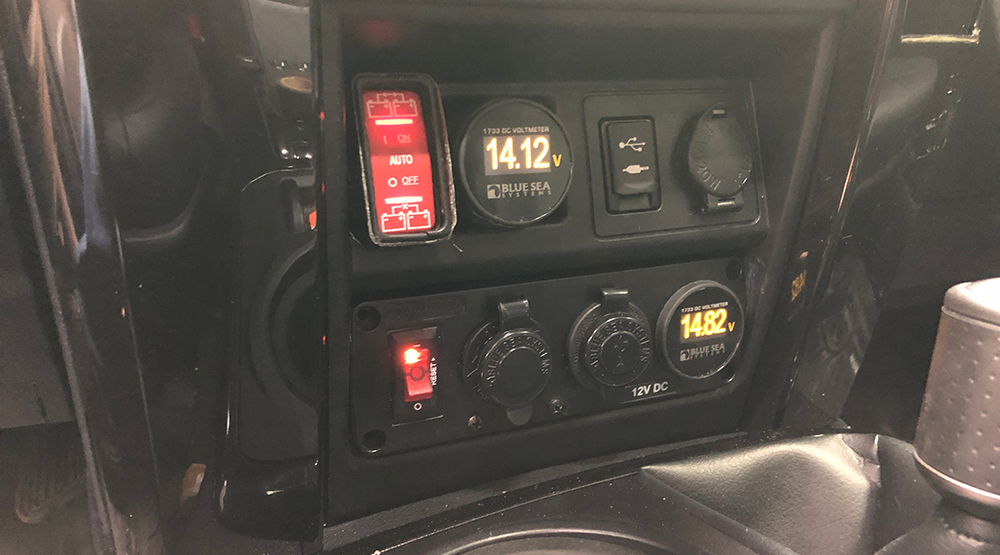
Bottom Row: Blue Sea Systems 4356 Below Deck Outlet with a Fused Switch, USB ports, 12v Socket rand mini OLED voltmeter. A great product that came pre-wired – all I had to do was provide the positive and negative connections from the 2nd battery.
Upper Row: I installed the remote switch for the Blue Sea ML-ACR and a 2nd voltmeter to monitor the start battery. For that 2nd Voltmeter, I tapped the positive connection from the existing 12-volt cigarette lighter port to the right. Luckily, the existing connection to the 12-volt port only energizes after I start the engine.
There is a great video on how to remove the center console on YouTube. You can fast forward to the 2-minute mark to get to the details.
I made a box for the AGM Battery as well as wall space for the Ctek, ML-ACR and buss bar. When I installed the drawer system, I was able to tap into access points on the floor of the 4Runner. There was plenty of room for the battery between the seats and drawers.
Installed battery with connections taken from the front of the cab

On top of the Battery Box I installed the Blue Sea Bus Bar with all the connections to the added stuff.

As I mentioned earlier, I decided to keep both the ML-ACR and Ctek Dual 250s. I wired them in serial (I’ll provide a full wiring diagram at the end) with the ML-ACR acting as the front-line switch with that remote rocker up front in the console. With this set up I can directly control when the batteries are connected and disconnected. I know this is a bit overkill because I have found that the Ctek does a great job to isolate the batteries. However, with one cabling change in the back, I am able to bypass the Ctek and connect the batteries directly if I had to. Also, if the Ctek ever fails for whatever reason, the ML-ACR will also automatically disconnect the batteries before either one gets too drained.
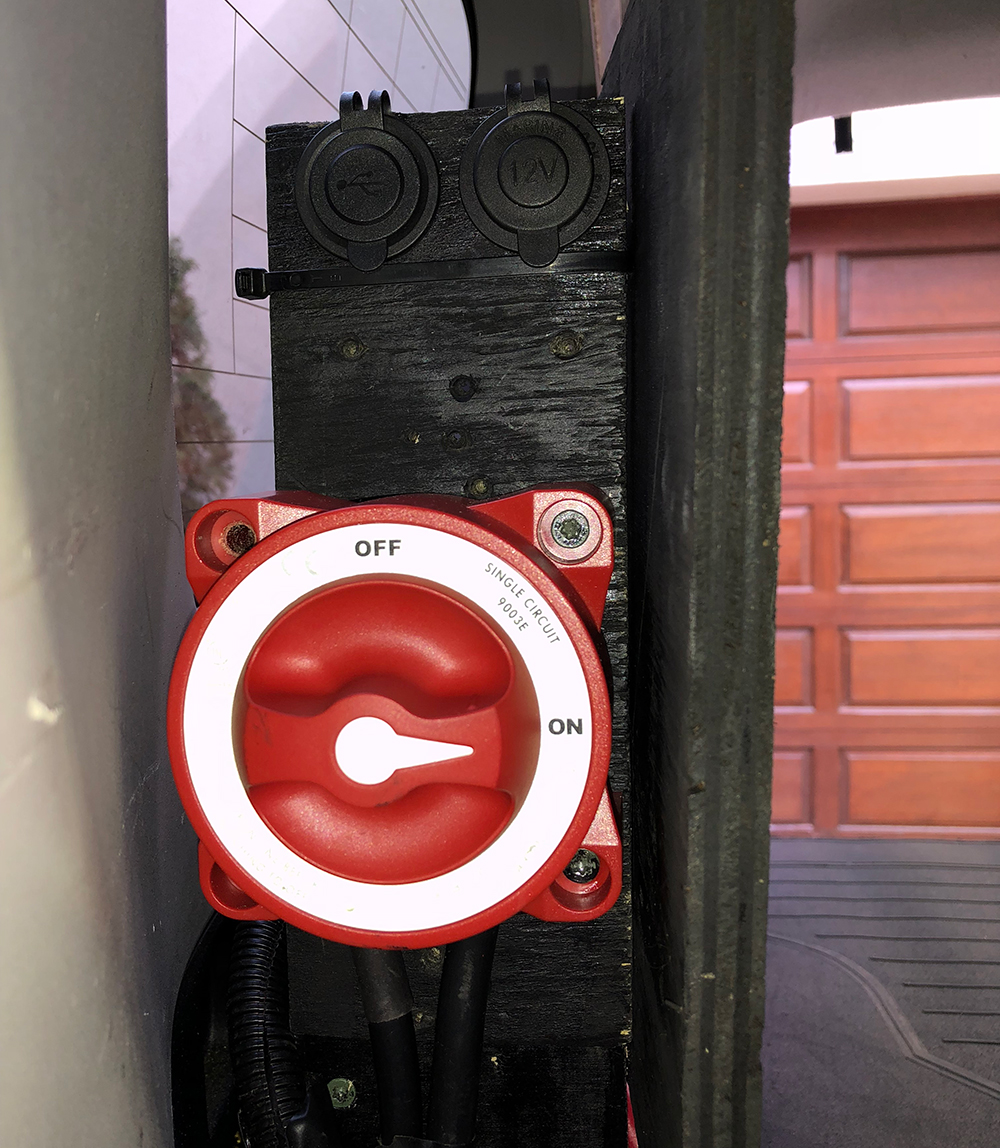
To isolate and connect all the extra stuff, I installed another mechanical switch, shown below with additional USB and 12-volt ports – sorry, the exposure is not great, but the additional ports are just above the big red switch.
The switch is on the passenger side just behind the rear passenger door. The Photo below is taken form the front of the 4Runner.
One final component I installed at this point is a 1500-watt pure sine wave inverter with its outlets pointing to the back of the 4Runner as shown below:

I don’t have a lot of data on the VertaMax inverter, so I can’t say how well it will perform. It works as advertised but I have not put any load on it yet. It had good reviews on Amazon so that’s why I picked it at the time.
As promised below is the full diagram – really a mix of hand drawings with my notes. Please check out the Ctek and Blue Sea websites for full descriptions of their products and more precise wiring diagrams.

And this leads to the last thing I would change if I were to do it again: a better plan from the start. I have to admit, most of this was trial and error. I wanted to save money, so I crimped the cable connectors myself. I made the boxes and used what spare parts I had.
I wound up overspending on some parts, overkill on other parts and I must have wired the back three different ways before I came up with the final version pictured above. Next time, I’ll plan the setup, get proper cable lengths and all cable connections specified – up front. I know all wishful thinking and I wouldn’t have had half the fun I did doing it the hard way.
Thank you for the detailed information, pulling the trigger on some of these items as we speak.
My biggest question is how did you route your cabling through the firewall? How much length did you need in the end? I was debating going under the firewall along the frame, and running up through a plug above the gas tank to insert the cables into the back there, into a bed and drawer system with all seats removed. Any routing info would be appreciated.
Hi Zachary. I toured the cables through in if the firewall grommets. I believed I used about 12 feet of heavy 2 gauge cables for both positive and ground. That may be overkill and some articles suggest you only need the positive run but I ran both. BTW there are several grommets in the firewall. I decided to go through the one under the steering wheel linkage.
I will warn you it was a tight fit and I had to try and water proof the grommet after i ran the cable. I thought about following the frame but opted for the firewall. Once in, I followed the floor runner where other cables were run.
Things to remember: if you go under you will need to make sure you shield the cable and given the distance I would go with as big a cable as possible. 12-15 feet is a long run. Going under will also require you zip tie to isolate the cable from any movement.
That all said. I think either way will work. And you may have less issues getting in the back going above the tank.
My result show minimal voltage drop but you should check it to make sure.
Hope that helps.
You have done an excellent job, Your schematic is great, easy to follow and clean! Yours was the first one referenced, and i will follow suit. One question, how was the inverter? would this system run a small refridge?
Hey Gus,
I think I may do the route underneath by the frame, and do the heat sheilding/zip ties as i used to do for Amp steps and other assorted electrical/air/fuel lines I have installed over the years on rigs at my old jobs. It also seems like it may be easier to seal that grommet above the tank and under the carpet with some RTV or flex seal of some sort.
Also, I have been having issues finding info on the output amperage of the ML-ACR (trying to figure out the reasoning for the c-Tek addition), I get that the AGM batteries require the higher charging output to last longer, but cannot find any info on actual output of the ACR. Just kinda curious how long you think a house battery may last without heavy use over a few days (mostly some string lights at night and to charge a couple phones and a speaker). Is the c-Tek something that can be added at a later time? I do have plans on adding a winch/bumper/light set up too, and would like to be ready, but also think it might be overkill as those items will be running only when the engine is running. Any thoughts?
Zach
Zach – the ACR is more of an automatic switch while the Ctek is a smart DC to DC charger. What ever voltage or amperage comes into the ML-ACR, is what goes out. The advantage of the ML-ACR is that it has a remote switch that I installed up front on the dash so that I can shut down the link in case I wanted to disconnect the batteries in an emergency or otherwise whenever I wanted the isolation. The ML-ACR also will shut down the link when the voltage on one side goes below a certain amount. One thing that I liked was that I can manually connect the batteries even if one is below a certain voltage. This may help in the event when one battery – lets say the main – is low and can get a quick charge from the other battery.
The Ctek will charge the AGM battery at the right voltage while monitoring the battery’s temperature. It will also disconnect or isolate below a certain voltage but it’s all automatic – you have no way to disconnect or connect manually.
Saying all that, I’m not sure if I would add the ML-ACR again – however, I do like the remote switch and manual override features.
My opinion : for a dual battery system, at a minimum you need some kind of isolator. There are less expensive battery isolators out there – a simple switch would work. The dual battery setup is more of an insurance policy and with some sort of isolation, you can avoid getting stuck with a dead battery. You don’t need a DC-to-DC charger but it will help charge the 2nd battery while you’re on the road. If you add a dc-to-dc later, you may want to occasionally use a wall charge on the 2nd battery to top it up with the right voltage.
How long the main battery will last on its own depends on a lot of variables. A couple of lights and charging a phone or two should not be a problem on the 1 main battery. I don’t know the draw on that stuff you mention but as a rule of thumb most cold cranking batteries should not go below 60% of their rating to prolong useful life. Add on to that some reserve amperage to actually cold crank the engine and your talking about 20% more. So If you have a 100 amp/hour battery (most 4runners have smaller main batteries) that means you have about 20 hours if you’re only drawing down 1 amp an hour. An iphone/ipad charger can draw 2 amps. You’d have to check your lights on their draw and you can do the math. I’d say you have a few hours between charges.
One thing to mention is most main batteries are cold cranking batteries not made for deep cycle draws. If you use your main a lot for lights, and other stuff it may – at worse case- shorten the life of the battery. Again for me, my dual battery setup was part insurance policy part extra power for the stuff I installed in my truck. I have an air compressor, water pump, interior/exterior lights, fans and sometimes a fridge. You could in theory run all that on the main as long as you monitor the voltage and only use them without the alternator for a relatively short time.
Sorry about the lengthy reply – now that we’re isolated ourselves, I had a lot of time to think through and write up the reply 😉
stay safe.
The lengthy, detailed replied are welcomed. This whole not working thing gives me way too much time to go over this, which is probably gonna help save me money and time in the end though.
As for the string lights and whatnot, that will be run off the house battery once reaching a dispersed site. I plan on getting 2 group 34 odyssey batteries (one starter one house) since mine has been cranking sorta slow recently anyways.
I plan on leaving the house battery with an easy access panel, so charging from the house wont be an issue once in a while, i just dont see myself investing in the c-Tek yet. Possibly if i find the house losing charge quickly, I will probably save up for that c-Tek offroad bundle.
Yea man, safe and sound here in Portland, OR. I can only spend so much time looking at the garden grow, so i decided its time to go back into debt with a new dual batt system. Where are you riding out the corona storm?
Thanks Zach – I think your setup plan sounds good …. good luck with the effort. We can all use a project or two to keep us from going nuts. I can’t tell you how many times I thought about ripping out everything I did and start over …. that all changed when I got laid off. But now I have time to plan and tweak and adjust all I want. I’m in Brooklyn NY.
regards
Gus
Found a diode fuse that is a $10 fix to up the charging voltage from the stock alternator.
Thanks – let me know how it works for you…..
Just finished up today! Thanks for the advice, and putting together the page. I think I checked your diagram more than blue seas… Ended up using almost exactly 20′ of positive cable with trying to keep clean wire lines, but now if I ever need to replace one I don’t need to take a whole nest apart.
Here’s the bed system and button placement. The bed is 4′ x 6′ on top, battery compartment halfway up on left side
Hello Gus,
When you installed the second voltmeter to the cigarette lighter port did you have to add a fuse?
Thanks.
It’s been a while so all I can say is that I don’t think I added a fuse since the Cig outlet connection had one already. It can’t hurt to add one – even if there would be a slight, if any voltage drop – but you may want to check with the Blue Sea folks to see if they recommend one or not.
Hello hello,
I’m wondering when you installed the second volt meter to monitor the start battery did you splice the cigarette lighter wire or is there a spade conncector splitter that will work? Also, where did you ground it to?
Thanks.
Sorry. Just took a look at your question again and realized I didn’t answer your question. I spliced the cable for power soldered the wires back up.
Regards
Gus
Yes, there was a 12v cigaret outlet right there and I used it. I also used the same ground the outlet used. I don’t recall if it was a local screw or something else but it was pretty simple from what I recall.
Hope that helps.
Best regards
Gus
Sensei,
Great set-up, congrats.
I wanted to ask you, what did you use to mount the battery and the chargers? How did you secure it to the truck?
Is there some battery box you have made or bought? The Australians sell battery boxes with chargers and connectors already made. Have you seen those?
Thanx.
Thanks Mbanu!
Yes, I saw the ready made, all in 1 boxes – I think National Luna sells one. A good choice, but I wanted
a different setup and I wanted to hide the battery behind the back seats so I made a box for the battery and bolted the box to the floor system of the 4Runner behind my drawers. I screwed the chargers and bus bar to the outside of the box.
hope that helps!
regards
Gus
Hey Sensi, its been a while since ive sent you a message.
Well i have done the circuit and i didnt place the DC To DC charger, and it was right that if i left it like that the battery will die gradually.
to a point my battery went down to 0 volts, so i have purchased an external charger from BOSCH so i can use it also on other cars till my remote system stopped to operate XD got BLUE Sea to send me a new ACR system with its switch but i got this message from them when i asked them about the DC to DC charger.
“For the DC to DC charger, you can’t use them in series (in line) with an ACR. The ACR has to see battery voltage on both sides to function, and if you put a dc to dc charger between the ACR and one battery then the ACR won’t see that battery.
You should either use an ACR or a Dc to DC charger, but not both.”
what do you think?
Hi Amjed! – Great question and it’s at the heart of how and why I set up my system. First off, I talked with the Blue sea folks as well when I first setup my system. I got a few different answers depending on who I talked to. They are right – in their world the ACR has to see voltage on both sides to work in an automated mode. The C-Tech will provide a voltage for the ACR to see since that is how it works in my set up. I have the C-tech closer to the house battery with the ACR as the main switch to the main battery. The ACR and C-tech work in series and have not had any issues.
As for how and why – I had to solve for two items: Charging the AGM house battery and isolating the main from everything other than starting the 4Runner. The ACR does a perfect job of isolation and I monitor it in the cab via the switch. I can leave it on automatic or manually set it as required. However, it doesn’t do anything about how the AGM house battery is charged. The C-Tech does a great job of charging the AGM battery and in an automatic way does isolate the batteries. The problem with the C-tech is you have to look at the C-tech to tell if it’s isolated and there is no remote switch to shut off, isolate the house battery and things attached to it form the main. The ACR’s remote switch just works for me.
The way I use the system is with prioritizing the isolation of the Main battery. On and daily basis, I keep the ACR off most of the time and turn it on only of I’m going on a long ride or if I plan to use the House battery and the stuff attached to it (lights, ham radio, etc). I also have a big re switch to fully isolate it all but now I know that was overkill.
I hope that helps and good luck with your project.
regards
Gus
Does the 5th Gen have a smart alternator? Did you have to run a line from the C-tek to the ignition switch? Thanks.
Hi Colin! I think the alternator is “smart” in that it regulates the voltage supplied to the batteries but I don’t think it “understands” the demands of an AGM battery and that’s why I installed the DC-to-dc charger for the house battery. I set up my dual battery system to be totally isolated from one another and that’s why I have some of the physical switches in between the batteries. I keeping that them of separation going, I have all the power and control connections of all the house components on the house side. Nothing goes to the ignition switch.
hope that helps!
regards
Gus
Hey Amjed…
The CTEK offers DC to DC charging and at a voltage optimized for my AGM battery. From what I’ve gathered AGM batteries benefit from a higher charging voltage and the CTEK manages the charging process much like a wall charger. As long as you occasionally attach some sort of smart charger to the house battery you should be fine.
Regards
Gus
Hi Amjed!
There are a few good quality alternatives to the CTEK I Installed. In my set up I went a little overboard with both the Blue Sea ML and the CTEK. I think the CTEK alone would have sufficed. Don’t forget the CTEK has an MTTP, a DC to DC charger and also seperates the batteries when the voltage is right. The only point the Blue Sea offered was a way for me to use the house battery to jump the main (plus the isolation and remote switch that I use all the time). The newer version of the CTEK that I mentioned in the article, I believe will allow more current to flow to jump the main.
As for brands, Redarc is very popular in the overland world right now with National Luna still around. The folks at Equipt1 are very helpful and sell National Luna.
The lower panel was a Blue Sea below deck outlet which happened to fit with a little trimming and sealant. All I had to was drill holes in the existing plastic panel,to pass the wires. I pressed it in place and it’s still good to go.
Hope that helps. Let me know if you want bounce ideas around. Good luck with your build….
Regards
Gus
Dear Gus,
thanks for the clarification, however, i do believe that the Blue Sea ML does the job in keeping the batteries isolated, for instance, according to your circuit, if I would require the battery to be enabled and felt that there is a drop in the circuit, keeping the switch on Auto mode will get the batteries charged.
frankly speaking, i wouldn’t need a solar charger XD, since now there are many alternatives for solar systems that are portable and can be used separately.
Do you think if i removed the CTEK charger will do the job?
Heya Gus,
I am about to start with the project, but i was wondering about the CTEK unit, do you think there is an alternative for it, like for instance a Normal MTTP Charger ??
also for the lower panel unit, how did you install it (mount it)?
Hi Rogelio!. Yes when the car is running and the ML-ACR engaged both batteries are being charged by the alternator with the ctek supplying the proper voltage.
regards
Gus
Hi, so with this setup is your house battery being charged by the alternator and the Ctek DC DC charger at the same time?
Sorry .. typo error above 25MM
Thanks Amjed…..I agree, bigger is always better. When I started working on the dual battery setup, I started with a set of 2gauge 24 foot winch extension cables from Rough Country. They came with Anderson connectors and terminal crimps so even though I cut the cables, I was able to re-use those ends. The cables had good reviews on Amazon with folks using them to power up large winches and accessories on their trailers at the full length. Also, my longest run is less than 11 feet. I did a little research on the web and found a site called wirebarn.com that offered a wire size calculator. For 300 amps, with a 5% voltage drop, the calculator showed a maximum cable length of almost 15 feet with a 2 gauge cable. Lastly, my main purpose is to provide charging current to the battery, front to back. Even though I think I can use it to jump start the main or to help with a heavy winch job, I have never used it for that purpose and would do so very rarely. If I had to do it all over again, I’m not sure that I would change the choices I made given the pros and cons of going bigger. Taking your advice though, I will use extra caution in the very rare event I ever have to use a high amp application.
thanks!
Heya Gus! thanks for the info!
I don’t believe the 2 AWG cables will be enough for the 300 Amps Loads on the long run, they should be above 250MM cables. Even if the fuses are 300Amps you will require cables that can handle above 300 Amps.
try to change the cables which are based for load purposes.
Eng. Amjed
Heya! i just wanted to ask you why did you use a 300A fuse? , isn’t it pretty high for such a system?
Also could you please share more pictures of where you have installed the system if there is an updated pics of it?
i have ordered the parts and waiting for them to arrive soon
Hi Amjed! I used a 300 amp fuse in case I ever wanted to use the auxiliary battery to help jump the main or to help in case I have to use the auxiliary to assist with a heavy winch load. I don’t think that either will be a highly likely case but I didn’t see the down side to going with a 300 amp fuse (originally I was going to install a 400 amp fuse, but could find a good setup for that).
The set up is still the same – I cleaned up the cables with zip ties to keep them better secured, but the overall design is the same and hasn’t changed.
Hope that helps and let me know if you have any questions on the setup.
best regards
Gus
Hi Aaron! I don’t have plans to add an SPOD at this point. I have one set of LEDs on the front bumper with a switch installed already and the Winch is always connected. Lights and the compressor in the Back have local switches. So with all that, I don’t thing I have a need until I expand the system or add a trailer. Short answer, no.
Best regards
Gus
Will you still use an SPOD with the dual battery?