
Complete Overview and Installation of 5th Gen 4Runner HID Headlight Bulbs
These headlights are bright. Incredibly bright. We have the Xenon Depot LED low beam and high beam headlights now and these headlights are much brighter. But, all HID headlights are supposed to produce more light output than LEDs, so we are not surprised.
Before making the choice to upgrade to these bulbs, please read this overview on HID bulbs and HID retrofits. This will give you a much better idea of HIDs, LEDs and which lights are best for certain applications.
For me, I really like the look of these HIDs compared to LEDs. The light output is much brighter and covers a better wide angle as well.
These specific bulbs also have a very straight beam pattern which is very similar to the Xenon Depot LEDs that we are running right now, but they are just brighter.
How much are these HIDs?

Affordable. These might be the lowest priced and highest-quality light output headlights. Coming in at under $80 for a set, there is no reason why you can’t run these bulbs. Most other headlight kits come in at over $150+ and sometimes $200+.
This bulb is obviously not the highest-quality you can go with, but if you are ballin’ on a budget, these are less than $80 and lights kick ass for the money.
Jimmy at Snail Trail 4×4 and I were seriously impressed with these bulbs over the LEDs.
Overview on the Kensun Headlight Bulbs
Most 4Runners are compatible with this low beam kit, however, there are variations of each make and model. Please check and confirm that this kit will work on your model or if you need to make any modifications in order to run this low beam kit. As a disclaimer, the low beam HID bulb produces an incredibly high-voltage electrical gas discharge and is much more powerful than all the other headlights we have covered.
Installation by an experienced mechanic or person with general automotive installation experience is recommended. Be sure to professionally consult a technician for this installation as faulty or insecure installation can result in problems and or shock. This installation process is a little more advanced than LEDs, but not by much.
As always before installing a set of headlights please let your engine cool down completely before starting the install process of the low beam bulb.
Don’t Touch the HID bulb
Avoid unnecessary and rough handling of the bulbs. Throughout the process, just make sure not to touch the low beam HID bulb. It is always recommended to wear gloves while installing the low beam HID bulb.
Touching the bulbs with bare fingers may cause oil spots. If the bulbs are not clean you may wipe the bulbs with a dry cloth or rubbing alcohol, however, do not immerse or soak the bulbs in any liquid. DRL‘s or daytime running lights alarm lights and auto headlights should also be turned off before your installation.
Overview of the Installation
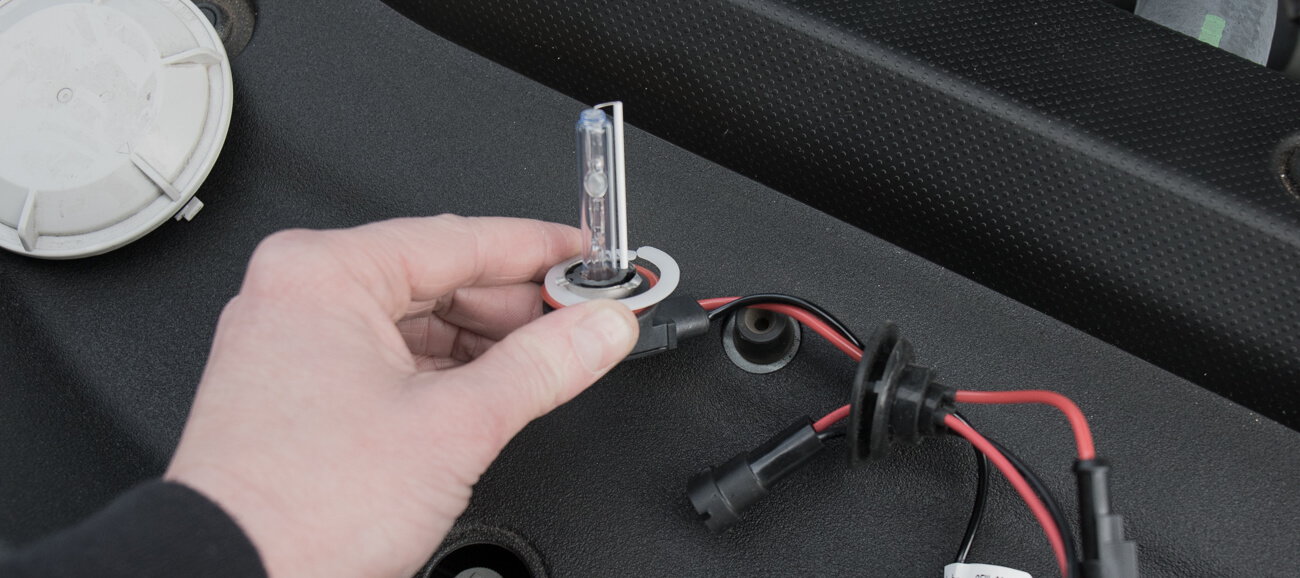
The Kensun low beam HID bulbs come well packed so they don’t get damaged while shipping. All the protective packaging should be removed prior to the installation process. There is a small plastic housing covering the HID bulbs so you need to be careful not to hit the vacuum tube while removing this plastic cover.
There is also a plastic ring at the bottom of the bulbs which you will need to remove as well. After you remove this plastic ring you will then replace the red rubber grommet at the bottom of the bulb.
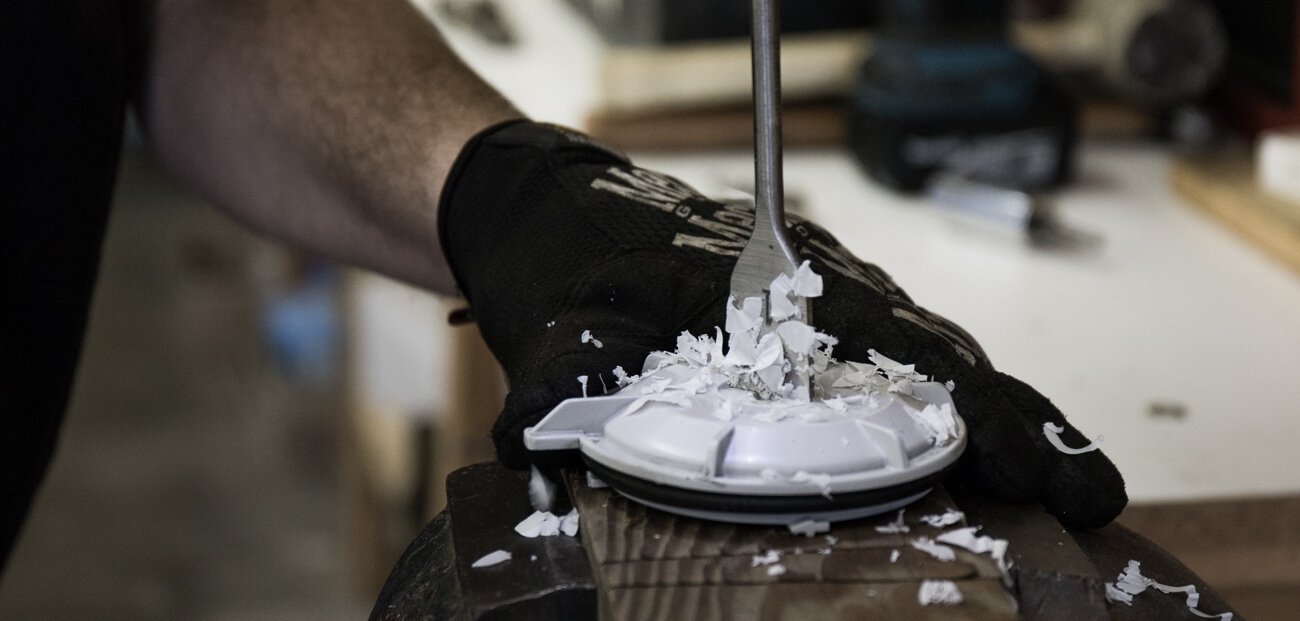
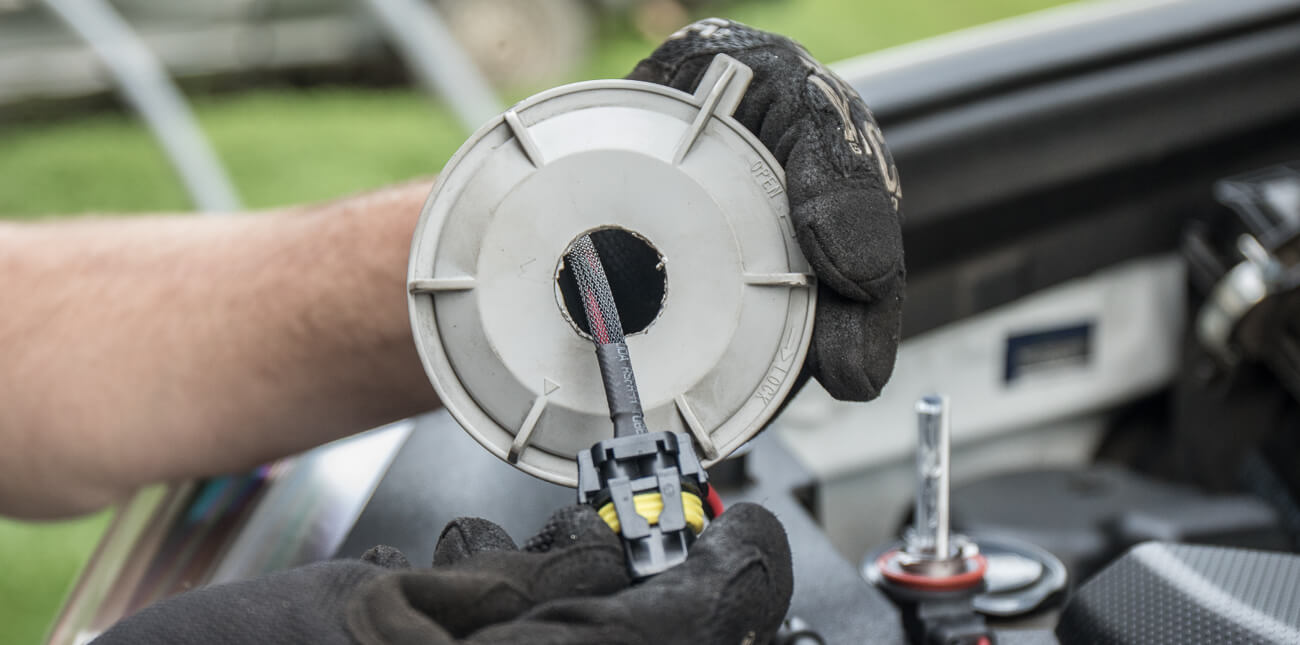
For the actual install process, you want to start by opening the hood and removing your dust caps which are covering the housing for your low beams. After you have the dust caps removed you will need to drill a 1″ hole in the center of your dust cap out. The rubber grommet that is secured to the bulb will fit into this 1″ hole. After you have the 1″ hole cut into your dust cap you will then need to feed the headlight bulb wiring through this hole.
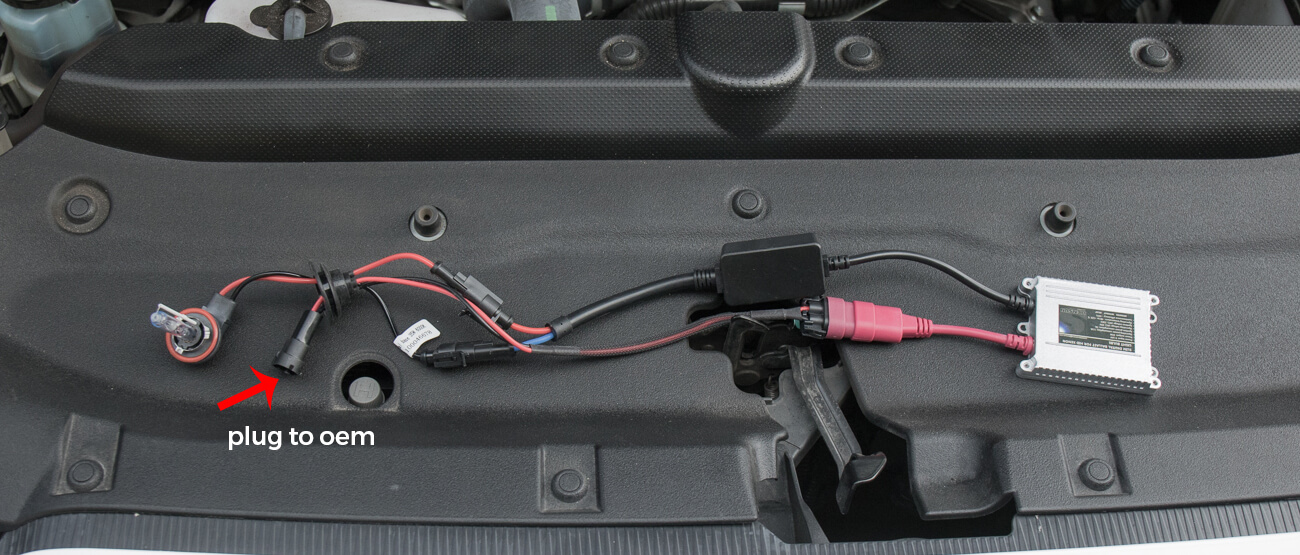
After you wire up your low beam bulbs, you will then need to mount your ballasts with the provided brackets. You want to find a secure place on the firewall of your 4Runner to mount the bracket and ballasts. After the bracket ballasts are mounted you can then zip tie the remaining wires together in order to clean things up.
Brief warnings on the low beam bulbs
- Do not disassemble or modify the ballasts
- Do not disassemble or modify the wiring harness
- Do not touch the lightbulbs until after they have cooled off
- Keep the system and all components away from paper cloth or anything flammable
- Be certain that your 4Runner is started before turning the headlights on. These headlights are incredibly powerful and will drain your battery pretty quick if left on without the car running
- Do not position the lightbulbs in an upward direction or at on coming Drivers
- You will want to adjust your headlights. You should angle your lights down so they are not blinding oncoming traffic (we will touch on this later on the page).
- For any repairs or replacements console a technician or just return the product
HIDs and polarity
Before we get started, you may need to reverse the polarity on one or maybe both of your lights. This is very simple. We will do another full post on this topic, but for now, just understand how the process works in short. In each bulb, you have a positive and negative. To reverse polarity, just means you swap the positive and negative in the housing and plug it back in.
If you need to reverse the polarity on your lights, just use a small screwdriver and pop both connections. Once you have the housing off, just flip the wires and then put it right back on. This will reverse the connection on your HIDs.
This might be only difficult part of the install. But the whole process including the reversing of polarity is pretty simple.
Mounting Ballasts
You will need additional hardware if you want to mount your ballasts to the firewall. You can use hardware or heavy duty double sided 3M. Either way, you will need something. Heavy duty double sided 3M is obviously going to be cheaper.
The HID Bulbs
- The bulbs for our 4Runner: Check Today’s Price
- Relay Harness not Needed
- Self-tapping screws
- Zip Ties always help
- Optional: Threading key
- Optional: Double Sided 3M
Snail Trail 4×4 Video Install
Step #1 – Remove Dust Cap

Step #2 – Remove Bulb

Step #3 – Remove Cap and Ring on Bulb
Step #4 – Adjust Rubber Seal Ring

Step #5 – Wire System to Ballasts
Step #6 – Drill 1″ Hole in Dust Cap

Step #7 – Feed Wiring Harness
Step #8 – Adjust Rubber Grommet

Step #9 – Inside of 4Runner Dust Cap

Step #10 – Plug-In Bulbs & OEM Connection

Step #11 – Test Bulbs

Step #12 – Find Somewhere to Mount your Ballasts

Step #13 – Remove Air Injection Pump

Step #14 – Mount Bracket on Ballast

Step #15 – Mark Your Location

Step #16A – Drill Hole in Firewall (May need to Thread out)

Step #16B – Threading Firewall

Step #17 – Mount Ballast

Step #18 – Zip Tie Loose Wire

Step #19 – Reinstall Air Injection Pump

Driver Side:
- Remove Battery
- Repeat the Same Process as above
- This process is the exact same on the driver side.
- For more information on driver side watch the video on this page.
Aligning and Adjusting your Low Beams
DOT requirements are very strict these days on exactly how bright your headlights can be. This is a general guide on how to adjust the headlights and fitment of your headlight beam pattern on your forerunner. We recommend you see an expert for aiming your low beams, but this should suffice. We also wrote another post on aiming your headlights. You might want to check that one out as well.
- Park your car on level surface 25 From the wall
- Remove the trim around the headlights and locate the adjusting screws on your 4Runner.
- Headlight adjustment screws are typically found adjacent to the headlight, there should be one screw at the top of the headlight to adjust vertically and another screw to one side the headlight to adjust horizontally. And some cars there may be adjusting bolts rather than screws.
- Use a screwdriver or socket to adjust the screws or bolts on your 4Runner headlight housing
- Turn screw or bolt clockwise to raise the headlight and counterclockwise to lower the headlight. Turn the side screws or bolts to move the headlight left or right
- You want your headlights to be 38 inches to 40 inches above the ground at 25 feet away. This means your headlights hitting the wall must be 48 inches from the ground. The beam pattern cut-off line should be completely flat at 40 inches above the ground on the wall.
I love the light output on these. Much more light than stock. The option to choose a warm light color temperature (I chose 4k) is easier on the eyes and there’s less perception of glare compared to my roommate’s 5500k LEDs. These bulbs also provide a wider spread of light than stock.
That said, I found installation tedious:
First off, love the site, insanely helpful and it’s all centrally located. Really beats trolling forums.
Second, the link for the product used on this page is 404’d.
Awesome, fixed. Thanks!
Great share! Was super helpful in doing my novice install. I ended up purchasing the 5th gen HID kit from Zenon Depot which made it all the more easy. Really happy to get rid of the absurdly dim lit OEM bulbs.
I’m having an issue with my headlights constantly flickering after installing these. Any suggestions? I have a 2016 trd pro.
I went to amazon to check them out and amazon hits me with a pop up saying these dont fit my make and 2016 4runner trail.
Check the link again. It looks like the link was broken/ wrong link.
How do you know if you need to reverse the polarity of the lights? Looking to make this upgrade soon and I don’t want to leave any steps out!
Thanks in advance.
Tim,
You will find out once you turn your lights on and test everything. You want to install the lights on one side and test. If they do not turn on, then you will need to reverse the polarity. If they do not turn on a second time, then you have a bad bulb. Repeat this step on both sides.