
CougarMotors All-In-One Low Beam H11 LED Conversion Kit – Affordable Amazon LED Headlight Option
These CougarMotors LED Headlight All-In-One low beam H11 conversion kits are a fantastic option for your 5th Gen 4Runner.
These LED low beams offer an easy install process, don’t require any drilling of the dust caps, and have cooling fans that fit nicely in the headlight module behind the dust caps.
These low beams have a 6000k bright cool white output and shine much brighter than the stock bulbs. They are 60w a piece each with a 10,000 RPM cooling fan to ensure a long life.
LED and HID both offer unique options and I decided to go with LED for a couple of reasons. First, one of the major reasons was that I didn’t want to drill the weather caps.
Affordable Option:
- Low Beams (H11): Check Price
- Fog Lights (H16): Check Price
Higher Quality Option (Xenon Depot):
CougarMotors LED Headlight All-In-One low beam H11

These protect the headlight assemblies from moisture and dirt, which is extremely common where I live in New England, as well as off-roading. The second reason I chose the LED headlights was that they don’t require a large ballast to be mounted on the inside of my engine bay.
Finally, these headlights are plug-and-play and are compatible with the vehicle I’ve heard horror stories of the ballast falling loosely into the motor and causing damage to a 4Runner.
Mounted properly, HID is a great option, however, for a quick install and significant difference, I thought LED was the way to go! If you are looking to go with the LED fog lights as well, check out the fog light install and the BajaDesigns Squadron-R Pros as well.
Here are some of the other options:
- Xenon Depot Xtreme: $124.99 (5500k at 1750 lumens)
- Diode Dynamic SL1 LEDs: $150.00
- LightWerkz XTE-2: $70.00
- See more options here
Note: I recommend completing the installation on the passenger side in full before moving on to the driver side. The passenger side has more room to work and will help you understand more about the process of installation.
STEP #1: REMOVE DUST/WEATHER CAP
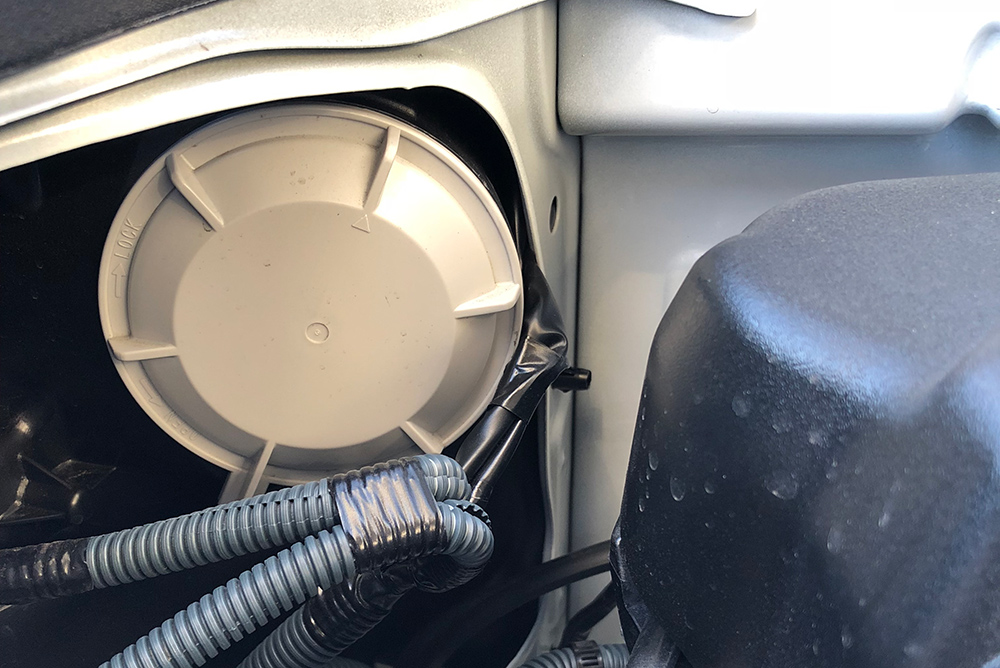

The low beams in the 5th Gen are protected by a gray weather/dust cap to ensure the headlight assembly is not exposed to dust or moisture/water. Use your hand to remove the OEM dust/weather cap on the passenger side.
Rotate the gray cap counterclockwise and pull it forward to expose the low-beam headlight. These OEM caps are somewhat tight from the factory, so it might take a little elbow grease to remove them. Once you’ve removed the OEM dust cap on the passenger side, I recommend placing it on a towel or rag on the inside of the passenger side floor or seat so you don’t lose it.
DRIVER-SIDE HEADLIGHT CAP

The removal on the driver’s side is a little bit more difficult due to the battery, which limits the amount of space you have to move your hand. The OEM cap is removed the same as the passenger side, by using your hand to twist counterclockwise and pull the dust cap off. Store it on a towel inside the vehicle for safekeeping.
STEP #2: REMOVE OEM LOW BEAM BULB
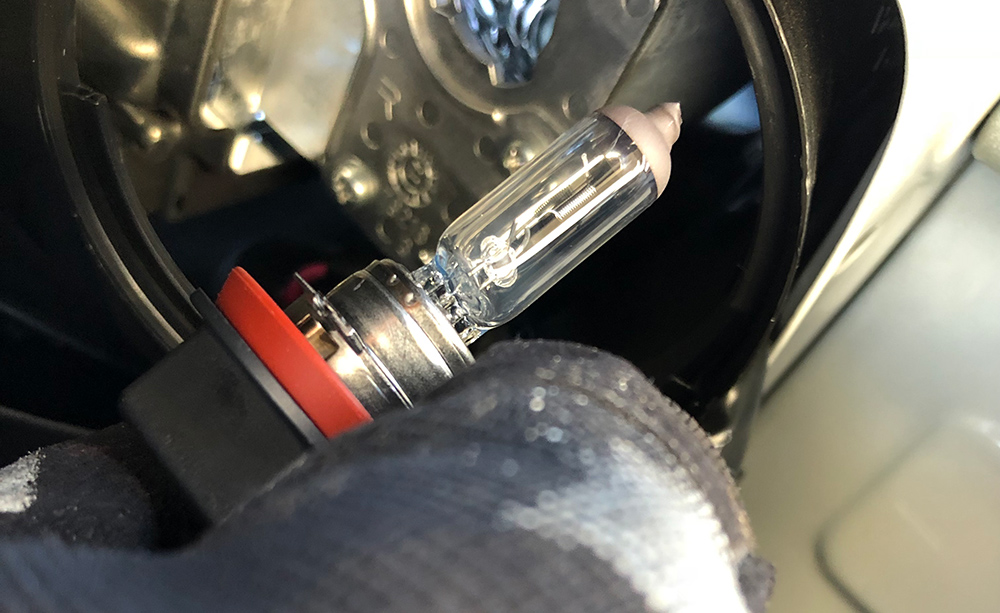
After the OEM dust/weather caps are removed, it will expose the OEM low beam bulb. To remove the OEM low beam bulb use your hand to turn the bulb, loosening it from it’s secure spot in the headlight, and pull the bulb out. Try not to bump the original bulb on anything to prevent scratching.
After the bulb is out, use your other hand to disconnect the power cable connected to the bulb. These are secured with a clip and are easily removable. After you remove the original bulbs, place them on a towel in the vehicle.
If your vehicle is still under warranty like mine, I recommend using gloves and saving the original bulbs just in case you need to have warranty work completed on another part of the headlight in the future.
After removing the OEM low beam bulbs and disconnecting the power cable, you are ready to install the new bulbs.
STEP #3: INSTALL NEW LED BULB


The new LED conversion kit assembly has your bulb with a cooling fan as well as a driver attached to it. On the end, you have the connector where the OEM headlight power cable will plug in.
The bulbs are not specific to the passenger or driver side of the car, so simply choose one bulb to start your installation. When installing the new LED bulb, carefully place the bulb inside the assembly. Line up the 3 notches with the assembly and ensure that the bottom of the LED (where the cable comes out) is in the same position as the original headlight bulbs.
After lining up the notches, press the bulb in and twist it toward the center of the vehicle to lock the bulb in place. Don’t worry about space for the drive yet, as we’ll cover that in the next step. Simply ensure that the bulbs are secured properly in the assembly. After securing the bulbs, connect the LED bulb connector to the vehicle’s headlight power cable.
Make sure you test each side after installing to ensure that the bulb illuminates brightly and there are no connectivity issues. This will prevent any additional backtracking and work if the bulbs don’t illuminate. If the bulb does not illuminate, check your connections to ensure the power cable is securely clipped into the new LED connector. Also, ensure that the driver is connected securely to the LED bulb.
STEP #4: CABLE MANAGEMENT

Cable management is important to ensure that everything fits behind the OEM dust caps properly. Zip tie the wires together neatly and tuck them down behind headlight. Try to ensure the wires are not directly against the LED bulb/fan or the headlight assembly to prevent any unexpected melting.
STEP #5: REPLACE OEM DUST CAPS

The final step in the installation is replacing the OEM dust/weather caps. Press the cap with the tab horizontally to the center of the vehicle then turn it clockwise to securely lock it in place. Enjoy a brightly lit world as you go explore with your new LED low-beam headlights!
I just installed these and had the same fitment issues when installing the low beams. I did use the OEM o-rings as they are shorter than what comes with the kit. I also heat treated them with a heat gun for about 20 seconds just prior to finally installing in the hopes that they were squishier and press in easier. I took a Dremel to the heat sink fans to clear the fitment issue mentioned earlier. However, the 3 fins still felt too thick to clear. So, I used a set of pliers to clasp around the entire heatsink / fan housing, and with inward pressure was able to finally twist. Hi beams installed no problem.
I just answered my own question 🙂 after completing the install on my baby.
Yellow is the stock low beam.
I noticed that in the final photo, the light is amber. Was this included in the kit?
These LEDs do not fit a 2016 Limited 4Runner due to the bulbs heat sink/fan shroud. Its too big and prevents twisting the bulb in place.
Anyone tried this on a 2013? Headlight assembly seems to have a different layout (no dust cap, bulb faces different direction, less room to insert bulb, may require headlight assembly to be removed). Thanks!
I see that low beams and high beams are always referenced separately whenever I research upgrading my headlights to LED.
I’ve never installed LED before. I’m used to only one bulb. Do LEDs require one bulb for low, and one bulb for high? If so… how do I install High?
Ashley, they are both similar but both require different bulbs. The low beam is an H11 and the high beam is 9005. Here is a good post that demonstrates the installation of both.
Sorry for the delay reporting back….. The RXMENT H11 Bulbs mentioned above fit with no issues! it’s kind of hard to determine the brightness level inside the projector, it changes depending on the angle and distance you view them at. They are nice and white though and not yellow anymore. I hear you Johnathan, I was a little pissed also since my choice to purchase all the Cougar Motor Bulbs was based on the recommendations I read on here. I am not in agreement with some of the other people on here that modify the fan housing on the Cougar Bulbs so they fit, you start messing with the operation of that fan and I think your asking for trouble. I also just added the Baja Design Squadron Sport Fog Lights and they are F-ing Bad Ass!! These in combination with the RXMENT Bulbs are super bright! Been running this set up for a week and have not been flashed once. Very happy with the set up I have right now but will be looking into changing the Low Beams to HID’s.
Yep fitment is an issue so far and im kinda pissed, tried 3 different brands and none of them twist. I have LED’s in all other places and i run LED’s in all of my cars. Any specific brand to look for?
Xenon Depot has been my LED of choice so far. Diode Dynamics is also an option that seems to work for a bunch of guys in the community.
The Cougar Motor H11 LED Bulbs DO NOT FIT the 2018 TRD PRO 4Runner….. The housing surrounding the fan is to big to get the bulbs in all the way and be able to twist them. After trying to make them fit on the passenger side, I didn’t even attempt the driver side. I returned them to Amazon and ordered the RXMENT H11 Bulbs. They are a little more expensive but have more lumens (9,600 compared to the Cougar Motor 7,200) and the base is the same dimension as the twist part of the bulb. haven’t received them yet but will report back after I receive them and install.
David, did the new ones work for your 18 TRD Pro?
I also found the bulbs hard to twist into place and ended up using a Stanley knife to remove less than 1mm from each of the three teeth (fan side, not bulb side). This was enough to allow me to lock them in place whilst keeping them tight. I wasn’t aware of the fins hitting the housing.
My are not as bright as I need them any ideas
Buy a set of Xenon Depots.
The reason you are having a tough time installing the bulbs is that the fan motor on the end of the bulb is hitting on the housing of your headlamp at the top. At least that is what I found installing mine – I simply took my dremel tool and lightly ground the top of the bezel where the LED motor was hitting – now the lamps go in. On another note – Most of the LED lamps with the fan motors require some type of open air movement to keep the motors from pre-maturely overheating and failing. They suggest to cut a hole roughly 1.75 in in the back of the dust caps. I am experimenting with a rubber boot configuration – where I simply cut a hole in the dust cap and then glue the rubber boot on the dust cap from the inside. This will give more area for the fan to circulate air and keep cool while at the same time keeping out water and debris.
I am also looking into mounting the ballast outside of the headlamp capsule as this to me seems set up to fail from heat if you tuck the wires inside of the housing.
Thank s
I am having that same issue of hitting the bar on the headlight housing but only on the passenger side. I’m going to file down the bulb a little more this afternoon to see if I can get it to lock in.
Had an issue with the bulbs not locking in. Seems the teeth (no better explanation for this) around the base of the bulb to lock them are too thick. Tried filing them down.
They fit in the slot, but I’m not able to twist into a locked position.
I have a 2019 and experiencing the same thing with GTR Ultra Series lighting. The High Beams when in easy but low beam LED did not. May have to send back and go HID. Their LED reverse and interior bulbs are crazy bright…interior a little too much in fact. Reverse is awesome.
Marcello,
You really have to push the bulb in pretty hard. We had a pretty tough time getting them in as well. Did you try taking your battery out to free up space?
Hey Minh,
Honestly I had no issues with excessive heat even behind the dust cover. As long as you cable manage properly and tuck them down, you should be fine. They also have cooling fans on them, to keep them from producing insane amounts of heat. Dust caps, even after I checked them, were good go.
I ended up swapping them for Xenon Depot LEDs after I was able to save up a bit more money. Little bit brighter, but had to drill the dust caps. Check out the other install for Xenon Depot LEDs.
Good luck!
– John @theblizzard4r
any problems with the bulbs so far? im just worried about placing the dust cover back on and having the heat from the bulbs trapped inside the headlight causing something to melt or moister build up. thanks in advance.
Thanks for publishing my install Brenan! It’s been awesome to get this information out to the 4Runner community! Love it.
Instagram: @TheBlizzard4R
John,
No worries man, keep them coming!