
The Sports are an excellent choice for upgrading your fog lights. While there are other options like Xenon Depot, The Retrofit Source, and Rigid Industries, the Baja Designs Sports stand out for their balance of price and quality.
Designed specifically for off-road use, these lights are exceptionally powerful and reliable in any condition. For a more affordable yet effective LED bulb, consider the H16 bulbs.
For this upgrade, I chose the Baja Designs Sports. They are available in black or white face options with the choice of amber lighting, priced between $119 and $129.
It’s worth noting that these are not the higher-end Squadron-R Pro models ($219-$400+). While both fit the 5th Gen fog assembly, the Squadron-R Pros feature a round bezel that offers a sleeker look.
Find Them Online:
- Squadron-R Sport (specific kit for 5th Gen): Check Price
The Diode Dynamics are about 50% cheaper than the Baja Squadrons and are SAE (street-legal) compliant.
Sport vs. Pro
- Sports: 1800 lumens, sufficient for most needs, with a reach of about 300 feet.
- Pros: 4900 lumens, offering significantly more light and a reach of about 500 feet for improved visibility.
Light Patterns Offered by Baja Designs
- Driving/Combo: The most versatile option, combining wide cornering lights with spotlights for smooth coverage in both near and far applications.
- Wide Cornering: Designed for cornering, dust, or fog conditions, this pattern provides a 42° flattened horizontal beam for enhanced comfort lighting.
- Spot: A narrow 9° beam focused for long-distance illumination, best paired with wide driving or driving/combo lights.
- Flood: Ideal for work or “scene” lighting with a 60° smooth circle projecting up to 60 feet, but not suitable for driving.
Table Of Contents
Installation Video
1. Tools

Get all your equipment, everything you see in this photo is what I used to install the Baja Squadron Sport LED Lights.
- Flashlight, (I used one of the pods from my ReadyLight)
- Hex key set
- Phillips Screwdriver
- 10mm Socket and Ratchet
- Baja Design Kit (Compatible with Sport or Pro)
2. Removing Driver Side Fog Light

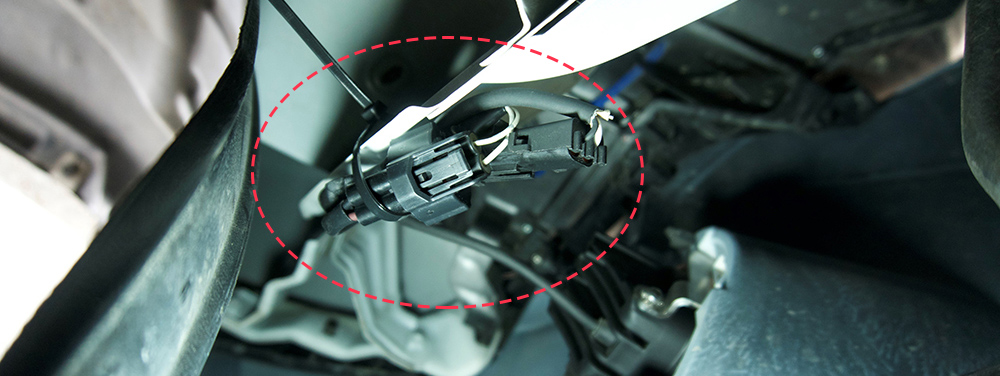
To remove the driver side stock fog light you don’t need to do much. Just lay underneath the driver side front bumper and use your flashlight to illuminate the area where the stock fog light sits.
After locating the fog light, you will need to remove two (2) philips head screws that are located to the left of the fog light. This area is a bit tight to fight a camera though so I did my best to capture a photo of the location of the screws. You will only need to remove these two screws.
3. Disconnect Wiring Harness

Once the fog light is removed, disconnect the wiring harness. This process is easy and no need to cut or use a new harness to install the Baja Squadron Sport LED Lights.
4. Wiring the Lights

Wiring the Baja Squadron Sport LED Lights is pretty easy once you’ve figured out where everything goes, the main key is to remember black is always negative and make sure it stays that way throughout this install.
The good thing about the wire harness that Baja gives you is that it’s a direct fit to the stock harness.
As you can see, it fits perfectly. Just make sure you match the black wire on the stock Toyota 4Runner harness to the black wire on the BD Harness.

Next, connect the adaptor to the Baja Squadron Lights first before connecting the Squads to the 4runner harness.

5. Mounting Light Brackets
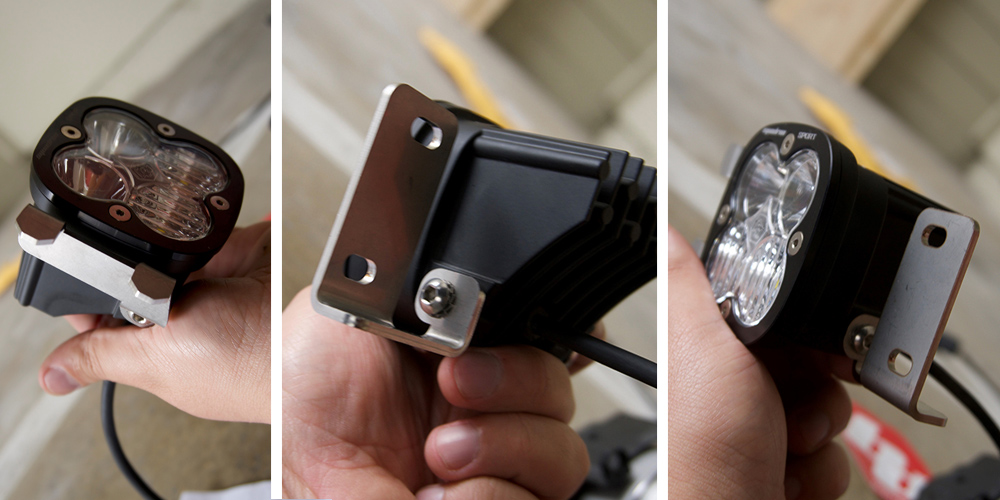
The diagram on the Baja Squadron Lights Installation guide doesn’t really explain much. Here are some actual photos of the mounting brackets to help you get a visual of how they are supposed to be installed. These Baja Squadron Light Brackets are off the driver side.
6. Installing the Lights


After you get your Baja Squadron Mounting Brackets on, you can start guiding the Squadron under the bumper and into the fog light slot.
If your vehicle is lifted it can be a bit of a hassle to get the fog light to stay in place while you install the two(2) Philips screws back on, but once you get one screw in, it gets easier.
Install Baja Squadron Wire Harness to the OEM Harness

At this point, you can install the Baja Squadron Sport LED Light wire harness to the stock 5th Gen 4Runner harness. Once you are done connecting the wire harnesses to the bracket you can go check your connections by turning on your headlights (low-beam) and switch your fog lights to see if your installation was successful.
ZipTie Baja Squadron Light Loose Wire
If your connections were successful and everything is working, turn your 4Runner off and take the keys out of the ignition. Jump back down below and tighten all your loose wiring up. You can use a zip-tie like I have to secure any access wires.
7. Passenger Side

Moving on to the passenger side Fog Light. This one is a little different to get to. You will need to remove a 10mm bolt which is shown. Once that bolt is removed you can pull the splash guard downward towards the ground to gain better access to the passenger side fog light.
Removing Additional Splash Guard

After pulling the splash guard out of the way you will notice that the passenger side fog light has an additional splashguard making it difficult to get to the two Philips screws. you will have to use a small flat head screwdriver to pry it out.

This by far was the hardest thing to do, though keep in mind you won’t be able to reinstall that splashguard once you install the Baja Squadrons because of the different style mounting brackets so don’t stress about damaging this splashguard, just make sure you install your wire harnesses on snug.
Install Light

Remove the two Philips screws and install the passenger Baja Squadron Sport LED Light just as you did on the driver side.
Reconnect Passenger Light Harness

Reconnect the wiring harness like you did for the driver side of the 4Runner, and if you’d like you can add another zip tie to secure the access wiring.
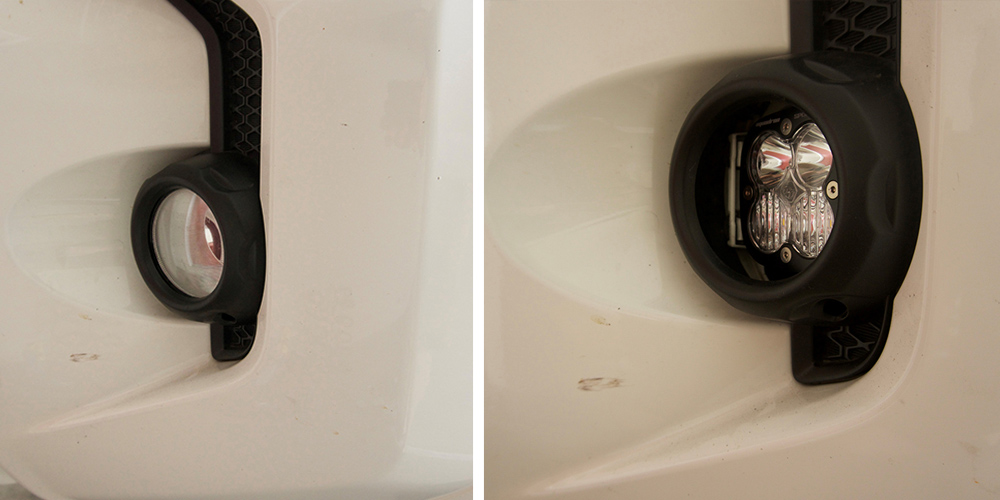
Before & After
At this point, you are done
Go ahead and store your two stock lights and passenger side splash guard. Remember these are the Baja Squadron Sports without the rounded bezel.
You will get a nicer fit if you use Baja Squadron-R Pro LED Light, which is dedicated for this install. With this being said, they are a bit more expensive but well worth it, I’m sure in the end.
Final Thoughts

Overall I like the way the BD squadrons look on the 4Runner. Either route you go with the Baja Squadrons, whether its the Baja Squadron Sport or the Baja Squadron-R Pro, you will be stoked on this mod.
Hope this helps anyone out there trying to tackle this Fog Light install on their 5th Gen 4Runner!
Did anyone install theirs and then the DRL stopped working?
Successful install! Thanks for being super detailed with your post!
Thanks for the write up. It saved me a lot of time as I was initially using BD’s instructions and realized they aren’t good.
That make a lot of sense. I imagine the bajas are constructed to withstand corrosion over time.
Yeah being off road oriented I’m sure they will be fine tucked into the bumper.
Hey, I live up North with a lot of snow, ice and salt. Any reason the 4Runner has a splash guard only on one side? Just curious, install of my Bajas on the a 17 Limited end of this October. Just worried about that splashgurad thing since I won’t be reinstalling it. You’d thing they have one for and engineered reason….
I recall reading that the splash guard is only on one side, the passenger side, to prevent windshield wiper fluid overflow/leaks from getting into the fog light/wiring.
Eric, not quite sure about that splash guard. Mine has been off for at least a year now and no major problems that I know of. Someone else can chime on this one for sure if they know why our Japanese friends planed that guard.
Thanks Brenan. That reassures me a bit.
If I’m not mistaken, look at the wheel well fender liners left to right. The pass side has a vent in it. So I would assume the splash guard on the light is just to keep water from splashing on the back of it.
Ill have to see if I can find the instructions but there was a 2″ x 2″ rubber foam square and the instructions said to cut into 4 pieces, and apply to the bracket tabs, then slide it into the bumper and bolt in. Must be a new thing, ill email baja on it
So using the BD instructions and this page I successfully installed mine but you never touched on the foam pieces that were included in the kit. Did yours come with it? Are they supposed to be mashed in between the tabs and the bumper or used to center the fog light in the mounting by forcing it outward? That padding is like an inch thick!
Eric, I think that foam is just a support for shipping? I don’t remember using any foam for the install. Do you want to email me a shot?
No night shots?????????
You can see the Pros in action here. Will update the post on the sports soon.
Cool write up. Did you have any guides to installing Pod lights + wiring? Extreme LED Stackerz
Not yet! If you would like to submit a guide, we will totally hook you up for that guide/overview.
Thank you for this. This helps out a lot. Baja Designs needs to put something like this in their instructions.
Bob,
Yeah, they sure do. I think every company should have a step by step install process on their instructions. The only company that I know for sure that includes the step by step images is C4 Fabrication. That post is here (c4 Fab Rock Sliders Install) but we shot our own.
Awesome site! Great info! Keep it up!
Rod,
Thanks, man! Appreciate it.