A lift kit is often one of the first mods that 4Runner owners choose, but it comes with a cost. By replacing the factory strut with one that’s several inches longer, all of the surrounding components are thrown out of alignment and the increased stress from misalignment can cause them to fail. The factory upper control arms (UCAs) are one of the most common failure points, but turning to an aftermarket one can prevent mechanical failure and mitigate the losses of installing a lift kit.
Tuff Country has produced a killer product that checks all of these boxes and more. Their build quality is exceptional and it is designed to handle the tuff-est of conditions. In this article, we’ll unpack this UCA and provide you with a step-by-step guide to install it on a 5th Gen Toyota 4Runner.
Table Of Contents
Product Overview
Tuff Country is a US-based company with a reputation for building quality suspension components for off-road vehicles. They make a variety of suspension systems for most 4WD models including— you guessed it— upper control arms. You can expect…
- Improve suspension travel (articulation increases by up to 35% over factory)
- Eliminate binding caused by factory ball joints
- Correct the geometry of the suspension in lifted vehicles (designed for 2-4″ lifts)
- Reduce stress caused by misalignment, leading to a lower chance of mechanical failure
- Last longer than factory ball-joints
- Improve on-road handling
Simply put, they will both improve your vehicle’s articulation off road and reduce stress in your drivetrain, keeping you out on the trails. These UCAs also boast the following features:
- Teflon-lined FK uniball joint (more on this later)
- Poly bushings with zerk fittings that allow for easy lubrication
- Gusseted connecting points for increased strength
- Powder-coated finish
- Limited lifetime warranty
- Made in the USA
And if that wasn’t enough, yes, it does come with a sticker.
We got these through Mudify.com – a trusted supplier of lifts kits and off-road accessories.
Uniball Vs. Ball Joint
If you’ve shopped for upper control arms, you’ve probably seen terms like “uni-ball” and “ball joint,” which both refer to the junction between the UCA and the steering knuckle. This junction needs to be able to flex as the wheels and tires travel over bumps, and as a result, they can become subject to a lot of mechanical stress. In case you’re unfamiliar with the two types, I’ll quickly break it down…
Your 4Runner, as well as most vehicles, come from the factory with a standard ball joint. Ball joints function similarly to a ball and socket joint, the kind in our shoulders and hips. Their motion is restricted by the socket portion of the joint, but still adequate for most applications. They are also completely sealed by a rubber casing, which protects dirt and grime from penetrating the joint and shortening its lifespan.
Uniball joints, on the other hand, are made from a spherical bearing encased partially in Teflon or a similar polymer. The spherical design allows uniballs to flex much further than ball joints without reaching the edge of their range of motion. However, the exposed portion of the uniball can easily collect dust and grime, which can become lodged in the joint if not maintained properly. Additionally, uniballs have a stronger construction than ball joints, which greatly reduces the likelihood of mechanical failure under the stress of off-roading.
For strictly on-road driving, the ball joints in the factory upper control arms are more than sufficient, and won’t require as much maintenance as a uniball UCA. However, if you take your vehicle on a moderately difficult trail with the factory UCAs, especially if you’ve modified the geometry of your suspension with a lift kit, you run the risk of damaging the ball joint or the UCA itself. For anyone who has lifted their 4Runner or frequently drives off-road, uniballs should be at the top of your list, as they will greatly improve handling, durability, and articulation over the factory ball joints. I fall into the second category.
Installation Guide
Difficulty: Moderate
Time & Assistance:
- Hours: 4, less if you’re mechanically inclined
- People: can be done with one, but a second set of hands really helps
Tools & Materials:
- Floor jack
- Jack stands
- Tire iron or impact wrench
- Socket/Ratchet set
- Wrench Set
- Torque wrench
- WD-40 or penetrating oil
- Lithium- or Moly-Base grease
- Grease gun
- Channel locks
- Trim removal tool
- Breaker bar
- Rubber mallet
Step 1. Preparation
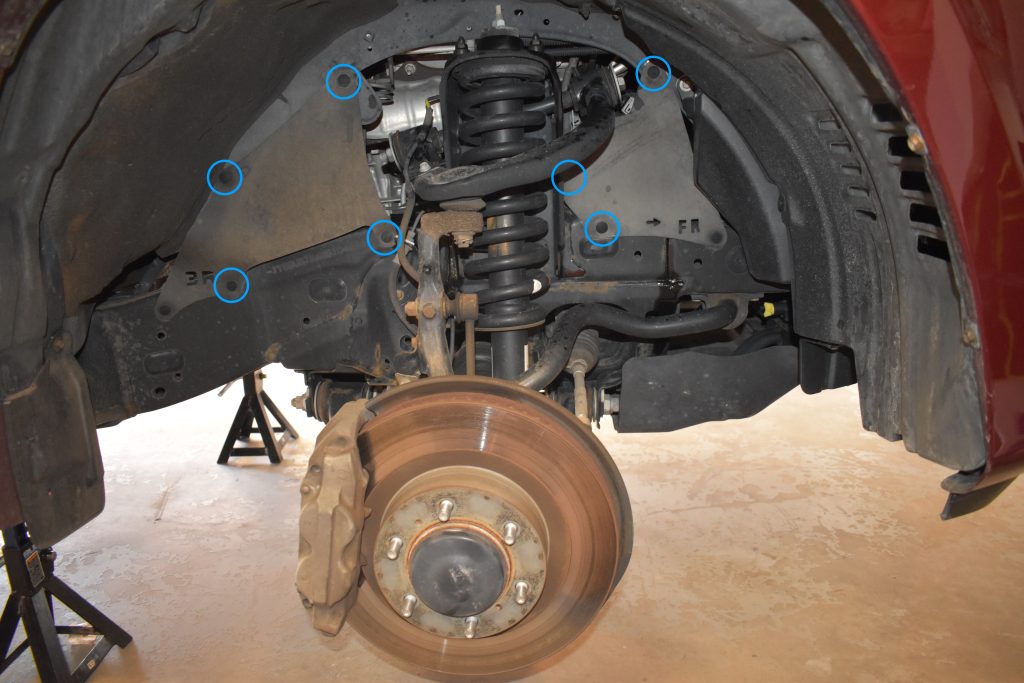
Before you can touch the UCAs, you’ll first need to jack up the front end of the vehicle and ensure it is safely placed on jack stands. I found the protruding circle on the rear engine skid to be an adequate jack point, and placed the jack on the frame on either side. After this, remove both front wheels/tires using a tire iron or impact wrench and a 21mm socket. Last, use a trim removal tool to disconnect the mudguards from the fender.
Step 2. Disconnect ABS Lines
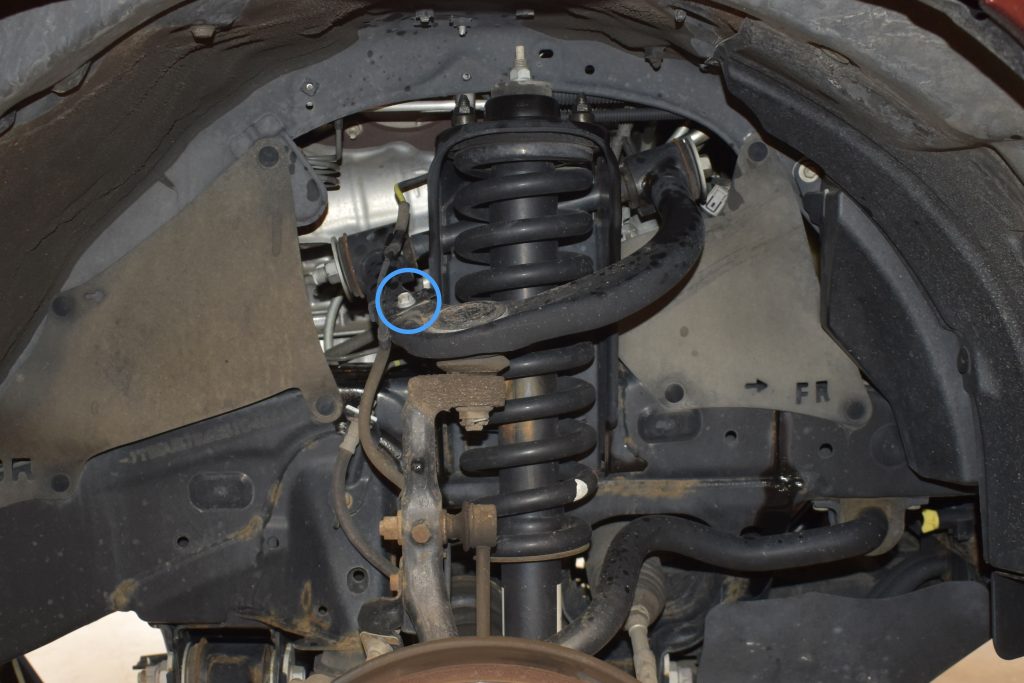
Now that the vehicle is prepared, we can turn our attention to the UCAs. You’ll notice that the ABS lines are attached to the factory one; it’ll be easiest to remove those now. Use a 10mm socket and ratchet to remove the bolt holding the line.
Step 3. Secure Steering Knuckle
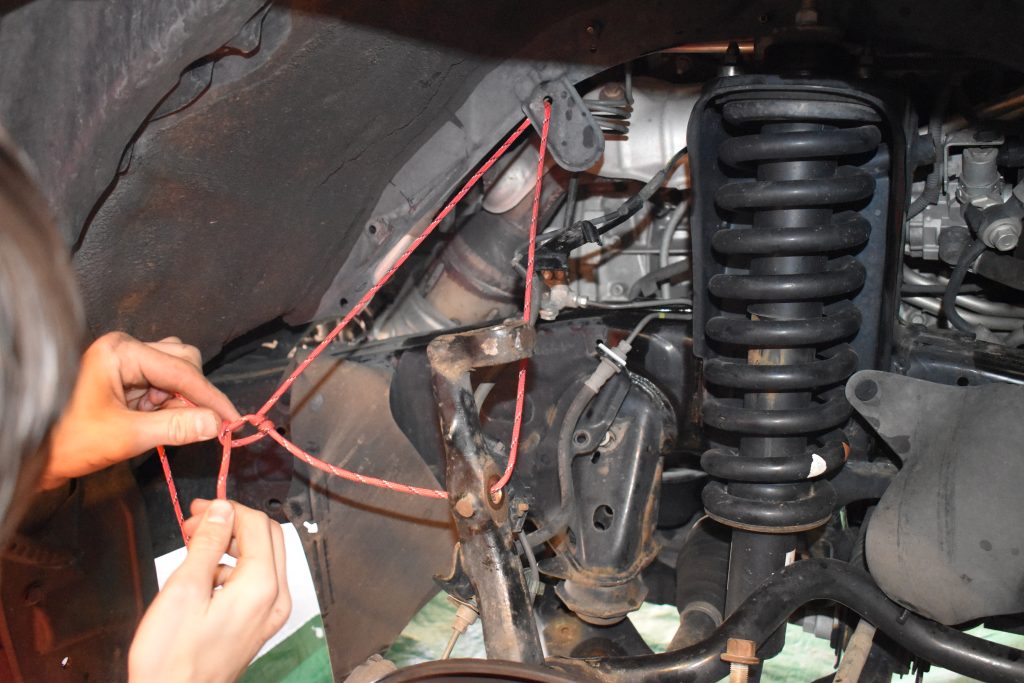
In the next step, we’ll disconnect the UCA from the steering knuckle, but before we do that, we need to secure the steering knuckle; at this point, the only thing holding up the steering/brake assembly is the upper control arm, so when we disconnect it, it’s going to drop down, which can easily stretch (and ruin) your ABS lines if the knuckle isn’t secured. So, if you don’t want your dash lighting up like a Christmas tree, I’d suggest placing a jack underneath the lower control arm and tying the steering knuckle to two points in the fender.
Step 4. Disconnect Steering Knuckle
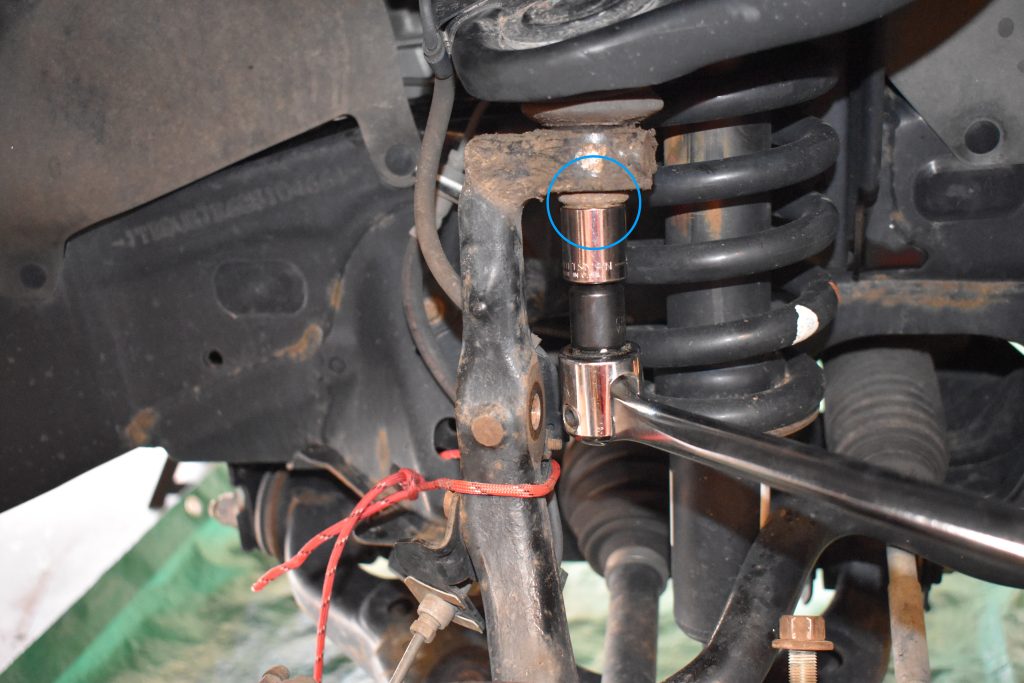
Using a breaker bar and a 19 mm socket, remove the crown nut at the top of the steering knuckle. If the UCA doesn’t immediately separate from the steering knuckle, tap either side of the assembly with a rubber mallet (or gently with a hammer) to break it loose. Some WD-40 or penetrating oil may also help.
Author’s Note: If your vehicle is like mine and has high mileage or rust, the steering knuckle may have corroded to the UCA, making it extremely difficult to separate. If this is the case, consider running to your local auto parts store and picking up a ball joint separator. It’ll set you back $20, but it’ll save you hours of swinging a hammer at your rig in frustration. Yes, I’m talking from experience.
Step 6. Remove Factory UCA
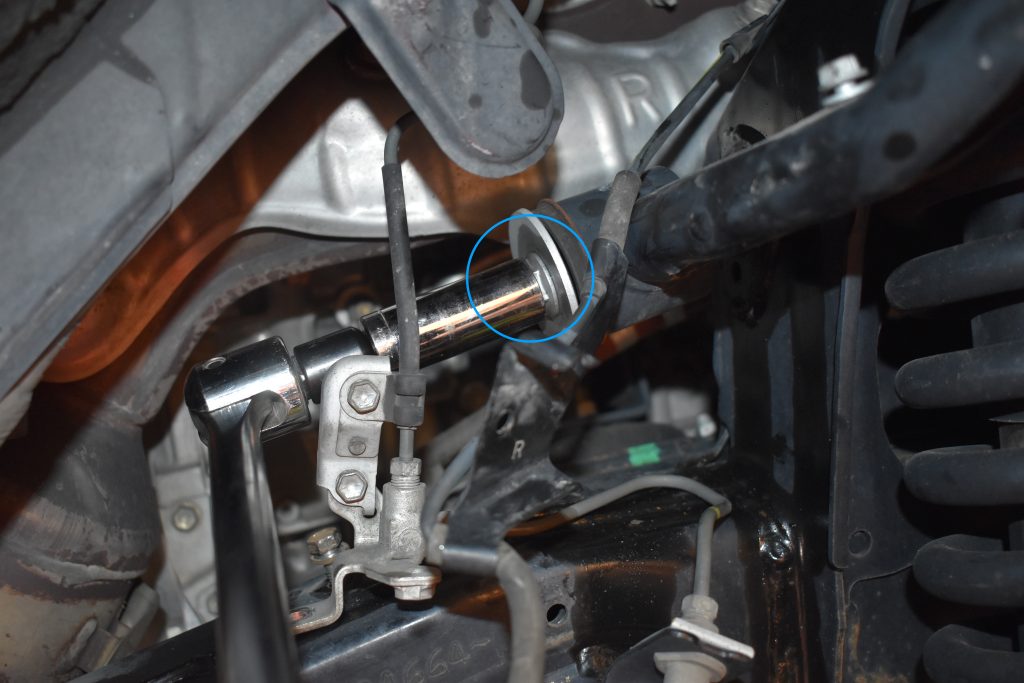
It’s time! Using a 19 mm breaker bar, break the bolt running through loose. Then, pop the hood and have a friend hold the wrench while you loosen the other end from inside the engine bay. On the passenger side, you may find that an AC line prevents you from completely removing the UCA bolt. If so, use a 10 mm to loosen the AC line bracket and gently push it out of the way while you remove the bolt.
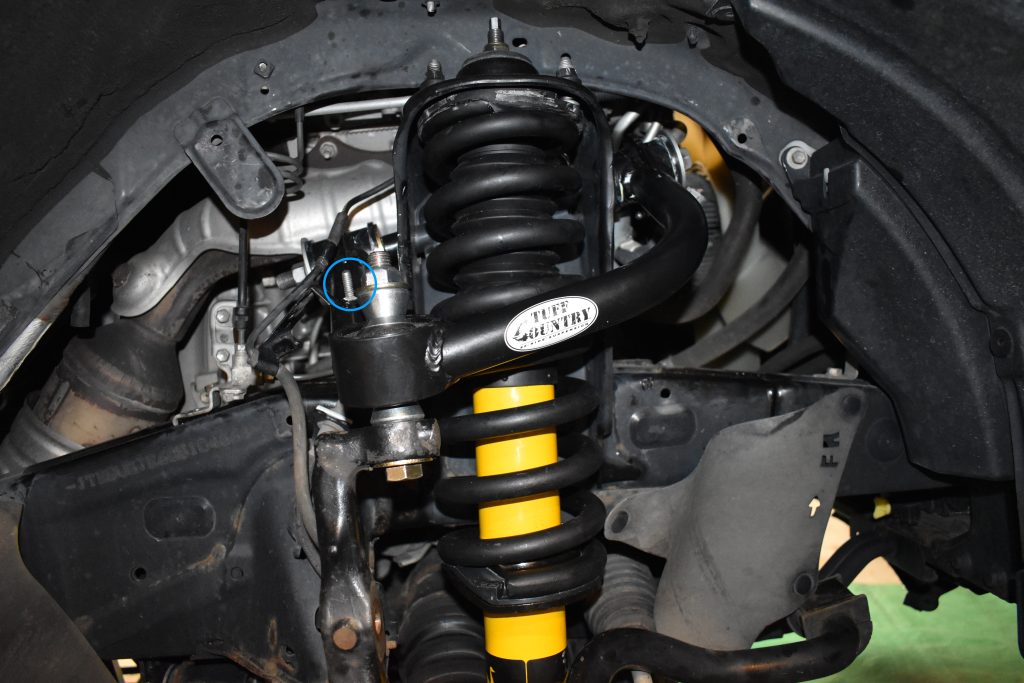
Author’s Note: If you’re also installing a lift kit, this is the time to pause the install and replace the front coilover. You may notice the different strut in the background after this point.
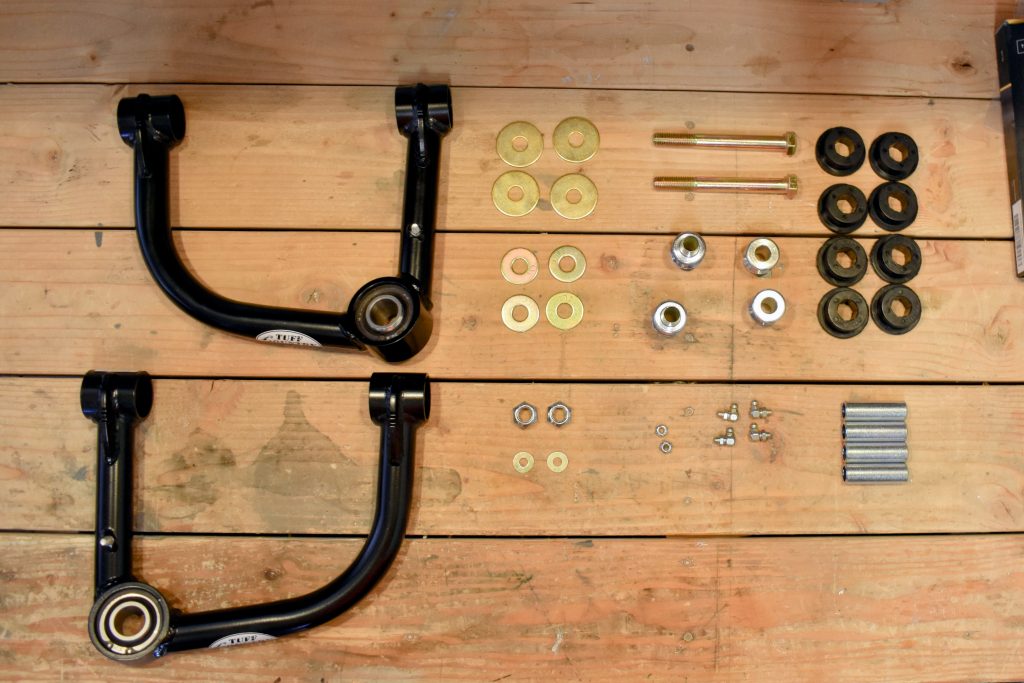
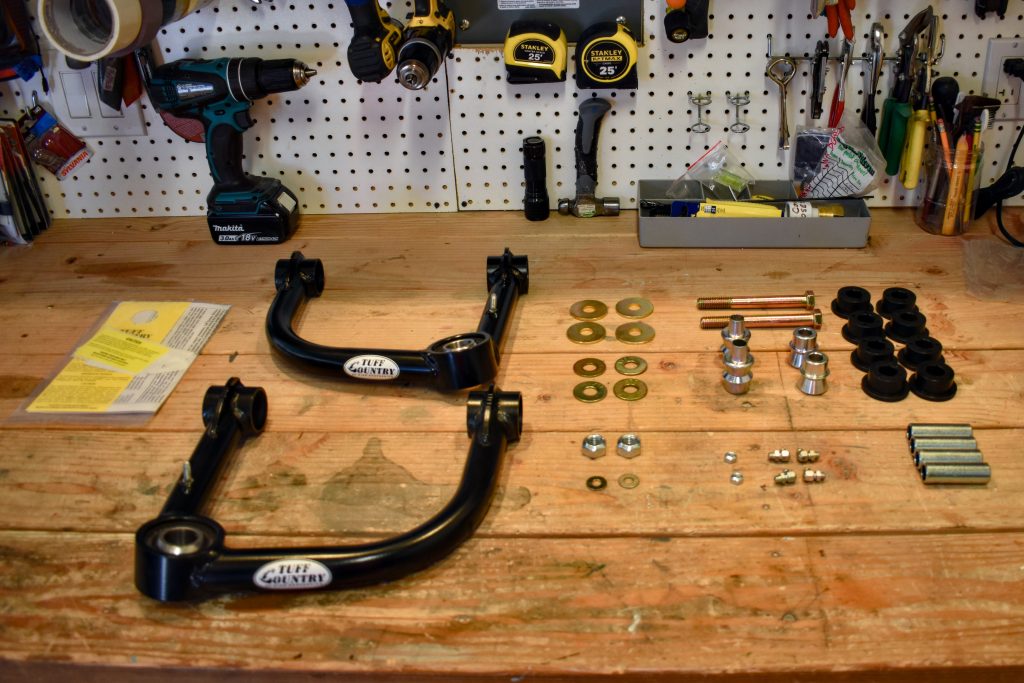
Step 7. Prep New UCA
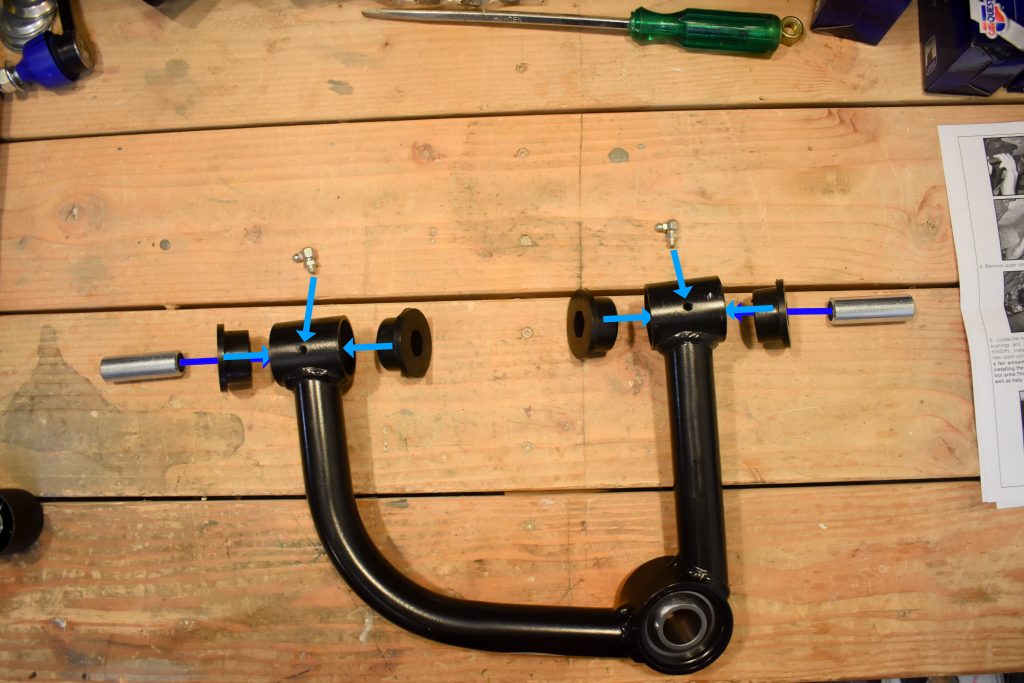
Before taking the UCAs to the rig, it helps to assemble them at a table or workbench. Using the diagram above as a guide, install the bushings and sleeves, ensuring to apply lithium- or moly-base grease generously. Then, screw the zerk fittings in, ensuring that the tips are oriented in such a way that they will be easily accessible with a grease gun when installed. I found that I needed a pair of channel locks to get the fittings past the first two threads. Once they are assembled, use a grease gun to lubricate everything through the zerk fittings.
Step 8. Install Tuff Country UCAs
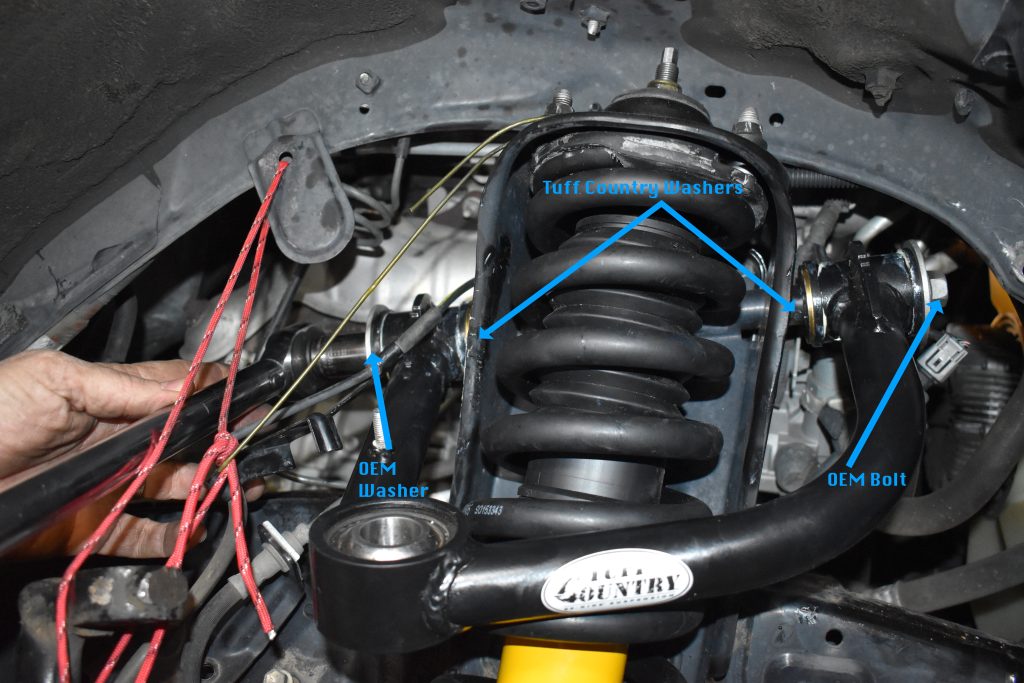
Make sure to use the new nut and fender washers provided by Tuff Country in the orientation seen in the diagram above. You’ll use the factory UCA bolt and will need to hold both ends with a wrench to tighten. Torque to 95 ft-lb using a 19 mm socket and a torque wrench. Don’t forget to re-attach that AC line bracket once you’ve finished feeding the bolt through the engine bay.
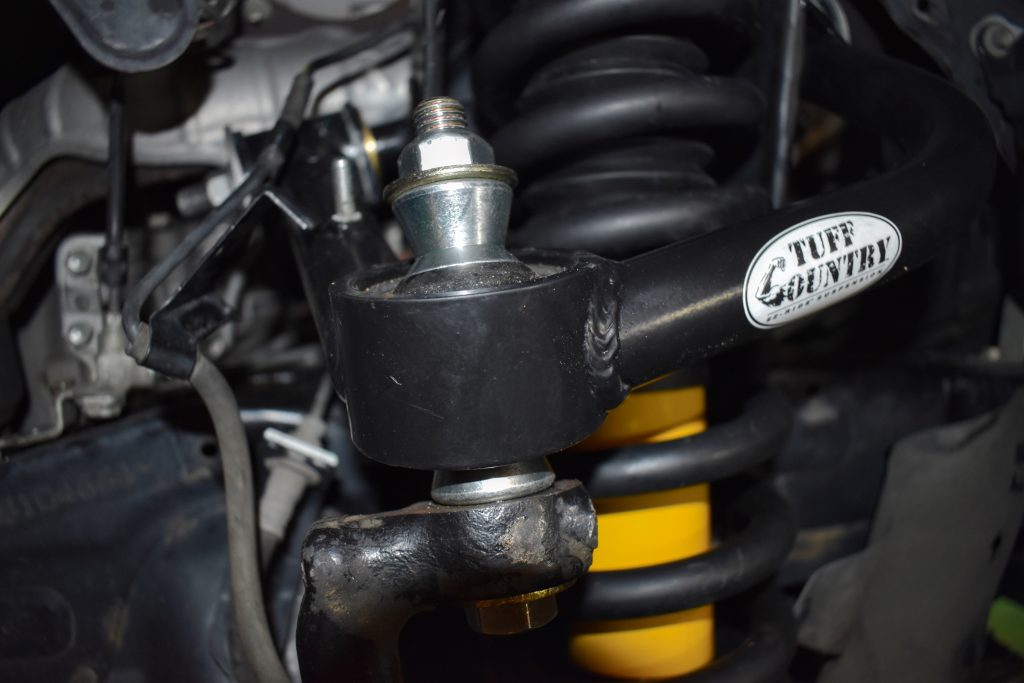
Step 9. Assemble Uniball
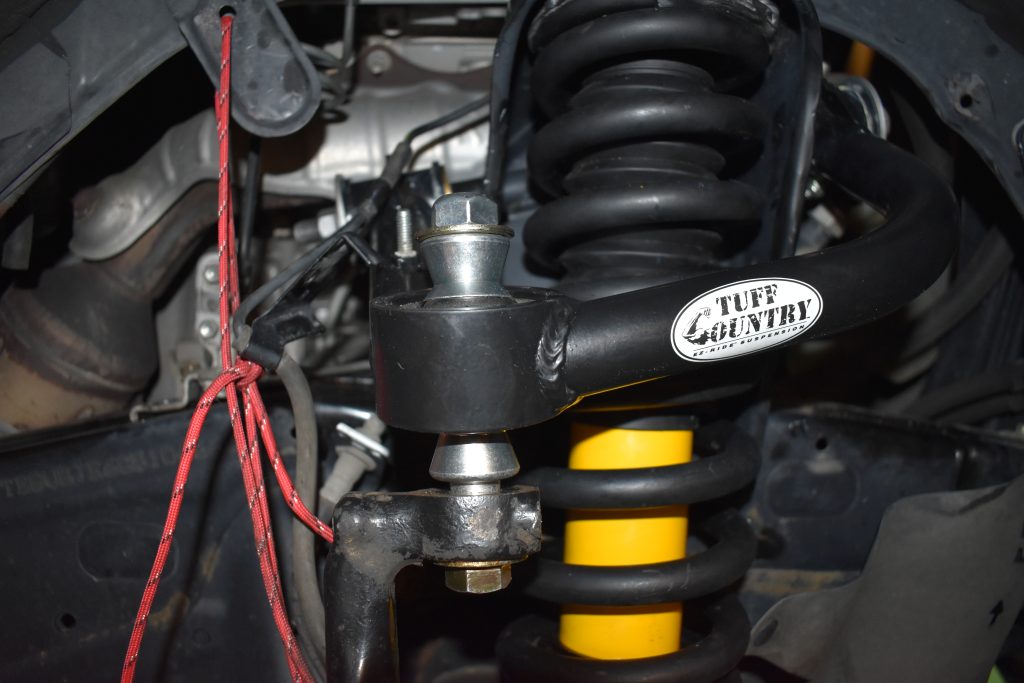
Using the remaining hardware provided by Tuff Country, assemble the uniball joint with the bolt pointing up from the bottom. The diagram above shows the order to orient the parts. Torque to 95 lb-ft using a 7/8″ socket and torque wrench for the top and a 13/16″ socket and wrench for the bottom.
Step 10. Reinstall ABS Lines
Using the provided nut, reinstall the ABS lines to the bolt protruding from the Tuff Country UCA. A 7/16″ wrench is the tool of choice here. Make sure not to overtighten, as this bolt will easily break if over-torqued. Talking from experience again…
Step 11. Reinstall Wheels & Tires
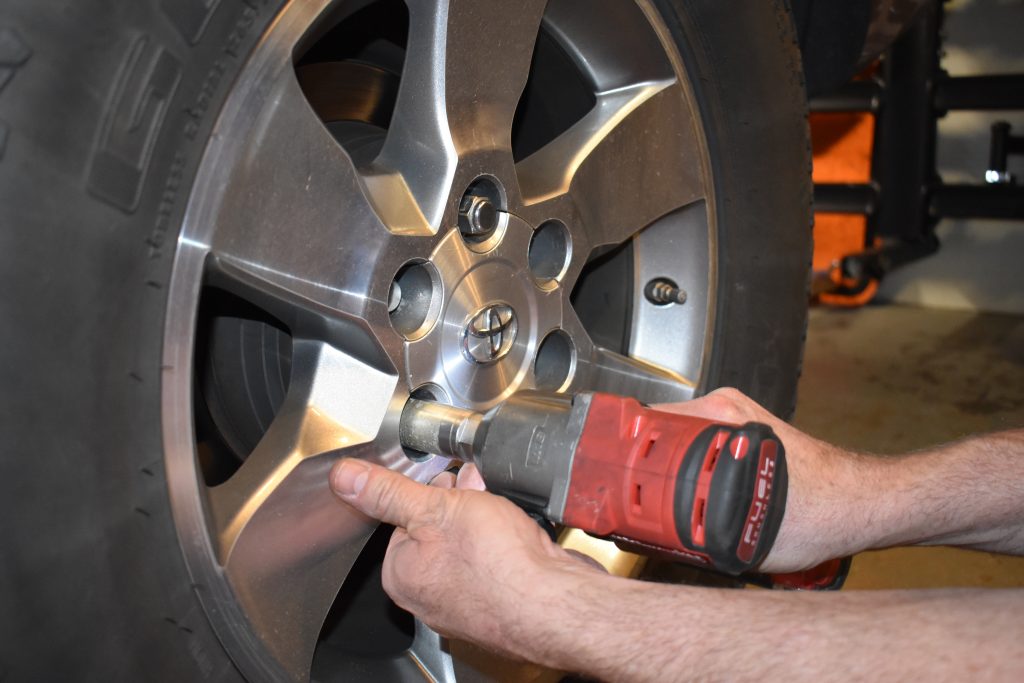
Repeat everything on the other side, and you’re about done! Just reinstall the mud flaps, mount the wheels/tires, and torque to 81 ft-lb with a torque wrench and a 21 mm socket. Then, raise the vehicle off the jack stands, and set it back on the ground.
Initial Impressions
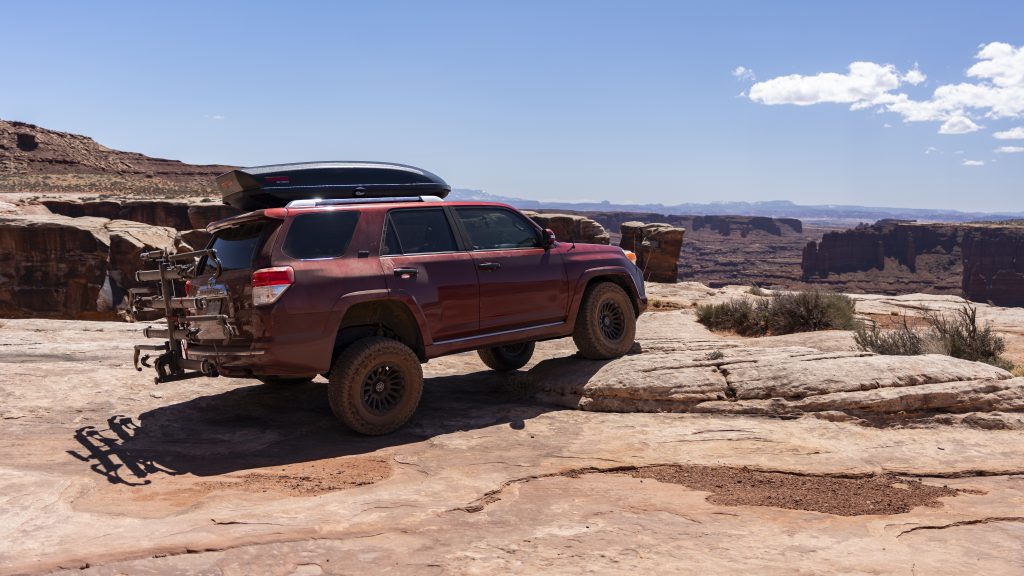
I’ve had these installed on my vehicle for about a month now, and it’s safe to say that I’m beyond impressed. Tuff Country’s UCAs corrected the geometry of my suspension after installing a three-inch lift kit. The handling feels comparable to factory, if not better, even with larger/heavier tires. Most of all, I feel so much more confident taking my 4Runner off-road, knowing that these are one less part I have to worry about failing.
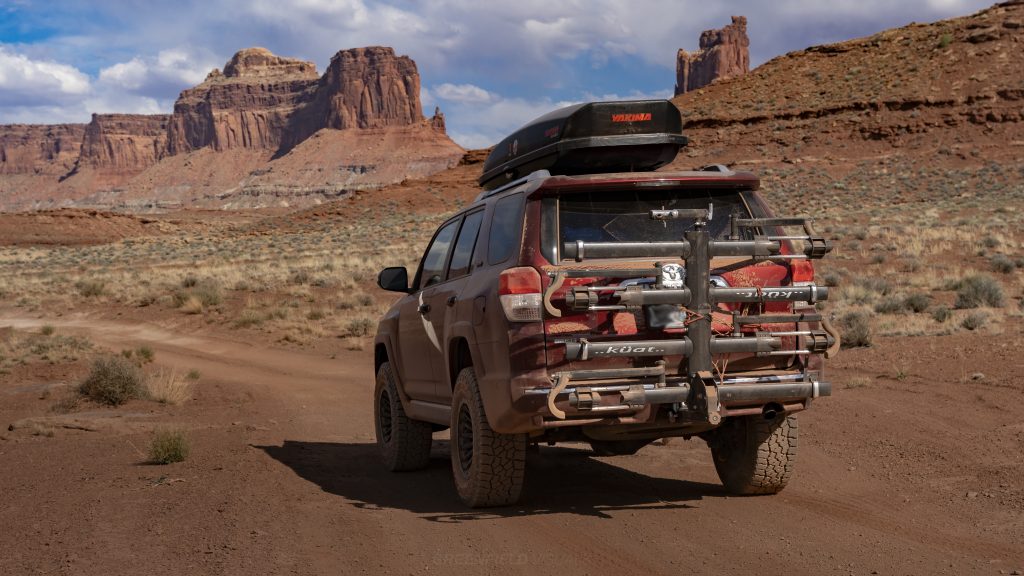
With over 150k miles on my rig, the seals on my factory ball joints had failed, which could’ve caused corrosion in the joint over time. Now, I can take on even flexier trails without worrying about the part failing or reaching the limits of its range of motion. On top of all of that, I can rest easy knowing that Tuff Country has a limited lifetime warranty on these. As I push my rig to the limits this summer, I’m stoked to see how they perform.
Final Thoughts
UCAs are almost a necessary complement to any lift kit for the 4Runner; installing a suspension lift without also installing one risks misalignment, undue stress to several parts, and mechanical failure. Among the many on the market, Tuff Country option stands out as an affordable, well-built, and tuff option. Installing them not only mitigates suspension-related issues but also improves handling and articulation.
As someone who drives my 4Runner as both a daily driver and an expedition platform, this was a perfect solution to accompany a lift kit. Few mods in the overland space offer such substantial improvements without some downside, but I can think of none beyond the time and cost of installation.
Are these available for stock to 1.5″ spacer lift?
They will work for that application as well, yes.
Does the lifetime warrantee cover failure of the ball joint due to corrosion caused by de-icing road salt?
It’s probably within reasonable daily use. I would think that it falls under the category of regular wear and tear (for any brand). At the price point too, I wouldn’t expect anything crazy. Not to say they won’t honor warranty. But you can’t just ask for a new BJ every time it fails. Uniballs (as mentioned in the article) require more maintenance. Can you prevent/slow down the degradation of the joint? For sure. But it happens to all of them. Just a matter of time.